 返回首页
返回首页
 回到顶部
回到顶部
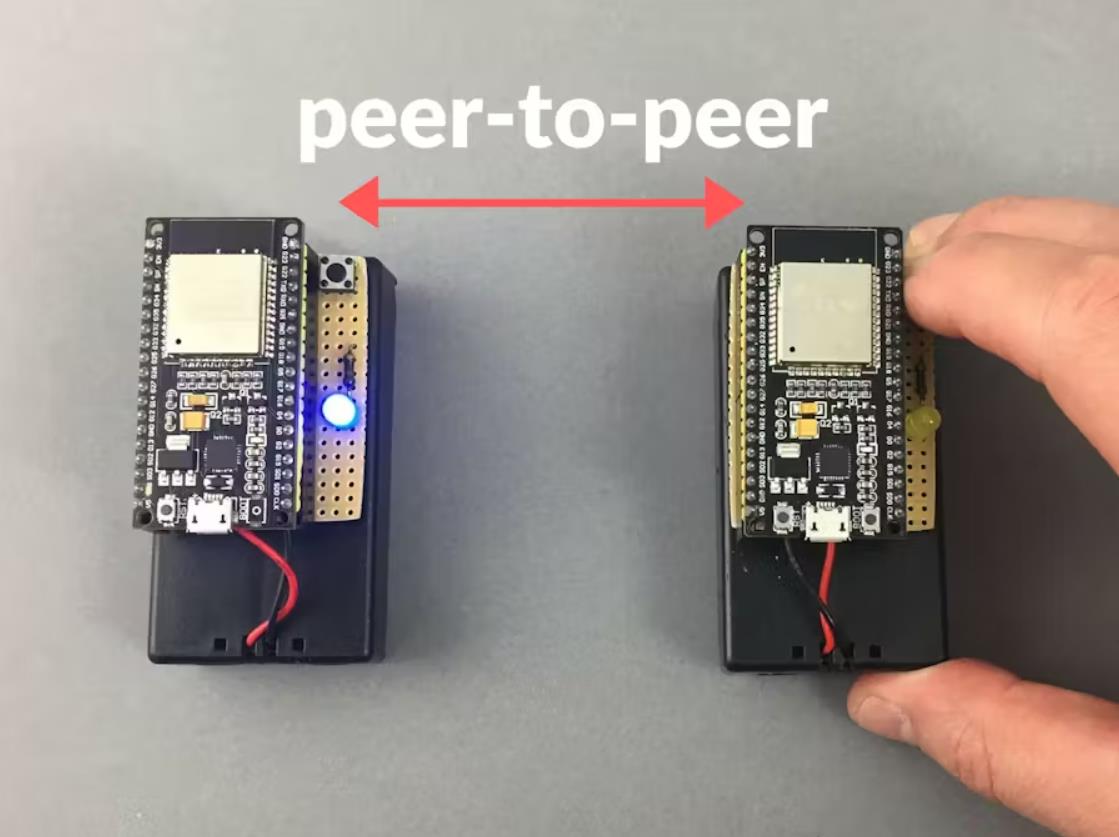
在设备之间建立安全、P2P、低延迟的连接。连接到第一个 ESP32 的按钮控制连接到第二个 ESP32 的 LED。一个简单的项目模板,演示如何在两个基于 ESP32 的设备之间建立连接。在 LAN 和 Internet 中均可工作。
【编辑:2021 年 7 月 9 日】该项目已得到改进、修复并从 ArduinoIDE 移植到 platformio。下面评论中的问题应该已经修复。
通常,互联项目具有某种 Web 或移动 UI。如果您想通过另一个事物控制一件事,尤其是通过低延迟和互联网,这很难实现。这就是我创建这个项目的原因。这是一个 Arduino 框架模板,向您展示如何通过 Internet 连接两个基于 ESP32 的开发板,在 Wi-Fi 连接断开或其中一个连接的开发板临时断电的情况下,通过自动恢复功能最大限度地减少延迟。很酷的是,如果 ESP32 板位于同一 Wi-Fi 网络中,并且位于不同的网络中,它就可以正常工作。即使在不同的大陆。
我们在这里描述的模板可以作为基于 ESP32 的项目的各种酷炫接口的基础,例如:
智能手套控制您的 RC 汽车
远程控制您的智能家居设备
安全且私密的 Wi-Fi 密钥到您家(当连接为 P2P 时,任何第三方都无法访问加密密钥)
一个非常快速的 Internet 按钮,可访问您的物品
以及更多、更多。
该模板的默认功能是通过 ESP32 板的按钮对 LED 进行双向控制。您还可以将此模板视为摩斯电码 Internet 通信器:)。请随意将代码替换为您需要的任何输入/输出作来控制按钮和 LED。
运作方式
ESP32 既可以用作 HTTP 服务器(基于 库),也可以用作 HTTP 客户端(基于 ESPAsyncWebServerAsyncTCP)
ESP32 会自动检测同一 Husarnet VPN 网络中的所有对等体
按下该按钮时,HTTP 请求将发送到所有其他对等体并打开 LED
释放按钮后,HTTP 请求将发送到所有其他对等体,并关闭 LED
Wi-Fi 任务
如果当前连接断开,则写入 Wi-Fi 任务以自动切换到另一个 Wi-Fi 网络。在配置部分,您可以对多个 Wi-Fi 网络凭证进行硬编码 - 这是一个舒适的解决方案,因为如果您在不同位置打开电路板,则无需重新编程电路板。
基本上,ESP32 设备之间的虚拟 LAN 网络是通过以下两条线路创建的:
Husarnet.join(husarnetJoinCode, hostNameX);
Husarnet.start();
Connection 也是完全加密、安全和私有的。它不仅可以在 LAN 中运行,还可以通过 Internet 运行,因为连接由 Husarnet 提供支持 - 一个开源 P2P VPN 客户端,它非常轻量级,不仅适用于普通计算机,也适用于 ESP32 微控制器。Husarnet 仅有助于通过 Internet 建立连接,用户数据不会由其服务器转发。因此延迟更低。
HTTP 服务器
// A dummy web server (see index.html)
server.on("/", HTTP_GET, [](AsyncWebServerRequest* request) {
request->send(200, "text/html", html);
});
// Send a GET request to
server.on("^\\/led\\/([0-9]+)\\/state\\/([0-9]+)$", HTTP_GET,
[] (AsyncWebServerRequest *request) {
String ledNumber = request->pathArg(0);
String state = request->pathArg(1);
digitalWrite(LED_PIN, state.toInt());
request->send(200, "text/plain", "LED: " + ledNumber + ", with state: " + state);
});
装配
在引脚 P0 和 GND 之间连接按钮
在引脚 27 和 GND 之间串联 LED 二极管和电阻器
将电池连接到基于 ESP32 的开发板。在该项目中,我们使用带有内置 LDO 的 ESP32 开发套件。查看基于 ESP32 的开发板时的最大输入电压电平,以避免损坏。
准备固件
从 GitHub 存储库克隆项目,然后按照以下步骤作:
1. 打开项目
从安装了 Platformio 扩展的 Visual Studio Code 打开项目文件夹
2. 配置您的项目(ESP32-to-ESP32.ino 文件)
获取您的 Husarnet VPN 加入代码(允许您将设备连接到同一个 VPN 网络)
您将在 https://app.husarnet.com
中找到您的加入代码 - > 单击所需的网络
- > 添加元素 按钮
- > 加入代码 选项卡
将您的 Husarnet 加入代码放在这里:
const char *husarnetJoinCode = "fc94:b01d:1803:8dd8:b293:5c7d:7639:932a/xxxxxxxxxxxxxxxxxxxxxx
在此处添加您的 Wi-Fi 网络凭证:
// WiFi credentials
const char* wifiNetworks[][2] = {
{"wifi-ssid-one", "wifi-pass-one"},
{"wifi-ssid-two", "wifi-pass-two"},
}
如果您的 ESP32 开发板是 ESP32 TTGO T Display,那么您可以通过第 14 行启用 LCD/TFT 显示:
#define ENABLE_TFT 1 //tested on TTGO T Display
将项目上传到 ESP32 开发板(所有开发板的代码相同)。
为两个 ESP32 模块供电并等待约 15 秒,让您的 ESP32 设备连接到 Wi-Fi 网络并建立 P2P 连接(在 LAN 和 Internet 中均可工作)。
就这样!我希望你会喜欢它。很高兴看到您的反馈。
项目代码
#include <WiFi.h>
#include <WiFiMulti.h>
#include <AsyncTCP.h>
#include <ESPAsyncWebServer.h>
#include <Husarnet.h>
#include <AceButton.h>

#include <SPI.h>
#include <TFT_eSPI.h>

#define ENABLE_TFT 1  // tested on TTGO T Display

#if ENABLE_TFT == 1

TFT_eSPI tft = TFT_eSPI();

#define LOG(f_, ...)                                                         \
  {                                                                          \
    if (tft.getCursorY() >= tft.height() || tft.getCursorY() == 0) {         \
      tft.fillScreen(TFT_BLACK);                                             \
      tft.setCursor(0, 0);                                                   \
      IPAddress myip = WiFi.localIP();                                       \
      tft.printf("IP: %u.%u.%u.%u\r\n", myip[0], myip[1], myip[2], myip[3]); \
      tft.printf("Hostname: %s\r\n--\r\n", Husarnet.getHostname().c_str());  \
    }                                                                        \
    tft.printf((f_), ##__VA_ARGS__);                                         \
    Serial.printf((f_), ##__VA_ARGS__);                                      \
  }
#else
#define LOG(f_, ...) \
  { Serial.printf((f_), ##__VA_ARGS__); }
#endif

/* =============== config section start =============== */
#if __has_include("credentials.h")
#include "credentials.h"
#else
/* to get your join code go to https://app.husarnet.com
   -> select network
   -> click "Add element"
   -> select "join code" tab

   Keep it secret!
*/
const char *husarnetJoinCode = "xxxxxxxxxxxxxxxxxxxxxx";
const char *dashboardURL = "default";

// WiFi credentials
const char* wifiNetworks[][2] = {
  {"wifi-ssid-one", "wifi-pass-one"},
  {"wifi-ssid-two", "wifi-pass-two"},
};

const char *hostname = "random";

#endif
/* =============== config section end =============== */

using namespace ace_button;

const int BUTTON_PIN = 0;
const int LED_PIN = 27;
const int PORT = 8001;

int ledState = 0;

// Push button
AceButton btn(BUTTON_PIN);
void handleButtonEvent(AceButton *, uint8_t, uint8_t);

// you can provide credentials to multiple WiFi networks
WiFiMulti wifiMulti;

// store index.html content in html constant variable (platformio feature)
extern const char index_html_start[] asm("_binary_src_index_html_start");
const String html = String((const char*)index_html_start);
AsyncWebServer server(PORT);

// Task functions
void taskWifi(void *parameter);

void setup() {
  Serial.begin(115200);

#if ENABLE_TFT == 1
  tft.init();
  tft.setRotation(0);
  tft.fillScreen(TFT_BLACK);
  tft.setTextColor(TFT_WHITE, TFT_BLACK);
  tft.setTextSize(1);
#endif

  // LED and Button config
  pinMode(BUTTON_PIN, INPUT_PULLUP);
  btn.setEventHandler(handleButtonEvent);

  pinMode(LED_PIN, OUTPUT);
  digitalWrite(LED_PIN, LOW);

  // Save Wi-Fi credentials
  for (int i = 0; i < (sizeof(wifiNetworks)/sizeof(wifiNetworks[0])); i++) {
    wifiMulti.addAP(wifiNetworks[i][0], wifiNetworks[i][1]);
    Serial.printf("WiFi %d: SSID: \"%s\" ; PASS: \"%s\"\r\n", i, wifiNetworks[i][0], wifiNetworks[i][1]);
  }

  // Husarnet VPN configuration
  Husarnet.selfHostedSetup(dashboardURL);
  Husarnet.join(husarnetJoinCode, hostname);

  // A dummy web server (see index.html)
  server.on("/", HTTP_GET, [](AsyncWebServerRequest* request) {
    request->send(200, "text/html", html);
  });

  // Send a GET request to <IP>/led/<number>/state/<0 or 1>
  server.on("^\\/led\\/([0-9]+)\\/state\\/([0-9]+)$", HTTP_GET, [] (AsyncWebServerRequest *request) {
    String ledNumber = request->pathArg(0); // currently unused - we use only a predefined LED number
    String state = request->pathArg(1);

    digitalWrite(LED_PIN, state.toInt());
    request->send(200, "text/plain", "LED: " + ledNumber + ", with state: " + state);
  });

  xTaskCreate(taskWifi,   /* Task function. */
              "taskWifi", /* String with name of task. */
              10000,      /* Stack size in bytes. */
              NULL,       /* Parameter passed as input of the task */
              1,          /* Priority of the task. */
              NULL);      /* Task handle. */
}

void loop() {
  while (1) {
    btn.check();
    delay(1);
  }
}

void taskWifi(void *parameter) {
  uint8_t stat = WL_DISCONNECTED;

  while (stat != WL_CONNECTED) {
    stat = wifiMulti.run();
    Serial.printf("WiFi status: %d\r\n", (int)stat);
    delay(100);
  }

  Serial.printf("WiFi connected\r\n");

  // Start Husarnet VPN Client
  Husarnet.start();

  // Start HTTP server
  server.begin();

  LOG("READY!\r\n");

  while (1) {
    while (WiFi.status() == WL_CONNECTED) {
      delay(500);
    }
    LOG("WiFi disconnected, reconnecting\r\n");
    delay(500);
    stat = wifiMulti.run();
    LOG("WiFi status: %d\r\n", (int)stat);
  }
}

void handleButtonEvent(AceButton *button, uint8_t eventType, uint8_t buttonState) {
  ledState = (buttonState==1?0:1);

  for (auto const &host : Husarnet.listPeers()) {
    IPv6Address peerAddr = host.first;
    if(host.second == "master") {
      ;
    } else {
      AsyncClient* client_tcp = new AsyncClient;

      client_tcp->onConnect([](void *arg, AsyncClient *client) {
        String requestURL = "/led/1/state/" + String(ledState);
        String GETreq = String("GET ") + requestURL + " HTTP/1.1\r\n" + "Host: esp32\r\n" + "Connection: close\r\n\r\n";

        if ( client->canSend() && (client->space() > GETreq.length())){
          client->add(GETreq.c_str(), strlen(GETreq.c_str()));
	        client->send();
        } else {
          Serial.printf("\r\nSENDING ERROR!\r\n");
        }
      }, client_tcp);

      client_tcp->onData([](void *arg, AsyncClient *client, void *data, size_t len) {
        Serial.printf("\r\nResponse from %s\r\n", client->remoteIP().toString().c_str());
	      Serial.write((uint8_t *)data, len);
        client->close();
      }, client_tcp);

      client_tcp->onDisconnect([](void* arg, AsyncClient* client) {
        Serial.println("[CALLBACK] discconnected");
        delete client;
      }, client_tcp);

      client_tcp->onError([](void* arg, AsyncClient* client, int8_t error) {
        Serial.printf("[CALLBACK] error: %d\r\n", error);
      }, NULL);

      client_tcp->onTimeout([](void* arg, AsyncClient* client, uint32_t time) {
        Serial.println("[CALLBACK] ACK timeout");
      }, NULL);

      client_tcp->connect(peerAddr, PORT);

      LOG("Sending HTTP req to:\r\n%s:\r\n%s\r\n\r\n", host.second.c_str(), host.first.toString().c_str());
    }
  }
}
【Arduino 动手做】使用Arduino框架的ESP32到ESP32通信示例
项目链接:https://www.hackster.io/donowak/esp32-to-esp32-communication-over-the-internet-9799df
项目作者:多米尼克
项目视频 :https://www.youtube.com/watch?v=DRsfMmTfyeo
项目代码:https://github.com/DominikN/ESP32-to-ESP32


 他的勋章
他的勋章

评论