 返回首页
返回首页
 回到顶部
回到顶部
Beetle 树莓派RP2350 - 数字识别
本文介绍了 DFRobot Beetle RP2350 开发板结合 MNIST 数据集和串口通信,实现网页手写数字识别的项目设计。
项目介绍
准备工作:MNIST 数据集和Python库安装等;
模型训练:通过电脑主机训练 MNIST 数据集,获取轻量化权重;
工程代码:包括板端执行代码和网页设计代码;
效果演示:运行程序和网页,完成手写数字识别效果演示。
准备工作
下载 MNIST 数据集文件:MNIST数据集 - GitCode .
电脑主机安装 Python 软件,安装推理所需扩展库,如 numpy ;
开发板上传 *.uf2 固件,用于 MicroPython 开发;
硬件连接
示意图
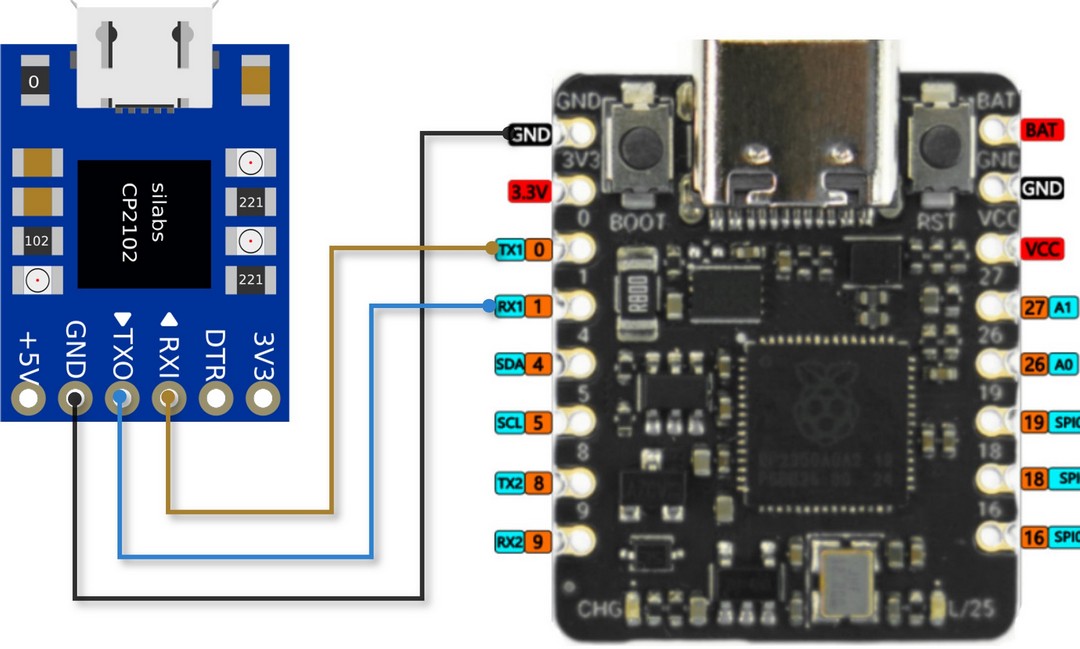
| RP2350 | USB to TTL | Note |
|---|---|---|
| TXD (Pin0) | RXD | Transmite |
| RXD (Pin1) | TXD | Receive |
| GND | GND | Ground |
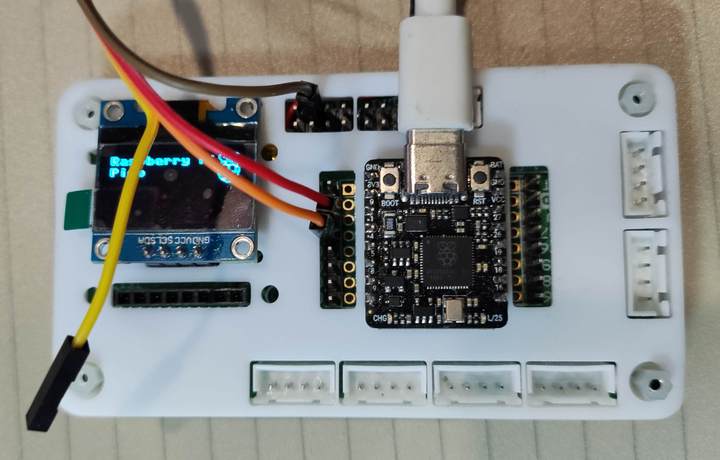
实物图
模型训练
创建 train_tiny_model.py 文件,添加如下代码
# train_tiny_model.py
import numpy as np
import json
import os
def load_mnist_local():
"""直接加载本地的MNIST文件"""
# 检查文件是否存在
train_images_file = 'train-images.idx3-ubyte'
train_labels_file = 'train-labels.idx1-ubyte'
test_images_file = 't10k-images.idx3-ubyte'
test_labels_file = 't10k-labels.idx1-ubyte'
files = [train_images_file, train_labels_file, test_images_file, test_labels_file]
missing_files = [f for f in files if not os.path.exists(f)]
if missing_files:
print(f"❌ 缺少文件: {missing_files}")
print("请确保以下文件在当前目录:")
print("- train-images.idx3-ubyte")
print("- train-labels.idx1-ubyte")
print("- t10k-images.idx3-ubyte")
print("- t10k-labels.idx1-ubyte")
return None
print("✅ 找到所有MNIST文件,开始加载...")
try:
# 加载训练图像
with open(train_images_file, 'rb') as f:
magic = int.from_bytes(f.read(4), 'big')
num_images = int.from_bytes(f.read(4), 'big')
rows = int.from_bytes(f.read(4), 'big')
cols = int.from_bytes(f.read(4), 'big')
x_train = np.frombuffer(f.read(), dtype=np.uint8).reshape(num_images, rows, cols)
print(f"训练图像: {x_train.shape}")
# 加载训练标签
with open(train_labels_file, 'rb') as f:
magic = int.from_bytes(f.read(4), 'big')
num_labels = int.from_bytes(f.read(4), 'big')
y_train = np.frombuffer(f.read(), dtype=np.uint8)
print(f"训练标签: {y_train.shape}")
# 加载测试图像
with open(test_images_file, 'rb') as f:
magic = int.from_bytes(f.read(4), 'big')
num_images = int.from_bytes(f.read(4), 'big')
rows = int.from_bytes(f.read(4), 'big')
cols = int.from_bytes(f.read(4), 'big')
x_test = np.frombuffer(f.read(), dtype=np.uint8).reshape(num_images, rows, cols)
print(f"测试图像: {x_test.shape}")
# 加载测试标签
with open(test_labels_file, 'rb') as f:
magic = int.from_bytes(f.read(4), 'big')
num_labels = int.from_bytes(f.read(4), 'big')
y_test = np.frombuffer(f.read(), dtype=np.uint8)
print(f"测试标签: {y_test.shape}")
return (x_train, y_train), (x_test, y_test)
except Exception as e:
print(f"❌ 文件加载错误: {e}")
return None
class TinyNN:
def __init__(self, input_size=784, hidden_size=8, output_size=10):
# 极简模型: 784 -> 8 -> 10
np.random.seed(42)
self.w1 = np.random.randn(input_size, hidden_size) * 0.1
self.b1 = np.zeros(hidden_size)
self.w2 = np.random.randn(hidden_size, output_size) * 0.1
self.b2 = np.zeros(output_size)
def relu(self, x):
return np.maximum(0, x)
def softmax(self, x):
exp_x = np.exp(x - np.max(x, axis=1, keepdims=True))
return exp_x / np.sum(exp_x, axis=1, keepdims=True)
def forward(self, x):
self.layer1 = x @ self.w1 + self.b1
self.layer1_act = self.relu(self.layer1)
self.output = self.layer1_act @ self.w2 + self.b2
return self.softmax(self.output)
def predict(self, x):
probabilities = self.forward(x)
return np.argmax(probabilities, axis=1)
def train(self, x, y, learning_rate=0.1, epochs=5):
num_samples = x.shape[0]
for epoch in range(epochs):
# 随机打乱
indices = np.random.permutation(len(x))
x_shuffled = x[indices]
y_shuffled = y[indices]
total_loss = 0
batches = 0
for i in range(0, len(x_shuffled), 128):
batch_x = x_shuffled[i:i+128]
batch_y = y_shuffled[i:i+128]
# 前向传播
output = self.forward(batch_x)
loss = -np.log(output[np.arange(len(batch_y)), batch_y])
total_loss += np.mean(loss)
# 简化反向传播
output_error = output.copy()
output_error[np.arange(len(batch_y)), batch_y] -= 1
output_error /= len(batch_y)
grad_w2 = self.layer1_act.T @ output_error
grad_b2 = np.sum(output_error, axis=0)
hidden_error = (output_error @ self.w2.T) * (self.layer1_act > 0)
grad_w1 = batch_x.T @ hidden_error
grad_b1 = np.sum(hidden_error, axis=0)
self.w2 -= learning_rate * grad_w2
self.b2 -= learning_rate * grad_b2
self.w1 -= learning_rate * grad_w1
self.b1 -= learning_rate * grad_b1
batches += 1
# 计算精度
train_pred = self.predict(x[:1000])
train_acc = np.mean(train_pred == y[:1000])
test_pred = self.predict(x_test[:1000])
test_acc = np.mean(test_pred == y_test[:1000])
avg_loss = total_loss / batches
print(f"Epoch {epoch+1}/{epochs}, 损失: {avg_loss:.4f}, 训练精度: {train_acc:.3f}, 测试精度: {test_acc:.3f}")
def save_tiny_weights(model, filename='weights_tiny.json'):
"""保存极简模型权重"""
# 直接使用列表格式,不保留小数位
weights = {
'w1': [[round(float(x), 4) for x in row] for row in model.w1.tolist()],
'b1': [round(float(x), 4) for x in model.b1.tolist()],
'w2': [[round(float(x), 4) for x in row] for row in model.w2.tolist()],
'b2': [round(float(x), 4) for x in model.b2.tolist()]
}
with open(filename, 'w') as f:
json.dump(weights, f, separators=(',', ':')) # 最小化JSON格式
size = os.path.getsize(filename)
total_params = model.w1.size + model.b1.size + model.w2.size + model.b2.size
print(f"✅ 极简模型权重保存到 {filename}")
print(f"📊 参数总量: {total_params}")
print(f"💾 文件大小: {size} 字节")
if __name__ == "__main__":
print("=== 训练极简模型 (784->8->10) ===")
data = load_mnist_local()
if data is None:
exit()
(x_train, y_train), (x_test, y_test) = data
x_train = x_train.reshape(-1, 784).astype(np.float32) / 255.0
x_test = x_test.reshape(-1, 784).astype(np.float32) / 255.0
# 创建极简模型
model = TinyNN(hidden_size=8) # 只有8个隐藏神经元!
print("🚀 开始训练极简模型...")
model.train(x_train, y_train, epochs=5)
# 最终测试
test_pred = []
for i in range(0, len(x_test), 100):
batch_pred = model.predict(x_test[i:i+100])
test_pred.extend(batch_pred)
final_acc = np.mean(np.array(test_pred) == y_test[:len(test_pred)])
print(f"🎯 最终测试精度: {final_acc:.3f}")
# 保存权重
save_tiny_weights(model)
保存代码;
终端执行 python train_tiny_model.py 指令,运行程序;

生成大小为 48KB 的 weight_tiny.json 权重文件。
工程代码
Thonny IDE 新建文件,添加如下代码
# main.py
import json
import math
import time
from machine import UART, Pin
class FixedTinyNN:
def __init__(self, weights_file='weights_tiny.json'):
self.load_weights(weights_file)
def load_weights(self, filename):
try:
with open(filename, 'r') as f:
weights = json.load(f)
self.w1 = weights['w1']
self.b1 = weights['b1']
self.w2 = weights['w2']
self.b2 = weights['b2']
print("✅ 权重加载成功")
except Exception as e:
print(f"❌ 权重加载失败: {e}")
self._create_backup_weights()
def _create_backup_weights(self):
# 简化的备份权重
self.w1 = [[0.01] * 8 for _ in range(784)]
self.b1 = [0.0] * 8
self.w2 = [[0.1 if j == i % 8 else 0.0 for i in range(10)] for j in range(8)]
self.b2 = [0.0] * 10
print("🔄 使用备用权重")
def predict(self, pixels):
"""预测手写数字"""
if len(pixels) != 784:
return 0, [0.1] * 10
# 像素归一化
normalized = [p / 255.0 for p in pixels]
# 第一层: 784 -> 8
hidden = [0.0] * 8
for j in range(8):
total = 0.0
for i in range(784):
total += normalized[i] * self.w1[i][j]
hidden[j] = max(0.0, total + self.b1[j])
# 第二层: 8 -> 10
output = [0.0] * 10
for k in range(10):
total = 0.0
for j in range(8):
total += hidden[j] * self.w2[j][k]
output[k] = total + self.b2[k]
# Softmax
max_val = max(output)
exp_sum = sum(math.exp(o - max_val) for o in output)
probabilities = [math.exp(o - max_val) / exp_sum for o in output]
prediction = probabilities.index(max(probabilities))
return prediction, probabilities
def safe_int_convert(value, default=0):
"""安全地将值转换为整数"""
try:
# 移除可能的空白字符和非数字字符
cleaned = value.strip()
if not cleaned:
return default
return int(cleaned)
except (ValueError, TypeError):
return default
def parse_pixel_data(data_line):
"""安全地解析像素数据"""
pixels = []
# 移除可能的"pixels:"前缀
if data_line.startswith('pixels:'):
data_line = data_line[7:]
# 分割数据
parts = data_line.split(',')
for part in parts:
pixel_value = safe_int_convert(part)
pixels.append(pixel_value)
# 如果已经收集了784个像素,就停止
if len(pixels) >= 784:
break
# 如果像素数量不足,用0填充
while len(pixels) < 784:
pixels.append(0)
return pixels[:784] # 确保正好784个像素
def main():
# 初始化UART
uart = UART(0, baudrate=115200, tx=Pin(0), rx=Pin(1))
uart.init(baudrate=115200, bits=8, parity=None, stop=1, timeout=100)
# 初始化模型
model = FixedTinyNN('weights_tiny.json')
print("🎯 修复版数字识别系统就绪")
print("📡 等待UART数据输入...")
buffer = ""
error_count = 0
success_count = 0
while True:
try:
# 读取UART数据
if uart.any():
data = uart.read()
if data:
try:
buffer += data.decode('utf-8')
except UnicodeDecodeError:
# 处理解码错误
buffer = ""
error_count += 1
if error_count % 10 == 0:
print(f"⚠️ 解码错误计数: {error_count}")
continue
# 处理完整的行
while '\n' in buffer:
line_end = buffer.find('\n')
line = buffer[:line_end].strip()
buffer = buffer[line_end + 1:]
if not line:
continue
print(f"📨 收到数据: {line[:60]}{'...' if len(line) > 60 else ''}")
# 检查是否为像素数据(包含逗号)
if ',' in line:
try:
# 安全解析像素数据
pixels = parse_pixel_data(line)
if len(pixels) == 784:
# 进行预测
start_time = time.ticks_ms()
prediction, probabilities = model.predict(pixels)
confidence = max(probabilities)
inference_time = time.ticks_diff(time.ticks_ms(), start_time)
# 发送结果
result_lines = [
f"识别结果: 数字 {prediction}",
f"置信度: {confidence:.1%}",
f"推理时间: {inference_time}ms",
f"RESULT:{prediction}:{confidence:.3f}"
]
for result_line in result_lines:
uart.write(result_line + '\n')
success_count += 1
print(f"✅ 识别成功: 数字{prediction}, 置信度{confidence:.1%}, 时间{inference_time}ms")
print(f"📊 成功计数: {success_count}")
else:
uart.write(f"错误: 像素数量不正确 ({len(pixels)}/784)\n")
print(f"❌ 像素数量错误: {len(pixels)}/784")
except Exception as e:
error_count += 1
uart.write(f"错误: 数据处理失败 - {str(e)[:50]}\n")
print(f"❌ 处理错误 #{error_count}: {e}")
# 处理命令
elif line == "test":
# 测试命令
test_pixels = [0] * 784
# 创建一个简单的数字1测试图像
for i in range(28):
test_pixels[i * 28 + 12] = 200
test_pixels[i * 28 + 13] = 255
test_pixels[i * 28 + 14] = 200
prediction, probabilities = model.predict(test_pixels)
confidence = max(probabilities)
uart.write(f"测试结果: 数字 {prediction} (应该为1)\n")
uart.write(f"测试置信度: {confidence:.1%}\n")
print(f"🧪 测试完成: 数字{prediction}, 置信度{confidence:.1%}")
elif line == "info":
# 信息命令
info_lines = [
"系统信息:",
"- 模型: 极简神经网络 (784->8->10)",
"- 通信: UART0 (GPIO0/1)",
"- 波特率: 115200",
f"- 成功识别: {success_count} 次",
f"- 错误计数: {error_count} 次"
]
for info_line in info_lines:
uart.write(info_line + '\n')
elif line == "reset":
# 重置计数
success_count = 0
error_count = 0
uart.write("计数器已重置\n")
print("🔄 计数器重置")
elif line in ["help", "?"]:
# 帮助命令
help_lines = [
"可用命令:",
"- 像素数据: 784个逗号分隔的数字 (0-255)",
"- 'test': 运行测试识别",
"- 'info': 显示系统信息",
"- 'reset': 重置计数器",
"- 'help': 显示此帮助"
]
for help_line in help_lines:
uart.write(help_line + '\n')
else:
uart.write(f"未知命令: {line}\n")
uart.write("输入 'help' 查看可用命令\n")
except KeyboardInterrupt:
print("\n👋 程序退出")
break
except Exception as e:
error_count += 1
print(f"💥 系统错误 #{error_count}: {e}")
time.sleep(1) # 错误时暂停一下
# 短暂休眠以减少CPU使用
time.sleep(0.01)
if __name__ == "__main__":
main()
保存代码。
网页设计
电脑端新建 index.html 文件,添加如下代码
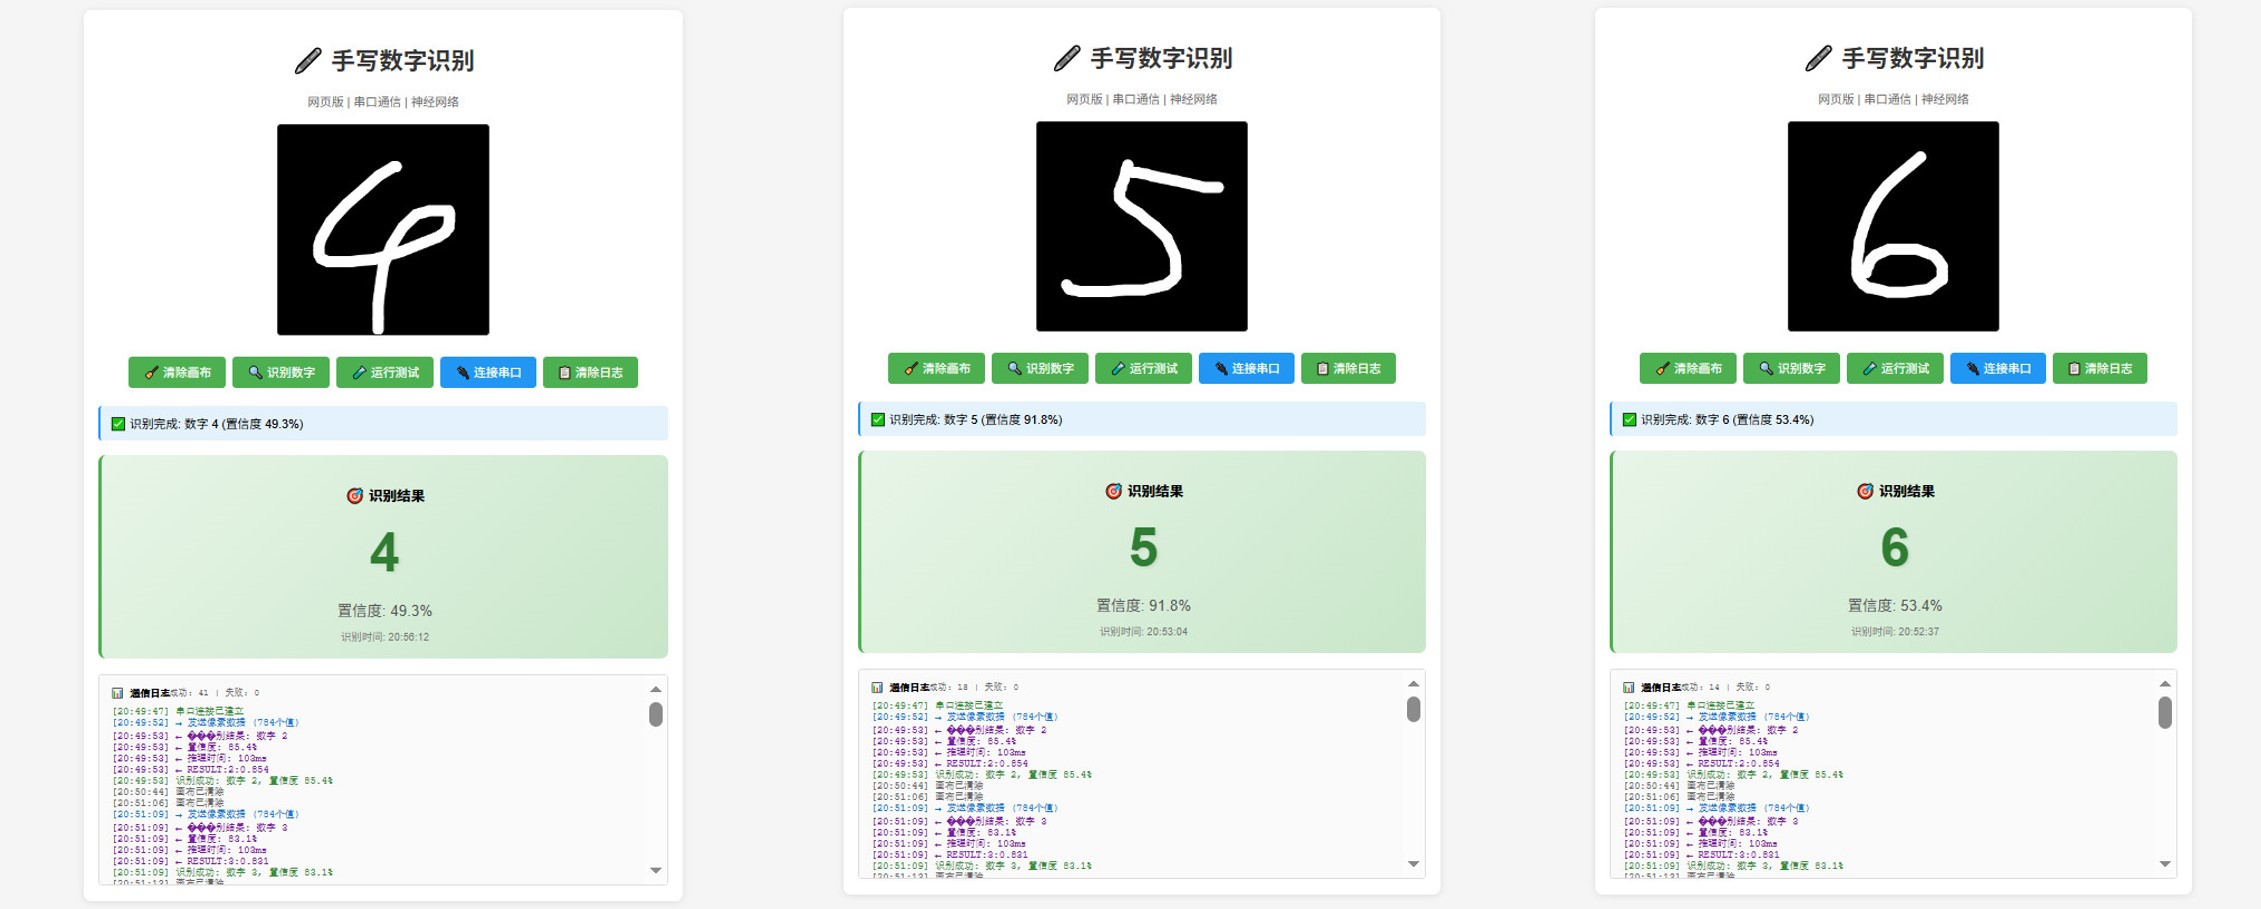
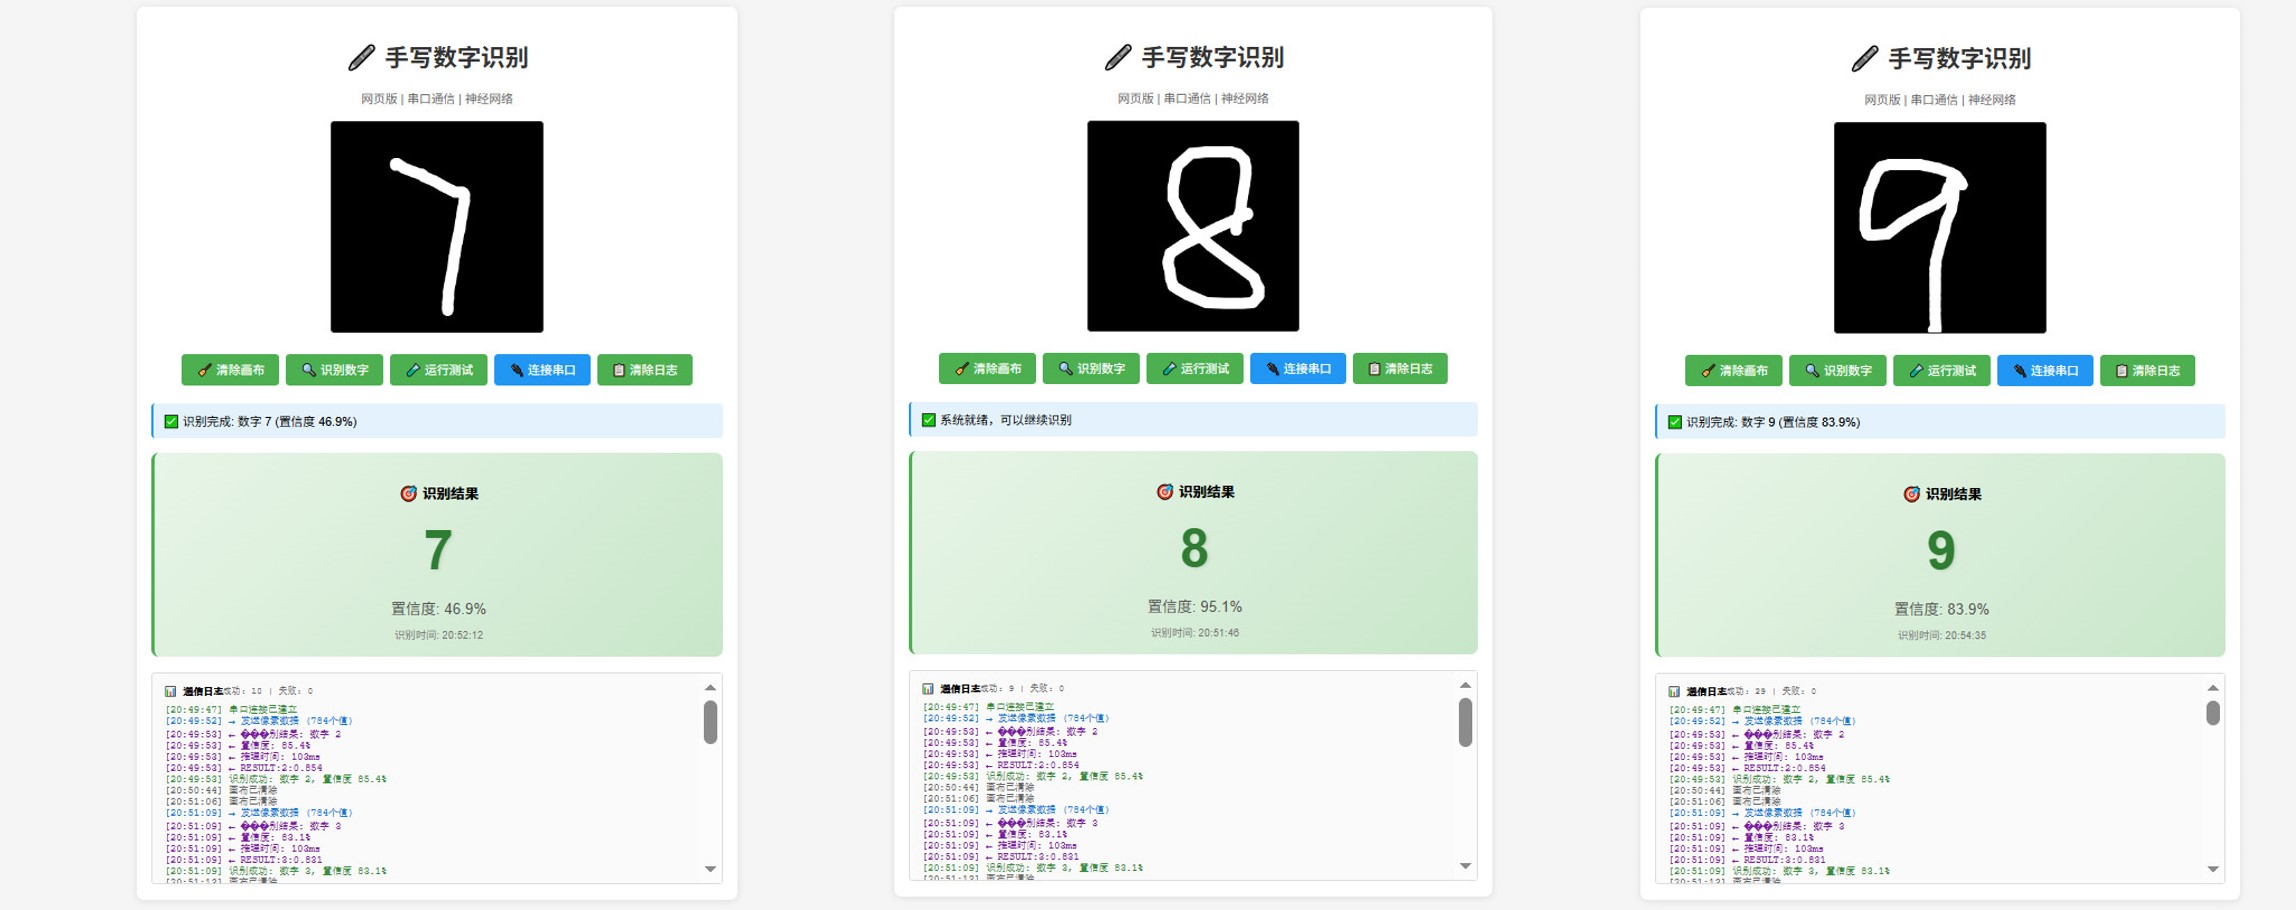
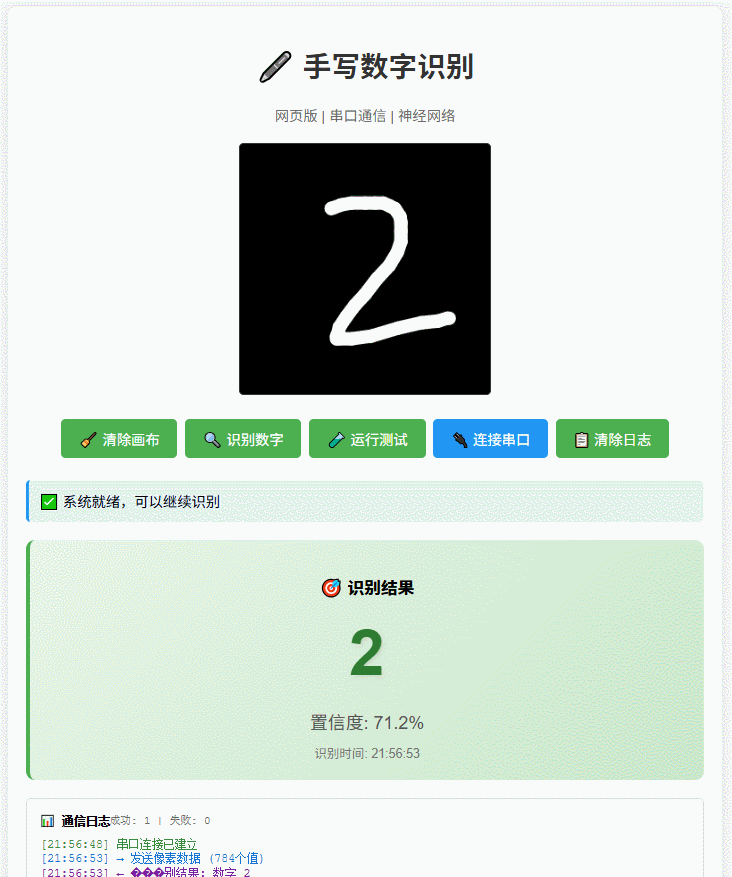
🖊️ 手写数字识别
网页版 | 串口通信 | 神经网络
⚡ 请点击"连接串口"开始使用
📊 通信日志
成功: 0 | 失败: 0
保存代码。
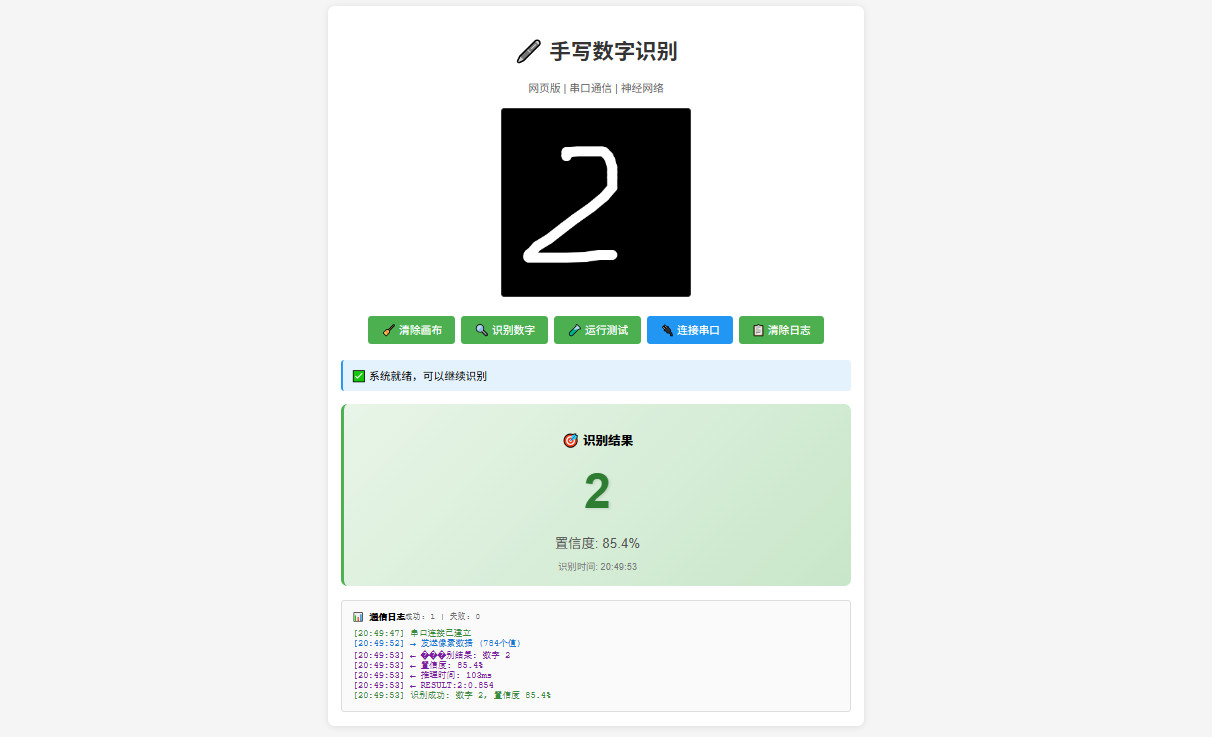
效果
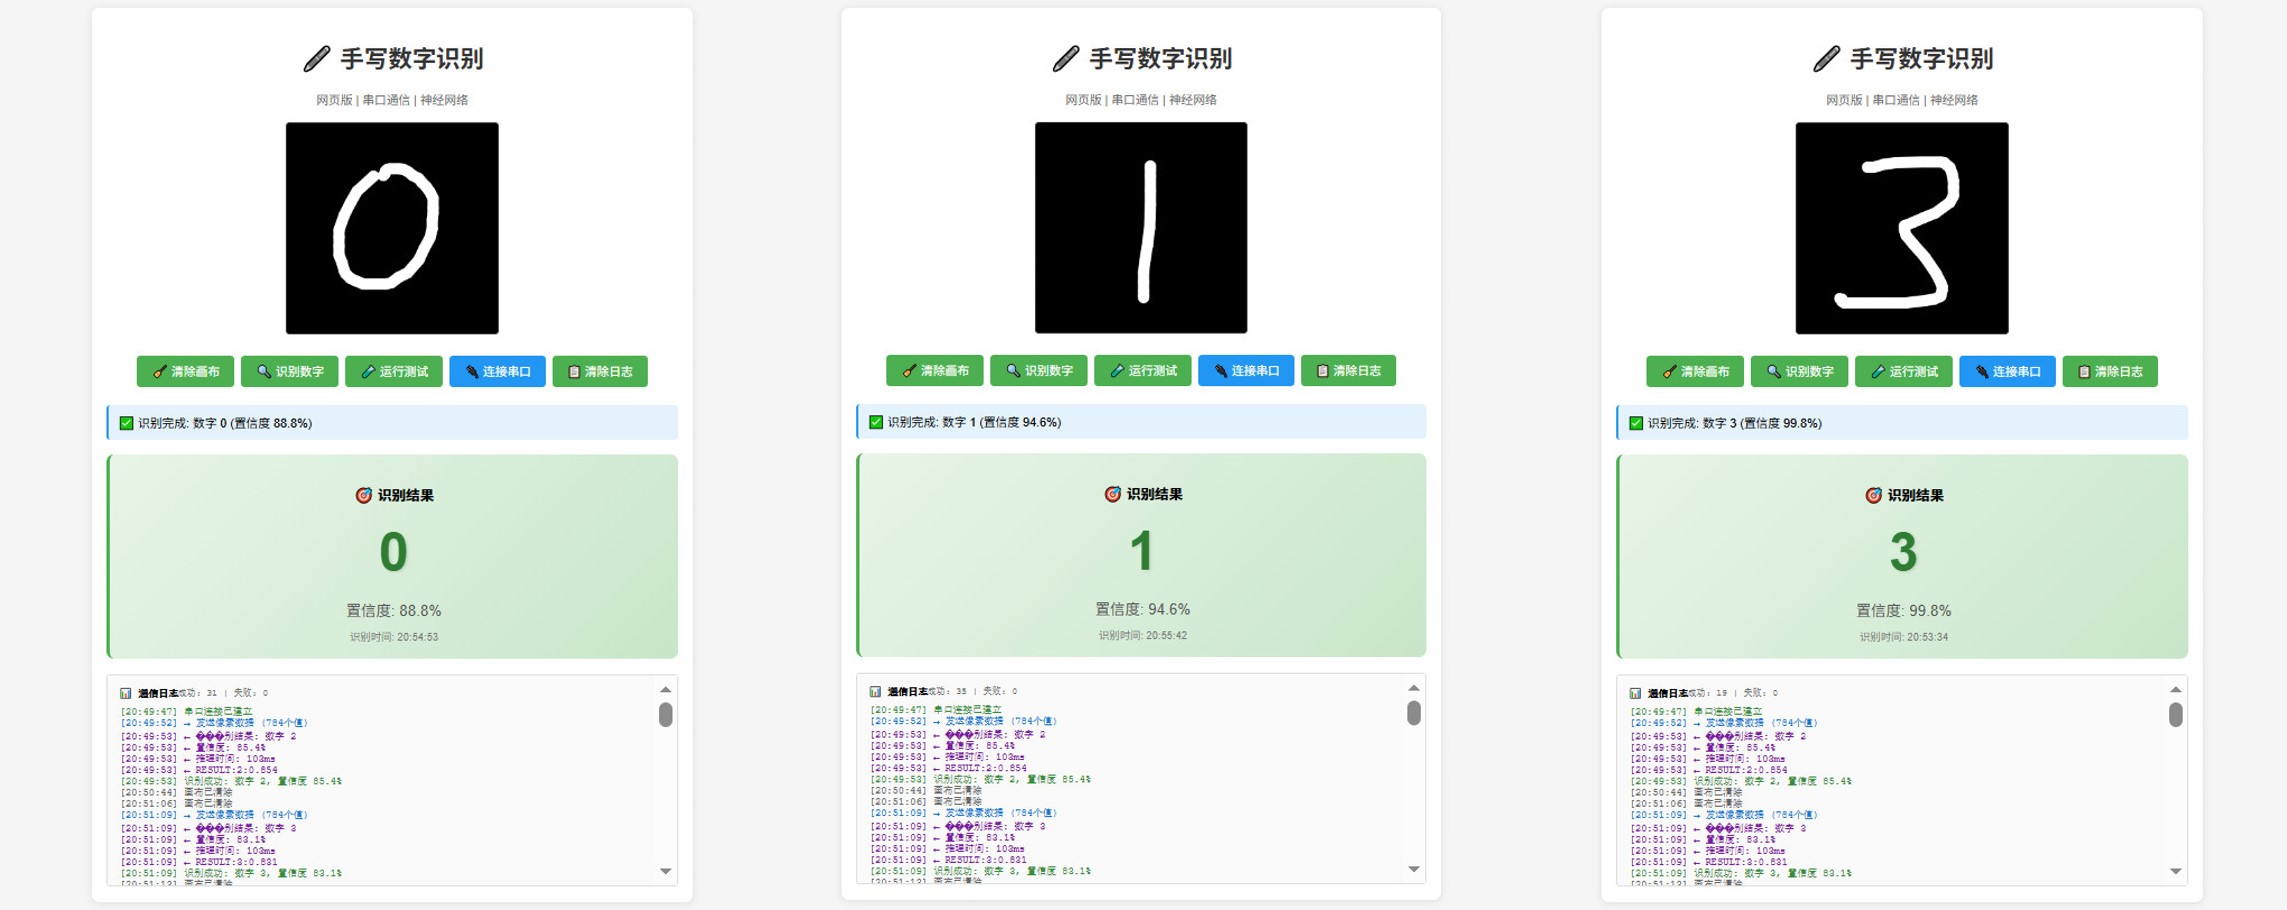
更多效果
动态演示
总结
本文介绍了 DFRobot Beetle RP2350 开发板结合 MNIST 数据集和串口通信,实现网页手写数字识别的项目设计,为 RP2350 在人工智能领域的开发设计和产品应用提供了参考。


 他的勋章
他的勋章


评论