 返回首页
返回首页
 回到顶部
回到顶部
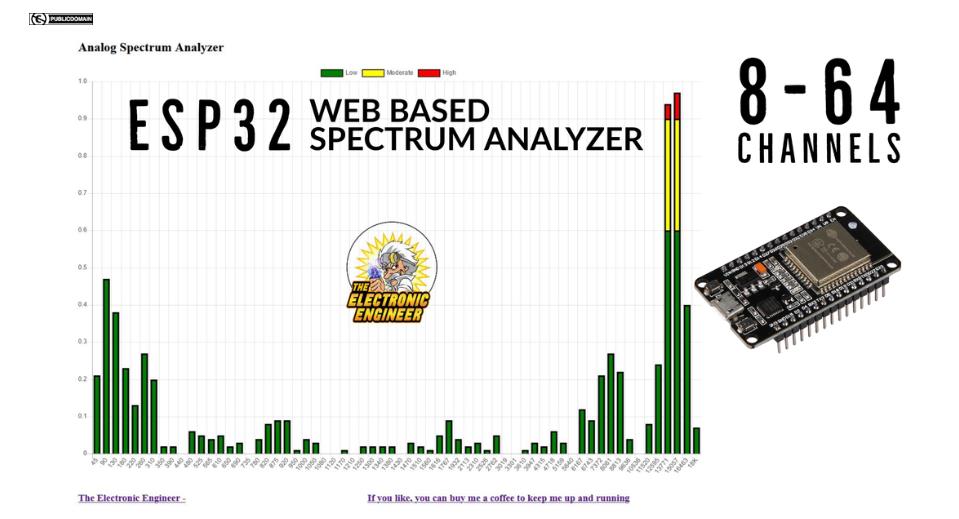
这是一个简单的项目,可以在几分钟内完成。然而,结果不仅仅是一个快速而肮脏的解决方案。使用 ESP32 控制器,可以轻松构建具有多达 64 个通道的音频频谱分析仪。而且您不需要显示器或 LED。只需使用计算机、平板电脑或手机访问分析仪即可。您只需要一个 wifi 接入点
这个项目在幕后使用了一些非常艰难的数学。它对传入音频信号进行FFT分析。如果您想了解更多关于幕后发生的事情,请查看此网站
https://en.wikipedia.org/wiki/Fast_Fourier_transform
用于 ESP32 的 Web 底座 8-64 通道频谱分析仪
该项目使用 ESP32 DEVKIT V1 和仅 4 个外部组件。 使用交换机,您可以选择要在 web 界面 8、16、24、32 或 64 上显示的频段数 首次启动时,wifi 管理器将开始询问您的 WIFI 凭据。如果没有,您可以强制 管理器在重新启动时按住模式按钮来启动。
下面是 coorect 启动的屏幕转储(串行调试器):
设置音频输入 I2S 配置 I2S... 已安装 I2S 驱动程序。 音频输入设置完成 *wm:[1] 自动连接 *wm:[2] 启用了 ESP32 事件处理程序 *wm:[2] 作为 wifi 客户端连接... *wm:[2] setSTAConfig 静态 ip 未设置,跳过 *wm:[1] 连接到 SAVED AP:EMDEE *wm:[1] connectTimeout 未设置,ESP waitForConnectResult... *wm:[2] 连接结果:WL_CONNECTED *wm:[1] 自动连接:成功 *wm:[1] STA IP 地址:192.168.1.140
ESP32 已连接到 Wi-Fi 网络,如果您刚刚重新配置了网络设置,请不要忘记重新启动。 您可以通过在重新启动时按住模式按钮来重新配置 WIFI 设置。
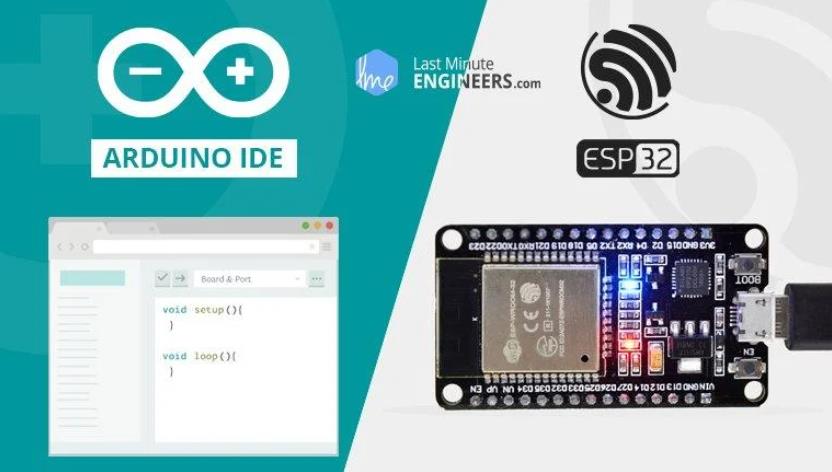
您需要以下库:
arduino FFT,我用的是 1.5.6 版
easybutton,我用的是verdion 2.0.1
Wifimanager,我用的是verdion 2.0.5Beta
Websockets,我用的是verdion 2.1.4
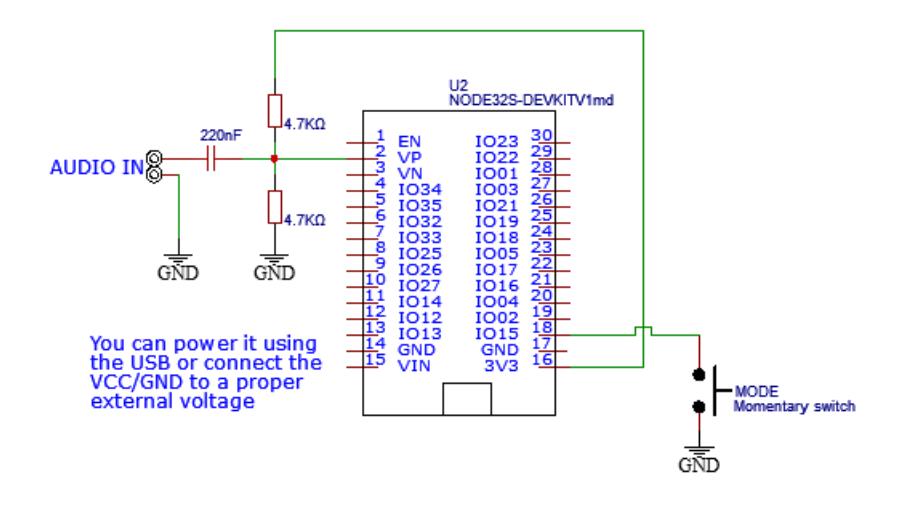
所需组件: ESP32(显然) 将开关连接到引脚 GPIO15(D15) 并接地以创建模式按钮 两个相同的电阻器。可以是 1K 到 50K 之间的任何值,只要您使用 2 个相同的值 在引脚 GPIO36(向上)和地之间连接 1 个电阻器。将另一个电阻连接到+3.3V和GPIO36 这将为您的输入信号创建一个偏移量以保护 esp32 将 220nF 的电容器连接到 GPIO36。电容器的另一端是您的音频线路输入
该程序在两个内核上运行。内核 1 用于主回路并进行 FFT 分析 核心 0 用于 Web 界面。两者都可以在 1 个内核上运行,但每当 WIFI 信号受到干扰时, 例如,通过将 ESP32 交给程序,程序会冻结......并且用户界面不受监控。 因此,Web 服务器位于不同的核心上。如果它冻结,用户界面仍然可以工作。HTTP 服务器启动 Web 服务器任务在核心 0 上运行。
项目代码
/********************************************************************************************************************************************************
* *
* Project: Webspector - WebServer based Spectrum Analyzer *
* Target Platform: ESP32 *
* *
* Version: 1.0 *
* Hardware setup: See github *
* *
* *
* Mark Donners *
* The Electronic Engineer *
* Website: www.theelectronicengineer.nl *
* facebook: https://www.facebook.com/TheelectronicEngineer *
* youtube: https://www.youtube.com/channel/UCm5wy-2RoXGjG2F9wpDFF3w *
* github: https://github.com/donnersm *
* *
********************************************************************************************************************************************************/
#define VERSION "V1.0"
//general libaries
#include <arduinoFFT.h> //libary for FFT analysis
#include <EasyButton.h> //libary for handling buttons
//included files
#include "I2SPLUGIN.h" //Setting up the ADC for I2S interface ( very fast readout)
#include "FFT.h" //some things for selecting the correct arrays for each number of bands
#include "Settings.h" // your general settings
#include "Webstuf.h" //This is the actual webpage housed in a variable
//libaries for webinterface
#include <WiFi.h>
#include <WebServer.h>
#include <WebSocketsServer.h>
#include <Ticker.h>
#include <WiFiManager.h> //The magic setup for wifi! If you need to setup your WIFI, hold the mode button during boot up.
int numBands = 64; // Default number of bands. change it by pressing the mode button
//************* web server setup *************************************************************************************************************************
TaskHandle_t WebserverTask; // setting up the task handler for webserver //**
bool webtoken = false; // this is a flag so that the webserver noise when the other core has new data //**
WebServer server(80); // more webserver stuff //**
WiFiManager wm; // Wifi Manager init //**
WebSocketsServer webSocket = WebSocketsServer(81); // Adding a websocket to the server //**
//************* web server setup end**********************************************************************************************************************
//*************Button setup ******************************************************************************************************************************
EasyButton ModeBut(MODE_BUTTON_PIN); //defining the button //**
// Mode button 1 short press //**
// will result in changing the number of bands //**
void onPressed() { //**
Serial.println("Mode Button has been pressed!"); //**
if (numBands == 8)numBands = 16; //**
else if (numBands == 16)numBands = 24; //**
else if (numBands == 24)numBands = 32; //**
else if (numBands == 32)numBands = 64; //**
else if (numBands == 64)numBands = 8; //**
SetNumberofBands(numBands); //**
Serial.printf("New number of bands=%d\n", numBands); //**
} //**
//*************Button setup end***************************************************************************************************************************
void setup() {
//create a task that will be executed in the Task1code() function, with priority 1 and executed on core 0
// this will run the webinterface datatransfer.
xTaskCreatePinnedToCore(
Task1code, /* Task function. */
"WebserverTask", /* name of task. */
10000, /* Stack size of task */
NULL, /* parameter of the task */
4, /* priority of the task */
&WebserverTask, /* Task handle to keep track of created task */
0); /* pin task to core 0 */
delay(500);
Serial.begin(115200);
Serial.println("Setting up Audio Input I2S");
setupI2S();
delay(100);
i2s_adc_enable(I2S_NUM_0);
Serial.println("Audio input setup completed");
ModeBut.onPressed(onPressed);
if (digitalRead(MODE_BUTTON_PIN) == 0) { //reset saved settings is mode button is pressed and hold during startup
Serial.println("button pressed on startup, WIFI settings will be reset");
wm.resetSettings();
}
wm.setConfigPortalBlocking(false); //Try to connect WiFi, then create AP but if no success then don't block the program
// If needed, it will be handled in core 0 later
wm.autoConnect("ESP32_AP", "");
Serial.println(Projectinfo); // print some info about the project
server.on("/", []() { // this will load the actual html webpage to be displayed
server.send_P(200, "text/html", webpage);
});
server.begin(); // now start the server
Serial.println("HTTP server started");
webSocket.begin();
webSocket.onEvent(webSocketEvent);
SetNumberofBands(numBands);
}
void loop() {
size_t bytesRead = 0;
int TempADC = 0;
ModeBut.read();
//############ Step 1: read samples from the I2S Buffer ##################
i2s_read(I2S_PORT,
(void*)samples,
sizeof(samples),
&bytesRead, // workaround This is the actual buffer size last half will be empty but why?
portMAX_DELAY); // no timeout
if (bytesRead != sizeof(samples)) {
Serial.printf("Could only read %u bytes of %u in FillBufferI2S()\n", bytesRead, sizeof(samples));
}
//############ Step 2: compensate for Channel number and offset, safe all to vReal Array ############
for (uint16_t i = 0; i < ARRAYSIZE(samples); i++) {
vReal[i] = offset - samples[i];
vImag[i] = 0.0; //Imaginary part must be zeroed in case of looping to avoid wrong calculations and overflows
}
//############ Step 3: Do FFT on the VReal array ############
// compute FFT
FFT.DCRemoval();
FFT.Windowing(vReal, SAMPLEBLOCK, FFT_WIN_TYP_HAMMING, FFT_FORWARD);
FFT.Compute(vReal, vImag, SAMPLEBLOCK, FFT_FORWARD);
FFT.ComplexToMagnitude(vReal, vImag, SAMPLEBLOCK);
FFT.MajorPeak(vReal, SAMPLEBLOCK, samplingFrequency);
for (int i = 0; i < numBands; i++) {
FreqBins[i] = 0;
}
//############ Step 4: Fill the frequency bins with the FFT Samples ############
for (int i = 2; i < SAMPLEBLOCK / 2; i++) {
if (vReal[i] > NoiseTresshold) {
int freq = BucketFrequency(i);
int iBand = 0;
while (iBand < numBands) {
if (freq < BandCutoffTable[iBand])break;
iBand++;
}
if (iBand > numBands)iBand = numBands;
FreqBins[iBand] += vReal[i];
}
}
//############ Step 5: Averaging and making it all fit on screen
static float lastAllBandsPeak = 0.0f;
float allBandsPeak = 0;
for (int i = 0; i < numBands; i++) {
if (FreqBins[i] > allBandsPeak) {
allBandsPeak = FreqBins[i];
}
}
if (allBandsPeak < 1)allBandsPeak = 1;
allBandsPeak = max(allBandsPeak, ((lastAllBandsPeak * (GAIN_DAMPEN - 1)) + allBandsPeak) / GAIN_DAMPEN); // Dampen rate of change a little bit on way down
lastAllBandsPeak = allBandsPeak;
if (allBandsPeak < 80000)allBandsPeak = 80000;
for (int i = 0; i < numBands; i++)FreqBins[i] /= (allBandsPeak * 1.0f);
webtoken = true; // set marker so that other core can process data
} // loop end
// Return the frequency corresponding to the Nth sample bucket. Skips the first two
// buckets which are overall amplitude and something else.
int BucketFrequency(int iBucket) {
if (iBucket <= 1)return 0;
int iOffset = iBucket - 2;
return iOffset * (samplingFrequency / 2) / (SAMPLEBLOCK / 2);
}
void webSocketEvent(uint8_t num, WStype_t type, uint8_t * payload, size_t length) {
// Do something with the data from the client
if (type == WStype_TEXT) {
Serial.println("websocket event Triggered");
}
}
void SendData() {
String json = "[";
for (int i = 0; i < numBands; i++) {
if (i > 0) {
json += ", ";
}
json += "{\"bin\":";
json += "\"" + labels[i] + "\"";
json += ", \"value\":";
json += String(FreqBins[i]);
json += "}";
}
json += "]";
webSocket.broadcastTXT(json.c_str(), json.length());
}
//Task1code: webserver runs on separate core so that WIFI low signal doesn't freeze up program on other core
void Task1code( void * pvParameters ) {
delay(3000);
Serial.print("Webserver task is running on core ");
Serial.println(xPortGetCoreID());
int gHue = 0;
for (;;) {
wm.process();
webSocket.loop();
server.handleClient();
if (webtoken == true) {
SendData(); // webbrowser
webtoken = false;
}
}
}【Arduino 动手做】WEBSPECTOR - 基于 ESP32 的 Web FFT 频谱分析仪
项目链接:https://www.instructables.com/WEBSPECTOR-a-Web-Based-Spectrum-Analyzer-With-ESP3/
项目作者:emdee401
快速傅里叶变换:https://en.wikipedia.org/wiki/Fast_Fourier_transform
项目视频:https://www.youtube.com/watch?v=RuRwexR4FAQ
项目代码:https://github.com/donnersm/Webspector
https://github.com/donnersm/Webspector/blob/main/V1.0/Webspector.ino


 他的勋章
他的勋章

评论