 返回首页
返回首页
 回到顶部
回到顶部
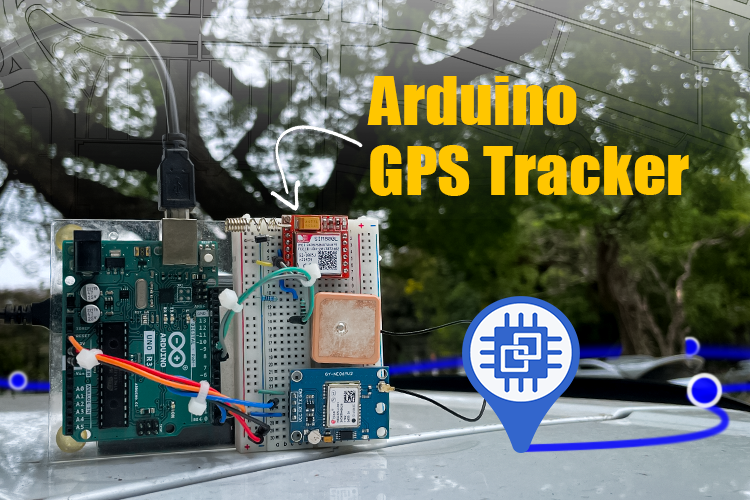
有没有想过构建您自己的 GPS 跟踪器,不需要每月 30 美元的订阅
如果这听起来像你的下一个项目,那么你正是你需要去的地方。我将引导您使用 Arduino UNO、SIM800L GSM 模块和 NEO-6M GPS 模块构建实时 GPS 跟踪器。
此外,我们会将其连接到一个免费的云仪表板(称为 GeoLinker),您可以在其中实时观察您的跟踪器在地图上移动。没有可疑的应用程序。没有费用。只需编写代码、硬件和完全控制。
Arduino GPS 追踪器的工作原理
• GPS 模块与卫星通信并吐出您当前的坐标。
• Arduino 读取该数据并整齐地格式化。
• 然后,SIM800L GSM 模块通过移动数据将该信息发送到我们构建的名为 GeoLinker 的免费云仪表板。
• 您可以打开浏览器并在地图上查看实时位置,或与某人共享。
整洁,对吧?
用品
• Arduino UNO R3 × 1(主控制器)
• SIM800L GSM 模块 × 1(用于 2G 数据通信)
• NEO-6M GPS 模块 × 1(获取 GPS 坐标)
• 面包板× 1(用于原型设计)
• 电阻器 4.7kΩ 和 10kΩ × 1 套(用于分压器)
• 跳线 × 根据需要(用于连接)
• 移动电源(5V,2A 输出)× 1(用于为设置供电)
另外,拿一张兼容 2G 的 SIM 卡。如果您在印度,请选择 Airtel、Vodafone 或 BSNL。避免使用 Jio,因为它仅支持 4G,无法与 SIM800L 配合使用。
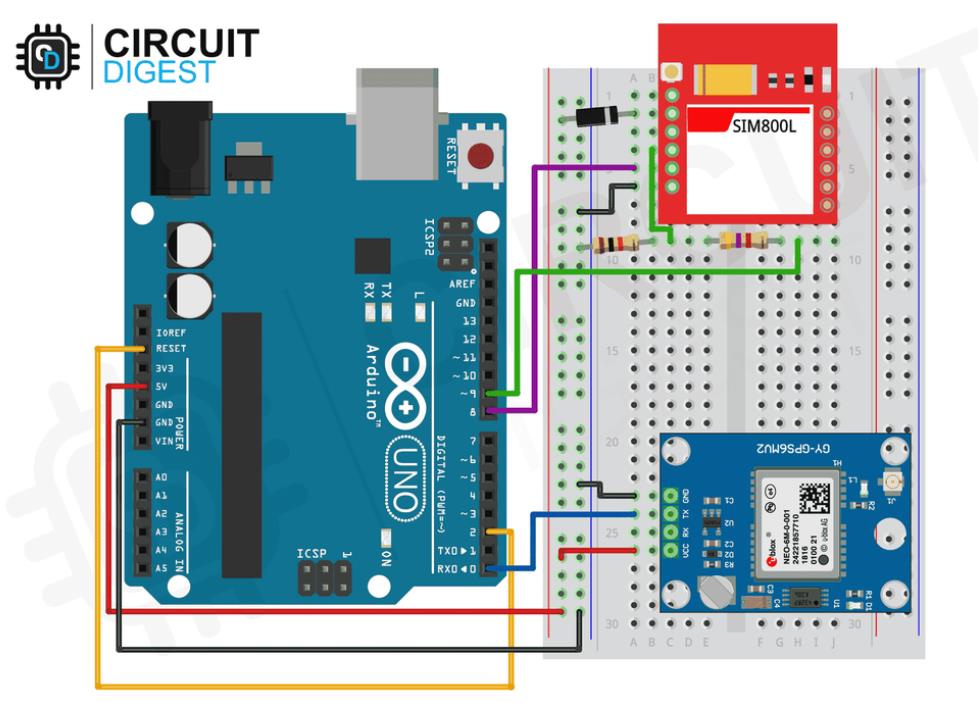
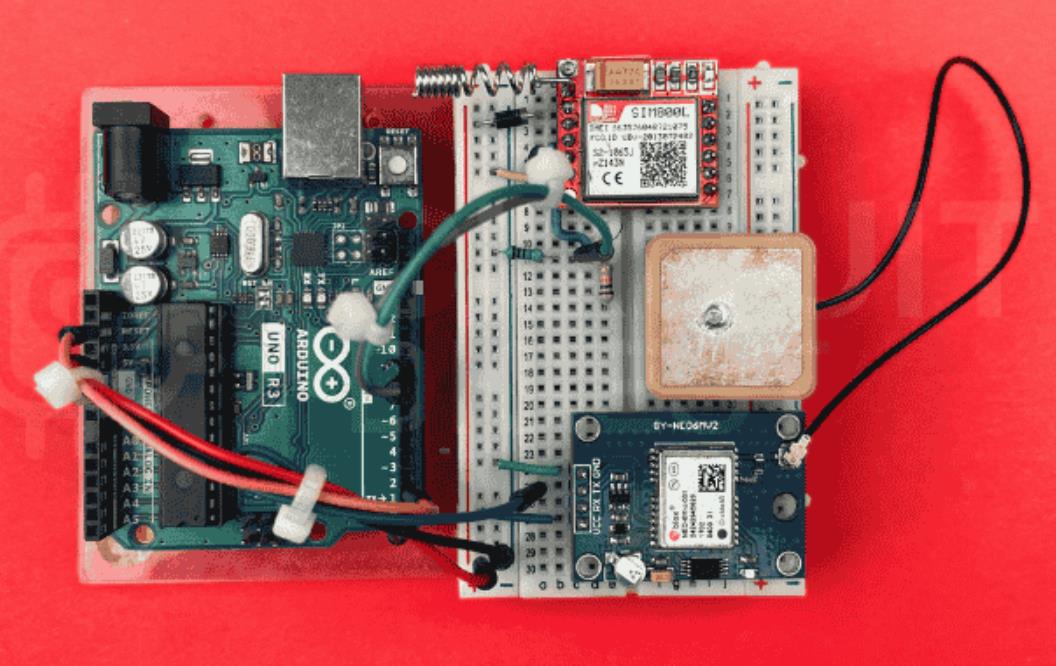
第 1 步:连接
让我们连接模块。别担心,它主要是即插即用的。
NEO-6M GPS → Arduino UNO
• VCC → 5V
• GND → GND
• TX →引脚 0 (RX)
• 接收→(不需要)
重要提示:在上传代码之前断开 TX 线与 GPS 的连接,因为它会弄乱引导加载程序。
SIM800L GSM → Arduino UNO
• VCC → 5V(通过二极管将其压降至 ~4.3V)
• GND → GND
• RX →引脚 8(通过分压器:10kΩ + 4.7kΩ)
• TX →引脚 9
• RST →引脚 2(这有助于管理内存)
电源提示:不要从笔记本电脑的 USB 端口运行此设置,因为发送数据时SIM800L消耗高达 2A 的电流。使用可以处理 2A 输出的移动电源。
第 2 步:添加 GeoLinker Lite 库
为了让事情尽可能简单,我们为此构建了一个轻量级的 Arduino 库。它处理:
• GPS解析
• SIM800L沟通
• 通过 HTTP 进行云集成
安装它:
• 打开 Arduino IDE
• 转到草图>包括库>管理库
• 搜索 GeoLinker Lite
• 点击安装
第 3 步:Arduino GPS 跟踪器代码
只需将占位符替换为您自己的 APN 和 API 密钥即可。
第 4 步:测试时间
上传代码并连接所有内容后:
• 前往户外,因为 GPS 需要晴朗的天空。
• 以 9600 波特率打开串行监视器。
• 您将看到 GPS 锁定→ GSM 连接→数据上传。
• 然后打开 GeoLinker 并实时查看跟踪器的位置。
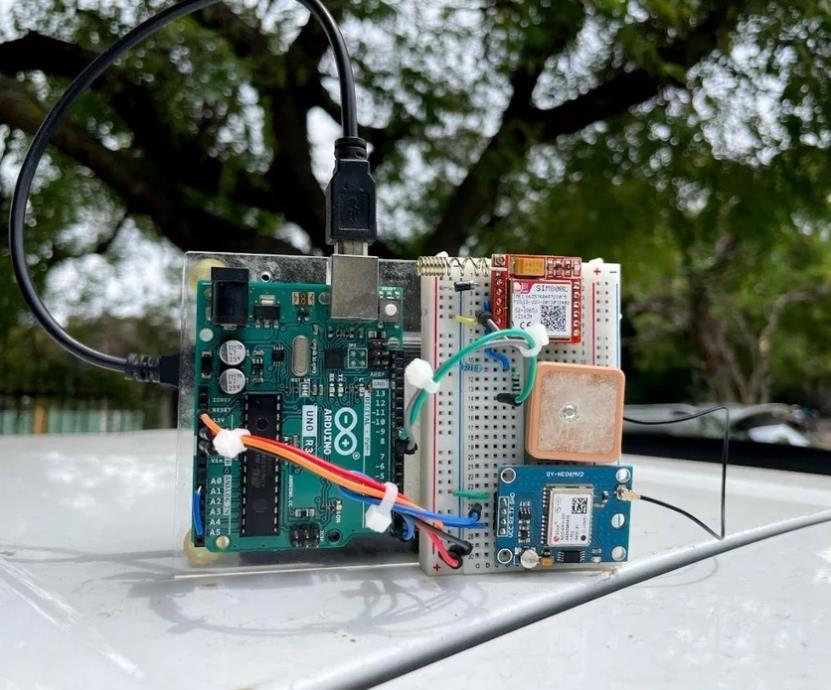
第 5 步:在真实条件下测试您的 Arduino GPS 追踪器
我们将设置放在汽车仪表板上,然后四处行驶。GeoLinker 每 20 秒更新一次。您甚至会在交通中看到更狭窄的航路点。对于基本设置来说还不错,是吧?
第 6 步:常见问题
无法上传代码?
首先从引脚 0 上拔下 GPS TX 线。
您的 Arduino 不断重置?
这是一个电源问题。使用具有 2A 输出的移动电源。
没有 GPS 数据?
出门,等待 2-5 分钟卫星锁定。还要检查天线。
HTTP 401 错误?
仔细检查您的 API 密钥。确保没有空格或拼写错误。
SIM800L不起作用?
确保:
• SIM卡是2G(Jio不起作用)
• 您已经安装了分压器
• 天线连接正确
第 7 步:结论
现在你有它。您从头开始构建的工作 Arduino GPS 跟踪器。
它便宜、可靠,并且让您可以完全控制您的数据。
以下是扩展此项目的一些方法:
• 添加蜂鸣器或运动传感器
• 用于宠物追踪
• 将其内置到具有适当外壳的车辆中
• 甚至与家庭自动化集成
项目代码
/*
 * GeoLinkerLite Library
 * Copyright (C) 2025 Jobit Joseph, Semicon Media Pvt Ltd (Circuit Digest)
 * Author: Jobit Joseph
 * Project: GeoLinkerLite Cloud API Library
 *
 * Licensed under the MIT License
 * You may not use this file except in compliance with the License.
 *
 * You may obtain a copy of the License at:
 * https://opensource.org/license/mit/
 *
 * Permission is hereby granted, free of charge, to any person obtaining a copy
 * of this software (the "Software") and associated documentation files, to deal
 * in the Software without restriction, including without limitation the rights
 * to use, copy, modify, merge, publish, distribute, sublicense, and/or sell
 * copies of the Software, subject to the following additional conditions:

 * 1. All copies or substantial portions must retain:
 *    - The original copyright notice
 *    - A prominent statement crediting the original author/creator

 * 2. Modified versions must:
 *    - Clearly mark the changes as their own
 *    - Preserve all original credit notices
 *
 * THE SOFTWARE IS PROVIDED "AS IS", WITHOUT WARRANTY OF ANY KIND, EXPRESS OR
 * IMPLIED, INCLUDING BUT NOT LIMITED TO THE WARRANTIES OF MERCHANTABILITY,
 * FITNESS FOR A PARTICULAR PURPOSE AND NONINFRINGEMENT. IN NO EVENT SHALL THE
 * AUTHORS OR COPYRIGHT HOLDERS BE LIABLE FOR ANY CLAIM, DAMAGES OR OTHER
 * LIABILITY, WHETHER IN AN ACTION OF CONTRACT, TORT OR OTHERWISE, ARISING FROM,
 * OUT OF OR IN CONNECTION WITH THE SOFTWARE OR THE USE OR OTHER DEALINGS IN THE
 * SOFTWARE.
 */
 #include <GeoLinkerLite.h>

// Create the GeoLinkerLite instance
// Using Serial for both debug and GPS
GeoLinkerLite geoLinker(Serial, Serial);

void setup() {
    Serial.begin(9600);
    delay(1000);

    // Configure settings (optional - defaults are set in the library)
    geoLinker.setResetPin(2);                    // Reset control pin
    geoLinker.setGSMPins(8, 9);                  // GSM RX, TX pins
    geoLinker.setModemAPN("your.apn.here");      // Your carrier's APN
    geoLinker.setAPIKey("your_api_key");         // Your GeoLinker API key
    geoLinker.setDeviceID("arduino_tracker");    // Unique device ID / Device name
    geoLinker.setMaxRetries(3);                  // Max retry attempts to send a data ponit via GPRS
    geoLinker.setDebugLevel(1);                  // Debug level
    geoLinker.setTimeOffset(5, 30);              // Timezone: Eg. india +5:30 hours

    // Initialize the library
    geoLinker.begin();

    // Run the main functionality
    delay(1000);                                // Increase this delay to increase upate interval
    geoLinker.run();
}

void loop() {
    // Should never reach here as both modes end with reset
    delay(1000);
}

【Arduino 动手做】DIY Arduino GPS 跟踪器,在网络仪表板上提供实时位置
项目链接:https://www.instructables.com/DIY-Arduino-GPS-Tracker-With-Real-Time-Location-on/
项目作者:ElectroScope Archive
参考资料:https://circuitdigest.com/microcontroller-projects/arduino-gps-tracker-using-sim800l-and-neo-6m
项目视频:https://content.instructables.com/FIY/341L/MDG8RPAV/FIY341LMDG8RPAV.gif?format=mp4
https://content.instructables.com/FOV/M3K4/MDG8RPEI/FOVM3K4MDG8RPEI.gif?format=mp4
GeoLinker Lite 库:https://github.com/Circuit-Digest/GeoLinkerLite
项目代码:
https://circuitdigest.com/microcontroller-projects/arduino-gps-tracker-using-sim800l-and-neo-6m


 他的勋章
他的勋章

评论