 返回首页
返回首页
 回到顶部
回到顶部
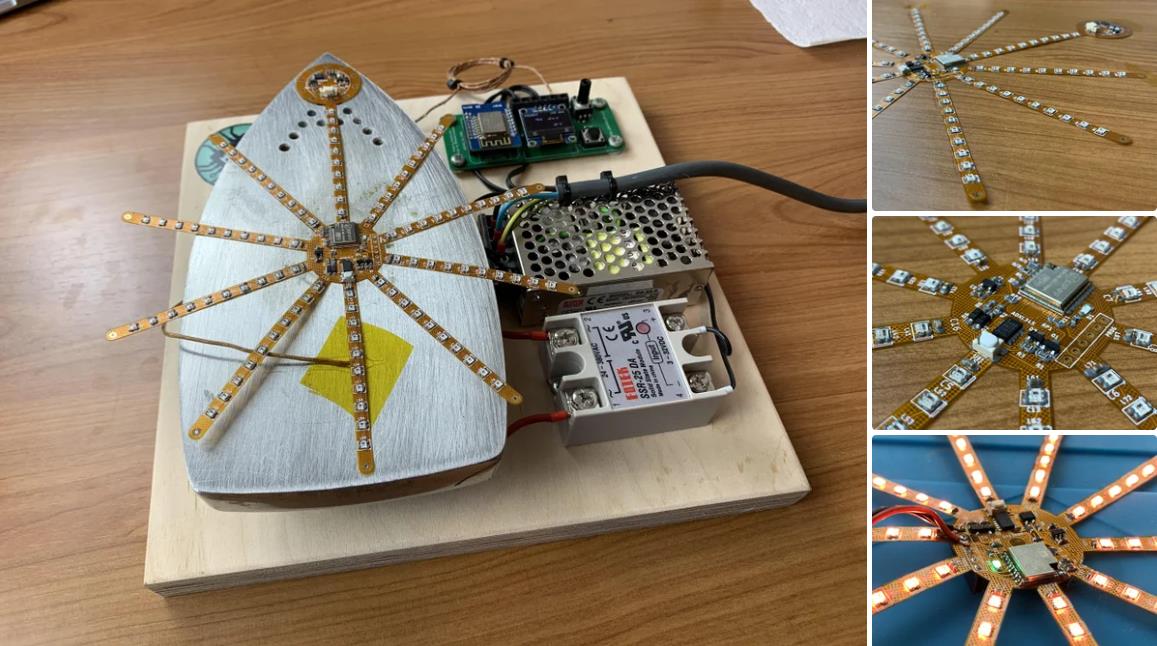
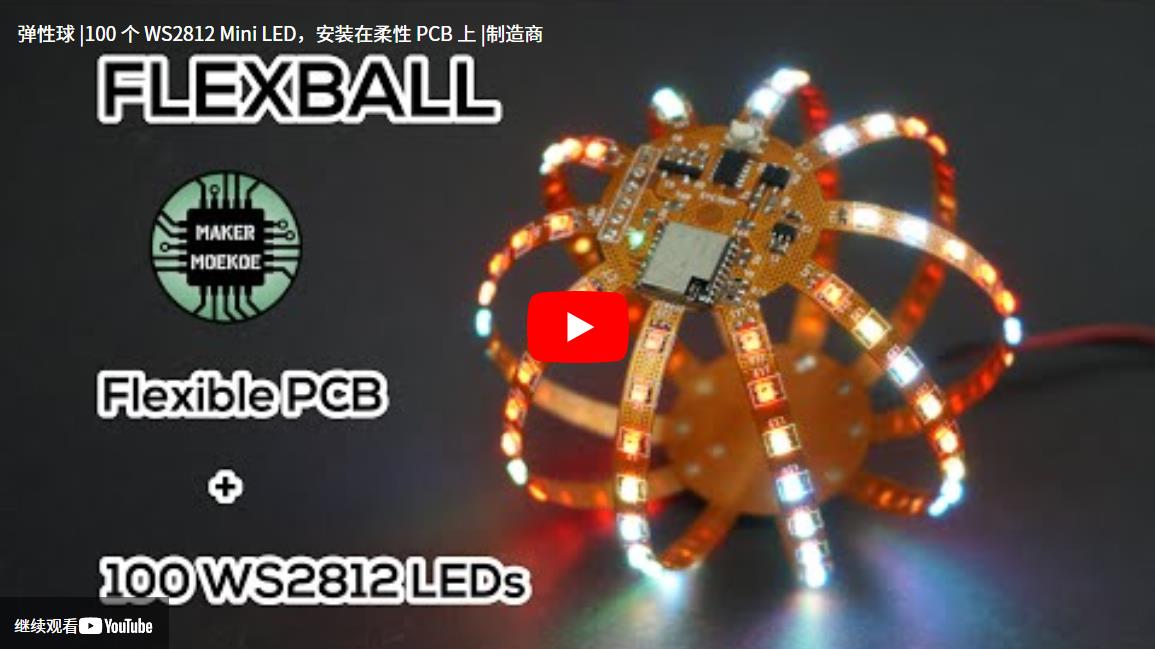
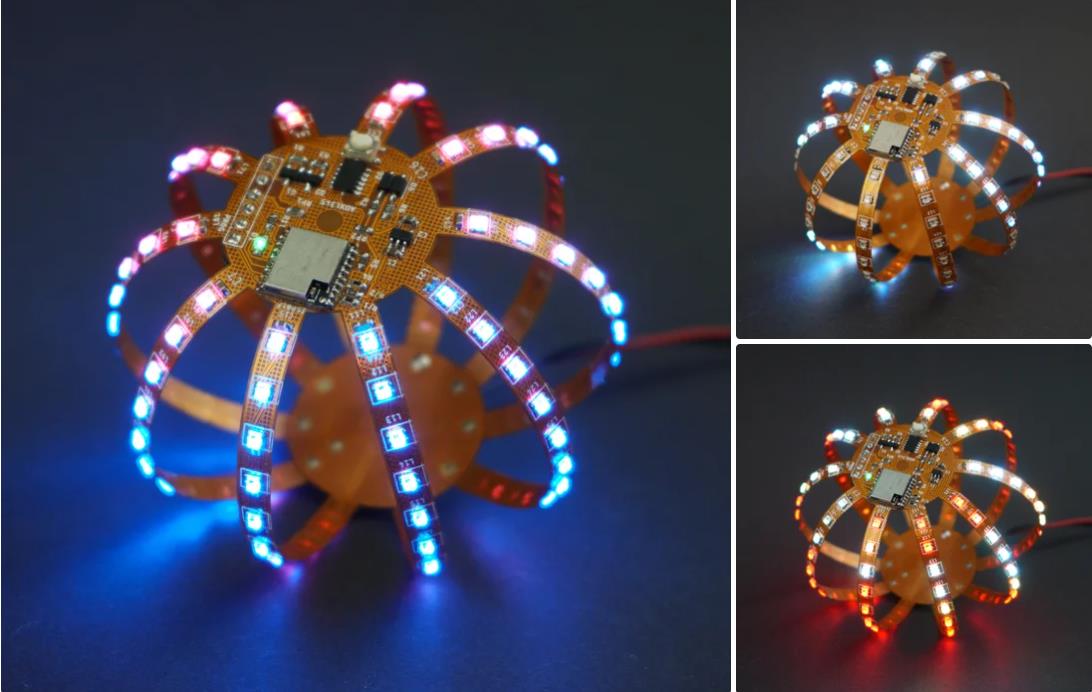
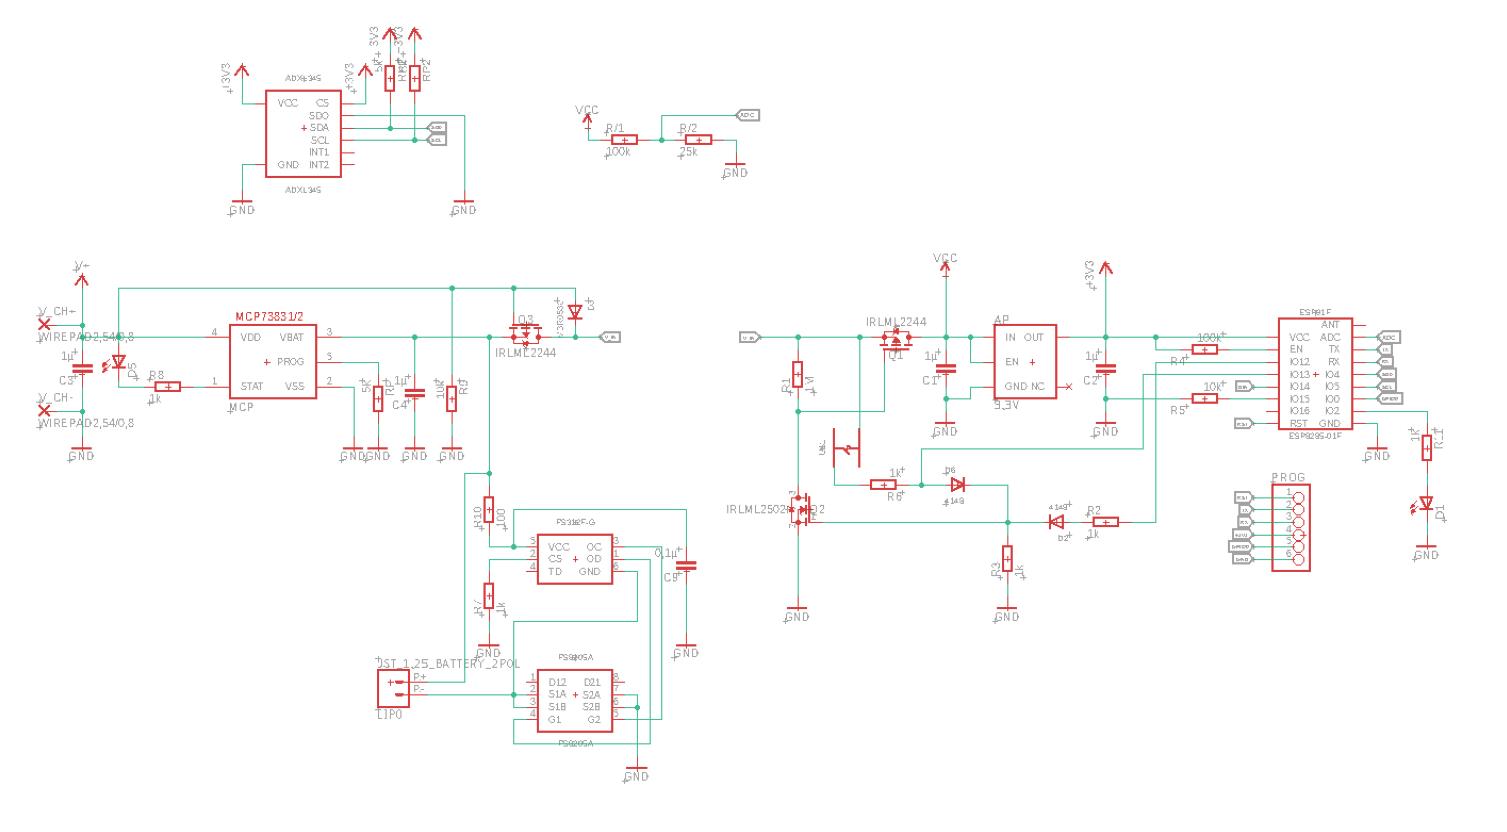
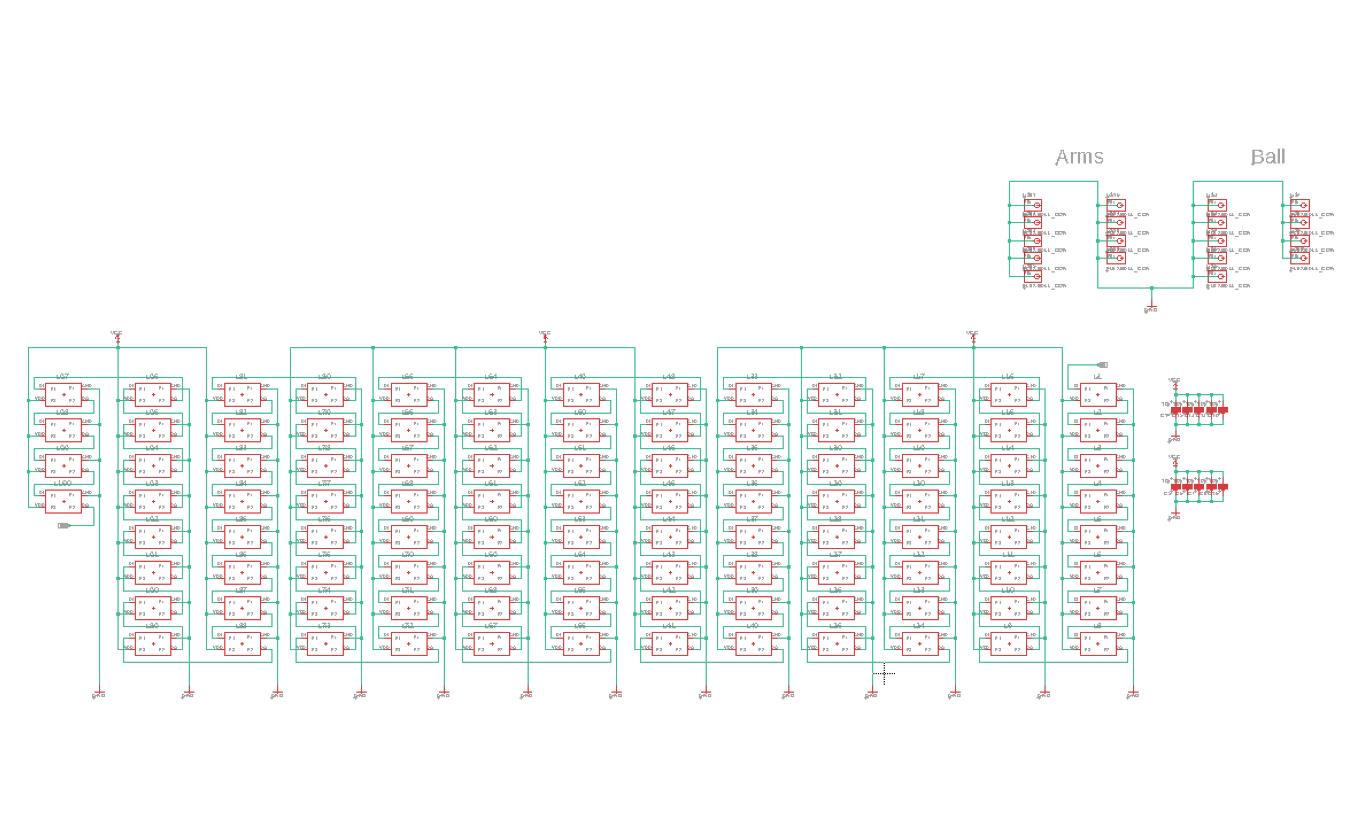
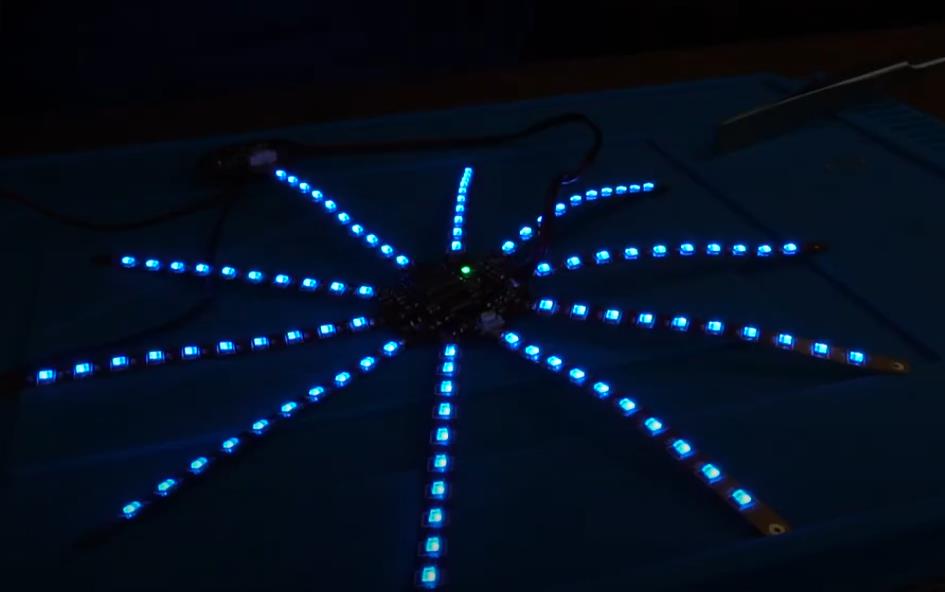
Flexball 基于柔性 PCB,配备 100 个 WS2812 2020 可寻址 LED。它由 ESP8285-01f 控制,这是乐鑫最小的基于 ESP 的模块。此外,它还配备了一个 ADXL345 加速度计传感器。
最初的想法是在那个圆形矩阵 (10x10) 上显示文本消息,但不幸的是,手臂的距离太大,不容易阅读(您可以在视频末尾观看)。尽管如此,它是我迄今为止建造的最漂亮的 LED 雕塑。
这是我的第一个柔性 PCB 设计,所以你肯定会发现一些可能不是最好在这里使用的东西。作为 DIY 制造商,对我来说最重要的部分是它最终会起作用 - 嘿,它确实有效!:)
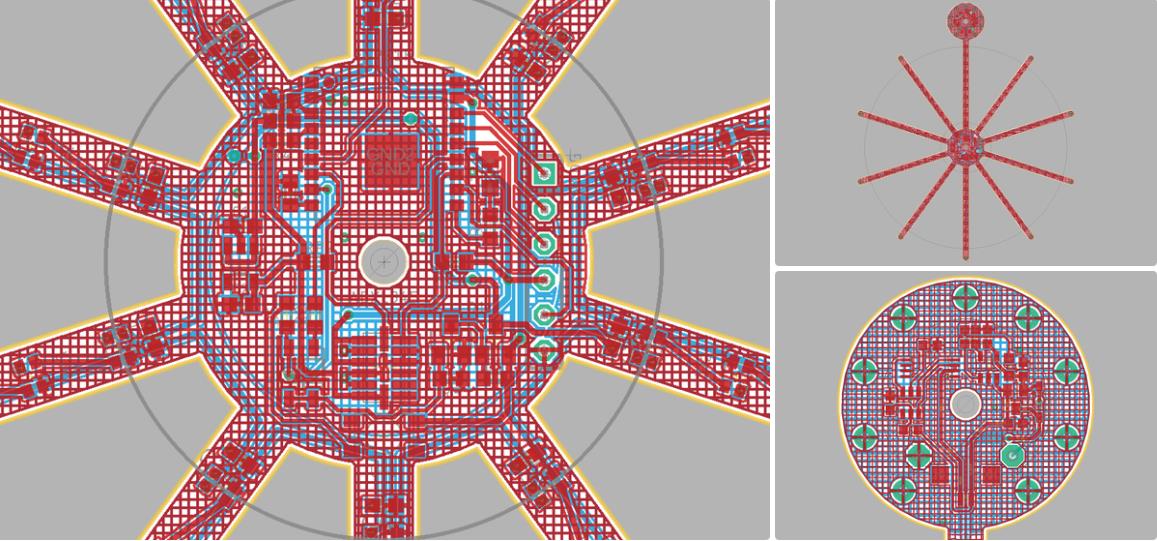
对于柔性电路,我读过一些特殊的设计规则:
不要在设计的柔性部分使用带有拐角或边缘的走线。走线可能会破裂,信号可能会损坏。弯曲的痕迹在这里是更好的。
GND 平面也是如此,它可能会因 PCB 的弯曲而断裂。更好的选择是使用上图所示的哈希网络。
焊盘和过孔应该用这些泪滴连接到走线上......在我最喜欢的设计软件 Eagle 中找不到此选项。如果你能帮忙,请在评论中告诉我:)
设计这种 PCB 时最难的部分是 LED、盖子和臂末端焊盘的圆形排列。我创建了一个简单的 Excel 表格,根据相应手臂的半径和角度计算 XY 位置。如果您需要这样的循环安排,这肯定是一个巨大的帮助。
我已将 BOM 附加到此步骤。有关每个组件的详细信息,请参见此处。
可以在以下列表中找到一些主要组件的想法:
PCB 系列
ESP8285-01F
ADXL345
WS2812 2020 LED 指示灯
MCP73831 Lipo 充电器 IC
电池保护套件
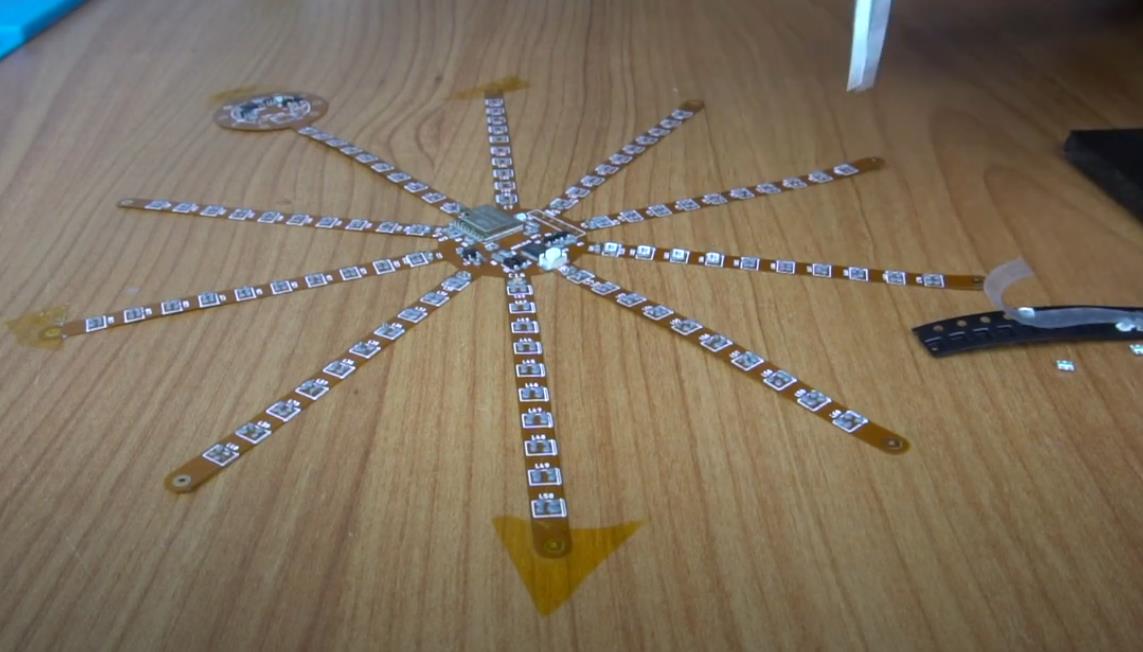
除了一百个 LED 之外,没有任何特别的细节需要记住。我用过我的 DIY 热板烙铁,但这根本不是最好的主意。首先,它太小了,无法加热所有 PCB。其次是我降低了温度,以保护损坏 PCB。它有点太低了,因此我也不得不使用我的回流焊枪。
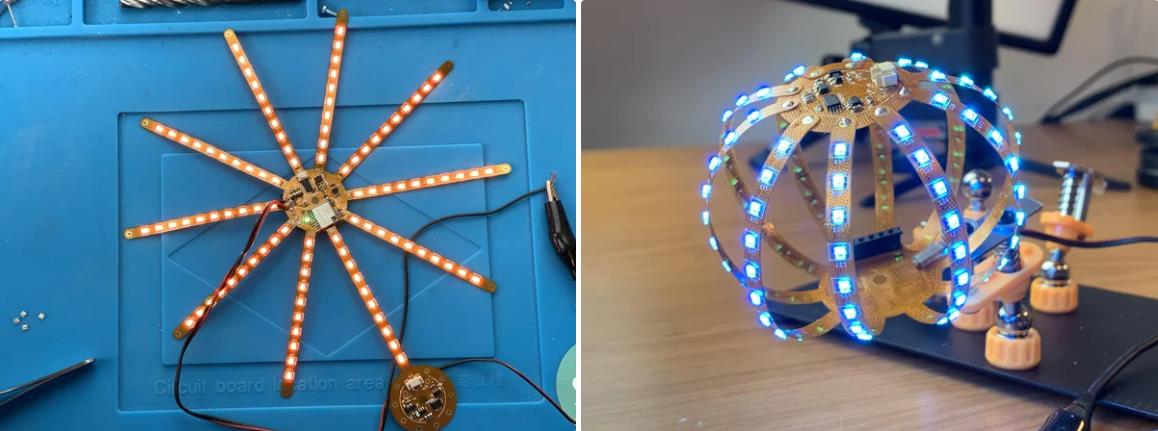
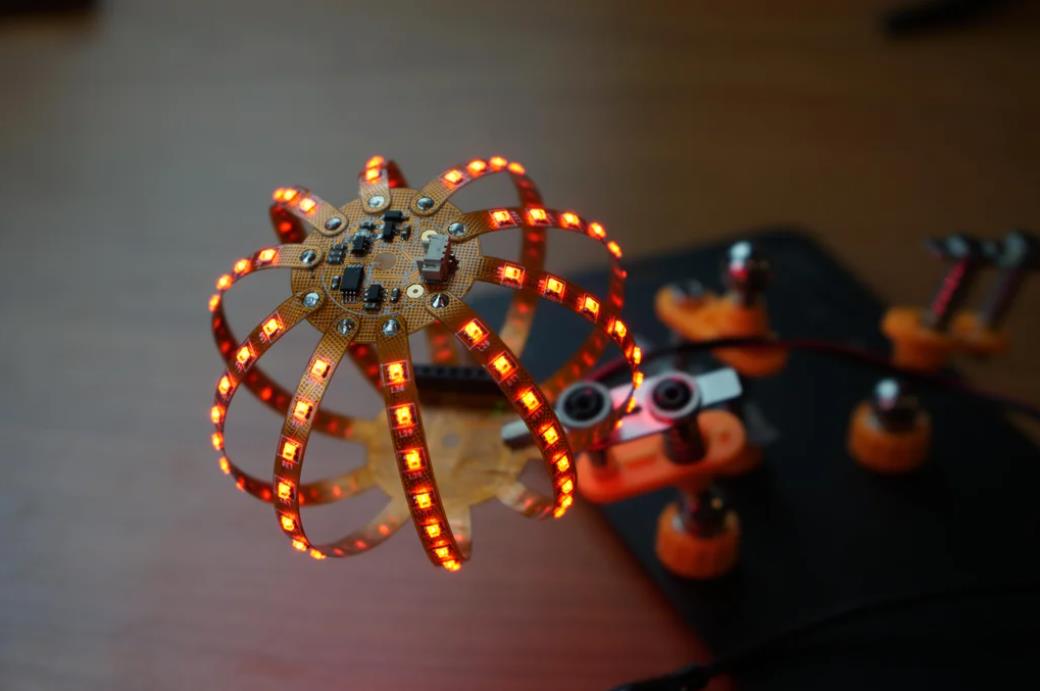
剩下的就是一点点的跟踪和错误。:D一百个 LED 乍一试不想工作。我花了大约两个小时才把它全部点亮。但最令人满意的时刻是所有 LED 都完美亮起时。
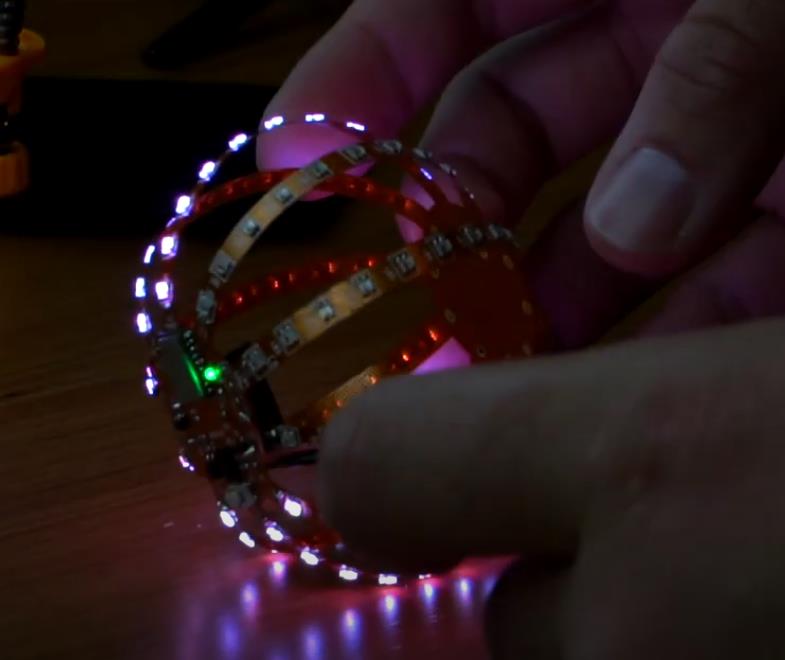
另一个棘手的部分是将底部圆圈的臂焊接到顶部的圆圈上。我绝对推荐在这里使用第三只手,否则可能会变得非常困难!
该代码基于 FastLED 库,该库可以驱动多个可寻址 LED,如 APA102、SK9822 或 WS2812。
代码中唯一必须的附加组件是锁存部分。只要锁存引脚保持高位,ESP 就可以保持自己的电源。一旦它被拉到 GND,球就会禁用自己的功率。附件中显示了一个基本示例。
该项目仍在进行中。尽管如此,这是我的一个秘密项目,我迫不及待地想向你们展示这些很棒的东西。如果您有其他想法,球可以做什么,请在下面的评论中告诉我。
项目代码
#include <Arduino.h>
#include <FastLED.h>

const int button = 13;
const int latch = 12;

bool state = false;

boolean battery_empty = false;
boolean battery_charging = false;
boolean stay_on = false;

int hue = 0;
double pi = 3.141;
double chg_bright = 100;


#define LED_PIN     14
#define BRIGHTNESS  120
#define LED_TYPE    WS2812
#define COLOR_ORDER GRB

const uint8_t kMatrixWidth  = 10;
const uint8_t kMatrixHeight = 10;
const bool    kMatrixSerpentineLayout = false;


// This example combines two features of FastLED to produce a remarkable range of
// effects from a relatively small amount of code.  This example combines FastLED's
// color palette lookup functions with FastLED's Perlin/simplex noise generator, and
// the combination is extremely powerful.
//
// You might want to look at the "ColorPalette" and "Noise" examples separately
// if this example code seems daunting.
//
//
// The basic setup here is that for each frame, we generate a new array of
// 'noise' data, and then map it onto the LED matrix through a color palette.
//
// Periodically, the color palette is changed, and new noise-generation parameters
// are chosen at the same time.  In this example, specific noise-generation
// values have been selected to match the given color palettes; some are faster,
// or slower, or larger, or smaller than others, but there's no reason these
// parameters can't be freely mixed-and-matched.
//
// In addition, this example includes some fast automatic 'data smoothing' at
// lower noise speeds to help produce smoother animations in those cases.
//
// The FastLED built-in color palettes (Forest, Clouds, Lava, Ocean, Party) are
// used, as well as some 'hand-defined' ones, and some proceedurally generated
// palettes.


#define NUM_LEDS (kMatrixWidth * kMatrixHeight)
#define MAX_DIMENSION ((kMatrixWidth>kMatrixHeight) ? kMatrixWidth : kMatrixHeight)

// The leds
CRGB leds[kMatrixWidth * kMatrixHeight];

// The 16 bit version of our coordinates
static uint16_t x;
static uint16_t y;
static uint16_t z;

// We're using the x/y dimensions to map to the x/y pixels on the matrix.  We'll
// use the z-axis for "time".  speed determines how fast time moves forward.  Try
// 1 for a very slow moving effect, or 60 for something that ends up looking like
// water.
uint16_t speed = 20; // speed is set dynamically once we've started up

// Scale determines how far apart the pixels in our noise matrix are.  Try
// changing these values around to see how it affects the motion of the display.  The
// higher the value of scale, the more "zoomed out" the noise iwll be.  A value
// of 1 will be so zoomed in, you'll mostly see solid colors.
uint16_t scale = 30; // scale is set dynamically once we've started up

// This is the array that we keep our computed noise values in
uint8_t noise[MAX_DIMENSION][MAX_DIMENSION];

CRGBPalette16 currentPalette( PartyColors_p );
uint8_t       colorLoop = 1;


void SetupRandomPalette()
{
  currentPalette = CRGBPalette16(
                      CHSV( random8(), 255, 32),
                      CHSV( random8(), 255, 255),
                      CHSV( random8(), 128, 255),
                      CHSV( random8(), 255, 255));
}

// This function sets up a palette of black and white stripes,
// using code.  Since the palette is effectively an array of
// sixteen CRGB colors, the various fill_* functions can be used
// to set them up.
void SetupBlackAndWhiteStripedPalette()
{
  // 'black out' all 16 palette entries...
  fill_solid( currentPalette, 16, CRGB::Black);
  // and set every fourth one to white.
  currentPalette[0] = CRGB::White;
  currentPalette[4] = CRGB::White;
  currentPalette[8] = CRGB::White;
  currentPalette[12] = CRGB::White;

}

// This function sets up a palette of purple and green stripes.
void SetupPurpleAndGreenPalette()
{
  CRGB purple = CHSV( HUE_PURPLE, 255, 255);
  CRGB green  = CHSV( HUE_GREEN, 255, 255);
  CRGB black  = CRGB::Black;

  currentPalette = CRGBPalette16(
    green,  green,  black,  black,
    purple, purple, black,  black,
    green,  green,  black,  black,
    purple, purple, black,  black );
}


//
// Mark's xy coordinate mapping code.  See the XYMatrix for more information on it.
//
uint16_t XY( uint8_t x, uint8_t y)
{
  uint16_t i;
  if( kMatrixSerpentineLayout == false) {
    i = (y * kMatrixWidth) + x;
  }
  if( kMatrixSerpentineLayout == true) {
    if( y & 0x01) {
      // Odd rows run backwards
      uint8_t reverseX = (kMatrixWidth - 1) - x;
      i = (y * kMatrixWidth) + reverseX;
    } else {
      // Even rows run forwards
      i = (y * kMatrixWidth) + x;
    }
  }
  return i;
}

// Fill the x/y array of 8-bit noise values using the inoise8 function.
void fillnoise8() {
  // If we're runing at a low "speed", some 8-bit artifacts become visible
  // from frame-to-frame.  In order to reduce this, we can do some fast data-smoothing.
  // The amount of data smoothing we're doing depends on "speed".
  uint8_t dataSmoothing = 0;
  if( speed < 50) {
    dataSmoothing = 200 - (speed * 4);
  }

  for(int i = 0; i < MAX_DIMENSION; i++) {
    int ioffset = scale * i;
    for(int j = 0; j < MAX_DIMENSION; j++) {
      int joffset = scale * j;

      uint8_t data = inoise8(x + ioffset,y + joffset,z);

      // The range of the inoise8 function is roughly 16-238.
      // These two operations expand those values out to roughly 0..255
      // You can comment them out if you want the raw noise data.
      data = qsub8(data,16);
      data = qadd8(data,scale8(data,39));

      if( dataSmoothing ) {
        uint8_t olddata = noise[i][j];
        uint8_t newdata = scale8( olddata, dataSmoothing) + scale8( data, 256 - dataSmoothing);
        data = newdata;
      }

      noise[i][j] = data;
    }
  }

  z += speed;

  // apply slow drift to X and Y, just for visual variation.
  x += speed / 8;
  y -= speed / 16;
}

void mapNoiseToLEDsUsingPalette()
{
  static uint8_t ihue=0;

  for(int i = 0; i < kMatrixWidth; i++) {
    for(int j = 0; j < kMatrixHeight; j++) {
      // We use the value at the (i,j) coordinate in the noise
      // array for our brightness, and the flipped value from (j,i)
      // for our pixel's index into the color palette.

      uint8_t index = noise[j][i];
      uint8_t bri =   noise[i][j];

      // if this palette is a 'loop', add a slowly-changing base value
      if( colorLoop) {
        index += ihue;
      }

      // brighten up, as the color palette itself often contains the
      // light/dark dynamic range desired
      if( bri > 127 ) {
        bri = 255;
      } else {
        bri = dim8_raw( bri * 2);
      }

      CRGB color = ColorFromPalette( currentPalette, index, bri);
      leds[XY(i,j)] = color;
    }
  }

  ihue+=1;
}


// There are several different palettes of colors demonstrated here.
//
// FastLED provides several 'preset' palettes: RainbowColors_p, RainbowStripeColors_p,
// OceanColors_p, CloudColors_p, LavaColors_p, ForestColors_p, and PartyColors_p.
//
// Additionally, you can manually define your own color palettes, or you can write
// code that creates color palettes on the fly.

// 1 = 5 sec per palette
// 2 = 10 sec per palette
// etc
#define HOLD_PALETTES_X_TIMES_AS_LONG 1

void ChangePaletteAndSettingsPeriodically()
{
  uint8_t secondHand = ((millis() / 1000) / HOLD_PALETTES_X_TIMES_AS_LONG) % 60;
  static uint8_t lastSecond = 99;

  if( lastSecond != secondHand) {
    lastSecond = secondHand;
    if( secondHand ==  0)  { currentPalette = RainbowColors_p;         speed = 20; scale = 30; colorLoop = 1; }
    if( secondHand ==  5)  { SetupPurpleAndGreenPalette();             speed = 10; scale = 50; colorLoop = 1; }
    if( secondHand == 10)  { SetupBlackAndWhiteStripedPalette();       speed = 20; scale = 30; colorLoop = 1; }
    if( secondHand == 15)  { currentPalette = ForestColors_p;          speed =  8; scale =120; colorLoop = 0; }
    if( secondHand == 20)  { currentPalette = CloudColors_p;           speed =  4; scale = 30; colorLoop = 0; }
    if( secondHand == 25)  { currentPalette = LavaColors_p;            speed =  8; scale = 50; colorLoop = 0; }
    if( secondHand == 30)  { currentPalette = OceanColors_p;           speed = 20; scale = 90; colorLoop = 0; }
    if( secondHand == 35)  { currentPalette = PartyColors_p;           speed = 20; scale = 30; colorLoop = 1; }
    if( secondHand == 40)  { SetupRandomPalette();                     speed = 20; scale = 20; colorLoop = 1; }
    if( secondHand == 45)  { SetupRandomPalette();                     speed = 50; scale = 50; colorLoop = 1; }
    if( secondHand == 50)  { SetupRandomPalette();                     speed = 90; scale = 90; colorLoop = 1; }
    if( secondHand == 55)  { currentPalette = RainbowStripeColors_p;   speed = 30; scale = 20; colorLoop = 1; }
  }
}

// This function generates a random palette that's a gradient
// between four different colors.  The first is a dim hue, the second is
// a bright hue, the third is a bright pastel, and the last is
// another bright hue.  This gives some visual bright/dark variation
// which is more interesting than just a gradient of different hues.


void setup() {
  pinMode(latch, OUTPUT);
  digitalWrite(latch, HIGH);

  pinMode(button, INPUT);
  state = digitalRead(button);

  // initialize the x/y and time values
  LEDS.addLeds<LED_TYPE,LED_PIN,COLOR_ORDER>(leds,NUM_LEDS);
  LEDS.setBrightness(BRIGHTNESS);

  // Initialize our coordinates to some random values
  x = random16();
  y = random16();
  z = random16();
}


void loop() {
  // Periodically choose a new palette, speed, and scale
  ChangePaletteAndSettingsPeriodically();

  // generate noise data
  fillnoise8();

  // convert the noise data to colors in the LED array
  // using the current palette
  mapNoiseToLEDsUsingPalette();

  LEDS.show();
  delay(10);
}
【Arduino 动手做】FLEXBALL - 带 WiFi 的百像素柔性 PCB 球
项目链接:https://www.instructables.com/FLEXBALL-a-Hundred-Pixel-Flexible-PCB-Ball-With-Wi/
项目作者:moekoe
项目视频 :https://www.youtube.com/watch?v=bGl29tdzQ-s
项目代码:https://content.instructables.com/FDC/XD7I/KER3YY2W/FDCXD7IKER3YY2W.cpp
brd 文件:https://content.instructables.com/FWB/HPMQ/KETYULX3/FWBHPMQKETYULX3.brd
sch 文件:https://content.instructables.com/F25/151C/KETYUM17/F25151CKETYUM17.sch
https://content.instructables.com/FNQ/3ZSD/KER3ZDCM/FNQ3ZSDKER3ZDCM.csv


 他的勋章
他的勋章

评论