 返回首页
返回首页
 回到顶部
回到顶部
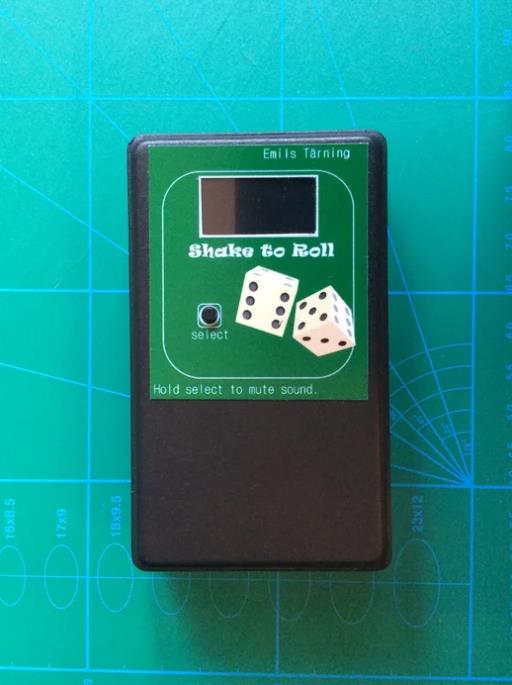
这个 instructable 是关于如何使用 oled 显示器和 Arduino uno 或类似设备构建一个非常漂亮的电子骰子。
在这个项目一开始,我就决定在原型完成后,我想构建一个定制的版本,所以在这个高深莫测的版本中,有描述、如何构建原型版本以及如果你想构建自己的自定义版本有用的提示。
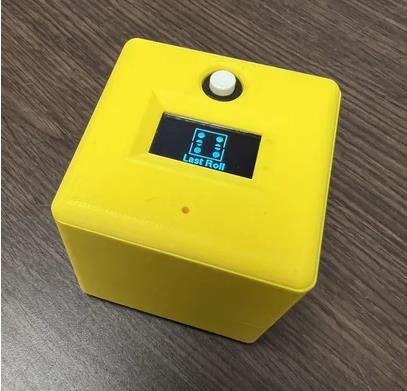
该视频展示了最终的定制骰子版本和功能。
第 1 步:骰子函数
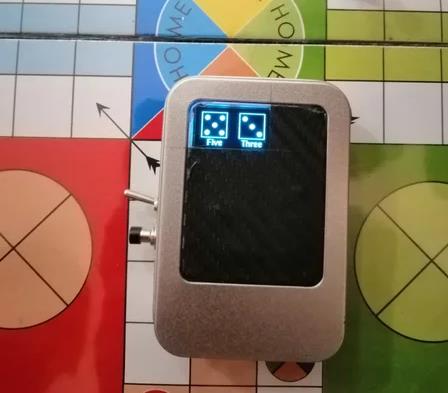
骰子有一个选择开关,可以在 1 个或 2 个骰子之间进行选择,它还有一个压电元件,当骰子通过随机数运行和停止时会产生声音。只要按住掷骰子开关,骰子就会运行并在显示屏上显示随机数。松开按钮后,它会开始减慢随机次数的速度,直到最终停止并显示结果。这是为了模拟真实掷骰子的行为。
Dice 具有自动关机电路以节省电池。
如果您在 60 秒内不使用骰子,电源会自动关闭。
在软件中,有一个功能可以通过按住选择开关超过一秒钟来打开或关闭声音。
第 2 步:自动关机功能
骰子具有在不使用时自行关闭以节省电池的功能,请参阅自动关机电路的原理图。
这是它的工作原理:
该电路由一个 P FET 晶体管组成,其作用类似于开关。晶体管上的栅极由标准瞬时按钮 (S1) 控制。当按下开关时,栅极上的电压下降,电流开始流经晶体管。在栅极上,有一个与接地开关并联的另一个晶体管。只要基极上的电压很高,晶体管就会保持 FET 栅极上的低电压。基极电压从微控制器施加,当控制器通电时,草图做的第一件事是将数字引脚 8 设置为高电平,然后通过软件锁存电路。7805 稳压器将电压稳定在 5V,两个二极管可防止电池的 9 伏电压到达微控制器。相同的开关也用于控制控制器上的数字输入(引脚 7)。
在草图中,我们测量了自按下按钮以来经过的时间,并将其与确定的 ON 时间进行比较。
在电源关闭之前,骰子开始闪烁,压电陶瓷会发出警告信号,因此用户有时间再次按下开关以重置计时器。
在断电之前,微控制器将最新的数字与选定的骰子数量和声音状态一起存储到 EEPROM 存储器中。这些值将在下次开始掷骰子时调用。
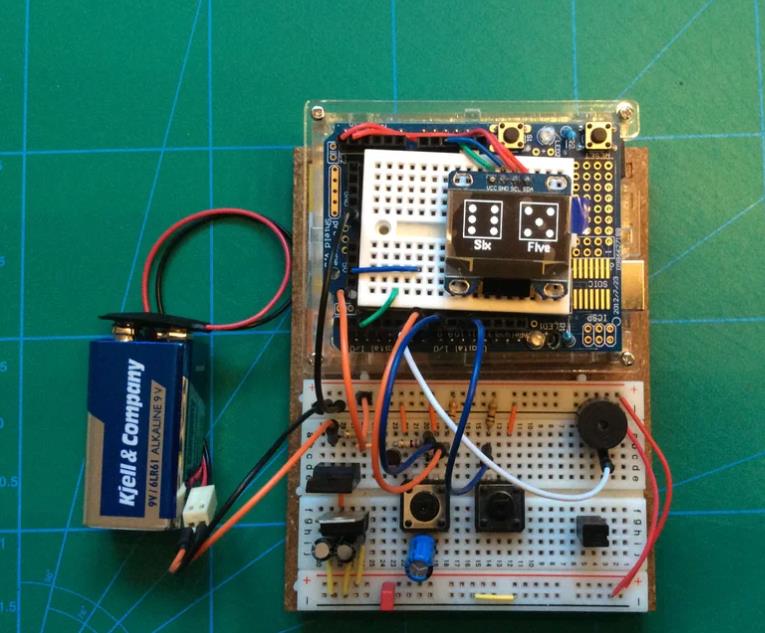
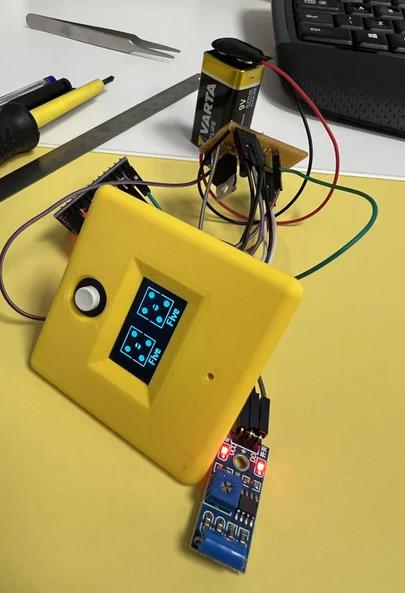
第 3 步:原型
现在是时候开始构建了。
你需要:
1 个无焊试验板
1 个 Arduino Uno
1 个 OLED 显示屏 128x64 i2c
2 个电容器 10uF
1 个电容器 100nF
2 个电阻器 10Kohm
2 电阻器 100Kohm
2 个二极管 1n4148
1 个晶体管 NPN BC547b
1 个 MosFET IRF9640
1 卷tage调节器 L7805
2 个可变开关
1 压电陶瓷
跳线
9 V 电池
就是这样。
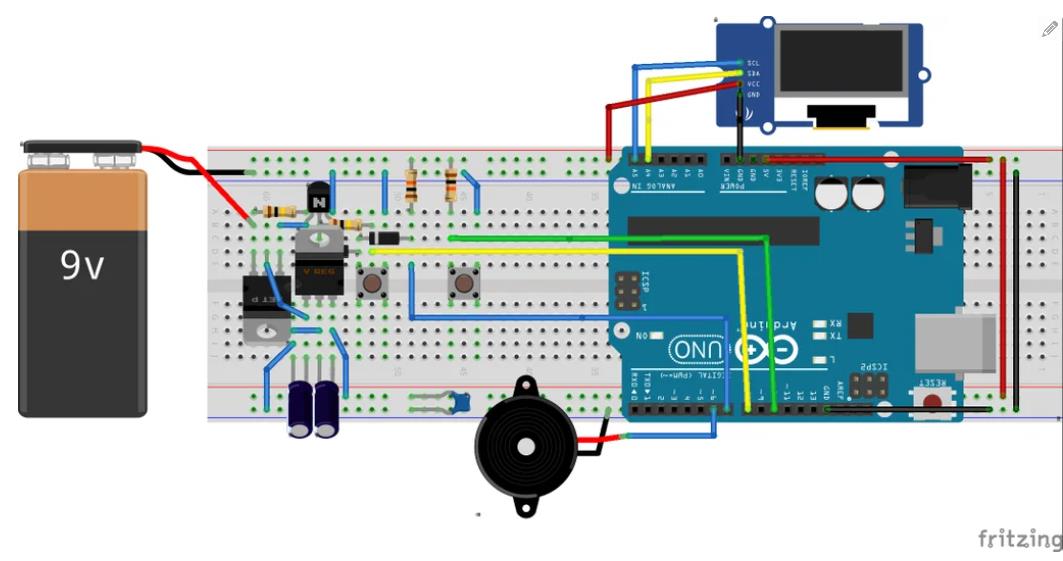
仔细按照上面的 fritzing 图片进行作。
请特别注意图片中稳压器后面的二极管(难以看清),原理图中的 D1。二极管的阳极侧应连接到 BC547 传输器的集电极。
压电连接到引脚 6,滚动按钮连接到引脚 7,选择按钮连接到引脚 10,Power_ON控制器连接到引脚 8。
不要忘记通过 Arduino 板上的 5V 引脚和接地引脚为 Arduino Uno 供电,而不是通过侧面的直流护套供电。
草图使用了 U8g2lib.h 作为显示,你可以在这里找到,https://github.com/olikraus/u8g2/ ,下载和安装后再编译代码。
如何安装库?https://www.arduino.cc/en/Guide/Libraries
复制代码并将其粘贴到 Arduino IDE 中,然后上传 sketch。
完成后不要忘记从 Arduino 上拔下 USB 电缆,否则自动关机功能将不起作用,因为 USB/计算机正在为控制器供电。
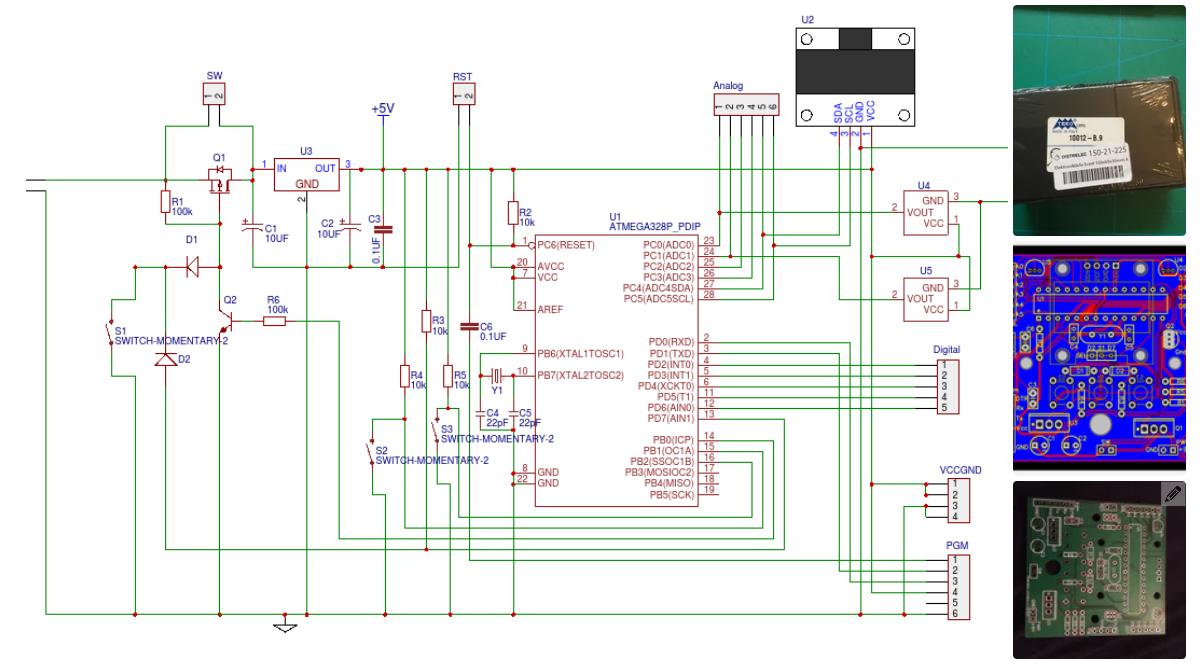
第 4 步:自定义版本。
这个 instructable 的其余部分是关于 tips 和 trix,如果你想把它转换成一个更有用的自定义版本。
为了绘制定制版本的完整原理图,我使用了免费的在线原理图和 PCB 软件 EASYEDA 您可以在 http://easyeda.com/ 中找到它。
订购组件时,您需要确保微控制器的芯片上有 Arduino 引导加载程序,如果没有,您必须先准备芯片。网络上有很多关于如何作的教程。
我添加了额外的组件,这些组件未在此项目中使用,但可用于未来的项目。U4、U5、R4、S2。
原理图中的 PGM Header 用于对芯片进行编程。如果您想使用 PGM 端口对芯片进行编程,您需要一个 USB 转串行适配器。
USB 转串行 UART 板
当然,您可以使用 Arduino 板将草图上传到控制器,然后将芯片移动到 PCB。
立译 (EASYEDA) 还提供为您制作 PCB 的功能。
在我开始将原理图转换为 PCB 布局之前,我选择了一个盒子,该盒子具有合适的尺寸和空间,可容纳可从外部更换的 9 伏电池。
这样做的原因是,在开始布局之前,我需要尺寸以及在 PCB 上为螺钉打孔的位置,这样最终的 PCB 将完美地放入盒子中。
我非常仔细地测量了盒子的内部尺寸,然后使用相同的软件将设计转换为定制尺寸的电路板,然后单击制造按钮并下订单。
第 5 步:焊接
因为我必须订购多个 PCB 才能获得合理的价格,所以我将其设计为多功能,以便我可以在未来的项目中使用相同的板和盒子。我为模拟和数字端口添加了额外的引脚以及额外的按钮。
在这个项目中,我使用 S1 为电路供电并掷骰子,使用 S3 作为 Select 。
当您收到 PCB 时,是时候将所有组件焊接到正确的位置了。在我的 PCB 上,显示屏和按钮安装在背面,以缩小尺寸并可从外部访问。
当我制作骰子时,我意识到如果您可以摇动盒子以启动它并掷骰子,那就太好了。
如果您想要该功能,则需要对电路进行小幅修改。
修改:
将滚动开关 (S1) 更改为倾斜开关传感器,并在开关上并联添加一个 100uF 电容器,以将 FET 栅极上的电平保持在足够长的低电平,以便微控制器有时间启动并将数字输出端口设置为高电平并锁定“电源”电路。
您需要将倾斜传感器安装在延长销上,以便您可以弯曲它并调整角度,以便在盒子躺在桌子上时关闭开关。
倾斜传感器
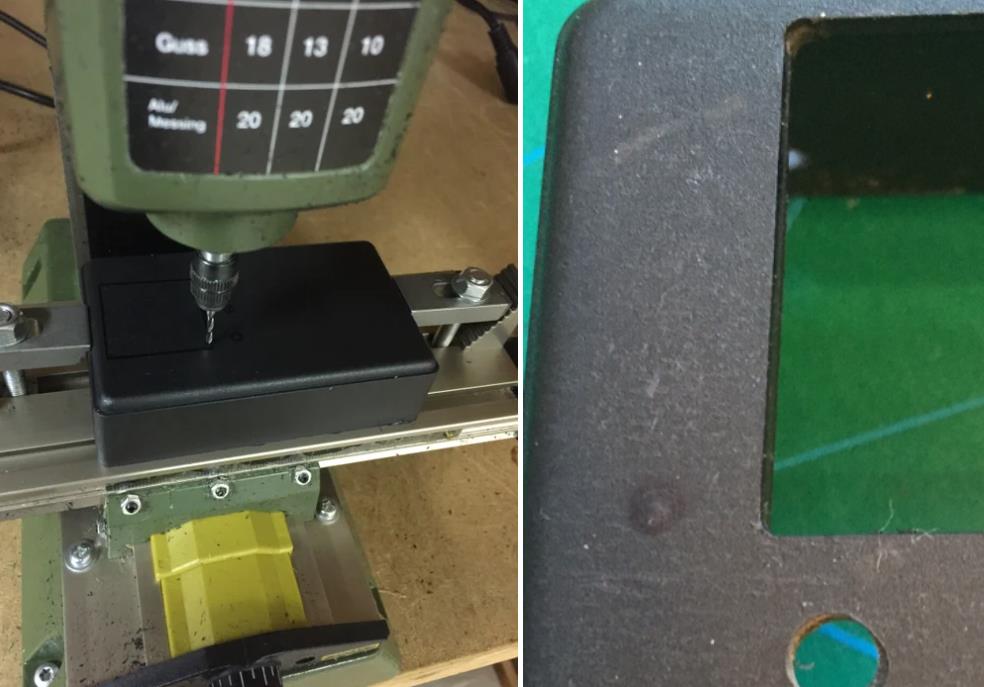
第 6 步:在盒子中切出所需的孔
完成 PCB 后,是时候在盒子中钻孔了。为了切割显示器的方孔,我使用了微型铣床,但您当然可以使用小曲线锯或类似设备。
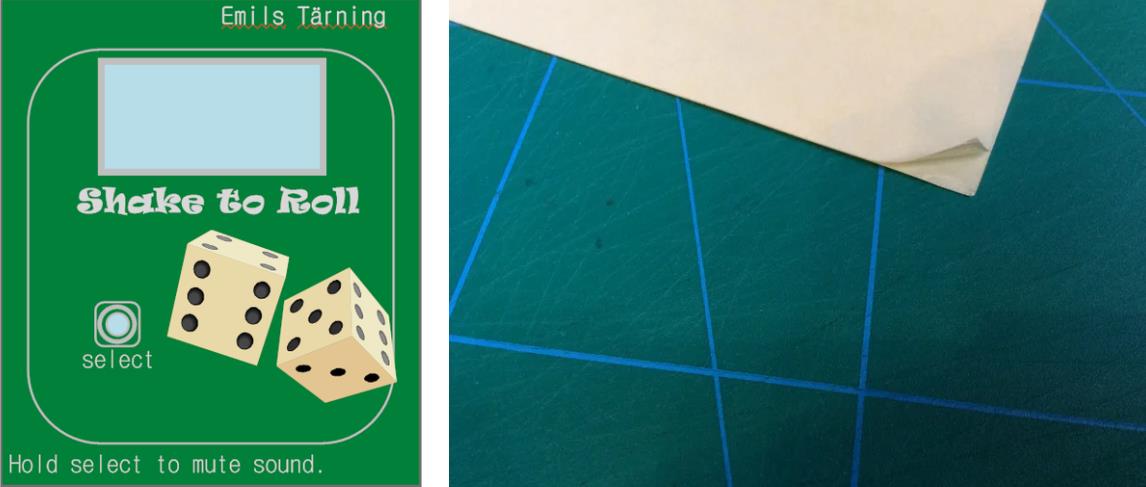
第 7 步:前面板
然后你需要一个漂亮的前面板。
我在 “smart-draw software” 中绘制面板,但您几乎可以使用任何您喜欢的绘图软件。
完成绘图后,在标准彩色激光打印机或类似打印机上打印出来,但要打印在比正常打印机厚一点的纸上。取一张两面都有胶水的塑料片。取下一侧的保护板并小心地粘贴面板。您可以在大多数纸店找到这种塑料薄膜。
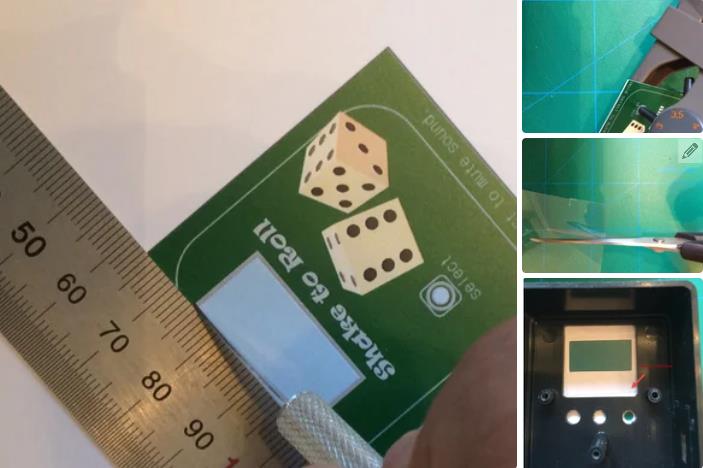
第 8 步:在面板上切孔。
用锋利的裁纸刀在面板上切出孔。
对于圆形按钮孔,请使用打孔器。现在面板看起来就像普通的贴纸,但在将其粘贴到盒子之前,您需要为其喷涂一层保护漆。
面板干燥后,小心地将其粘贴到盒子上。
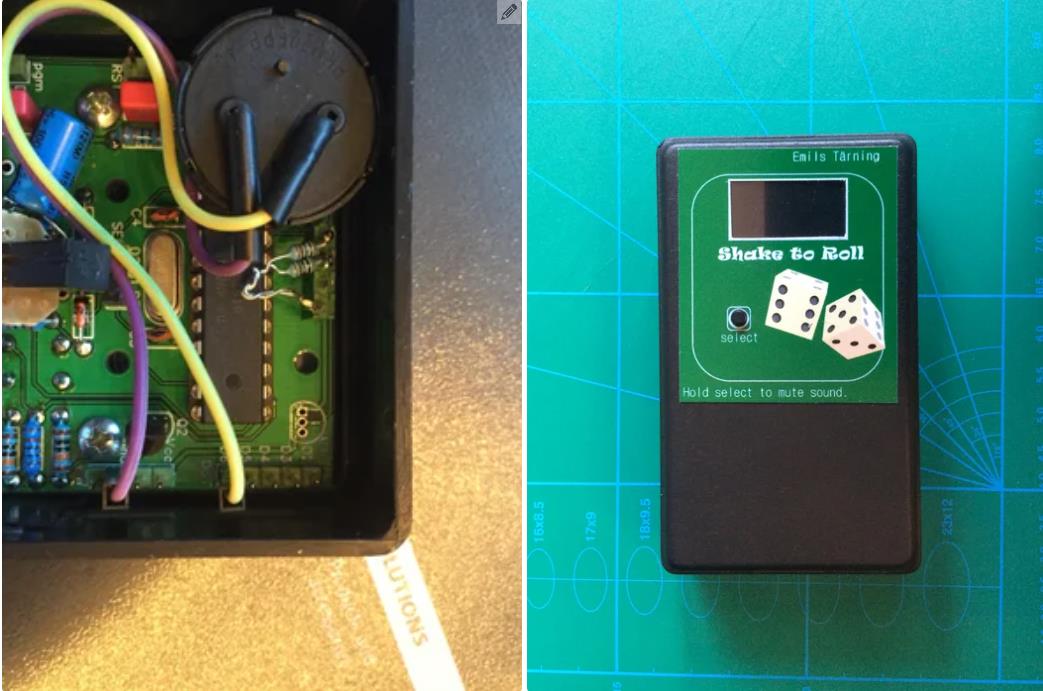
第 9 步:项目结束
不幸的是,当我完成这个项目时,我发现骰子有时会在我摇晃时冻结,需要重新启动。
我在原型设计过程中从未遇到过这个问题,所以我有点困惑,但我发现这是由于投射在显示器的 SDA、SCL 引脚上的噪声造成的。
解决方案是在每个引脚上添加额外的电阻器 1k 到 5V 作为上拉电阻,见图。之后,骰子按预期完美工作。

项目代码
/* Oled Dice By Tomas Carlsson

  The sketch use an oled display 128x64 pixel I2C interface to display one or two dices.
  The display are connected
  SCL Analog5  Use Pullup Resistor:
  SDA Analog4  Use Pullup Resistor:
  Vcc +5V
  GND Ground
  the sketch uses U8g2lib as displaydriver
  see below copyrigt and download info

  /*
  /*

  U8g2lib.h

  C++ Arduino wrapper for the u8g2 struct and c functions for the u8g2 library
  Universal 8bit Graphics Library (https://github.com/olikraus/u8g2/)
  Copyright (c) 2016, olikraus@gmail.com
  All rights reserved.
  Redistribution and use in source and binary forms, with or without modification,
  are permitted provided that the following conditions are met:
    Redistributions of source code must retain the above copyright notice, this list
    of conditions and the following disclaimer.

    Redistributions in binary form must reproduce the above copyright notice, this
    list of conditions and the following disclaimer in the documentation and/or other
    materials provided with the distribution.
  THIS SOFTWARE IS PROVIDED BY THE COPYRIGHT HOLDERS AND
  CONTRIBUTORS "AS IS" AND ANY EXPRESS OR IMPLIED WARRANTIES,
  INCLUDING, BUT NOT LIMITED TO, THE IMPLIED WARRANTIES OF
  MERCHANTABILITY AND FITNESS FOR A PARTICULAR PURPOSE ARE
  DISCLAIMED. IN NO EVENT SHALL THE COPYRIGHT HOLDER OR
  CONTRIBUTORS BE LIABLE FOR ANY DIRECT, INDIRECT, INCIDENTAL,
  SPECIAL, EXEMPLARY, OR CONSEQUENTIAL DAMAGES (INCLUDING, BUT
  NOT LIMITED TO, PROCUREMENT OF SUBSTITUTE GOODS OR SERVICES;
  LOSS OF USE, DATA, OR PROFITS; OR BUSINESS INTERRUPTION) HOWEVER
  CAUSED AND ON ANY THEORY OF LIABILITY, WHETHER IN CONTRACT,
  STRICT LIABILITY, OR TORT (INCLUDING NEGLIGENCE OR OTHERWISE)
  ARISING IN ANY WAY OUT OF THE USE OF THIS SOFTWARE, EVEN IF
  ADVISED OF THE POSSIBILITY OF SUCH DAMAGE.
  Note:
  U8x8lib.h is included for the declaration of the helper functions in U8x8lib.cpp.
  U8g2 class is based on the u8g2 struct from u8g2.h, the U8x8 class from U8x8lib.h is not used.
*/

#include<U8g2lib.h>
#include <Wire.h>
#include<SPI.h>
#include <EEPROM.h>


U8G2_SSD1306_128X64_NONAME_2_HW_I2C oled(U8G2_R0, /*reset=*/ U8X8_PIN_NONE);
const byte BUTTON_PIN = 7;
const byte SELECT_PIN = 10;
const byte SHUTOFFPIN = 8;
const byte SOUND_PIN = 6;

unsigned long int time = millis();
const long int warningTime = 60000; //AutoShutoff time

byte startadress = 0; //EEPROM Startadress
const byte EEPROM_ID = 0x97;//to track valid data in EEPROM

byte rollMode = 1;
int dicenr1 = 1; // Dice random number 1
int dicenr2 = 1; //Dice random number 2
int dicenumber = 1; //Dice variable One or Two
boolean BUZZ = true;//Sound on


void setup(void) {
  //oled.setI2CAddress(0x3C * 2); //set display adress if needed (default 0x3C)
  oled.begin();

  ////////////////////Set POWER On Control////////////////
  pinMode(SHUTOFFPIN, OUTPUT);
  digitalWrite(SHUTOFFPIN, HIGH);
  ////////////////////////////////////////////////////////
  pinMode(SELECT_PIN, INPUT_PULLUP);
  pinMode(BUTTON_PIN, INPUT_PULLUP);
  pinMode(SOUND_PIN, OUTPUT);
  //Serial.begin(9600);


  randomSeed(analogRead(A0));
  ///////////////////////Check for valid data//////////////////
  byte id = EEPROM.read(startadress);
  if (id == EEPROM_ID) {
    dicenr1 = EEPROM.read(startadress + 1);
    dicenr2 = EEPROM.read(startadress + 2);
    dicenumber = EEPROM.read(startadress + 3);
    BUZZ = EEPROM.read(startadress + 4);
  } else {
    EEPROM.write(startadress, EEPROM_ID);
    EEPROM.write(startadress + 1, dicenr1);
    EEPROM.write(startadress + 2, dicenr2);
    EEPROM.write(startadress + 3, dicenumber);
    EEPROM.write(startadress + 4, BUZZ);
  }
  /////////////////////////////////////////////////////////////////
  Roll(); //Show last Dice before shutoff
  delay(1000);
}
void loop(void) {
  ///////////////Select one or Two Dice////////////
  if (digitalRead(SELECT_PIN) == LOW) {
    long SELECT_time = millis();
    while (digitalRead(SELECT_PIN) == LOW) {};
    if (millis() - SELECT_time < 1000) {
      dicenumber = (dicenumber % 2) + 1;
      if (BUZZ) {
        tone(SOUND_PIN, 500, 80);
        delay(200);
      }
    } else {
      tone(SOUND_PIN, 500, 80);
      BUZZ = ! BUZZ;
    }
  }

  /////////////check rollbutton//////////////////

  if (digitalRead(BUTTON_PIN) == LOW) {

    rollMode = 0;
    do {
      randomGenerator();
      Roll();
    }
    while (digitalRead(BUTTON_PIN) == LOW);
    slow();
    time = millis();
    rollMode = 2;
  }
  ///////////////////////////////////////////////

  Roll(); // Show Result

  Check_On_Time();
}

//////////////Check On Time and save data//////////////////
void Check_On_Time() {
  if (millis() - time > warningTime) {
    CleanScreen();
    Roll();
  }
  if (millis() - time > warningTime + 5000) {

    EEPROM.write(startadress + 1, dicenr1);
    EEPROM.write(startadress + 2, dicenr2);
    EEPROM.write(startadress + 3, dicenumber);
    EEPROM.write(startadress + 4, BUZZ);
    delay(50);
    digitalWrite(SHUTOFFPIN, LOW);
  }
}
///////////////////////////////////////////////////////////////

///////////////////Roll dice draw and display///////////////////
void Roll() {
  String number[25] = {"One", "Two", "Three", "Foor", "Five", "Six"};

  int x;
  int x1;
  const int y = 2;
  oled.setFont(u8g_font_helvB10);

  oled.firstPage();
  do {
    if (rollMode == 1) {
      oled.drawStr(36, 64, "Last Roll");
    } else if (rollMode == 0) {
      oled.drawStr(36, 64, "Roll Dice");
    }

    switch (dicenumber) {

      case (1): //Two dice
        x = 76;

        oled.drawFrame(2 + x, y, 48, 48);
        if (dicenr1 == 1) {
          oled.drawDisc(26 + x, 24 + y, 4); //Center
          x1 = 13;
        } else if (dicenr1 == 2) {
          oled.drawDisc(12 + x, 10 + y, 4); //upper L
          oled.drawDisc(40 + x, 38 + y, 4); //lower R
          x1 = 14;

        } else if (dicenr1 == 3) {
          oled.drawDisc(26 + x, 24 + y, 4); //Center
          oled.drawDisc(12 + x, 10 + y, 4); //upper L
          oled.drawDisc(40 + x, 38 + y, 4); //lower R
          x1 = 7;

        } else if (dicenr1 == 4) {
          oled.drawDisc(12 + x, 10 + y, 4); //upper L
          oled.drawDisc(40 + x, 10 + y, 4); //upper R
          oled.drawDisc(12 + x, 38 + y, 4); //lower L
          oled.drawDisc(40 + x, 38 + y, 4); //lower R
          x1 = 11;

        } else if (dicenr1 == 5) {
          oled.drawDisc(12 + x, 10 + y, 4); //upper L
          oled.drawDisc(40 + x, 10 + y, 4); //upper R
          oled.drawDisc(12 + x, 38 + y, 4); //lower L
          oled.drawDisc(40 + x, 38 + y, 4); //lower R
          oled.drawDisc(26 + x, 24 + y, 4); //Center
          x1 = 13;

        } else if (dicenr1 == 6) {
          oled.drawDisc(12 + x, 10 + y, 4); //upper L
          oled.drawDisc(40 + x, 10 + y, 4); //upper R
          oled.drawDisc(12 + x, 38 + y, 4); //lower L
          oled.drawDisc(40 + x, 38 + y, 4); //lower R
          oled.drawDisc(12 + x, 24 + y, 4); //center L
          oled.drawDisc(40 + x, 24 + y, 4); //center R
          x1 = 16;
        }
        if (rollMode == 2) {

          oled.setCursor(x1 + x, 62 + y);
          oled.print(number[dicenr1 - 1]);

        }
      case (2)://one Dice

        if (dicenumber == 2) {
          x = 40;
        } else {
          x = 5;
        }
        oled.drawFrame(2 + x, y, 48, 48);

        if (dicenr2 == 1) {
          oled.drawDisc(26 + x, 24 + y, 4); //Center
          x1 = 13;

        } else if (dicenr2 == 2) {
          oled.drawDisc(12 + x, 10 + y, 4); //upper L
          oled.drawDisc(40 + x, 38 + y, 4); //lower R
          x1 = 14;

        } else if (dicenr2 == 3) {
          oled.drawDisc(26 + x, 24 + y, 4); //Center
          oled.drawDisc(12 + x, 10 + y, 4); //upper L
          oled.drawDisc(40 + x, 38 + y, 4); //lower R
          x1 = 7;

        } else if (dicenr2 == 4) {
          oled.drawDisc(12 + x, 10 + y, 4); //upper L
          oled.drawDisc(40 + x, 10 + y, 4); //upper R
          oled.drawDisc(12 + x, 38 + y, 4); //lower L
          oled.drawDisc(40 + x, 38 + y, 4); //lower R
          x1 = 11;

        } else if (dicenr2 == 5) {
          oled.drawDisc(12 + x, 10 + y, 4); //upper L
          oled.drawDisc(40 + x, 10 + y, 4); //upper R
          oled.drawDisc(12 + x, 38 + y, 4); //lower L
          oled.drawDisc(40 + x, 38 + y, 4); //lower R
          oled.drawDisc(26 + x, 24 + y, 4); //Center
          x1 = 13;

        } else if (dicenr2 == 6) {
          oled.drawDisc(12 + x, 10 + y, 4); //upper L
          oled.drawDisc(40 + x, 10 + y, 4); //upper R
          oled.drawDisc(12 + x, 38 + y, 4); //lower L
          oled.drawDisc(40 + x, 38 + y, 4); //lower R
          oled.drawDisc(12 + x, 24 + y, 4); //center L
          oled.drawDisc(40 + x, 24 + y, 4); //center R
          x1 = 16;
        }
        if (rollMode == 2) {
          oled.setCursor(x1 + x, 62 + y);
          oled.print(number[dicenr2 - 1]);
        }
        break;
    }
  } while (oled.nextPage());
  delay(100);
}
////////////////////////////////////////////////////////////////////////////

//////////////////////Slow down rolling dice///////////////////////////////

void slow() {
  int d = 0;
  for (int i = 0; i < (random(7, 30)); i++) {

    randomGenerator();
    Roll();
    delay(d);
    d = d + 50;
  }

  if (BUZZ) {
    tone(SOUND_PIN, 800, 500);
  }
}
////////////////////////////////////////////////////////////////////////

//////////////////////////Create Random Numbers////////////////////////

void randomGenerator () {

  dicenr1 = random(1, 7);
  dicenr2 = random(1, 7);

  if (BUZZ) {
    tone(SOUND_PIN, 700, 80);
  }

}

//////////////////////////////////////////////////////////////////////

/////////////////////////Clear Display////////////////////////////////
void CleanScreen() {
  if (BUZZ) {
    tone(SOUND_PIN, 1000, 20);
  }
  oled.firstPage();
  do {
  } while (oled.nextPage());
  delay(10);
}
/////////////////////////////////////////////////////////////
【Arduino 动手做】OLED 智能电子骰子
项目链接:https://www.instructables.com/Arduino-Oled-Dice/
项目作者:tomasC62
项目代码:https://content.instructables.com/FVR/JSZ5/JCGK7Q0U/FVRJSZ5JCGK7Q0U.txt
U8g2lib库:https://github.com/olikraus/u8g2/
如何安装库? https://www.arduino.cc/en/Guide/Libraries


 他的勋章
他的勋章

评论