 返回首页
返回首页
 回到顶部
回到顶部
wiki查阅感觉费解的点
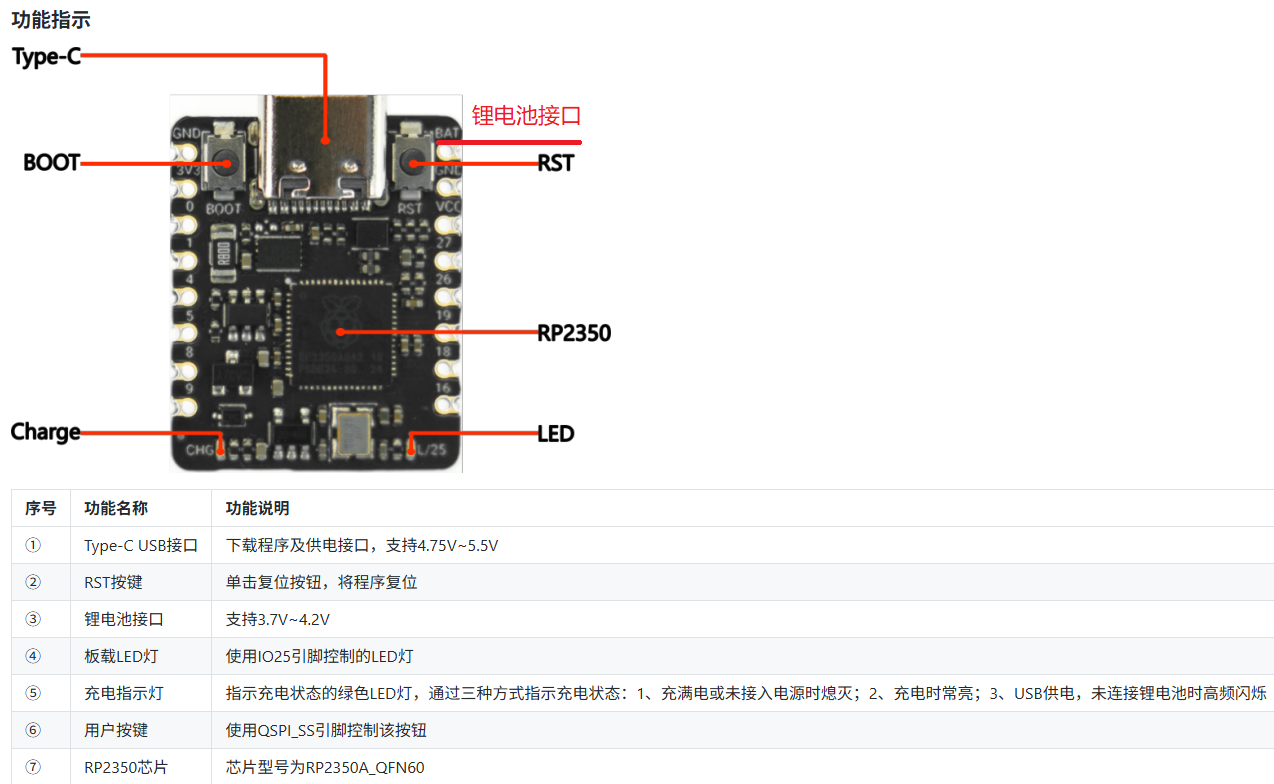
1.图示没有标出锂电池接口与用户按键,咨询之后得知③BAT就是锂电池接口,接入锂电池之后,VCC无输出;接入Type-C之后VCC可以有5V输出。⑥用户按键就是BOOT,对应IO0。
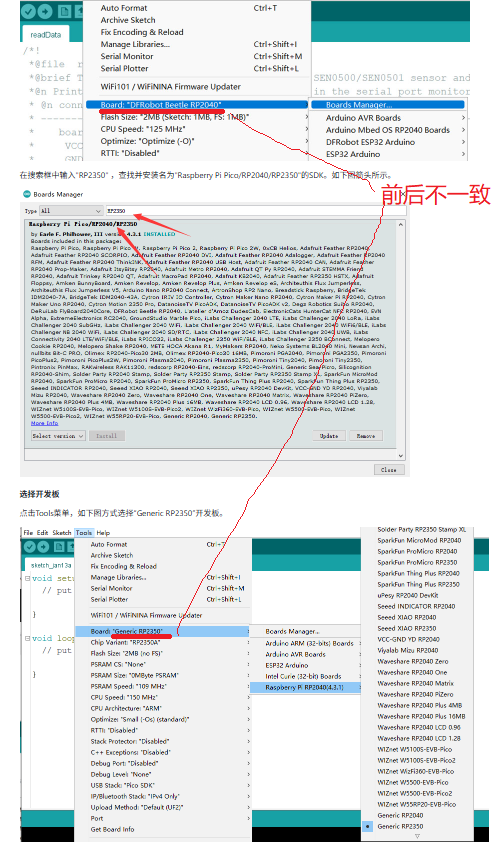
2.板管理器中涉及板前后不一致,建议调整成一致。
树莓派RP2350 环境安装
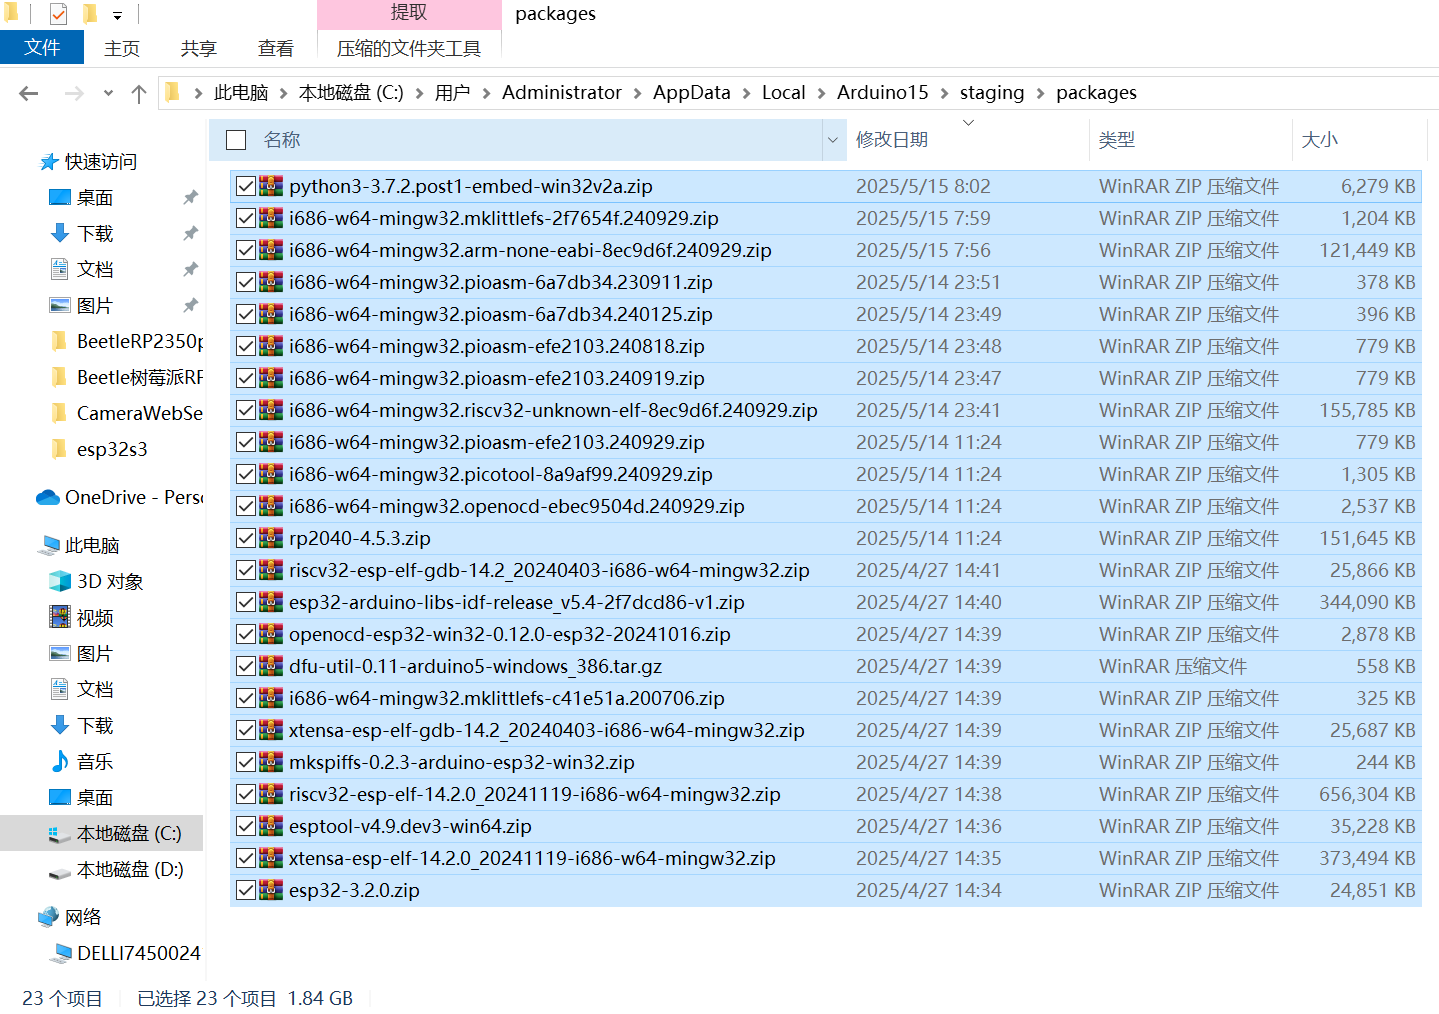
查阅大佬们关于树莓派RP2350环境安装的文献,发现现在可供编程、调试的环境可以有Arduino、Thonny、vscode+platformIO、vscode+pico。其实无论那种环境都是提供一样的功能,能够根据自己的偏好用好其中一种就行了。要注意安装环境默认占用C盘空间,如图所示,仅仅是ESP32S3、RP2350这2块板的安装程序就占用了1.8G的空间,还不包括解压之后占用的空间,所以最好改动一下安装的位置,为系统盘留下充足的空间。
推荐[微雪文档本地安装],他介绍了MicroPython系列(thonny)、C/C++系列,(picovscode)、Arduino系列环境安装,还有丰富的示例可供选择。
树莓派RP2350 环境安装涉及github下载过于缓慢着实让人烦恼,论坛有大神提供了[arduino修改hosts方法],大家可以下载尝试。我使用了代理方式一样可以将相关文件快速下载。例如需要下载https://github.com/earlephilhower/pico-quick-toolchain/releases/download/4.0.1/i686-w64-mingw32.pioasm-efe2103.240929.zip,我们可以在该网址前面加上https://ghproxy.cfd/,使用https://ghproxy.cfd/https://github.com/earlephilhower/pico-quick-toolchain/releases/download/4.0.1/i686-w64-mingw32.pioasm-efe2103.240929.zip就可以快速下载指定的文件,下载完成之后再拷贝到安装文件夹%appdata%/Local/Arduino15/staging/packages。
根据这个原理,可以将Arduino首选项中的附加开发板管理器网址做一个改动,涉及的文件地址均按上述方式改动完成,也能达到加速下载的目的。就是下载文件需要进行校验,否则可能会有意外发生。
树莓派RP2350 环境安装成功检测示例
Arduino环境安装完成之后,工具菜单之下选择“开发板:Generic RP2350”,选择正确连接端口,然后就可以编写程序上传观察效果了。
Arduino自带的程序示例可以充分利用。
WIKI上的RP2350亮灯示例为:
void setup() {
  pinMode(LED_BUILTIN, OUTPUT);//设置引脚为输出模式
}

void loop() {
  digitalWrite(LED_BUILTIN, HIGH); //输出高电平,点亮LED灯
  delay(1000);                    // 延时一秒钟
  digitalWrite(LED_BUILTIN, LOW);  //输出低电平,熄灭LED灯
  delay(1000);                   //延时一秒
}
/*
  Fade

  This example shows how to fade an LED on pin 9 using the analogWrite()
  function.

  The analogWrite() function uses PWM, so if you want to change the pin you're
  using, be sure to use another PWM capable pin. On most Arduino, the PWM pins
  are identified with a "~" sign, like ~3, ~5, ~6, ~9, ~10 and ~11.

  This example code is in the public domain.

  https://www.arduino.cc/en/Tutorial/BuiltInExamples/Fade
*/

int led = 9;           // the PWM pin the LED is attached to
int brightness = 0;    // how bright the LED is
int fadeAmount = 5;    // how many points to fade the LED by

// the setup routine runs once when you press reset:
void setup() {
  // declare pin 9 to be an output:
  pinMode(led, OUTPUT);
}

// the loop routine runs over and over again forever:
void loop() {
  // set the brightness of pin 9:
  analogWrite(led, brightness);

  // change the brightness for next time through the loop:
  brightness = brightness + fadeAmount;

  // reverse the direction of the fading at the ends of the fade:
  if (brightness <= 0 || brightness >= 255) {
    fadeAmount = -fadeAmount;
  }
  // wait for 30 milliseconds to see the dimming effect
  delay(30);
}int brightness = 0; // how bright the LED is
int fadeAmount = 5; // how many points to fade the LED by
void setup() {
pinMode(LED_BUILTIN, OUTPUT);//设置引脚为输出模式
}
void loop() {
// set the brightness of LED_BUILTIN:
analogWrite(LED_BUILTIN, brightness);
// change the brightness for next time through the loop:
brightness = brightness + fadeAmount;
// reverse the direction of the fading at the ends of the fade:
if (brightness <= 0 || brightness >= 255) {
fadeAmount = -fadeAmount;
}
// 若亮度为0则持续1秒黑屏;否则持续50ms亮度brightness
if(brightness==0){
digitalWrite(LED_BUILTIN, LOW); //输出低电平,熄灭LED灯
delay(1000); //延时一秒
}else{
delay(80);
}
}对比RP2350的blink程序与Arduino自带的fade程序,我们可以发现只需要将Arduino自带的fade程序中的led换成LED_BUILTIN就可以了。为了更好的看出呼吸灯的效果,可以将延时时间从30改为80;在亮度brightness为0时直接关灯1秒。
程序烧录完成,观察板子上的led灯能够看到预期效果。
树莓派RP2350疑惑
RP2350定位为可穿戴嵌入式开发板,为什么会没有蓝牙功能呢?印象之中,可穿戴类产品应该都有蓝牙实现交互的……


 他的勋章
他的勋章

评论