 返回首页
返回首页
 回到顶部
回到顶部
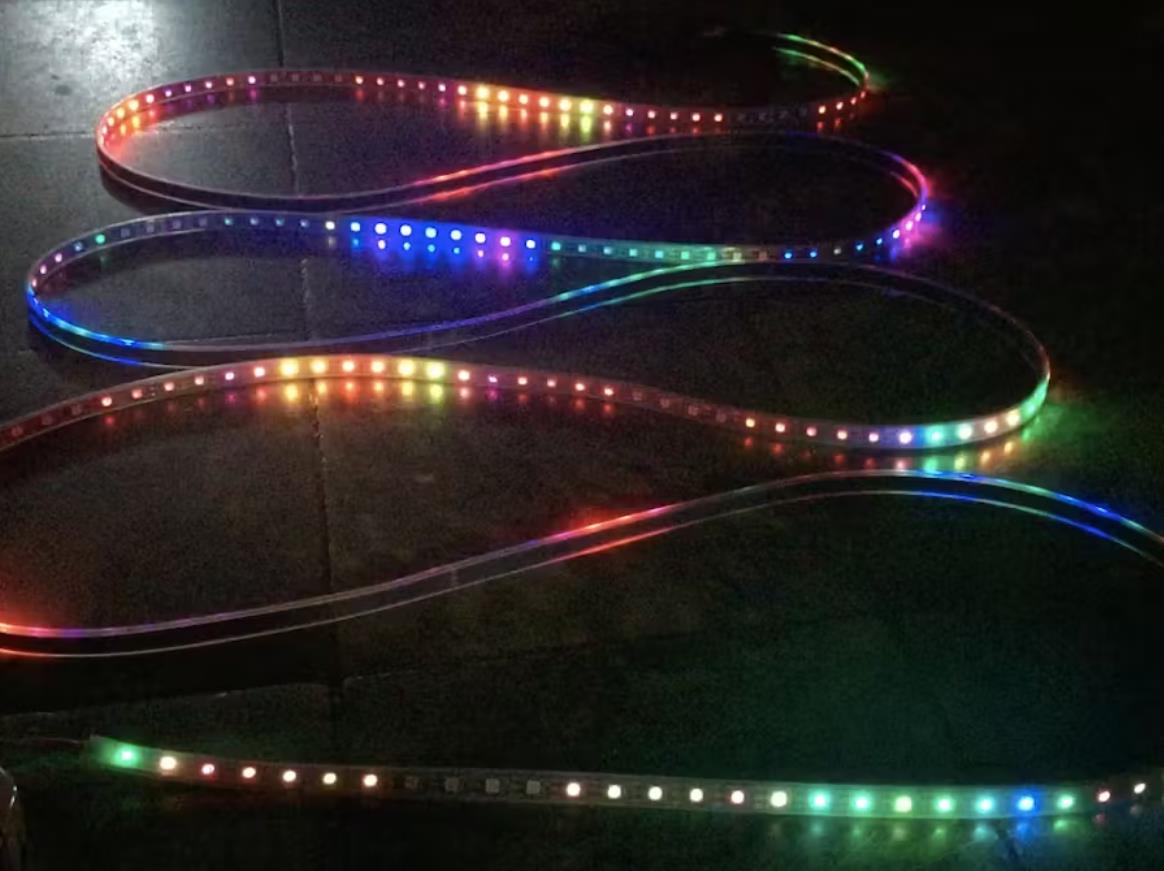
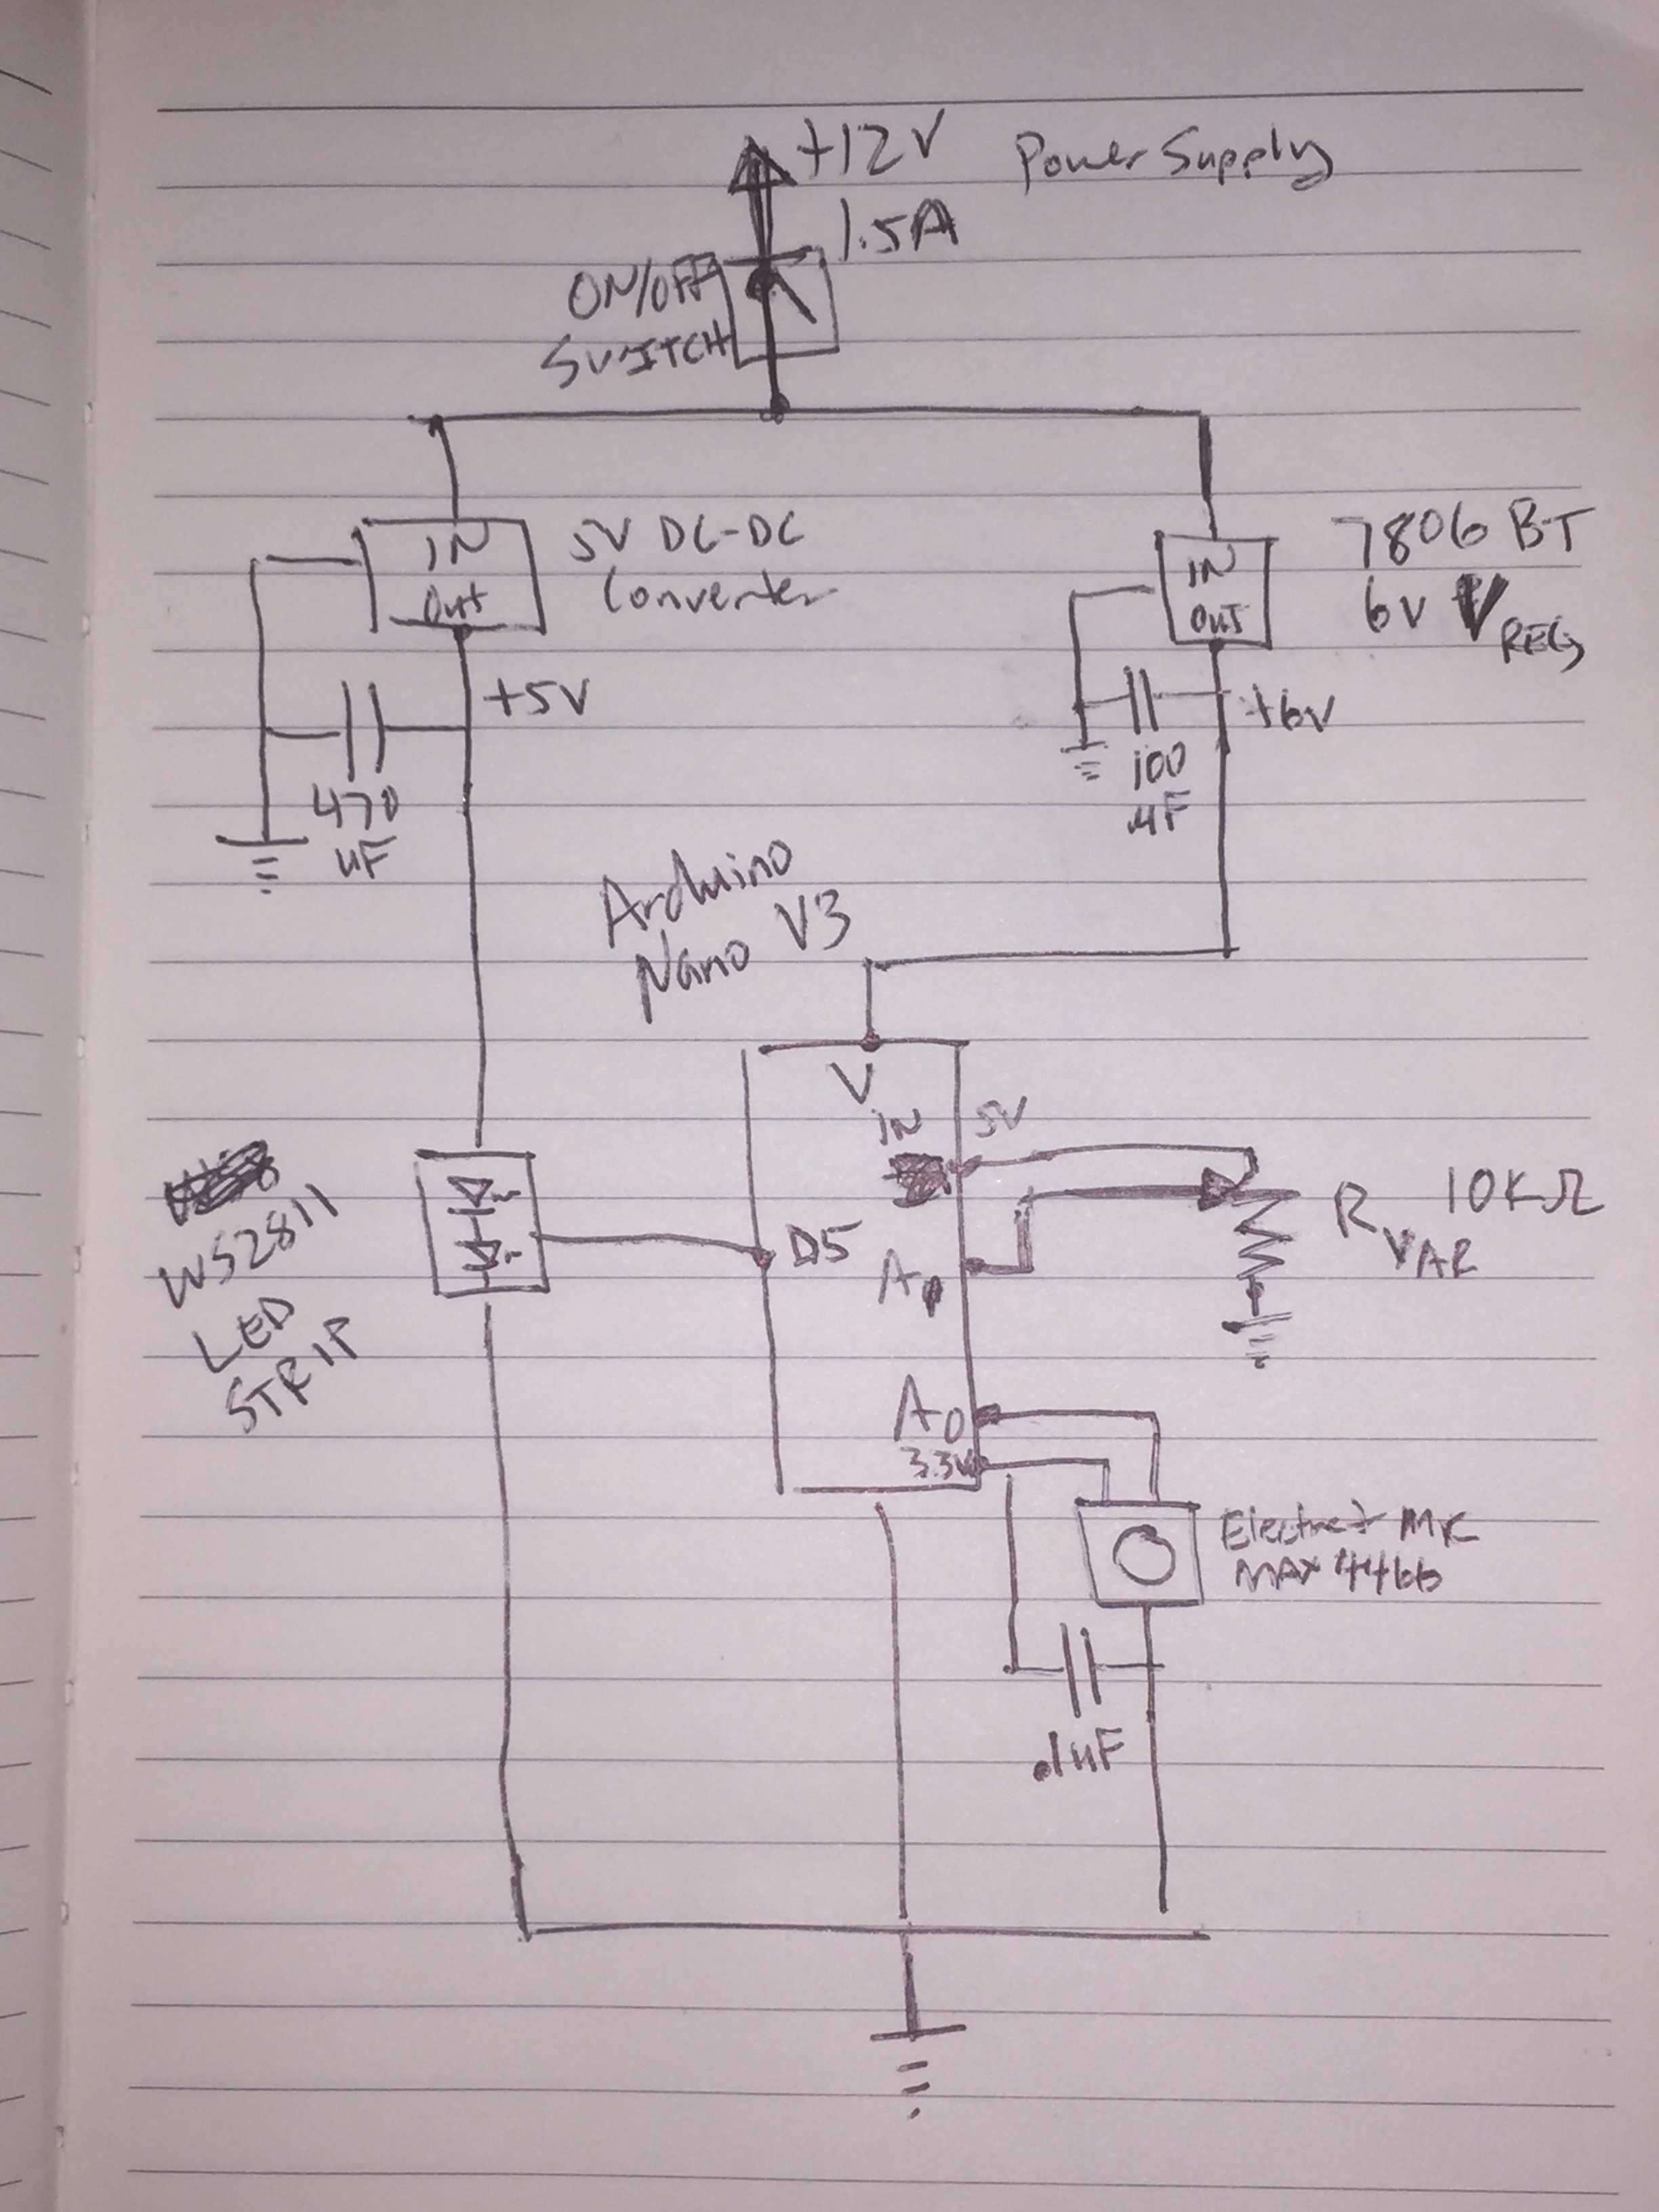
这是使用 Arduino Nano 和驻极体麦克风/Max4466 放大器的另一个版本的音乐 LED 灯带。
我14岁的侄女开始喜欢音乐了,所以我想给她做点很酷的东西放在她的房间里。我一直对声音互动项目很感兴趣,所以这是一个很好的学习项目。
演示
这是 Youtube 上的演示。
介绍
这个项目非常简单,已经做过无数次了,但对我来说,把一堆碎片拼凑在一起并打包成一个有趣的“最终产品”很有趣。
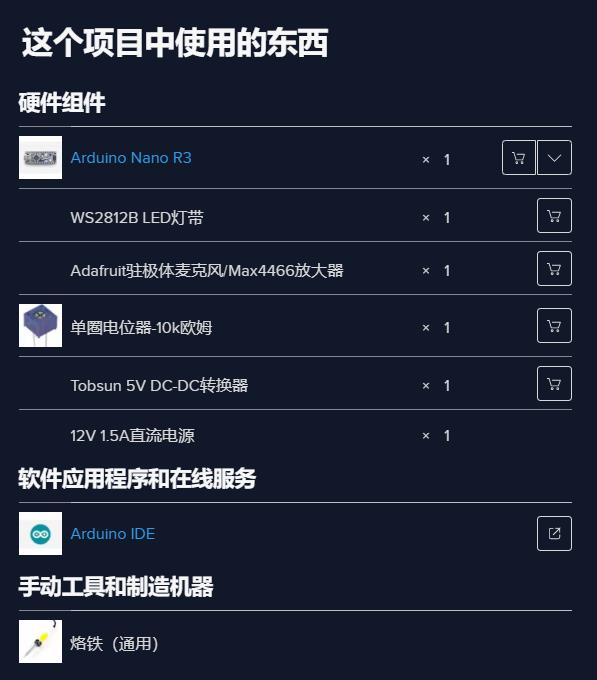
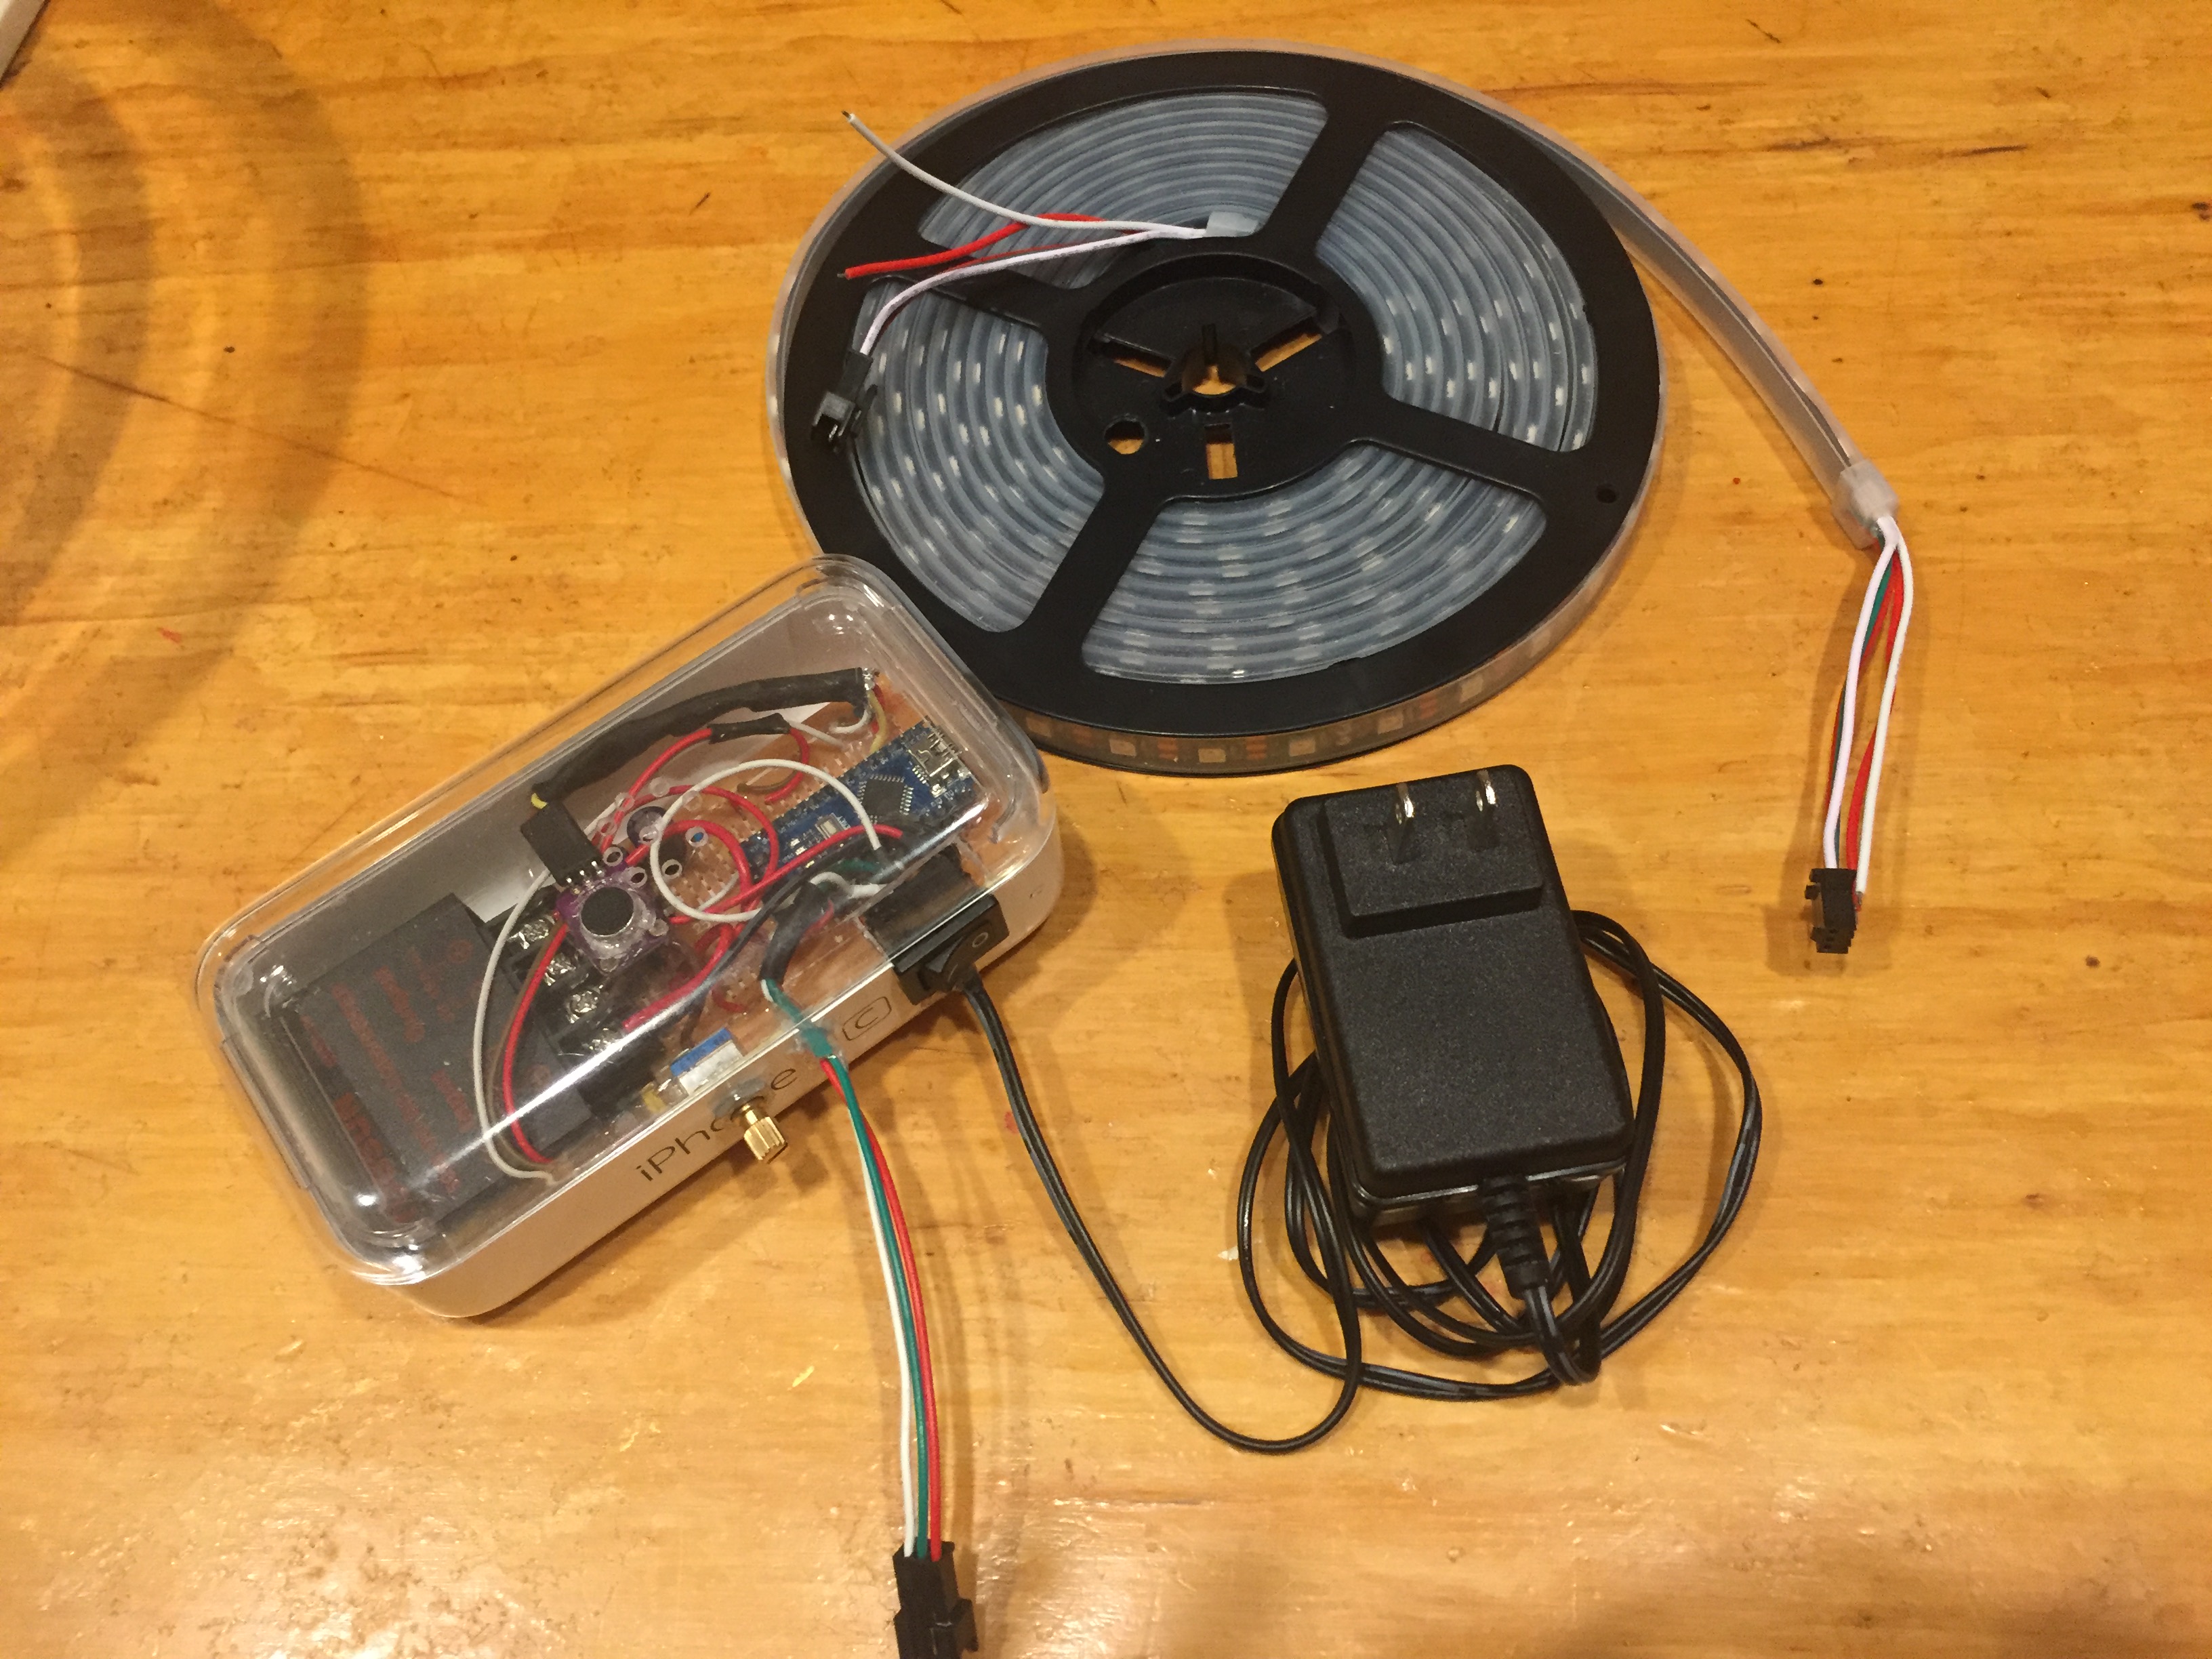
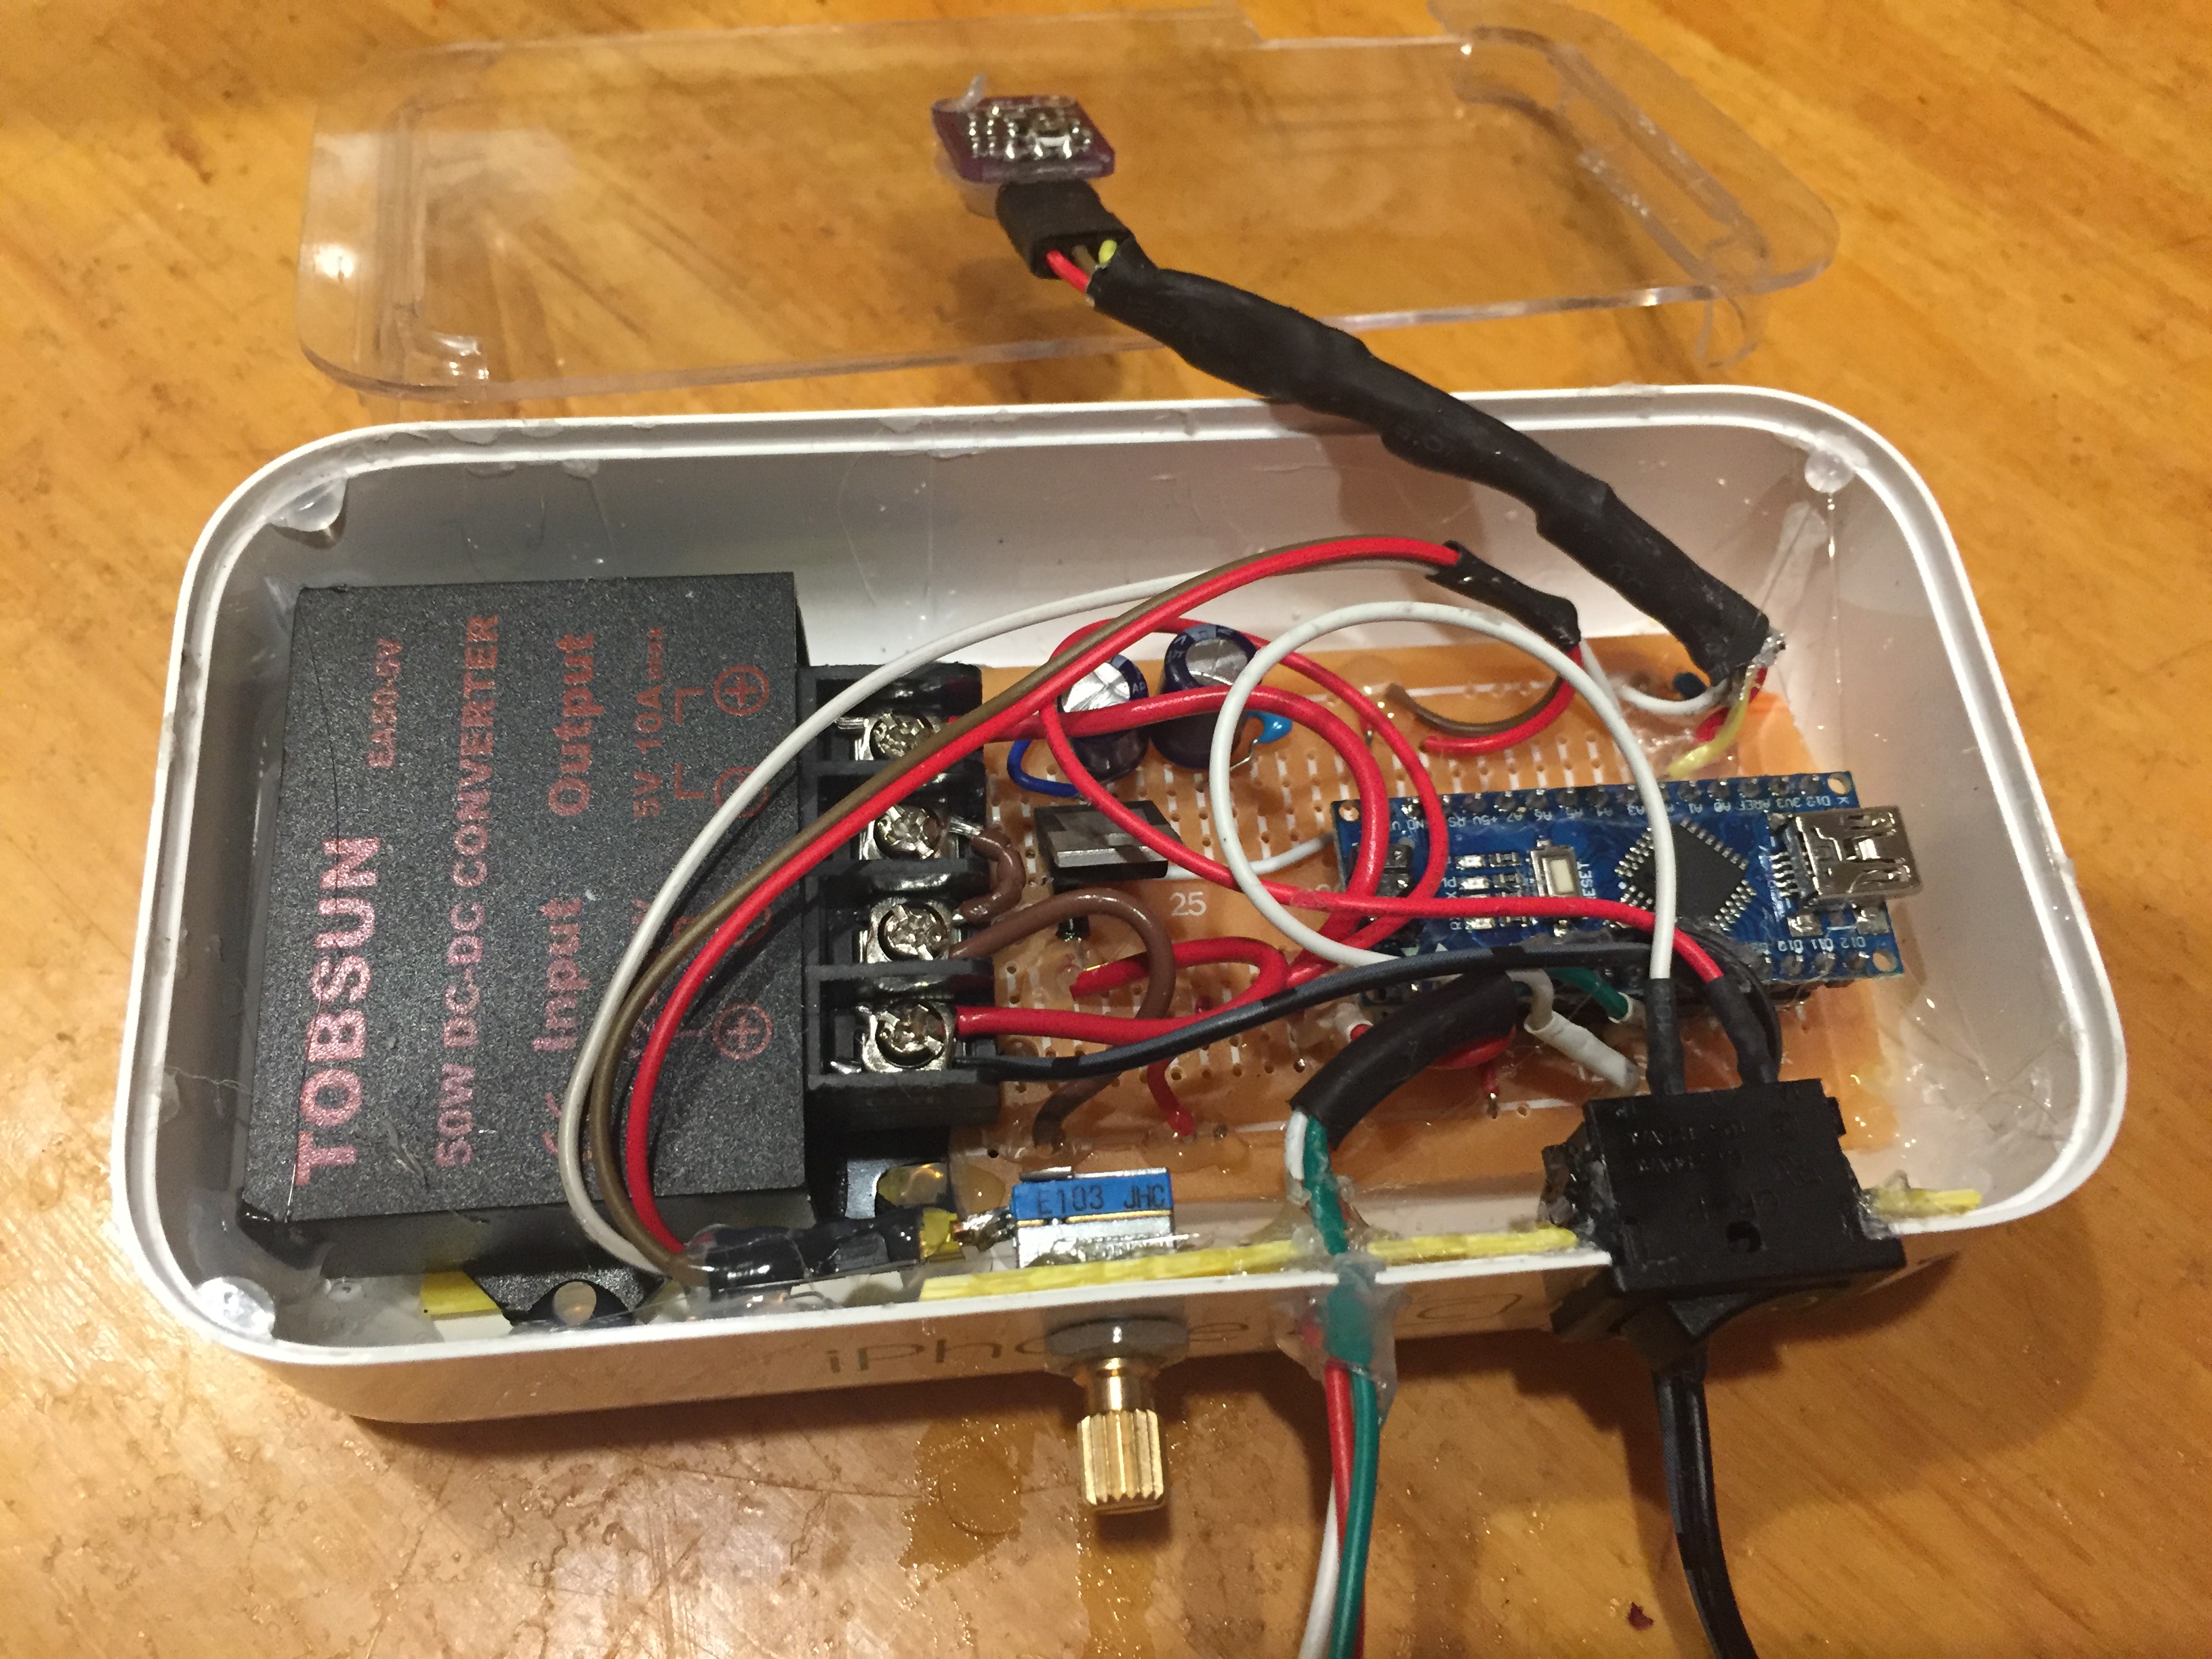
我使用 Arduino Nano 作为基础。使用 FFT 库将声音解码成八度音阶,使用 FASTLed 库驱动 LED 灯带,并使用一个旧的 iPhone C 外壳将它们固定在一起。
关于软件/功能的一些说明:
1)我使用 10kOhm POT 来控制声音灵敏度
2) 麦克风/放大器对噪音很敏感,所以我用接地的金属胶带屏蔽了电线/导线……这很有帮助。
3)该漫画以几种方式作出回应。
根据每个八度的音量改变颜色/亮度/饱和度
在整个灯带上重复相同的 11 个 LED 图案(但会改变颜色并改变每个组的颜色,使其看起来更连续
随着声音越来越大,图案沿着条带追逐
音量最大时,它会短暂地闪烁白色
你需要测试粉红噪声才能正确调整。每个电路板的情况都不同
4) 我用了一个旧的12V 1.5A壁式电源作为电源。功率有点小……但如果她不太用力的话应该没问题。我觉得24V 2A的电源会更好。另外,我可以在LED的电源上放一个更大的电容(而不是只放一个470uF的)。这样可以减少电流的爆发。下次……
项目代码
#include "FastLED.h"

// How many leds in your strip?
#include <FastLED.h>


#define OCTAVE 1 //   // Group buckets into octaves  (use the log output function LOG_OUT 1)
#define OCT_NORM 0 // Don't normalise octave intensities by number of bins
#define FHT_N 256 // set to 256 point fht
#include <FHT.h> // include the library
//int noise[] = {204,188,68,73,150,98,88,68}; // noise level determined by playing pink noise and seeing levels [trial and error]{204,188,68,73,150,98,88,68}


// int noise[] = {204,190,108,85,65,65,55,60}; // noise for mega adk
//int noise[] = {204,195,100,90,85,80,75,75}; // noise for NANO
int noise[] = {204,198,100,85,85,80,80,80};
float noise_fact[] = {15, 7, 1.5, 1, 1.2, 1.4, 1.7,3}; // noise level determined by playing pink noise and seeing levels [trial and error]{204,188,68,73,150,98,88,68}
float noise_fact_adj[] = {15, 7, 1.5, 1, 1.2, 1.4, 1.7,3}; // noise level determined by playing pink noise and seeing levels [trial and error]{204,188,68,73,150,98,88,68}


#define LED_PIN     5
#define LED_TYPE    WS2811
#define COLOR_ORDER GRB


// Params for width and height
const uint8_t kMatrixWidth = 11;
const uint8_t kMatrixHeight = 27;
 #define NUM_LEDS (kMatrixWidth * kMatrixHeight)
//#define NUM_LEDS    15

CRGB leds[NUM_LEDS];

int counter2=0;


void setup() {
//  Serial.begin(115200);
  delay(1000);
  FastLED.addLeds<LED_TYPE, LED_PIN, COLOR_ORDER>(leds, NUM_LEDS).setCorrection( TypicalLEDStrip );

  FastLED.setBrightness (200);
  fill_solid(leds, NUM_LEDS, CRGB::Black);
  FastLED.show();
// TIMSK0 = 0; // turn off timer0 for lower jitter
  ADCSRA = 0xe5; // set the adc to free running mode
  ADMUX = 0x40; // use adc0
  DIDR0 = 0x01; // turn off the digital input for adc0

}


void loop() {
int prev_j[8];
int beat=0;
int prev_oct_j;
int counter=0;
int prev_beat=0;
int led_index=0;
int saturation=0;
int saturation_prev=0;
int brightness=0;
int brightness_prev=0;

 while (1) { // reduces jitter

      cli();  // UDRE interrupt slows this way down on arduino1.0

  for (int i = 0 ; i < FHT_N ; i++) { // save 256 samples
      while (!(ADCSRA & 0x10)); // wait for adc to be ready
      ADCSRA = 0xf5; // restart adc
      byte m = ADCL; // fetch adc data
      byte j = ADCH;
      int k = (j << 8) | m; // form into an int
      k -= 0x0200; // form into a signed int
      k <<= 6; // form into a 16b signed int
      fht_input[i] = k; // put real data into bins
    }
    fht_window(); // window the data for better frequency response
    fht_reorder(); // reorder the data before doing the fht
    fht_run(); // process the data in the fht
    fht_mag_octave(); // take the output of the fht  fht_mag_log()

   // every 50th loop, adjust the volume accourding to the value on A2 (Pot)
    if (counter >= 50) {
      ADMUX = 0x40 | (1 & 0x07); // set admux to look at Analogpin A1 - Master Volume


      while (!(ADCSRA & 0x10)); // wait for adc to be ready
      ADCSRA = 0xf5; // restart adc
  delay(10);
      while (!(ADCSRA & 0x10)); // wait for adc to be ready
      ADCSRA = 0xf5; // restart adc
      byte m = ADCL; // fetch adc data
      byte j = ADCH;
      int k = (j << 8) | m; // form into an int
      float master_volume=(k+0.1)/1000 +.5;  // so the valu will be between ~0.5 and 1.5
 // Serial.println (master_volume);


      for (int i=1; i<8; i++) {
          noise_fact_adj[i]=noise_fact[i]*master_volume;
      }

      ADMUX = 0x40 | (0 & 0x07); // set admux back to look at A0 analog pin (to read the microphone input
      counter = 0;
    }

    sei();
    counter++;


    // End of Fourier Transform code - output is stored in fht_oct_out[i].

    // i=0-7 frequency (octave) bins (don't use 0 or 1), fht_oct_out[1]= amplitude of frequency for bin 1
    // for loop a) removes background noise average and takes absolute value b) low / high pass filter as still very noisy
    // c) maps amplitude of octave to a colour between blue and red d) sets pixel colour to amplitude of each frequency (octave)

    for (int i = 1; i < 8; i++) {  // goes through each octave. skip the first 1, which is not useful

      int j;
      j = (fht_oct_out[i] - noise[i]); // take the pink noise average level out, take the asbolute value to avoid negative numbers
      if (j<10) {j=0;}
      j= j*noise_fact_adj[i];

      if (j<10) {j=0;}
      else {
        j= j*noise_fact_adj[i];
        if (j>180) {
          if (i>=7) {
            beat+=2;
          }
          else {
            beat+=1;
          }
        }
        j=j/30;
        j=j*30; // (force it to more discrete values)
      }

      prev_j[i]=j;

//     Serial.print(j);
//     Serial.print(" ");


// this fills in 11 LED's with interpolated values between each of the 8 OCT values
       if (i>=2) {
        led_index=2*i-3;
        prev_oct_j=(j+prev_j[i-1])/2;

        saturation=constrain(j+30, 0,255);
        saturation_prev=constrain(prev_oct_j+30, 0,255);
        brightness=constrain(j, 0,255);
        brightness_prev=constrain(prev_oct_j, 0,255);
if (brightness==255) {
  saturation=50;
  brightness=200;
}
if (brightness_prev==255) {
  saturation_prev=50;
  brightness_prev=200;
}


        for (uint8_t y=0;y<kMatrixHeight;y++){
          leds[XY(led_index-1,y)] = CHSV(j+y*30,saturation, brightness);
          if (i>2){
            prev_oct_j=(j+prev_j[i-1])/2;
            leds[ XY(led_index-2,y)]=CHSV(prev_oct_j+y*30,saturation_prev, brightness_prev);
          }
        }
       }
    }


      if (beat>=7) {
          fill_solid(leds, NUM_LEDS, CRGB::Gray);
          FastLED.setBrightness(120);


 //    FastLED.setBrightness(200);

      }
    else {
      if (prev_beat!=beat) {
        FastLED.setBrightness(40+beat*beat*5);
        prev_beat=beat;
      }

    }

    FastLED.show();
    if (beat) {
      counter2+=((beat+4)/2-2);
      if (counter2<0) {counter2=1000;}
      if (beat>3 && beat<7) {
         FastLED.delay (20);
      }
      beat=0;
    }

// Serial.println();
 }
}


// Param for different pixel layouts
const bool    kMatrixSerpentineLayout = true;
// Set 'kMatrixSerpentineLayout' to false if your pixels are
// laid out all running the same way, like this:

// Set 'kMatrixSerpentineLayout' to true if your pixels are
// laid out back-and-forth, like this:

uint16_t XY( uint8_t x, uint8_t y)
{
  uint16_t i;

  if( kMatrixSerpentineLayout == false) {
    i = (y * kMatrixWidth) + x;
  }

  if( kMatrixSerpentineLayout == true) {
    if( y & 0x01) {
      // Odd rows run backwards
      uint8_t reverseX = (kMatrixWidth - 1) - x;
      i = (y * kMatrixWidth) + reverseX;

    } else {
      // Even rows run forwards
      i = (y * kMatrixWidth) + x;

    }
  }

  i=(i+counter2)%NUM_LEDS;
  return i;
}
【Arduino 动手做】音乐互动LED灯带
项目链接:https://www.hackster.io/buzzandy/music-reactive-led-strip-5645ed
项目作者:buzzandy
项目视频 :https://www.youtube.com/watch?v=lHRquzNed8s
项目代码:https://www.hackster.io/code_files/155345/download


 他的勋章
他的勋章

评论