 返回首页
返回首页
 回到顶部
回到顶部

1. 前置准备
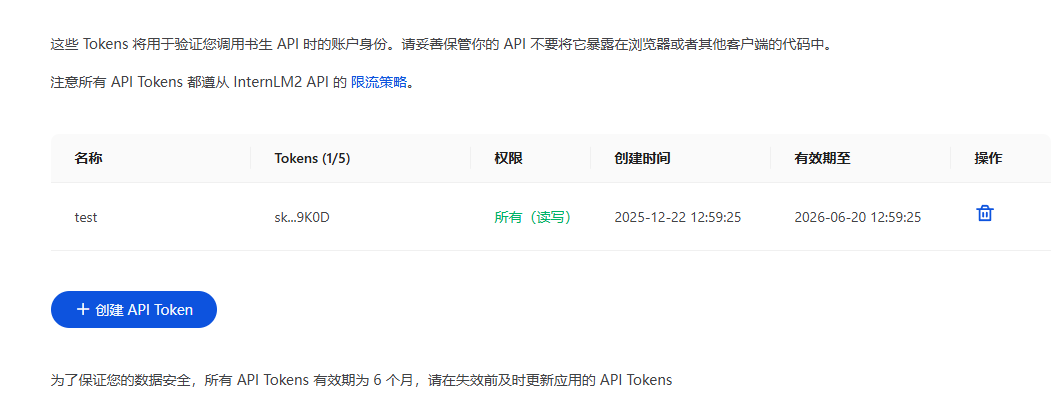
1. 获取API KEY
Intern系列模型提供免费的OpenAI兼容格式 API。获取步骤如下:
1. 访问https://internlm.intern-ai.org.cn/api/tokens
2. 确保使用正常注册且可用的账户
3. 为API Token命名并生成
重要提醒:API Token只能复制一次,生成后请妥善保管,切勿在代码中显式暴露
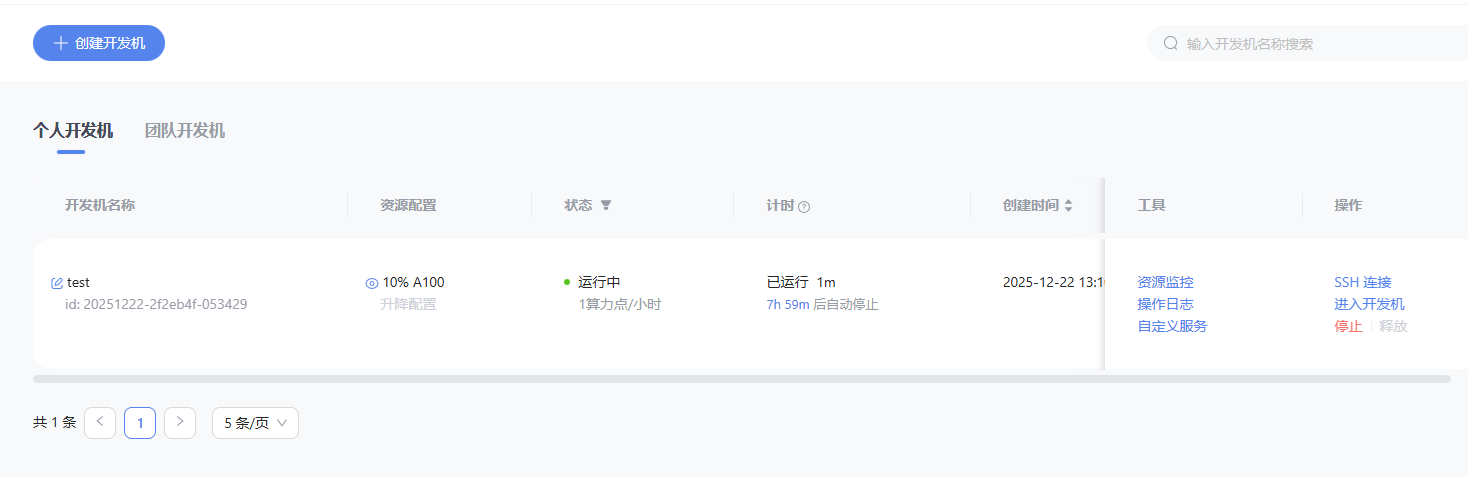
2. 开发机配置
在创建开发机界面进行如下配置:
镜像选择:Cuda12.8-conda
GPU配置:10% A100
本节课程不需要显存,故最小资源即可。
2. 快速开始
环境安装
conda activate base
pip install openai requests
2.1 文本生成
from openai import OpenAI
client = OpenAI(
      api_key="eyJ0eXxx",  # 此处传token,不带Bearer
    base_url="https://chat.intern-ai.org.cn/api/v1/",
)

completion = client.chat.completions.create(
    model="intern-s1",
    messages=[
        {
            "role": "user",
            "content": "写一个关于独角兽的睡前故事,一句话就够了。"
        }
    ]
)

print(completion.choices[0].message.content)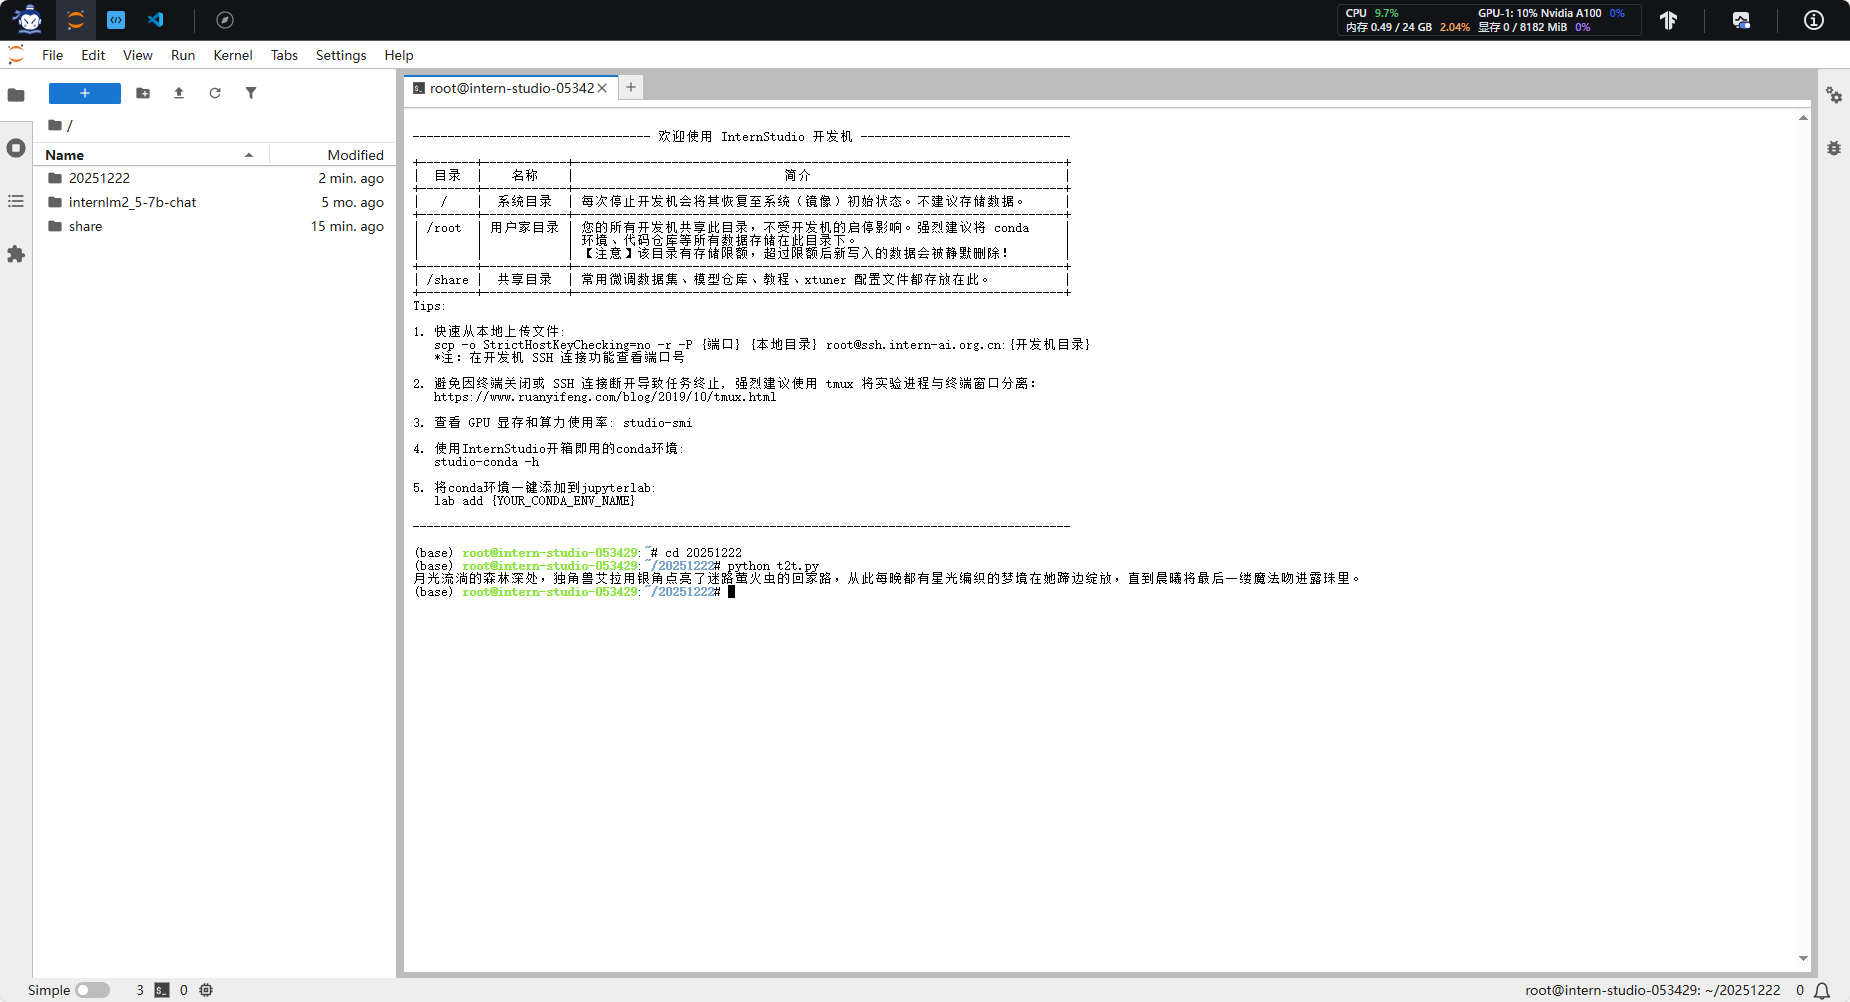
2.2 分析图像输入
你也可以向模型提供图像输入。扫描收据、分析截图,或使用计算机视觉技术在现实世界中寻找物体。
2.2.1 输入图像为url
这里转化图片为url的工具:https://www.superbed.cn/
from openai import OpenAI

client = OpenAI(
      api_key="eyJ0eXxx",  # 此处传token,不带Bearer
    base_url="https://chat.intern-ai.org.cn/api/v1/",
)

response = client.chat.completions.create(
    model="intern-s1",
    messages=[
        {
            "role": "user",
            "content": [
                {"type": "text", "text": "图片里有什么?"},
                {
                    "type": "image_url",
                    "image_url": {
                        "url": "https://upload.wikimedia.org/wikipedia/commons/thumb/d/dd/Gfp-wisconsin-madison-the-nature-boardwalk.jpg/2560px-Gfp-wisconsin-madison-the-nature-boardwalk.jpg",
                    },
                },
            ],
        }
    ],
    extra_body={"thinking_mode": True},
)

print(response.choices[0].message.content)
2.2.2 输入图像为文件

import base64
from openai import OpenAI

client = OpenAI(
      api_key="eyJ0eXxx",  # 此处传token,不带Bearer
    base_url="https://chat.intern-ai.org.cn/api/v1/",
)
# Function to encode the image
def encode_image(image_path):
    with open(image_path, "rb") as image_file:
        return base64.b64encode(image_file.read()).decode("utf-8")


# Path to your image
image_path = "/root/share/intern.jpg"

# Getting the Base64 string
base64_image = encode_image(image_path)

completion = client.chat.completions.create(
    model="intern-s1",
    messages=[
        {
            "role": "user",
            "content": [
                { "type": "text", "text": "图片里有什么?" },
                {
                    "type": "image_url",
                    "image_url": {
                        "url": f"data:image/jpeg;base64,{base64_image}",
                    },
                },
            ],
        }
    ],
)

print(completion.choices[0].message.content)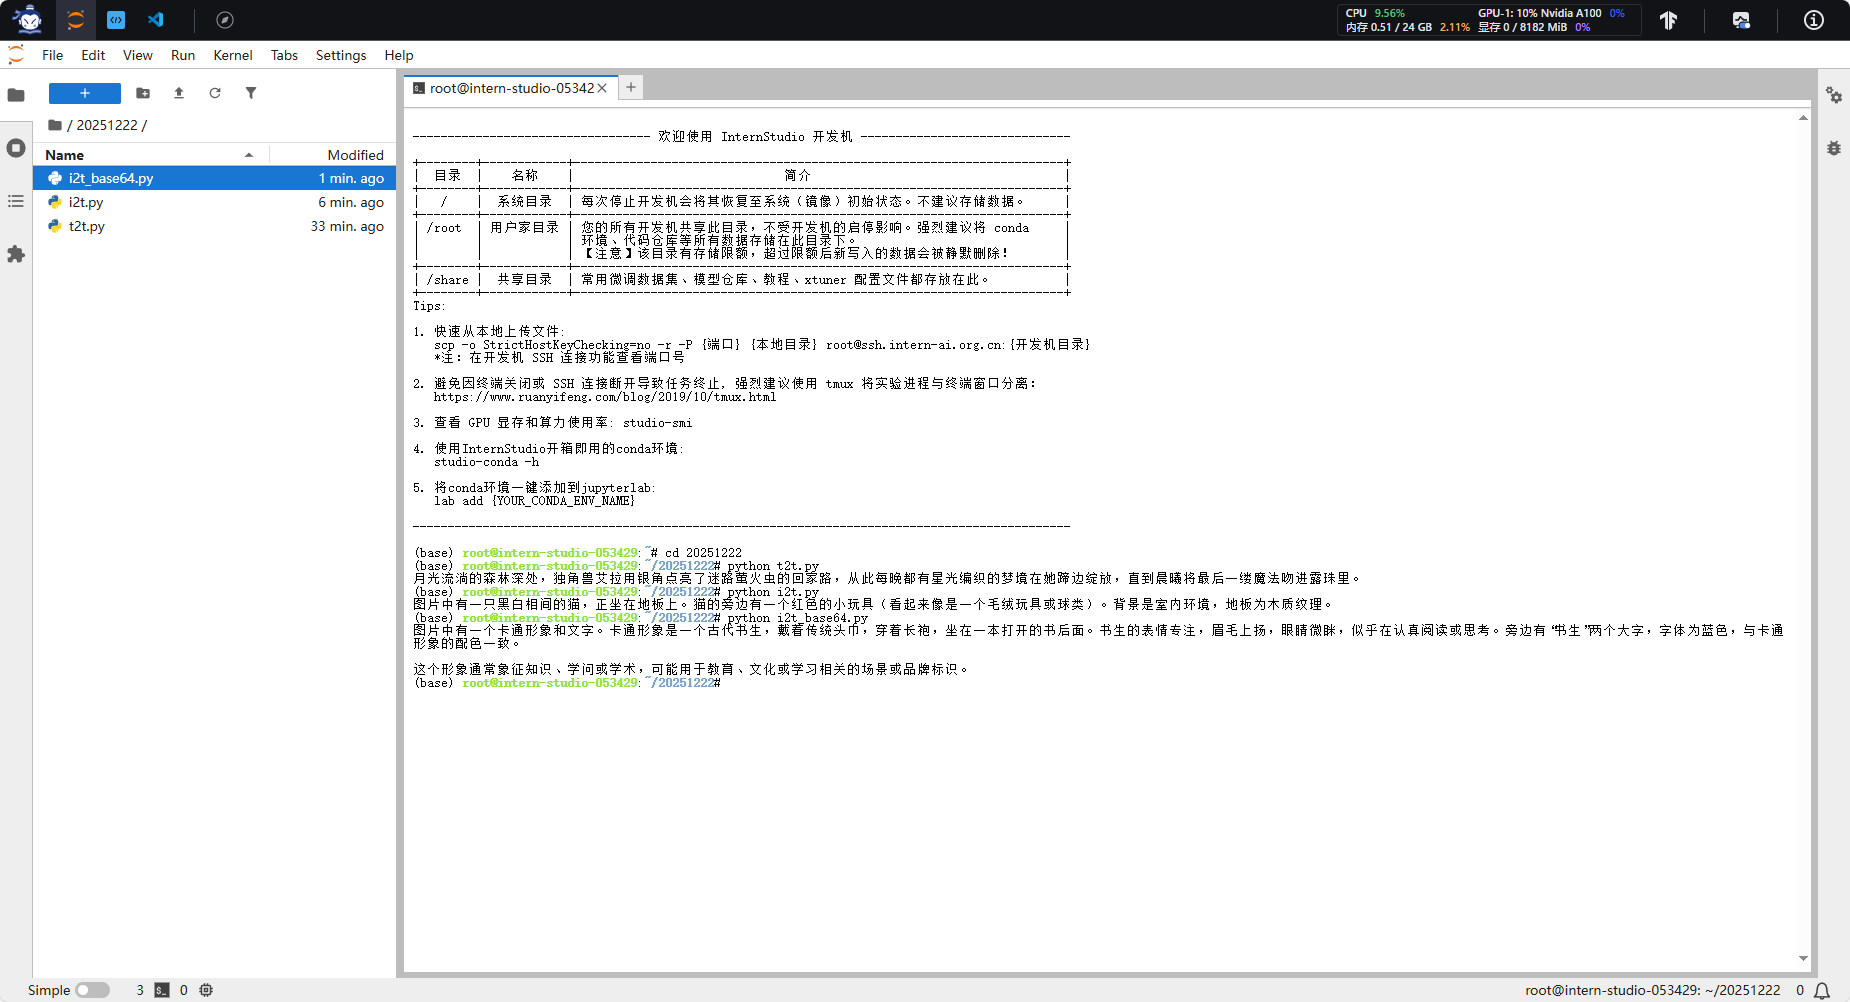
2.3 模型使用工具
Openai格式
from openai import OpenAI


client = OpenAI(     api_key="sk-lYQQ6Qxx,不带Bearer
    base_url="https://chat.intern-ai.org.cn/api/v1/",
)
tools = [{
    "type": "function",
    "function": {
        "name": "get_weather",
        "description": "Get current temperature for a given location.",
        "parameters": {
            "type": "object",
            "properties": {
                "location": {
                    "type": "string",
                    "description": "City and country e.g. Bogotá, Colombia"
                }
            },
            "required": [
                "location"
            ],
            "additionalProperties": False
        },
        "strict": True
    }
}]

completion = client.chat.completions.create(
    model="intern-s1",
    messages=[{"role": "user", "content": "What is the weather like in Paris today?"}],
    tools=tools
)

print(completion.choices[0].message.tool_calls)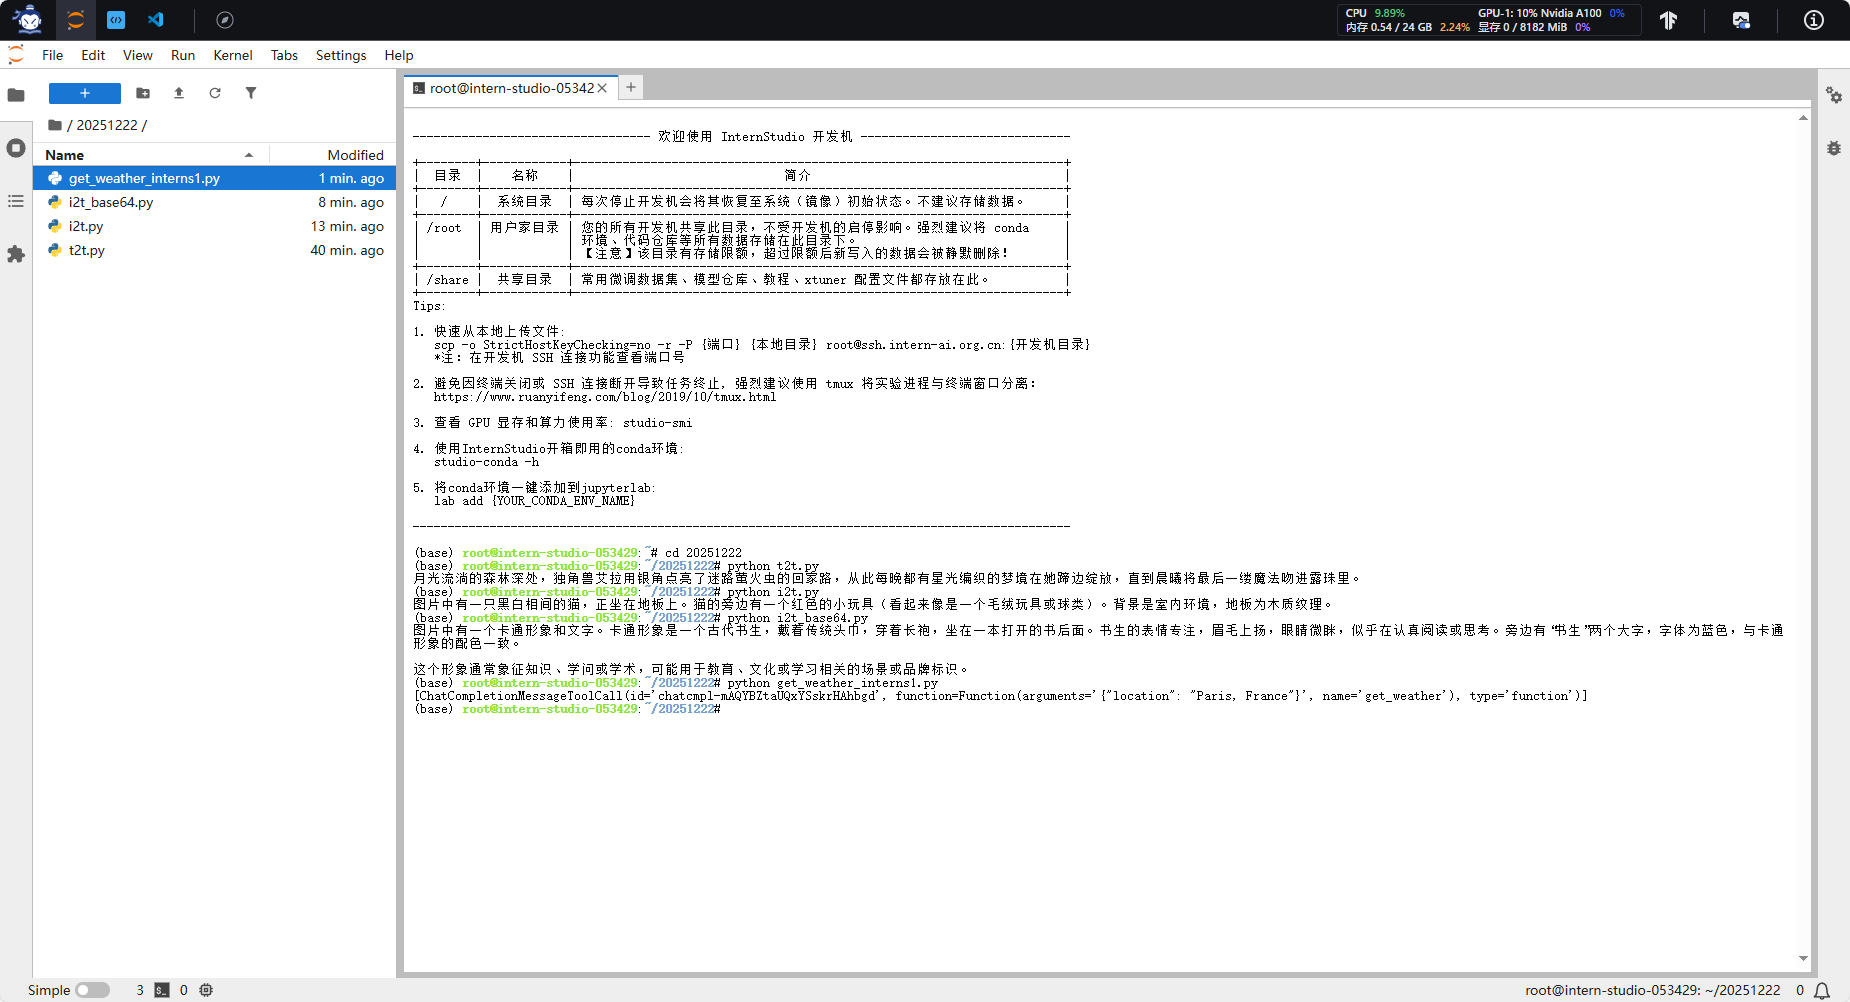
Python原生调用
import requests
import json
# API 配置
API_KEY = "eyJ0exxxxQ"
BASE_URL = "https://chat.intern-ai.org.cn/api/v1/"
ENDPOINT = f"{BASE_URL}chat/completions"
# 定义天气查询工具
WEATHER_TOOLS = [{
"type": "function",
"function": {
"name": "get_weather",
"description": "获取指定城市或坐标的当前温度(摄氏度)",
"parameters": {
"type": "object",
"properties": {
"latitude": {"type": "number", "description": "纬度"},
"longitude": {"type": "number", "description": "经度"}
},
"required": ["latitude", "longitude"],
"additionalProperties": False
},
"strict": True
}
}]
def get_weather(latitude, longitude):
"""
获取指定坐标的天气信息
Args:
latitude: 纬度
longitude: 经度
Returns:
当前温度(摄氏度)
"""
try:
# 调用开放气象API
response = requests.get(
f"https://api.open-meteo.com/v1/forecast?latitude={latitude}&longitude={longitude}¤t=temperature_2m,wind_speed_10m&hourly=temperature_2m,relative_humidity_2m,wind_speed_10m"
)
data = response.json()
temperature = data['current']['temperature_2m']
return f"{temperature}"
except Exception as e:
return f"获取天气信息时出错: {str(e)}"
def make_api_request(messages, tools=None):
"""发送API请求"""
headers = {
"Content-Type": "application/json",
"Authorization": f"Bearer {API_KEY}"
}
payload = {
"model": "intern-s1",
"messages": messages,
"temperature": 0.7
}
if tools:
payload["tools"] = tools
payload["tool_choice"] = "auto"
try:
response = requests.post(ENDPOINT, headers=headers, json=payload, timeout=30)
response.raise_for_status()
return response.json()
except requests.exceptions.RequestException as e:
print(f"API请求失败: {e}")
return None
def main():
# 初始消息 - 巴黎的坐标
messages = [{"role": "user", "content": "请查询当前北京的温度"}]
print("?️ 正在查询天气...")
# 第一轮API调用
response = make_api_request(messages, WEATHER_TOOLS)
if not response:
return
assistant_message = response["choices"][0]["message"]
# 检查工具调用
if assistant_message.get("tool_calls"):
print("? 执行工具调用...")
print("tool_calls:",assistant_message.get("tool_calls"))
messages.append(assistant_message)
# 处理工具调用
for tool_call in assistant_message["tool_calls"]:
function_name = tool_call["function"]["name"]
function_args = json.loads(tool_call["function"]["arguments"])
tool_call_id = tool_call["id"]
if function_name == "get_weather":
latitude = function_args["latitude"]
longitude = function_args["longitude"]
weather_result = get_weather(latitude, longitude)
print(f"温度查询结果: {weather_result}°C")
# 添加工具结果
tool_message = {
"role": "tool",
"content": weather_result,
"tool_call_id": tool_call_id
}
messages.append(tool_message)
# 第二轮API调用获取最终答案
final_response = make_api_request(messages)
if final_response:
final_message = final_response["choices"][0]["message"]
print(f"✅ 最终回答: {final_message['content']}")
else:
print(f"直接回答: {assistant_message.get('content', 'No content')}")
if __name__ == "__main__":
main()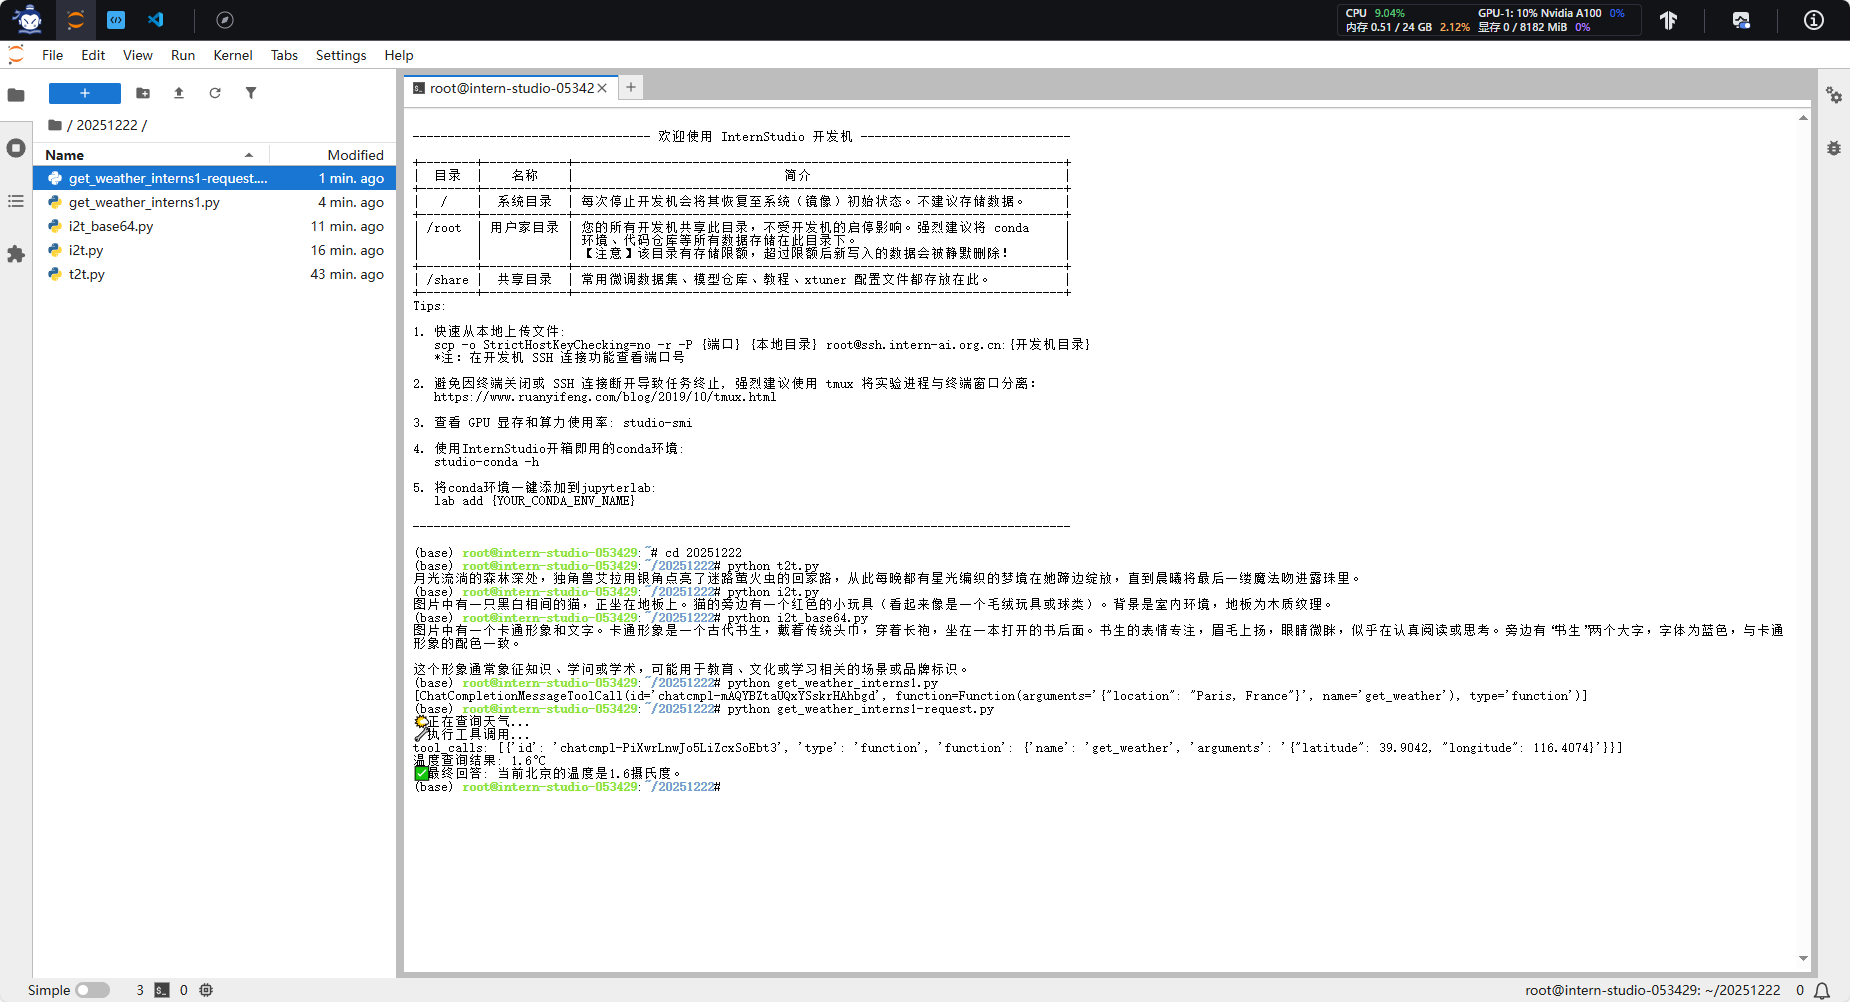
from openai import OpenAI

client = OpenAI(
    api_key="eyxxxx",
    base_url="https://chat.intern-ai.org.cn/api/v1/",
)

stream = client.chat.completions.create(
    model="intern-s1",
    messages=[
        {
            "role": "user",
            "content": "Say '1 2 3 4 5 6 7' ten times fast.",
        },
    ],
    stream=True,
)

# 只打印逐字输出的内容
for chunk in stream:
    if chunk.choices[0].delta.content:
        print(chunk.choices[0].delta.content, end="", flush=True)  # 逐字输出,不换行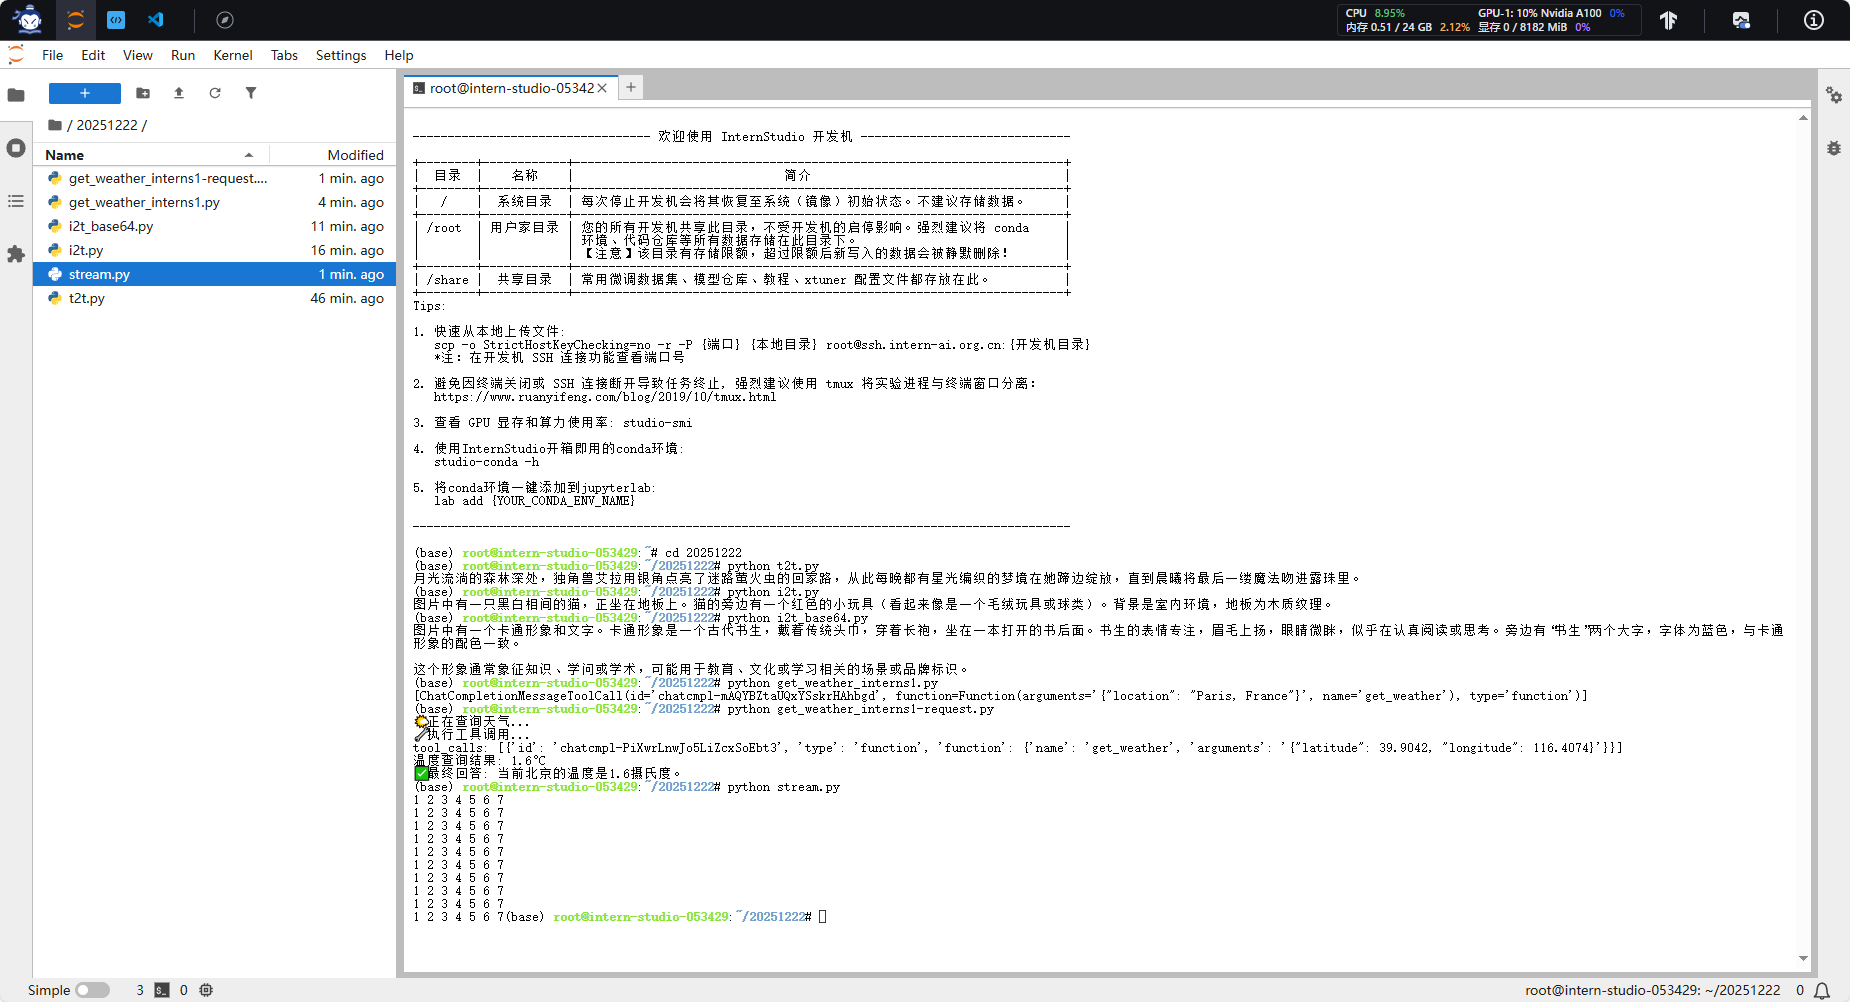
2.5 开关think模式
通过extra_body={"thinking_mode": True}打开思考模式
from openai import OpenAI
client = OpenAI(
      api_key="eyxxA",  # 此处传token,不带Bearer
    base_url="https://chat.intern-ai.org.cn/api/v1/",
)

completion = client.chat.completions.create(
    model="intern-s1",
    messages=[
        {
            "role": "user",
            "content": "写一个关于独角兽的睡前故事,一句话就够了。"
        }
    ],
    extra_body={"thinking_mode": True,},
)

print(completion.choices[0].message)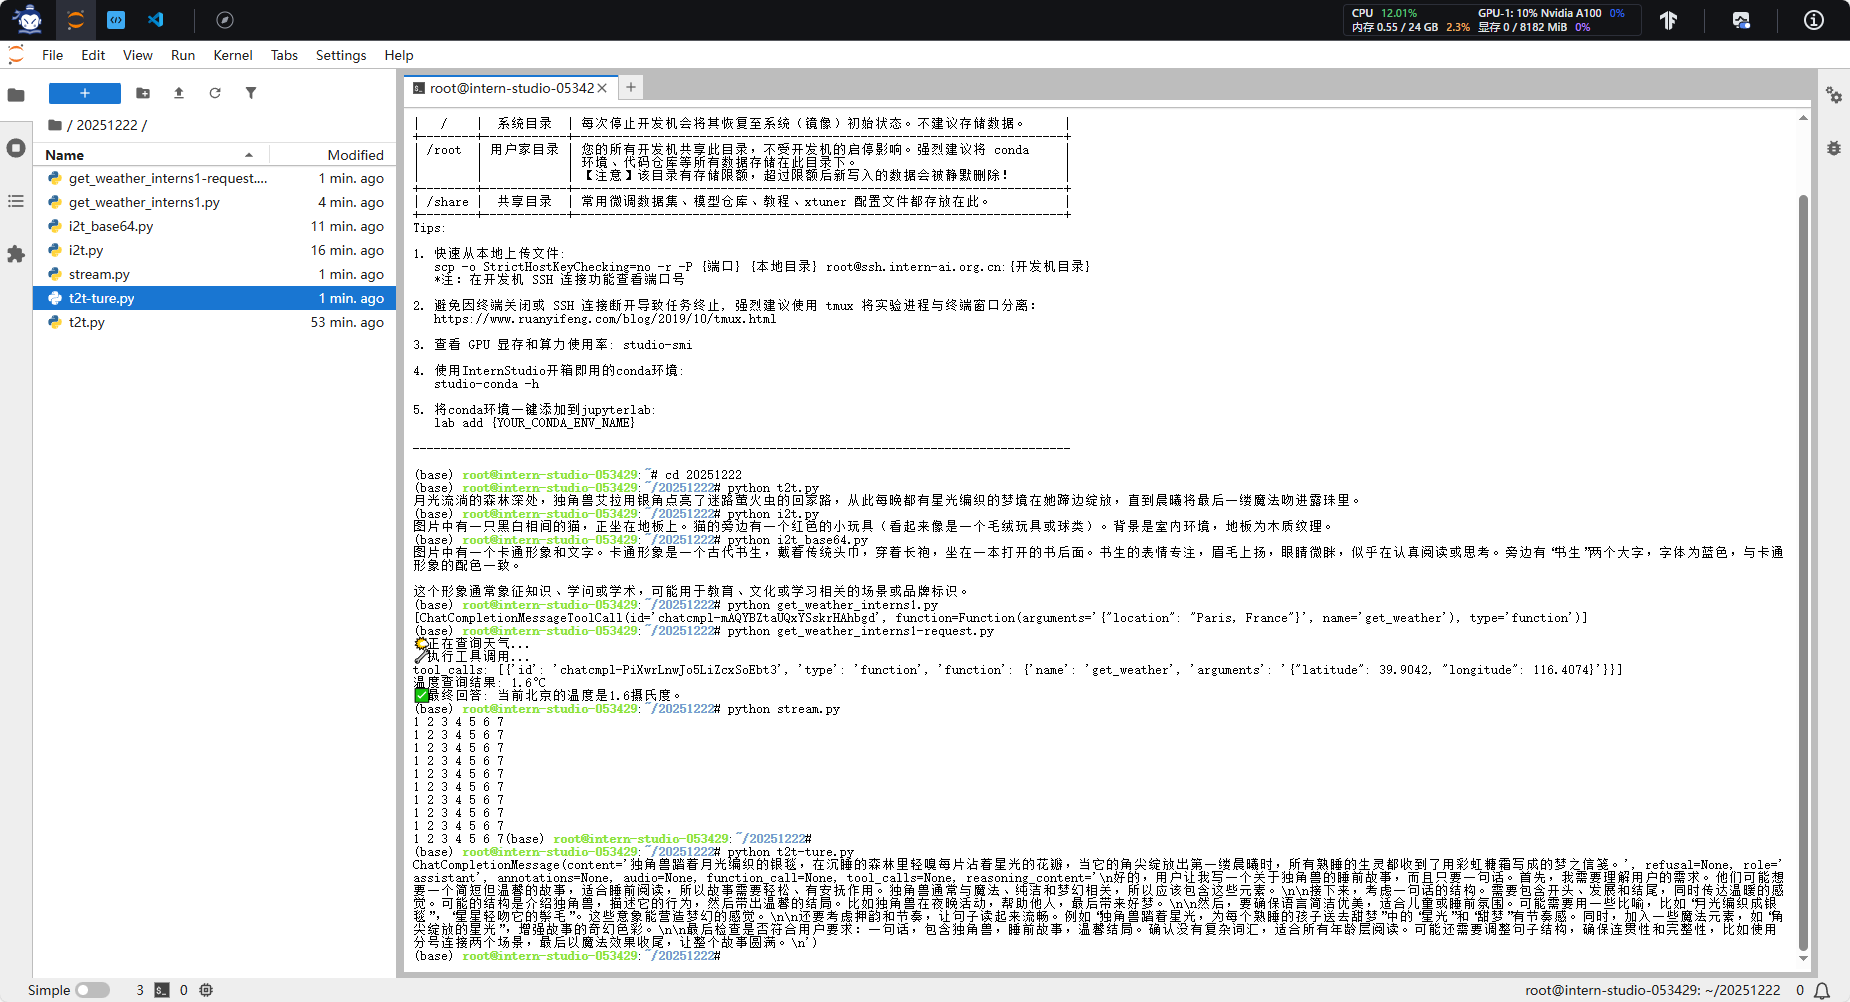
from openai import OpenAI
client = OpenAI(
      api_key="eyJ0xxxmA",  # 此处传token,不带Bearer
    base_url="https://chat.intern-ai.org.cn/api/v1/",
)

completion = client.chat.completions.create(
    model="intern-s1",
    messages=[
        {
            "role": "user",
            "content": "写一个关于独角兽的睡前故事,一句话就够了。"
        }
    ],
    extra_body={"thinking_mode": False,},
)

print(completion.choices[0].message)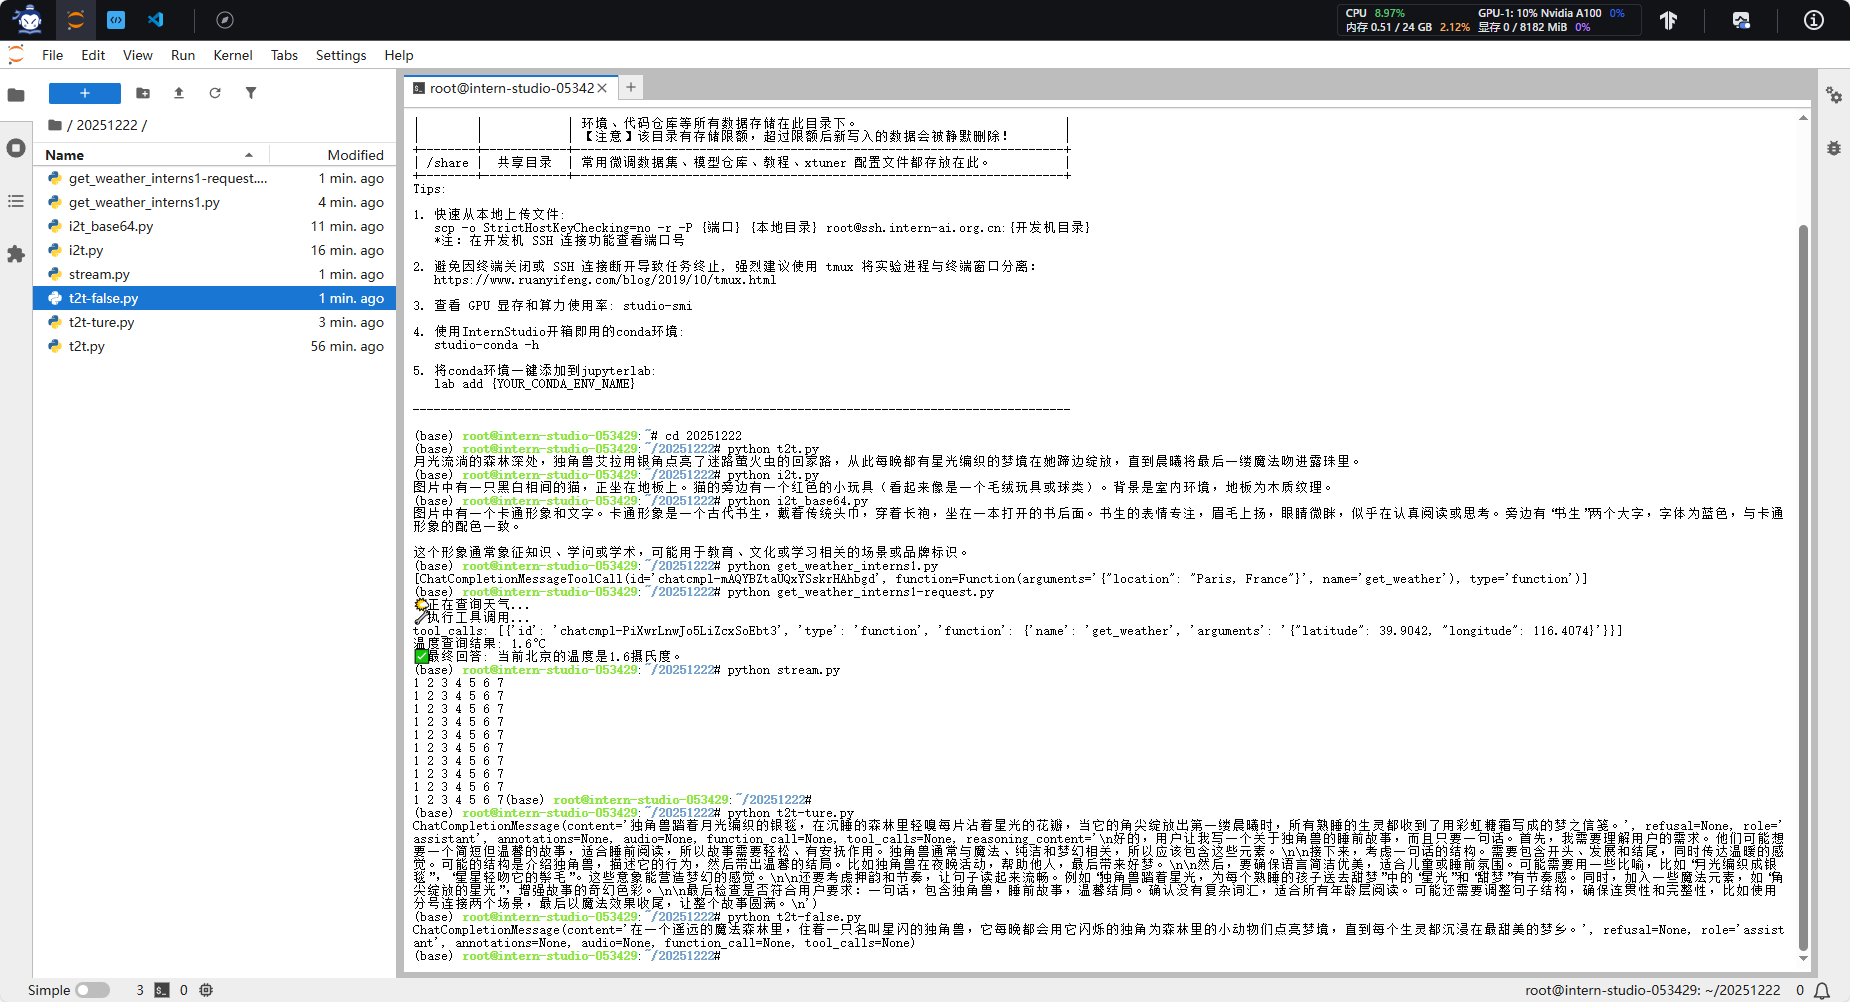
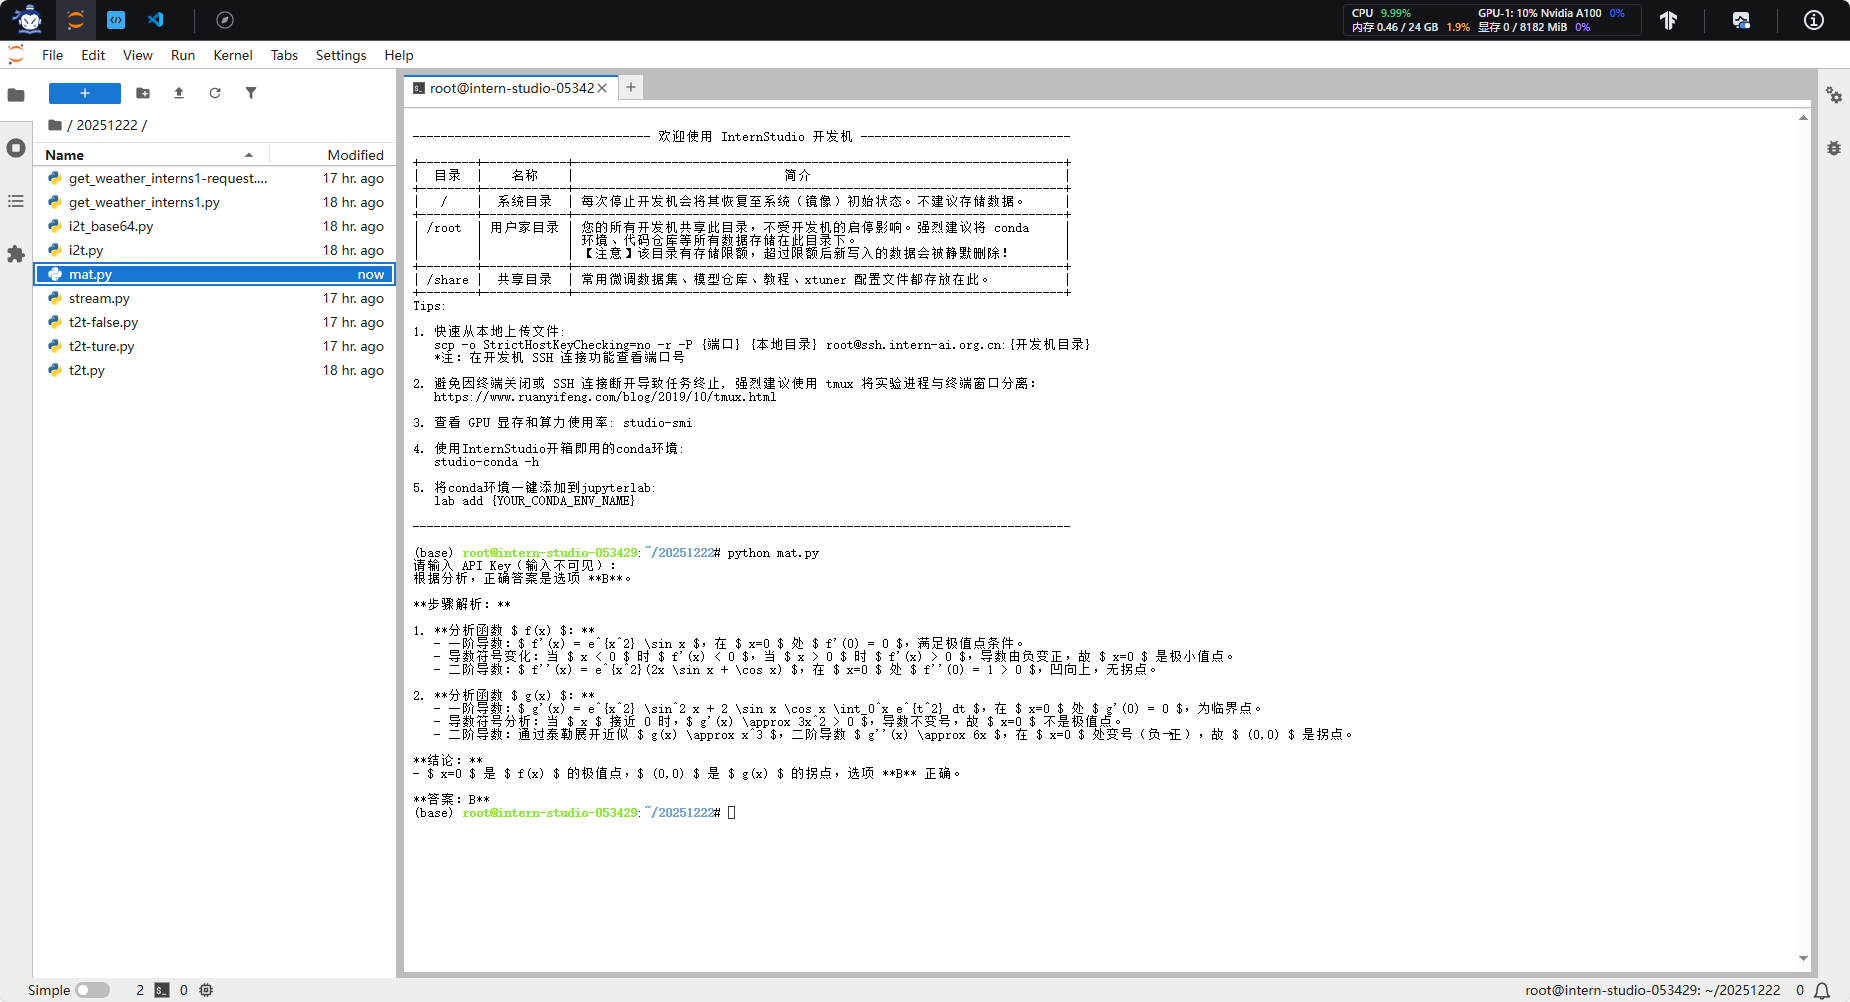
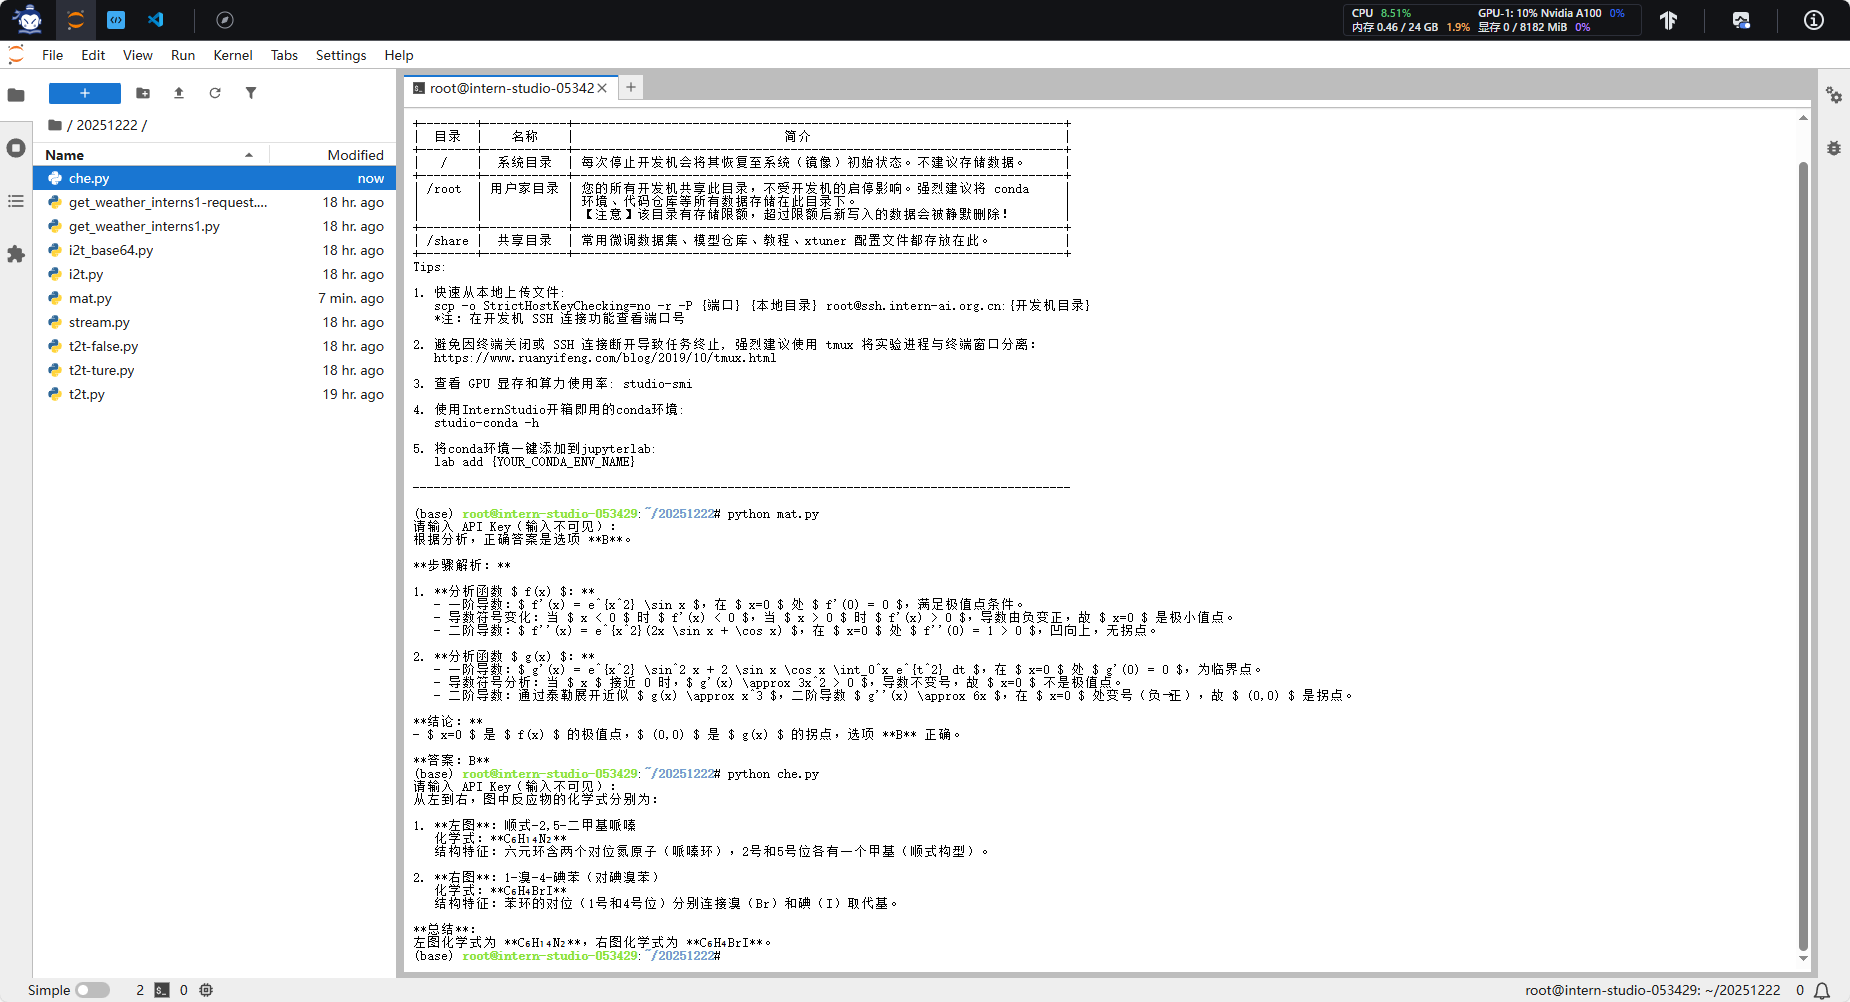
from getpass import getpass
from openai import OpenAI
api_key = getpass("请输入 API Key(输入不可见):")
client = OpenAI(
api_key=api_key, # 此处传token,不带Bearer
base_url="https://chat.intern-ai.org.cn/api/v1/",
)
response = client.chat.completions.create(
model="intern-s1",
messages=[
{
"role": "user",
"content": [
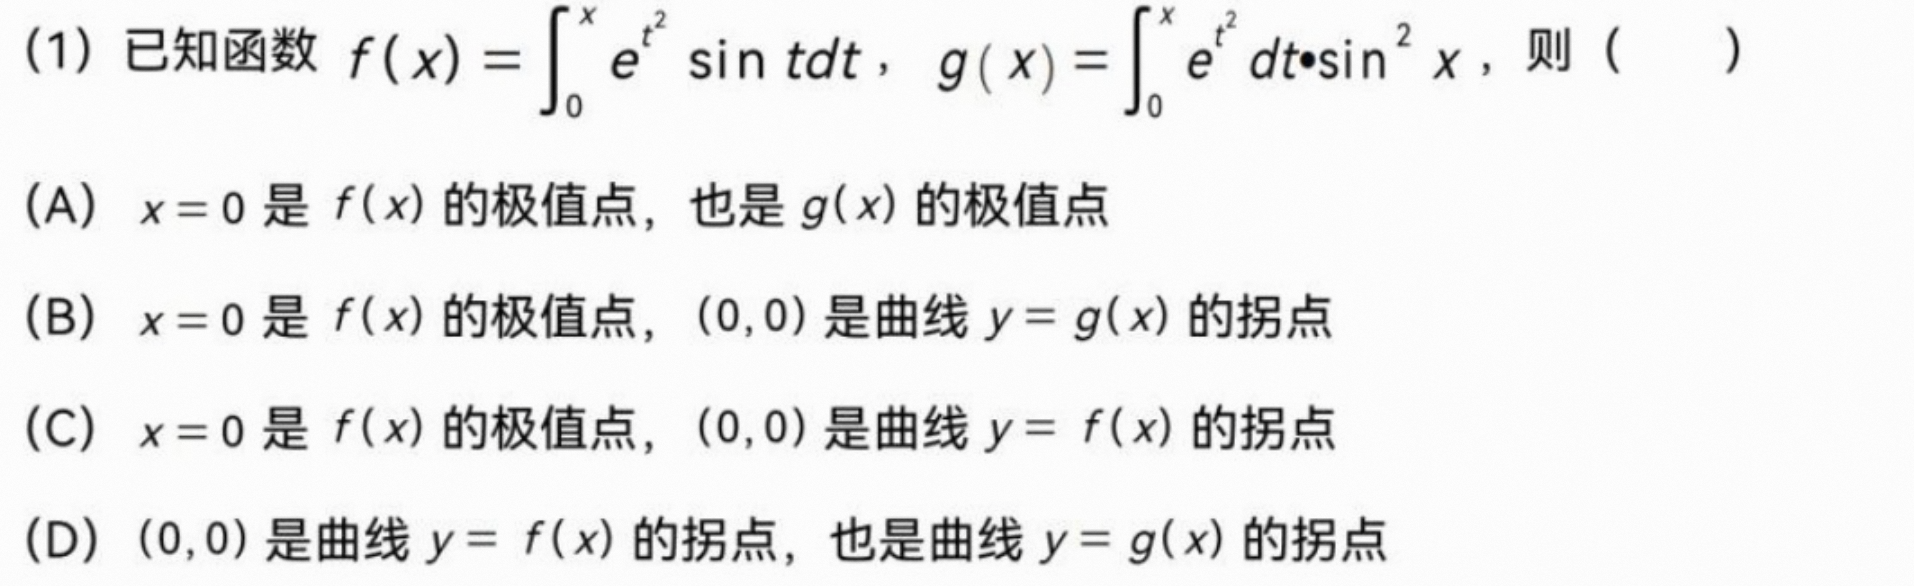
{"type": "text", "text": "这道题选什么"},
{
"type": "image_url",
"image_url": {
"url": "https://pic1.imgdb.cn/item/68d24759c5157e1a882b2505.jpg",
},
},
],
}
],
extra_body={"thinking_mode": True,},
)
print(response.choices[0].message.content)
化学

具体细节:https://www.chembk.com/cn/chem/2,5-%E4%BA%8C%E7%94%B2%E5%9F%BA%E5%93%8C%E5%97%AA(%E9%A1%BA%E5%BC%8F)
from getpass import getpass
from openai import OpenAI

api_key = getpass("请输入 API Key(输入不可见):")
client = OpenAI(
    api_key=api_key,  # 此处传token,不带Bearer
    base_url="https://chat.intern-ai.org.cn/api/v1/",
)

response = client.chat.completions.create(
    model="intern-s1",
    messages=[
        {
            "role": "user",
            "content": [
                {"type": "text", "text": "从左到右,给出图中反应物的化学式"},
                {
                    "type": "image_url",
                    "image_url": {
                        "url": "https://pic1.imgdb.cn/item/68d23c82c5157e1a882ad47f.png",
                    },
                },
            ],
        }
    ],
    extra_body={
        "thinking_mode": True,
        "temperature": 0.7,
        "top_p": 1.0,
        "top_k": 50,
        "min_p": 0.0,
    },
)

print(response.choices[0].message.content)
3. 玩转MCP
3.1 什么是MCP?

MCP(Model Control Protocol)是一种专为AI设计的协议(类别 USB-C接口转换器),其核心作用是扩充AI的能力。通过MCP,AI可以:
- 获取外部数据
- 操作文件系统
- 调用各种服务接口
- 实现复杂的工作流程
通过本教程,您将掌握如何让Intern-S1 API突破传统对话限制,实现以下核心功能:
- 外部数据获取:连接并处理来自各种外部源的数据
- 文件系统操作:具备完整的文件创建、读取、修改和删除能力,实现一个命令行版本的 cursor。
项目结构
Github 代码:https://github.com/fak111/mcp_tutorial
1. 环境准备
#git clone https://github.com/fak111/mcp_tutorial.git
git clone https://gh.llkk.cc/https://github.com/fak111/mcp_tutorial.git
cd mcp_tutorial
bash install.sh
2. 配置 API
cd mcp-client
cp .env.example .env
Vscode模式下,在相应的文件目录中创建 .env 文件,填写你的 API_KEY。
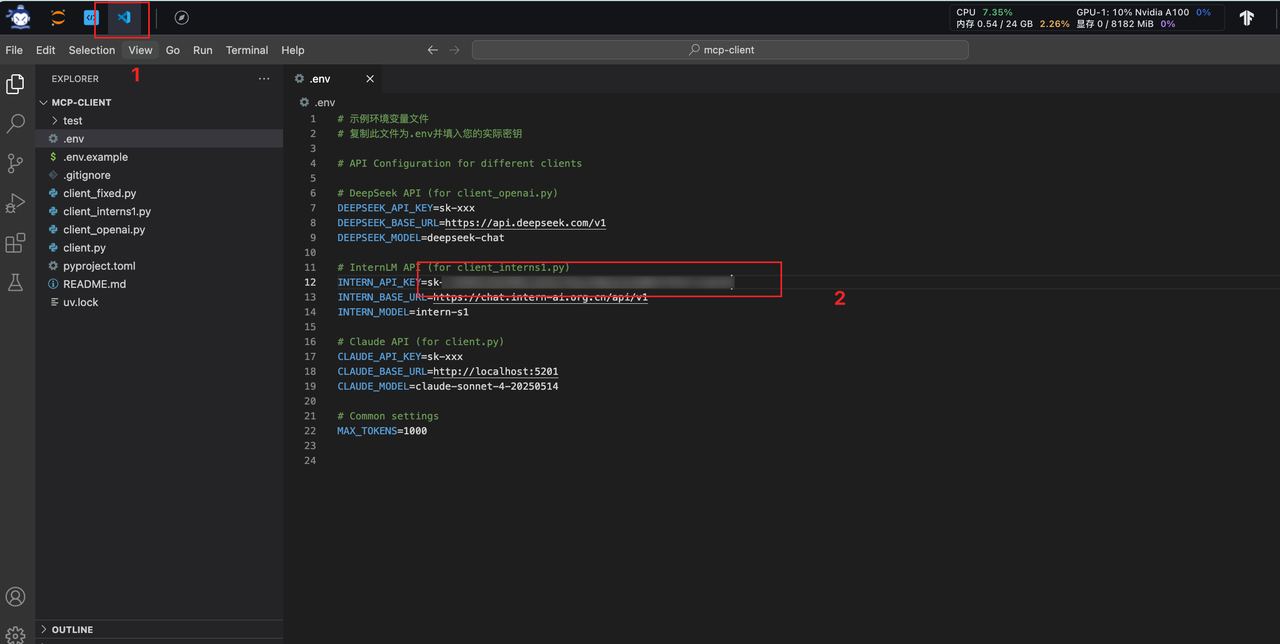
推荐:学习阶段建议使用书生的intern-s1模型,访问 https://internlm.intern-ai.org.cn/api/strategy 获取详细信息。
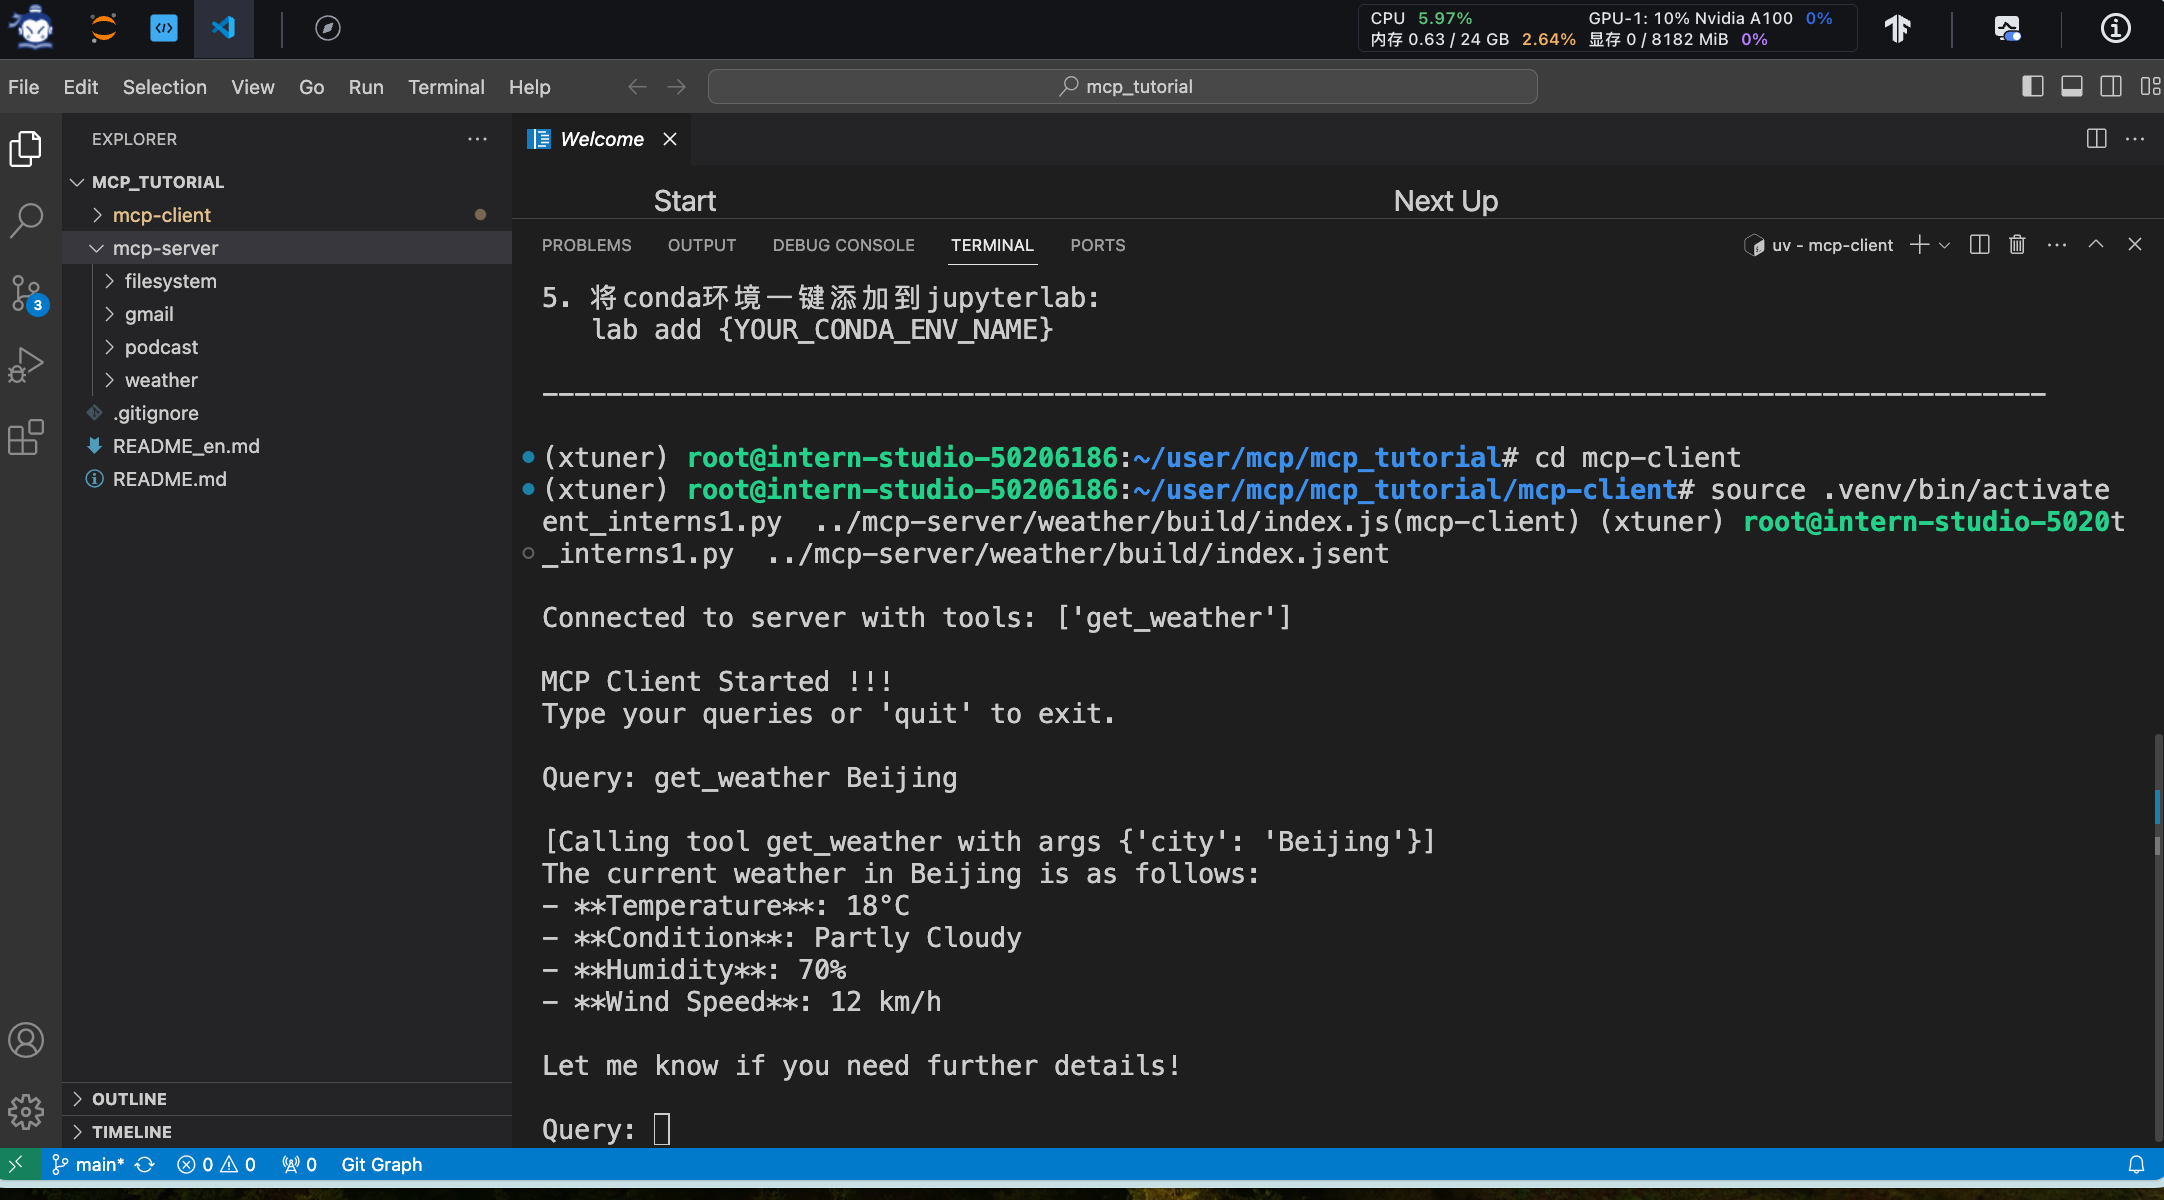
3.2 天气服务使用示例
启动天气服务
cd mcp-client
source .venv/bin/activate
uv run client_interns1.py ../mcp-server/weather/build/index.js
使用方法
get_weather Beijing
3.3 文件系统服务
文件服务的启动命令格式如下:
文件服务启动 uv run client_fixed.py arg1 arg2
参数说明:
arg1:MCP 文件操作服务的路径
arg2:运行文件操作的工作目录路径
cd mcp-client
source .venv/bin/activate
uv run client_fixed.py ../mcp-server/filesystem/dist/index.js ../
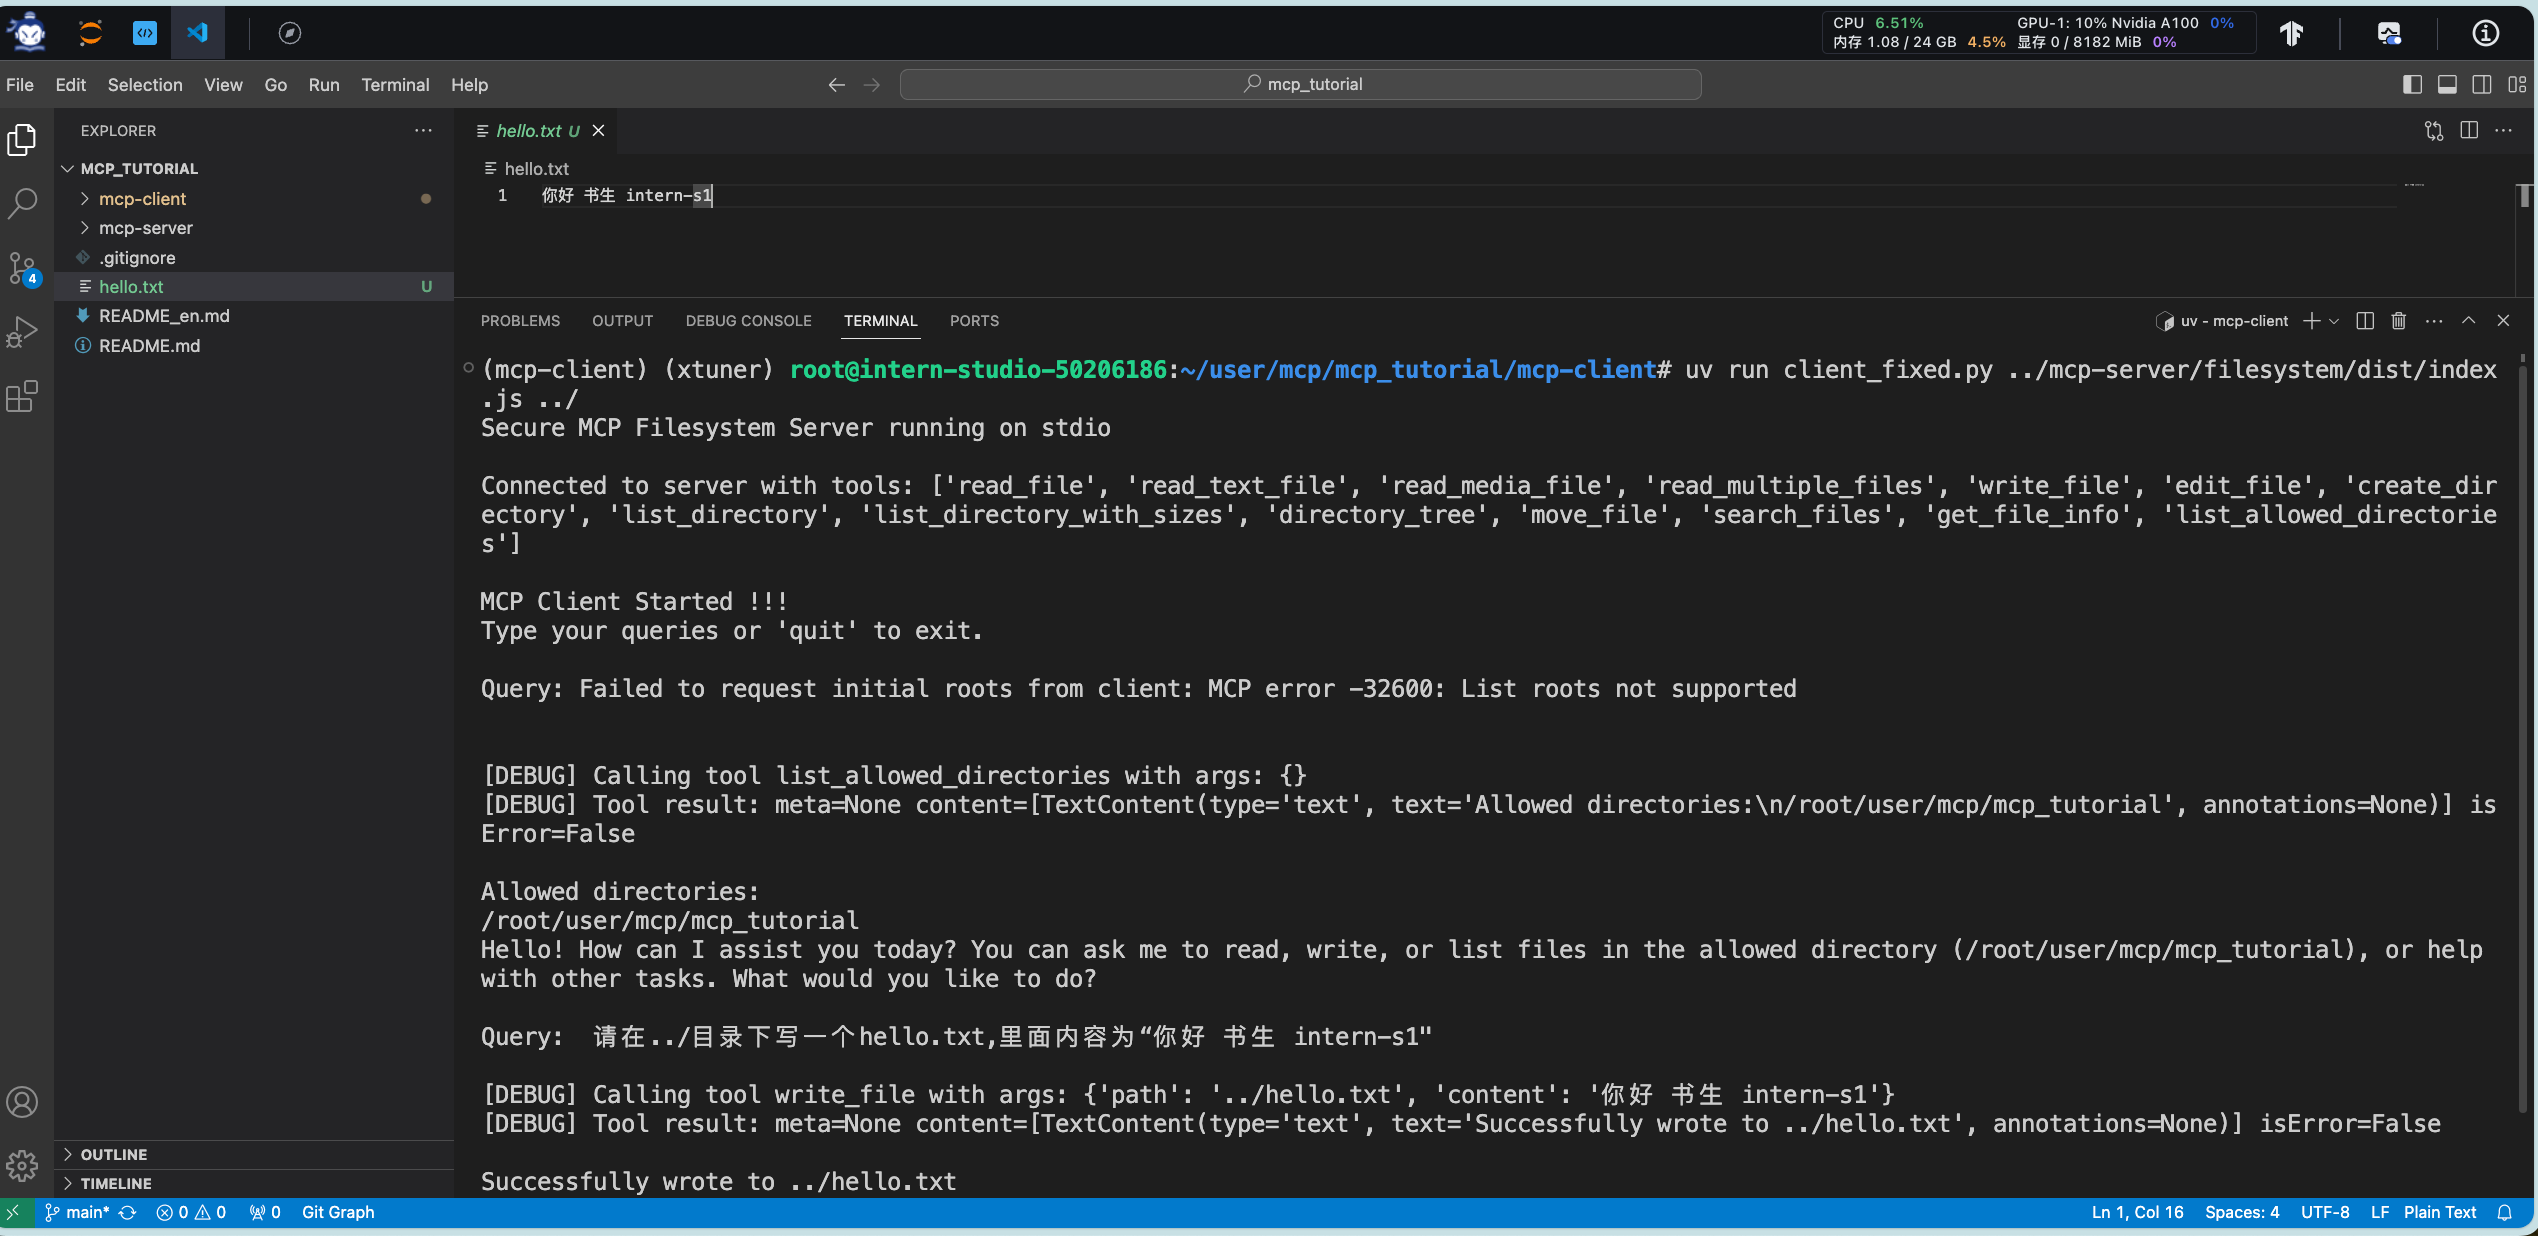
功能示例
列出文件:列出当前目录下的所有文件
读取文件:读取 README.md 文件的内容
创建文件:请在../目录下写一个hello.txt,里面内容为“你好 书生 intern-s1"
搜索文件:搜索所有 .md 文件


 他的勋章
他的勋章


评论