 返回首页
返回首页
 回到顶部
回到顶部
8.14
【目标任务】
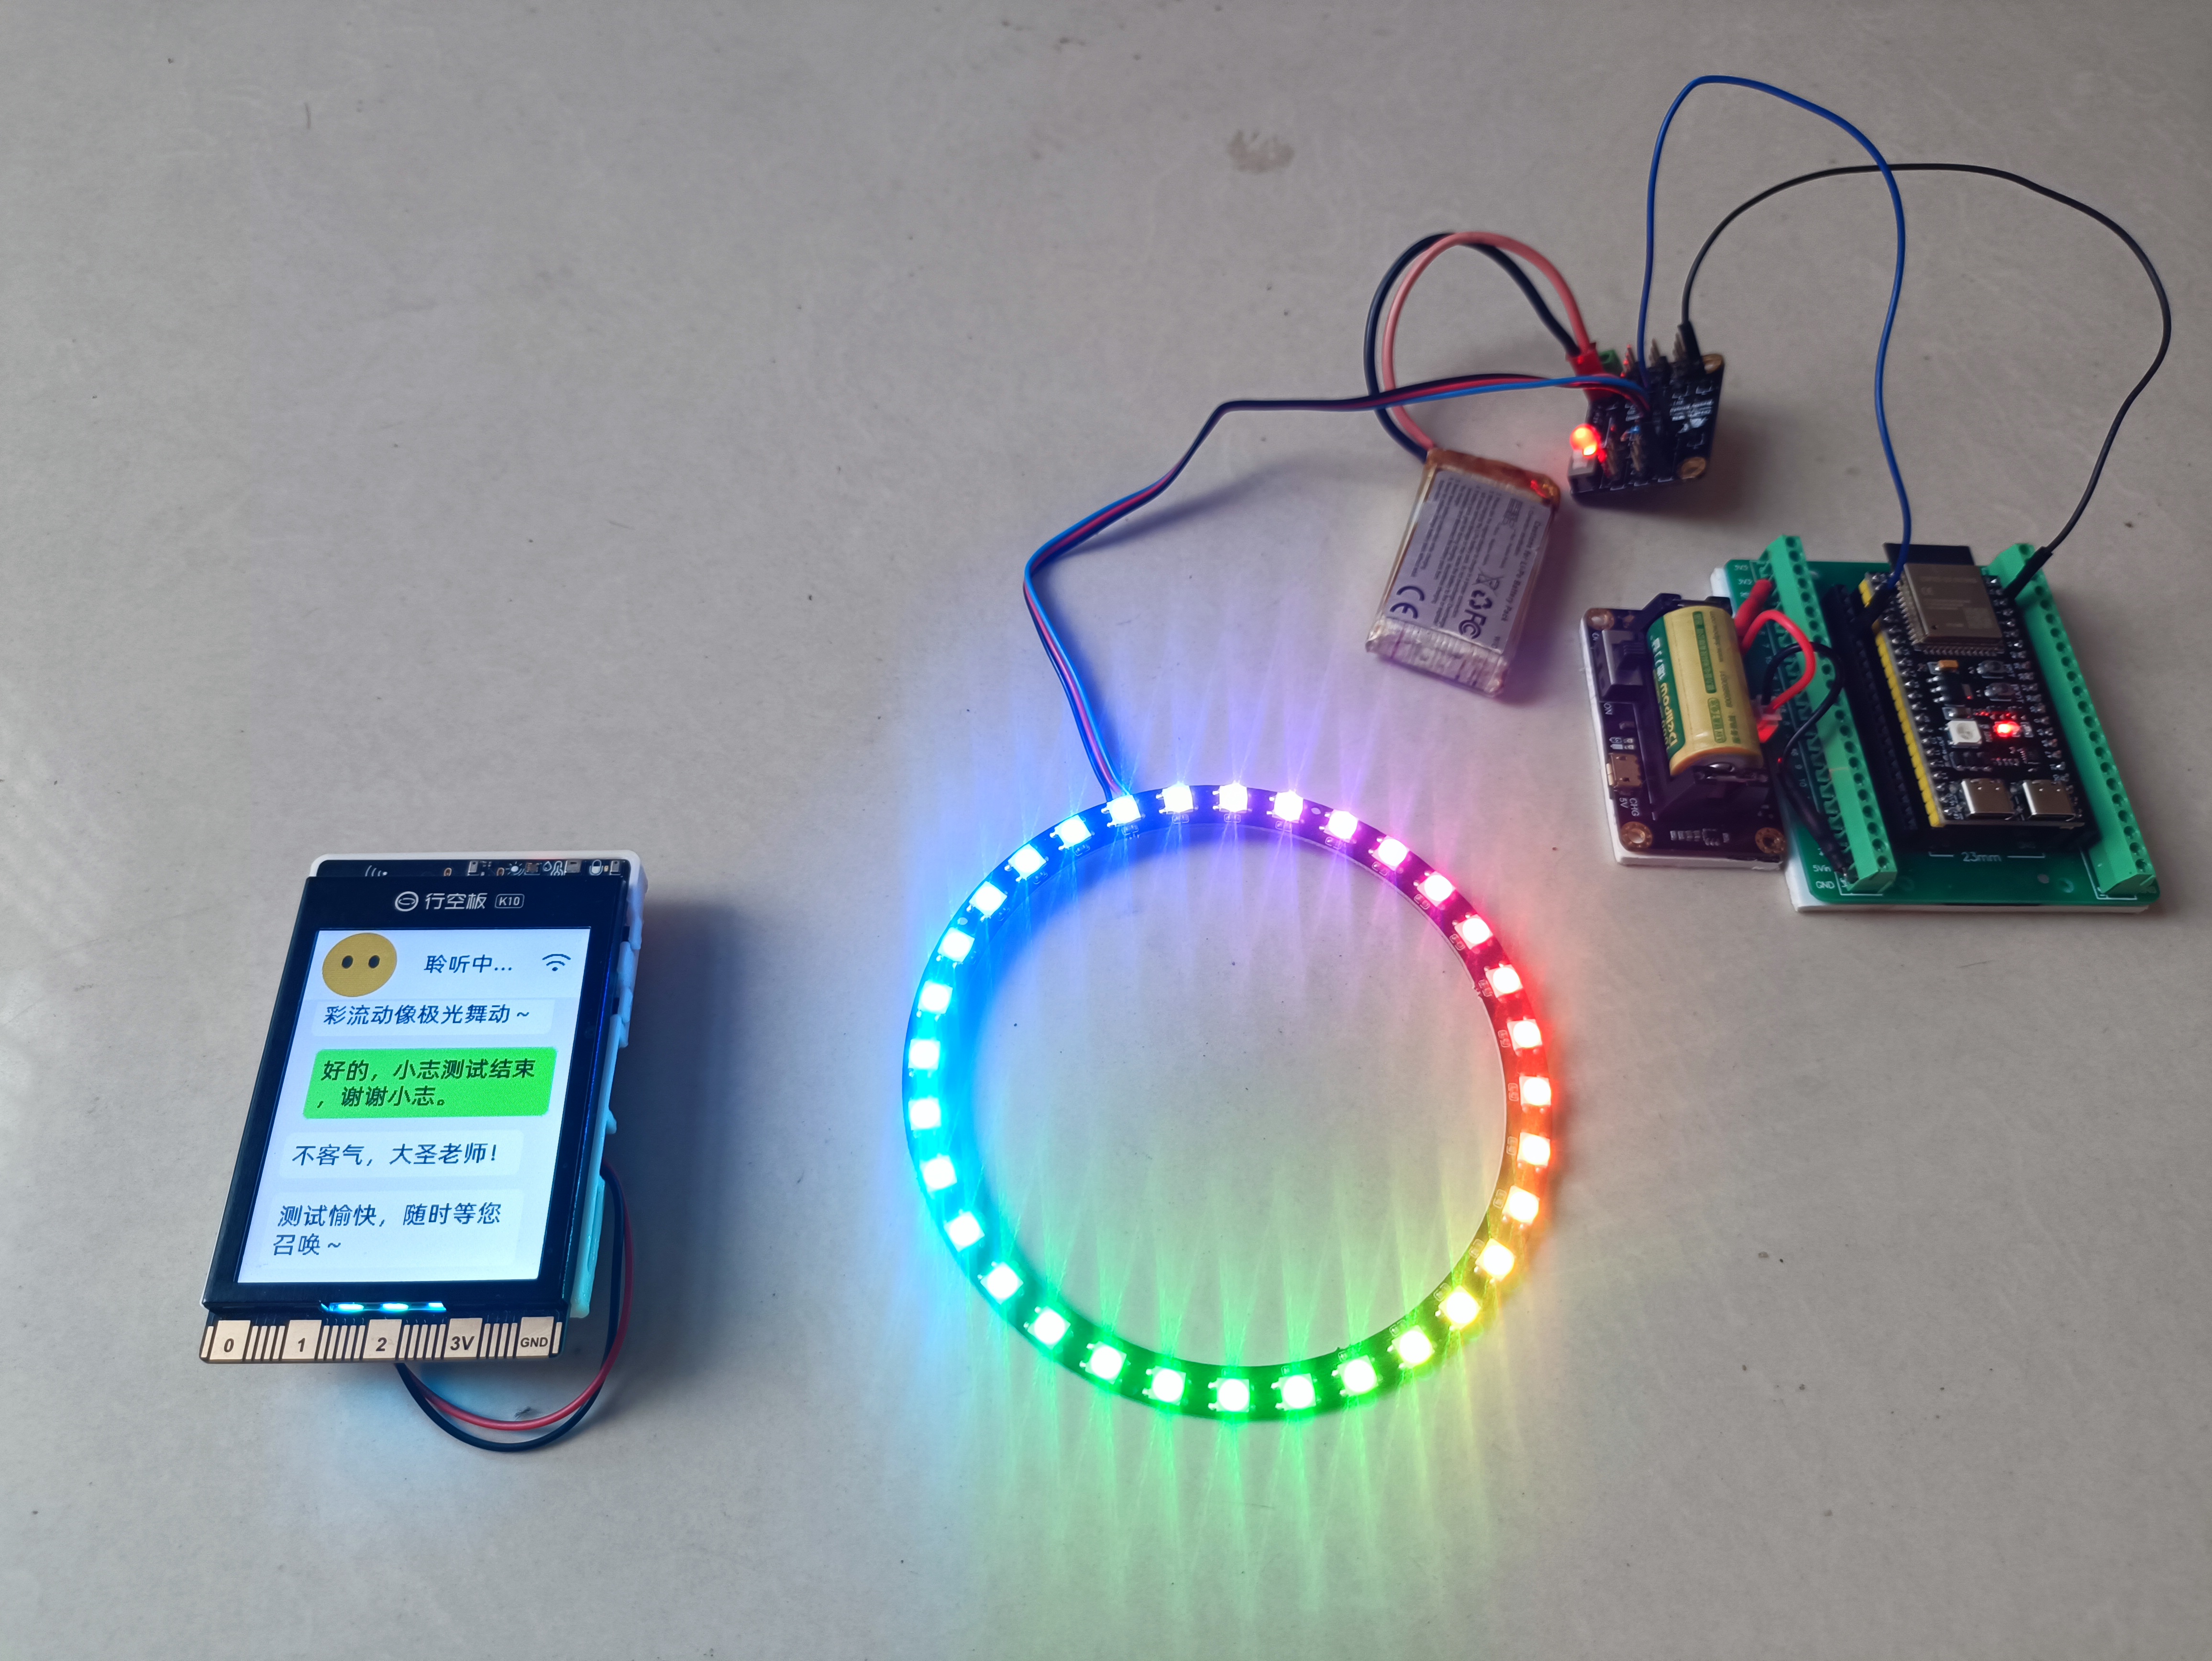
这个帖子,记录用小智语音控制ESP32 S3开发板板载WS2812 RGB灯及外接WS2812灯带(灯环),初步计划颜色和亮度的控制,后续争取实现更多灯光效果。
【编程环境配置】
让小智语音控制ESP32 S3点灯|极简MCP插件教程- Makelog(造物记)
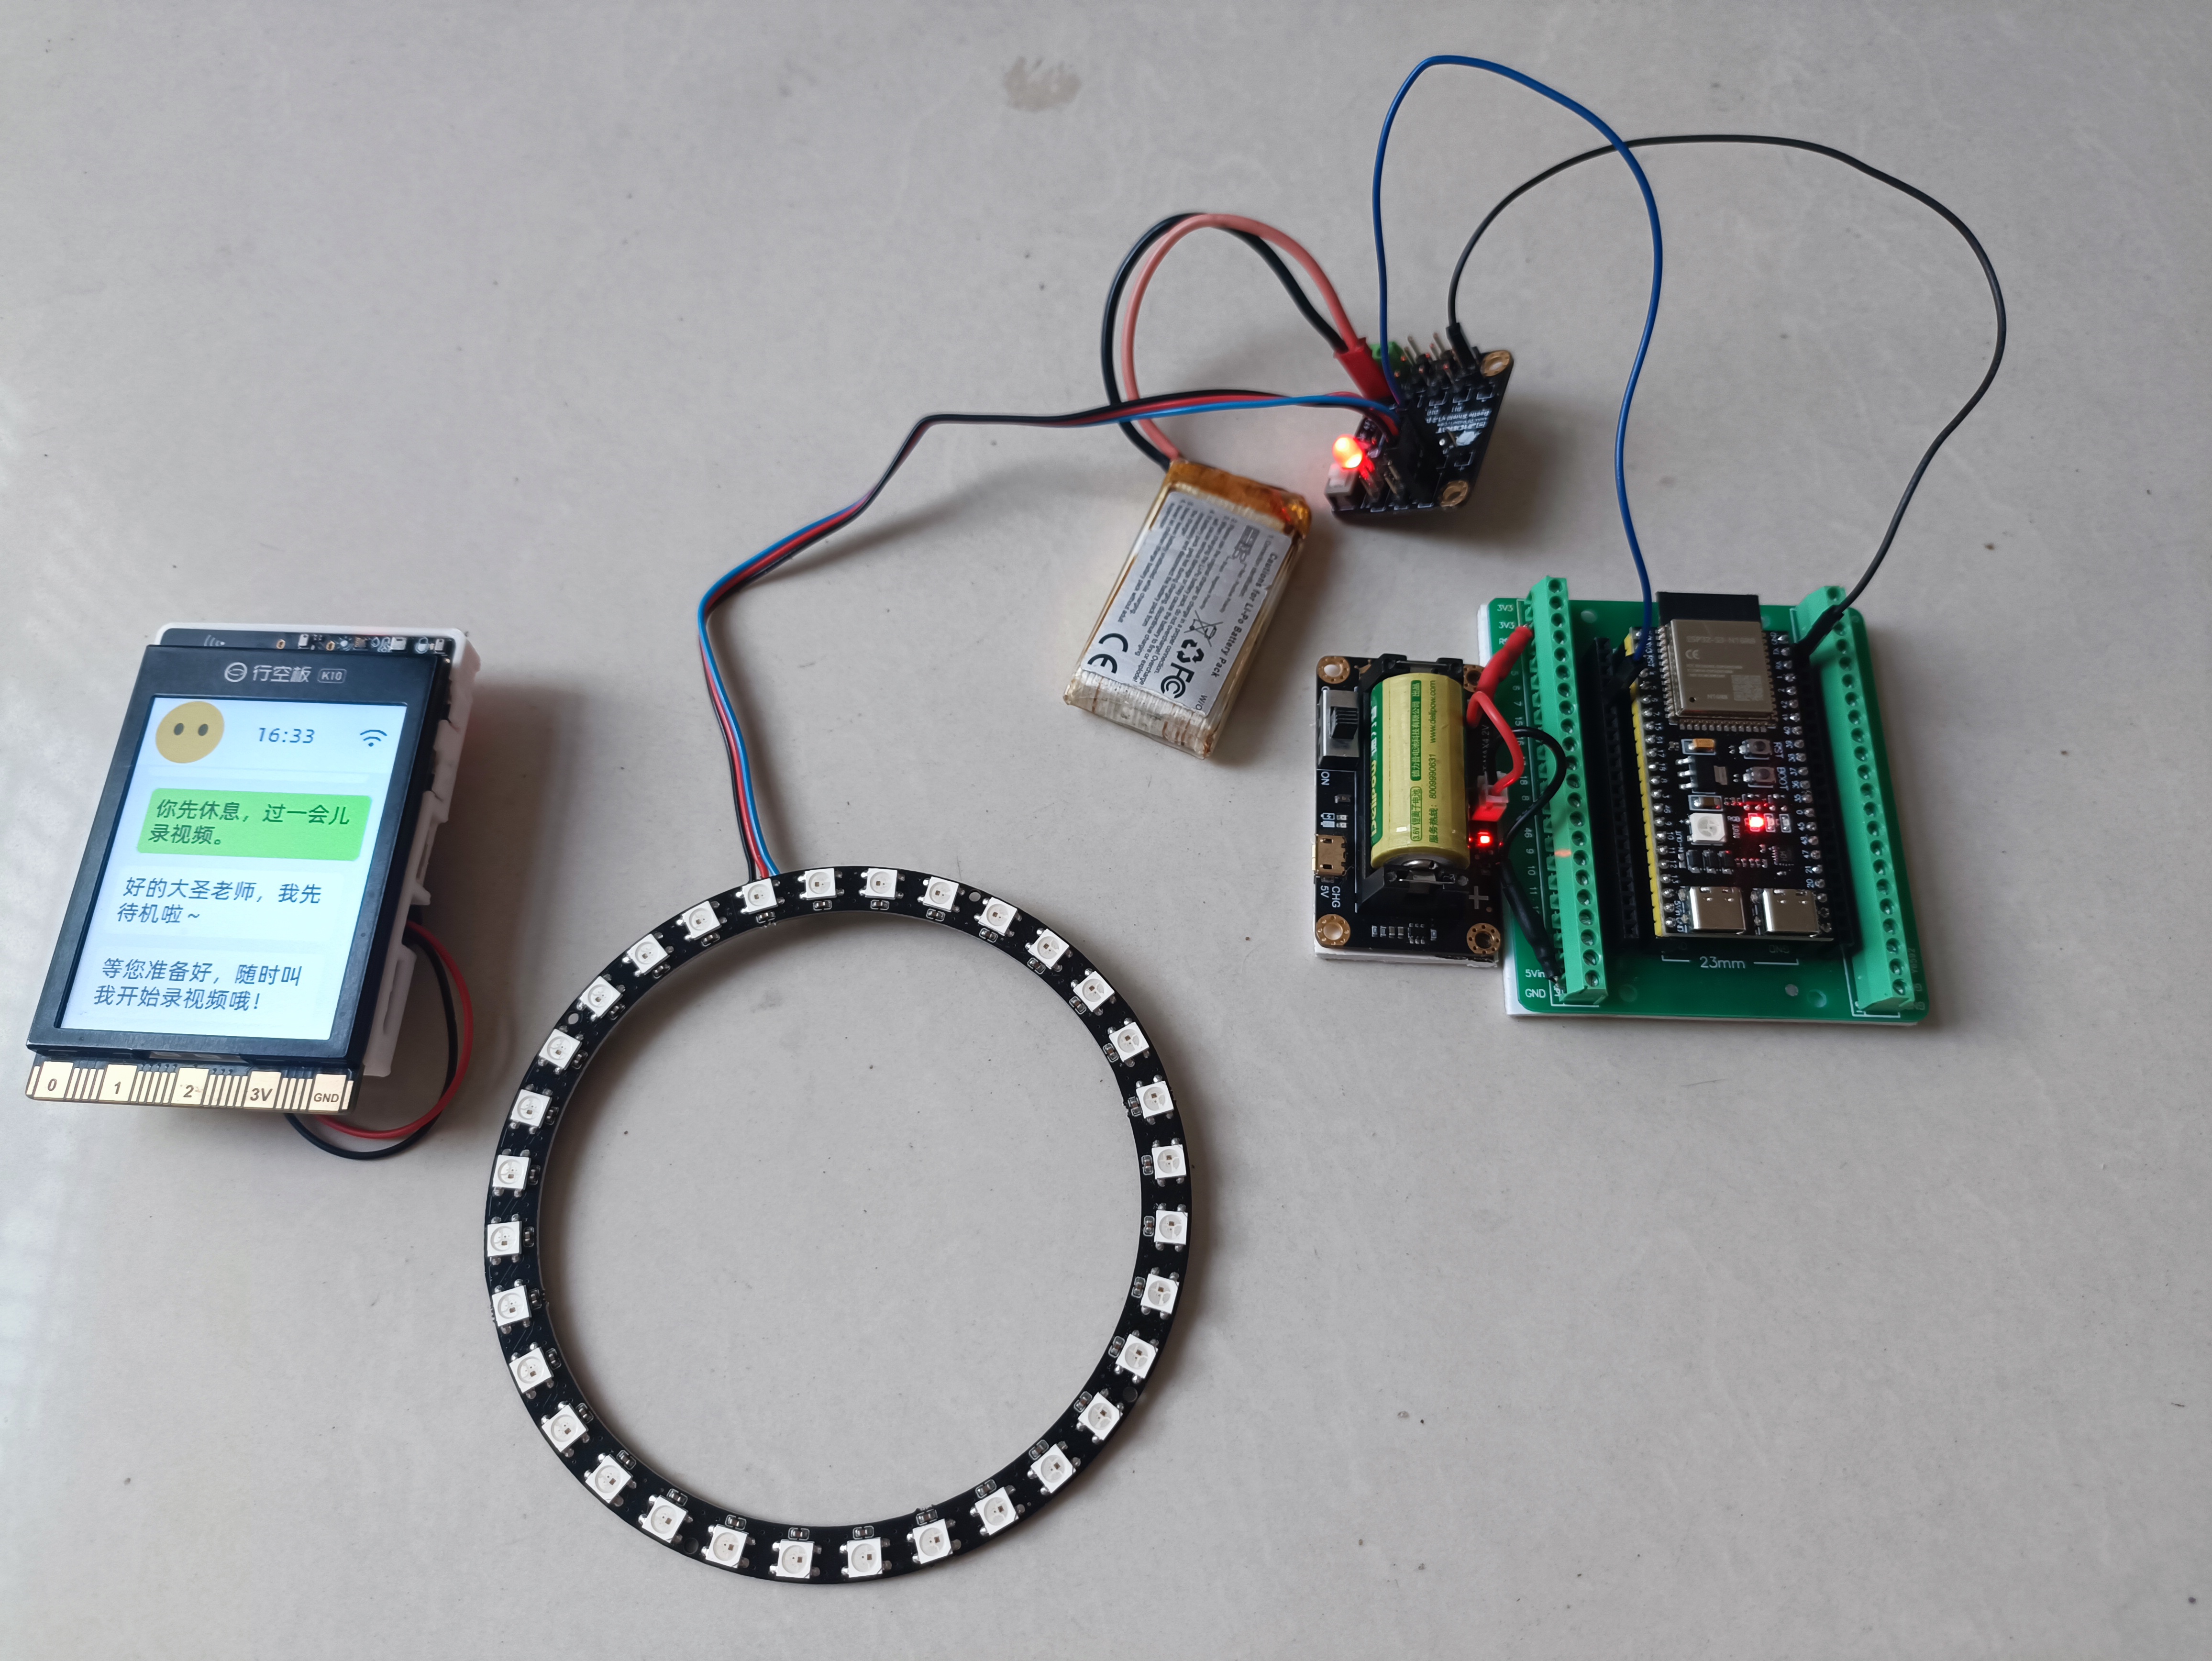
材料清单
- K10小智 X1
- ESP32 S3开发板 X1
- WS2812 RGB灯环 X1
- 锂电池 X
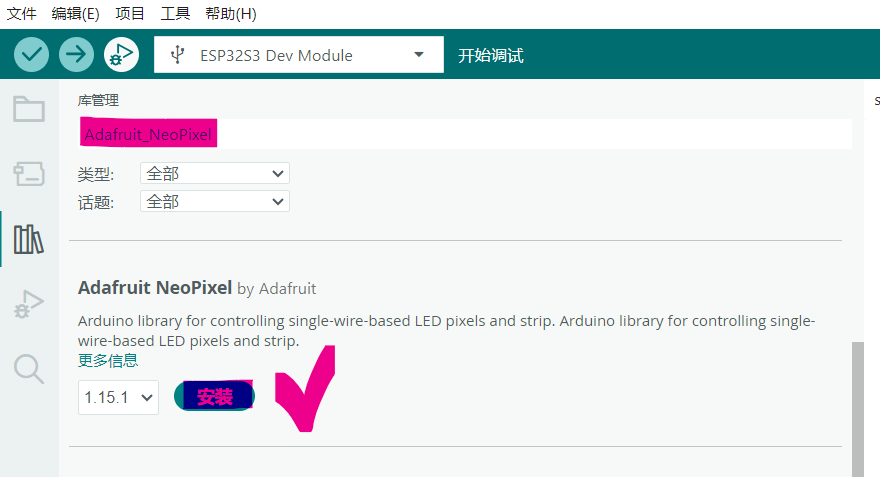
步骤1 安装Adafruit_NeoPixel库
编程环境配置:
让小智语音控制ESP32 S3点灯|极简MCP插件教程- Makelog(造物记)
工具--库管理,安装Adafruit_NeoPixel库。
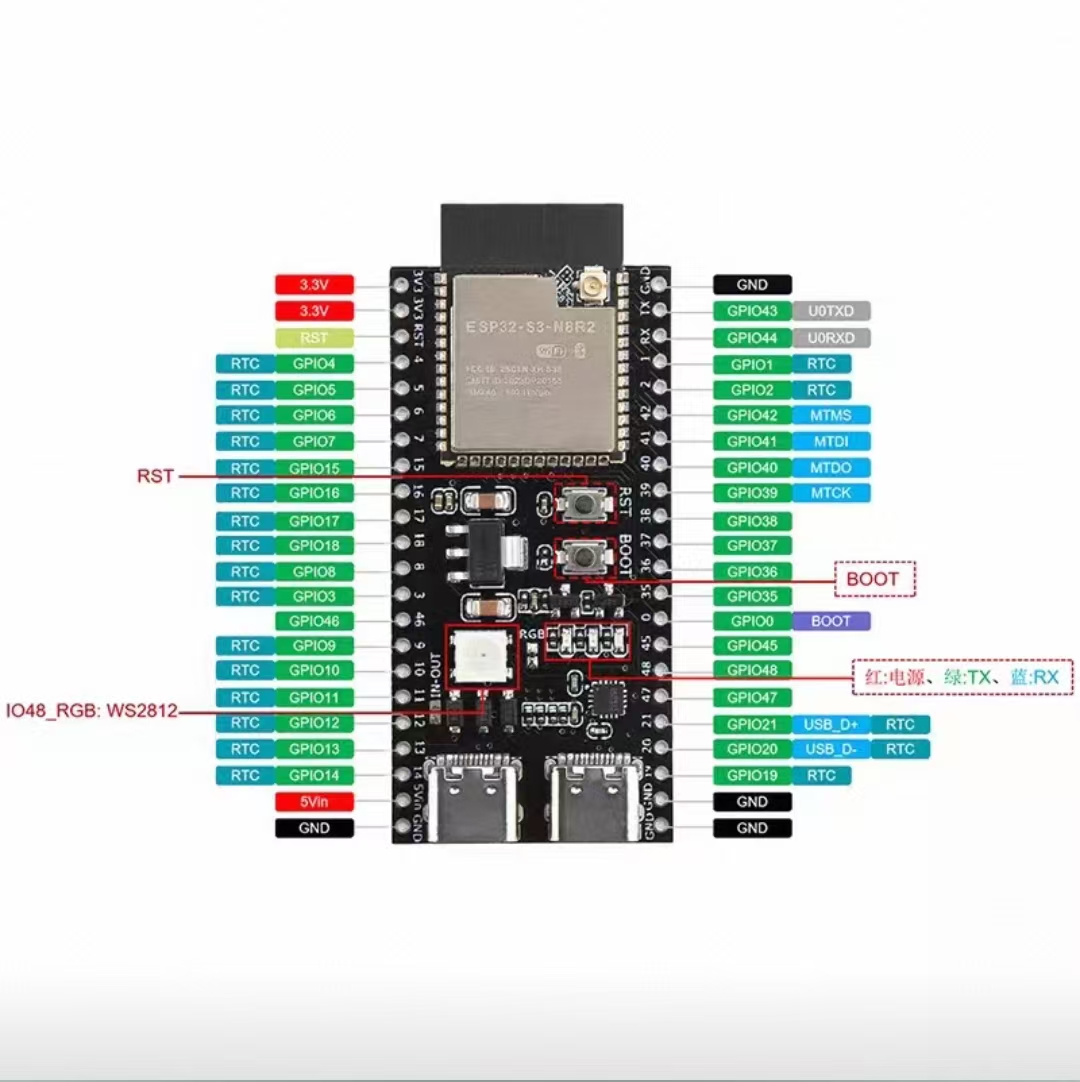
然后做一个板载WS2812 RGB灯点(IO48)亮测试,红绿蓝三色变换。
#include <Adafruit_NeoPixel.h>
#define LED_PIN    48   // RGB灯数据引脚[1](@ref)
#define LED_COUNT  1    // 灯珠数量(单颗)[1](@ref)

Adafruit_NeoPixel strip(LED_COUNT, LED_PIN, NEO_GRB + NEO_KHZ800);

void setup() {
  strip.begin();           // 初始化LED控制
  strip.setBrightness(50); // 设置亮度(0-255,建议≤50)[1,5](@ref)
  strip.show();            // 初始关闭灯珠
}

void loop() {
  // 红色 (R=255, G=0, B=0)
  strip.setPixelColor(0, strip.Color(255, 0, 0));
  strip.show();
  delay(1000);  // 持续1秒[1](@ref)

  // 绿色 (R=0, G=255, B=0)
  strip.setPixelColor(0, strip.Color(0, 255, 0));
  strip.show();
  delay(1000);

  // 蓝色 (R=0, G=0, B=255)
  strip.setPixelColor(0, strip.Color(0, 0, 255));
  strip.show();
  delay(1000);
}
步骤2 外接WS2812 RGB 32灯珠灯环基础测试
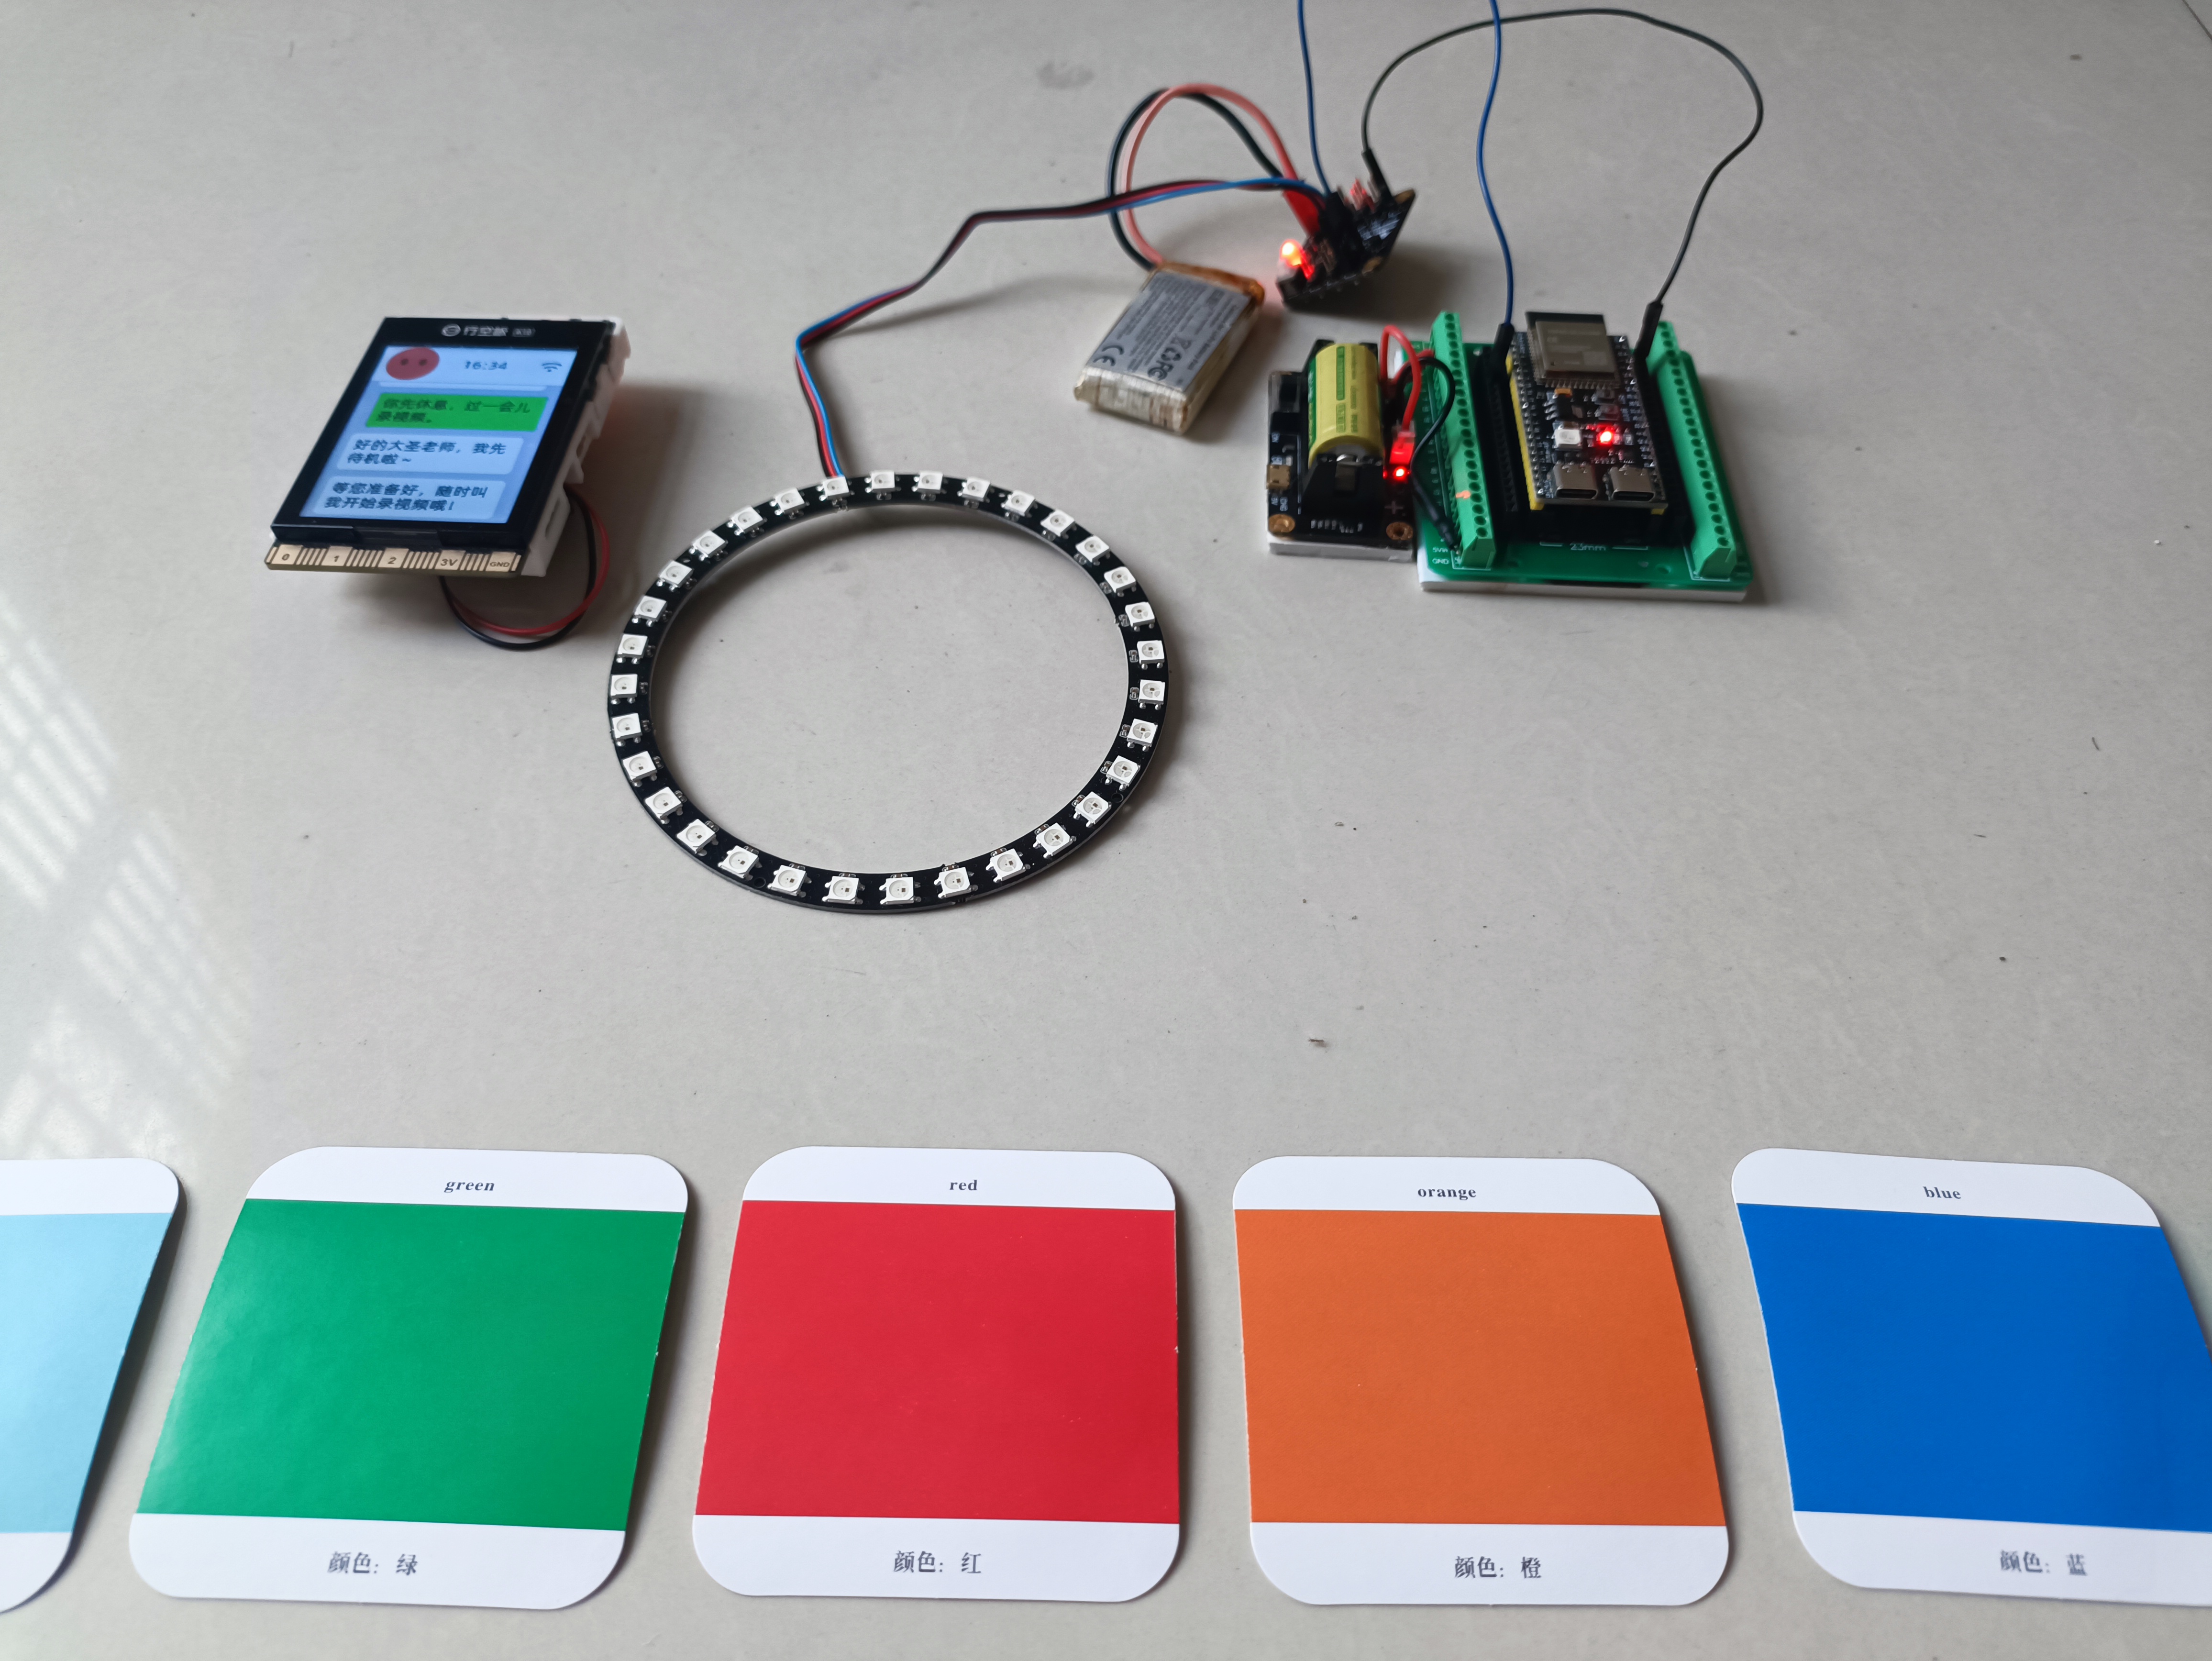
1.基础测试
colorWipe():实现红/绿/蓝三色顺序填充,验证灯珠焊接与信号传输。
每灯珠点亮间隔 50ms(可通过 wait参数调整速度)。
2.动态光效
剧场追逐:三灯一组移动白光,模拟跑马灯效果。
3.亮度安全
setBrightness(50):限制电流(32灯全亮时理论电流 ≈ 32× 20mA = 640mA)。
硬件连接注意事项
1.电源要求
必须外接 5V/2A 电源:32灯珠全白时峰值电流可达 1.92A(60mA × 32)。
接线顺序:先接 GND → 5V → 数据线(防浪涌冲击)。
2.信号传输
数据线串联 330Ω电阻(防信号反射)。
灯环 DI 端接 ESP32-S3 的 GPIO5,DO 端留空或接下一灯环。
3.ESP32-S3 配置
若灯珠不亮,检查开发板是否启用 GPIO5(部分板型需跳线)。
#include <Adafruit_NeoPixel.h>
#define LED_PIN     5   // 数据引脚(ESP32-S3 的 GPIO5)
#define LED_COUNT   32   // 灯珠数量(外接 32 灯环)

Adafruit_NeoPixel strip(LED_COUNT, LED_PIN, NEO_GRB + NEO_KHZ800);

void setup() {
  Serial.begin(115200);
  strip.begin();           // 初始化灯带
  strip.setBrightness(50);  // 设置亮度(0-255,建议≤50防过流)
  strip.show();             // 关闭所有灯珠
  Serial.println("32灯环测试启动");
}

void loop() {
  // 1. 基础颜色测试(红→绿→蓝)
  colorWipe(strip.Color(255, 0, 0), 50);    // 红色填充
  colorWipe(strip.Color(0, 255, 0), 50);    // 绿色填充
  colorWipe(strip.Color(0, 0, 255), 50);    // 蓝色填充

  // 2. 彩虹渐变效果
  rainbow(10);                             // 全灯环彩虹流动

  // 3. 剧场追逐效果
  theaterChase(strip.Color(127, 127, 127), 50); // 白色追逐
}

// 逐点填充颜色
void colorWipe(uint32_t color, int wait) {
  for (int i = 0; i < strip.numPixels(); i++) {
    strip.setPixelColor(i, color);  // 设置当前灯珠颜色
    strip.show();                   // 更新硬件显示
    delay(wait);                    // 控制填充速度
  }
}

// 彩虹渐变(非阻塞优化版)
void rainbow(int wait) {
  static long firstPixelHue = 0;  // 色相起始值

  for (int i = 0; i < strip.numPixels(); i++) {
    int pixelHue = firstPixelHue + (i * 65536L / strip.numPixels());
    strip.setPixelColor(i, strip.gamma32(strip.ColorHSV(pixelHue)));
  }
  strip.show();
  delay(wait);
  firstPixelHue += 256;  // 色相步进(每帧移动1°)
  if (firstPixelHue >= 5 * 65536) firstPixelHue = 0; // 完成5次色环循环后复位
}

// 剧场追逐效果(3灯一组移动)
void theaterChase(uint32_t color, int wait) {
  for (int cycle = 0; cycle < 10; cycle++) {   // 重复10轮
    for (int phase = 0; phase < 3; phase++) {    // 3种相位
      strip.clear();                            // 清空灯带
      // 点亮当前相位灯珠(每隔3灯点亮1颗)
      for (int i = phase; i < strip.numPixels(); i += 3) {
        strip.setPixelColor(i, color);
      }
      strip.show();
      delay(wait);
    }
  }
}
步骤3 启动小智控制
系统架构
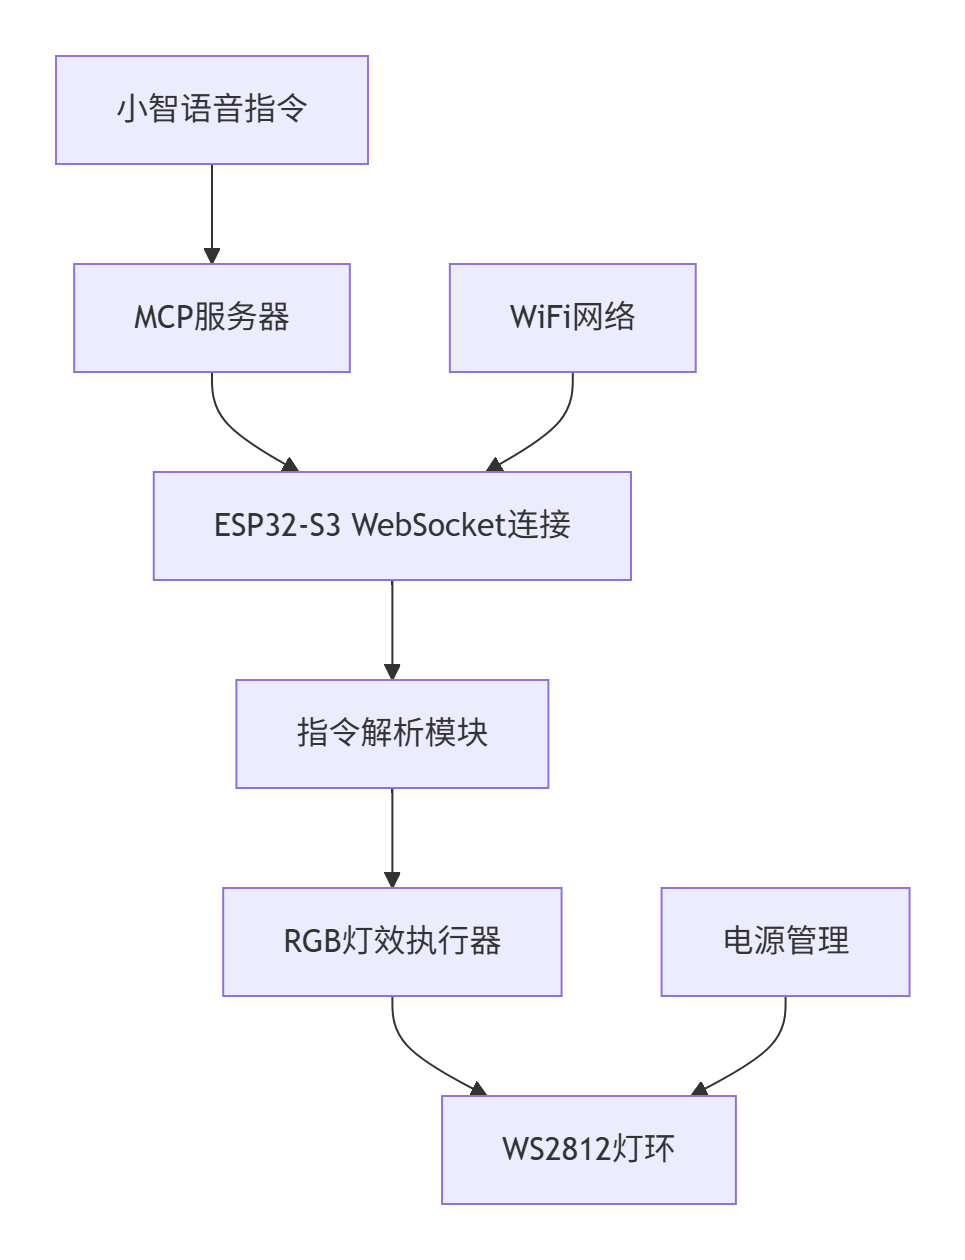
语音指令,例如下表
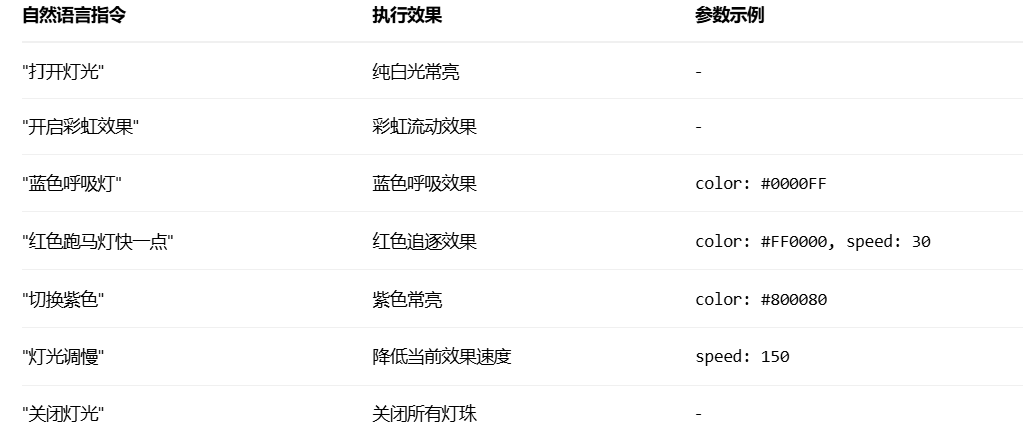
可以自然语言切换各种常见颜色和彩虹、各色呼吸、各色跑马灯。
#include <WiFi.h>
#include <WebSocketMCP.h>
#include <Adafruit_NeoPixel.h>

#define LED_PIN 5        // WS2812数据引脚(GPIO5)
#define LED_COUNT 32     // 32灯珠灯环

// 初始化灯环
Adafruit_NeoPixel strip(LED_COUNT, LED_PIN, NEO_GRB + NEO_KHZ800);

// 全局状态变量
enum Effects { OFF, SOLID, RAINBOW, BREATH, CHASE };
Effects currentEffect = OFF;
uint32_t effectColor = strip.Color(255, 255, 255); // 默认白色
uint16_t effectSpeed = 50; // 默认速度值

// WiFi配置
const char* ssid = "your-ssid";
const char* password = "your-password";
const char* mcpEndpoint = "ws://your-mcp-server:port/path";
WebSocketMCP mcpClient;

// 非阻塞灯光效果实现
void updateLEDEffects() {
  static unsigned long prevMillis = 0;
  static uint16_t rainbowCounter = 0;
  static uint8_t breathValue = 0;
  static bool breathDir = true;
  static uint8_t chasePos = 0;

  if (millis() - prevMillis < effectSpeed) return;
  prevMillis = millis();

  switch(currentEffect) {
    case OFF:
      strip.clear();
      strip.show();
      break;

    case SOLID:
      strip.fill(effectColor);
      strip.show();
      break;

    case RAINBOW:
      for(int i=0; i<LED_COUNT; i++) {
        strip.setPixelColor(i, strip.gamma32(strip.ColorHSV((i * 65536L / LED_COUNT) + rainbowCounter)));
      }
      strip.show();
      rainbowCounter += 256;
      break;

    case BREATH:
      strip.fill(strip.Color(breathValue * ((effectColor >> 16) & 0xFF) / 255,
                          breathValue * ((effectColor >> 8) & 0xFF) / 255,
                          breathValue * (effectColor & 0xFF) / 255));
      strip.show();

      if(breathDir) {
        if(++breathValue >= 255) breathDir = false;
      } else {
        if(--breathValue <= 30) breathDir = true;
      }
      break;

    case CHASE:
      strip.clear();
      for(int i=0; i<3; i++) {
        int pos = (chasePos + i) % LED_COUNT;
        strip.setPixelColor(pos, effectColor);
      }
      strip.show();
      chasePos = (chasePos + 1) % LED_COUNT;
      break;
  }
}

// MCP工具注册(新增灯环控制)
void registerMcpTools() {
  // RGB灯环控制工具
  mcpClient.registerTool(
    "rgb_control",
    "控制WS2812 RGB 小环 灯环",
    "{\"type\":\"object\",\"properties\":{"
    "\"command\":{\"type\":\"string\",\"enum\":[\"on\",\"off\",\"solid\",\"rainbow\",\"breath\",\"chase\"]},"
    "\"color\":{\"type\":\"string\",\"pattern\":\"^#[0-9a-fA-F]{6}$\"},"
    "\"speed\":{\"type\":\"integer\",\"minimum\":10,\"maximum\":500}}"
    "}",
    [](const String& args) {
      DynamicJsonDocument doc(512);
      deserializeJson(doc, args);

      String command = doc["command"].as<String>();

      // 解析颜色值 (#RRGGBB格式)
      if(doc.containsKey("color")) {
        String colorHex = doc["color"].as<String>();
        long colorNum = strtol(colorHex.substring(1).c_str(), NULL, 16);
        effectColor = strip.Color((colorNum >> 16) & 0xFF,
                                 (colorNum >> 8) & 0xFF,
                                 colorNum & 0xFF);
      }

      // 解析速度值
      if(doc.containsKey("speed")) {
        effectSpeed = doc["speed"];
      }

      // 执行指令
      if(command == "on" || command == "solid") {
        currentEffect = SOLID;
      }
      else if(command == "off") {
        currentEffect = OFF;
      }
      else if(command == "rainbow") {
        currentEffect = RAINBOW;
      }
      else if(command == "breath") {
        currentEffect = BREATH;
      }
      else if(command == "chase") {
        currentEffect = CHASE;
      }

      return WebSocketMCP::ToolResponse("{\"status\":\"success\",\"effect\":\"" + command + "\"}");
    }
  );
}
void setup() {
  Serial.begin(115200);

  // 初始化RGB灯环
  strip.begin();
  strip.setBrightness(100); // 设置亮度(0-255)
  strip.show(); // 初始关闭

  // WiFi连接(保持不变)
  WiFi.begin(ssid, password);
  while (WiFi.status() != WL_CONNECTED) delay(500);

  // MCP客户端初始化
  mcpClient.begin(mcpEndpoint, [](bool connected) {
    if (connected) {
      Serial.println("[MCP] 已连接");
      registerMcpTools();
    }
  });
}
void loop() {
  mcpClient.loop();  // 处理WebSocket消息
  updateLEDEffects(); // 更新灯光效果(非阻塞)
}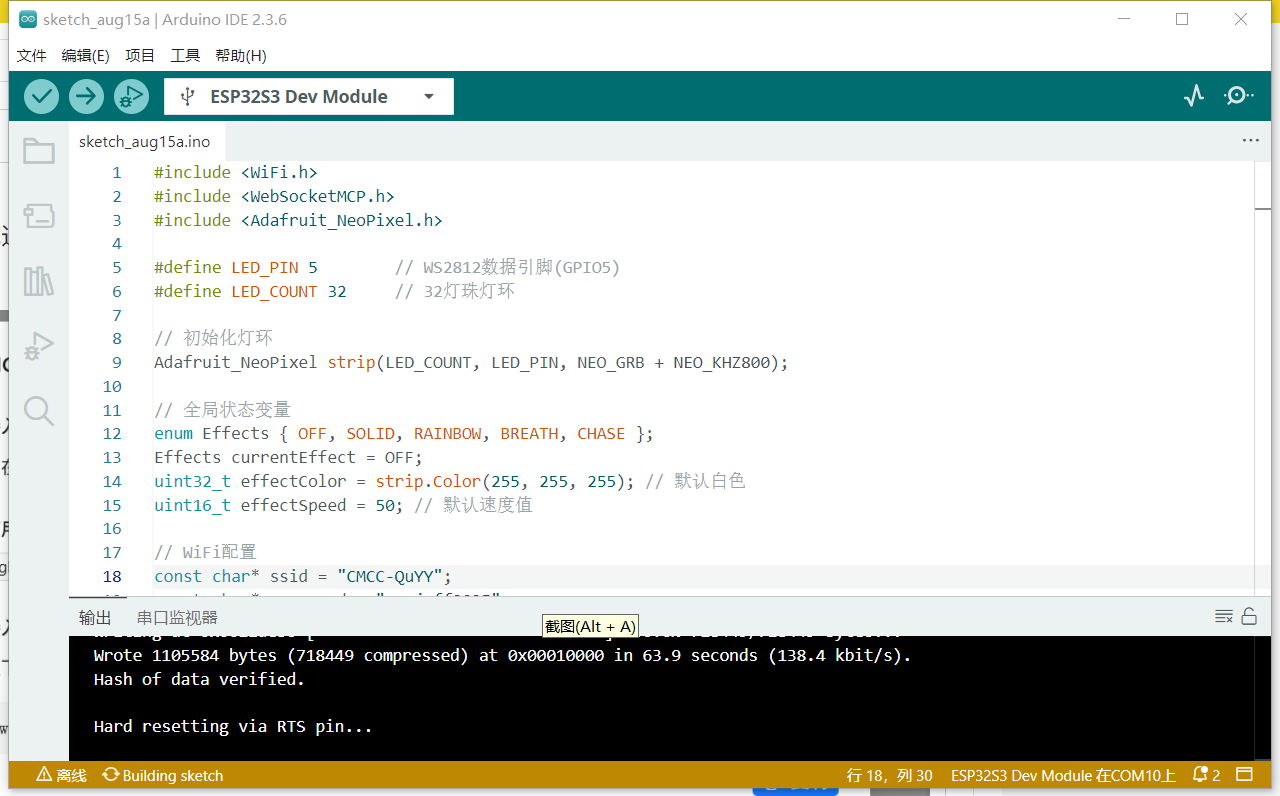
上传,测试通过。
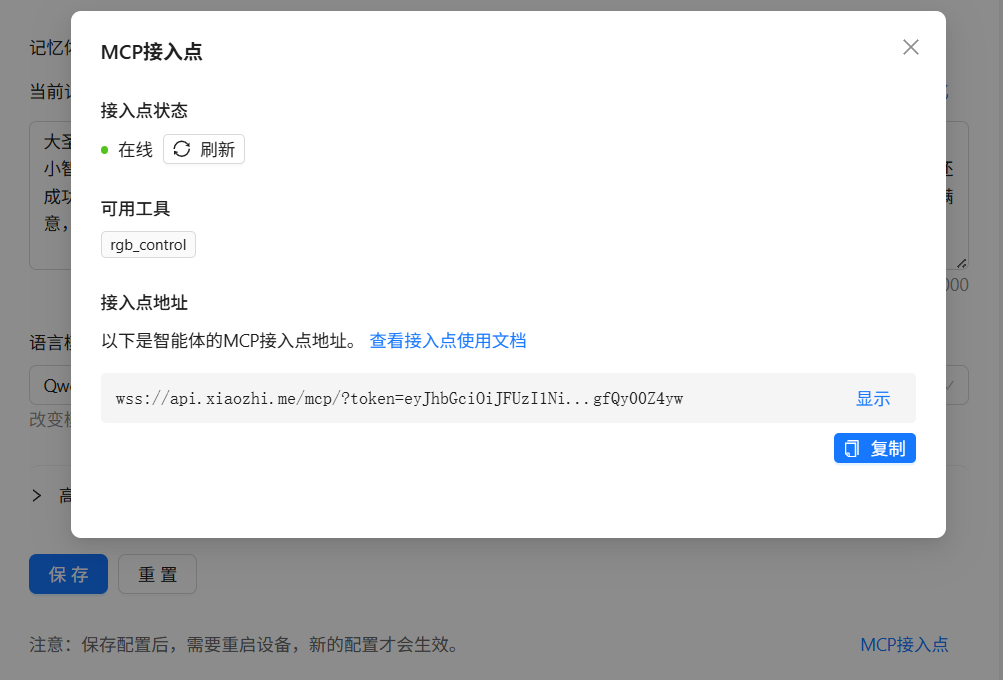
小智后台:


 他的勋章
他的勋章

罗罗罗2025.12.02
666