 返回首页
返回首页
 回到顶部
回到顶部
7.1
【任务设想】
这是一个学习笔记,对于小白来说,学习大神教程并写笔记,是学生时代整理错题本写试卷分析一样的有用。
 在社区论坛中学习了@freedomzjsx老师的教程,感觉很帅啊,所以我要学习并复刻一下,同时在学习中收获一些新知识。
 整个小项目分为三部分,在上面的M10中部署的有Blynk服务器,同时有程序调用保存在数据库中的数据显示在屏幕上。
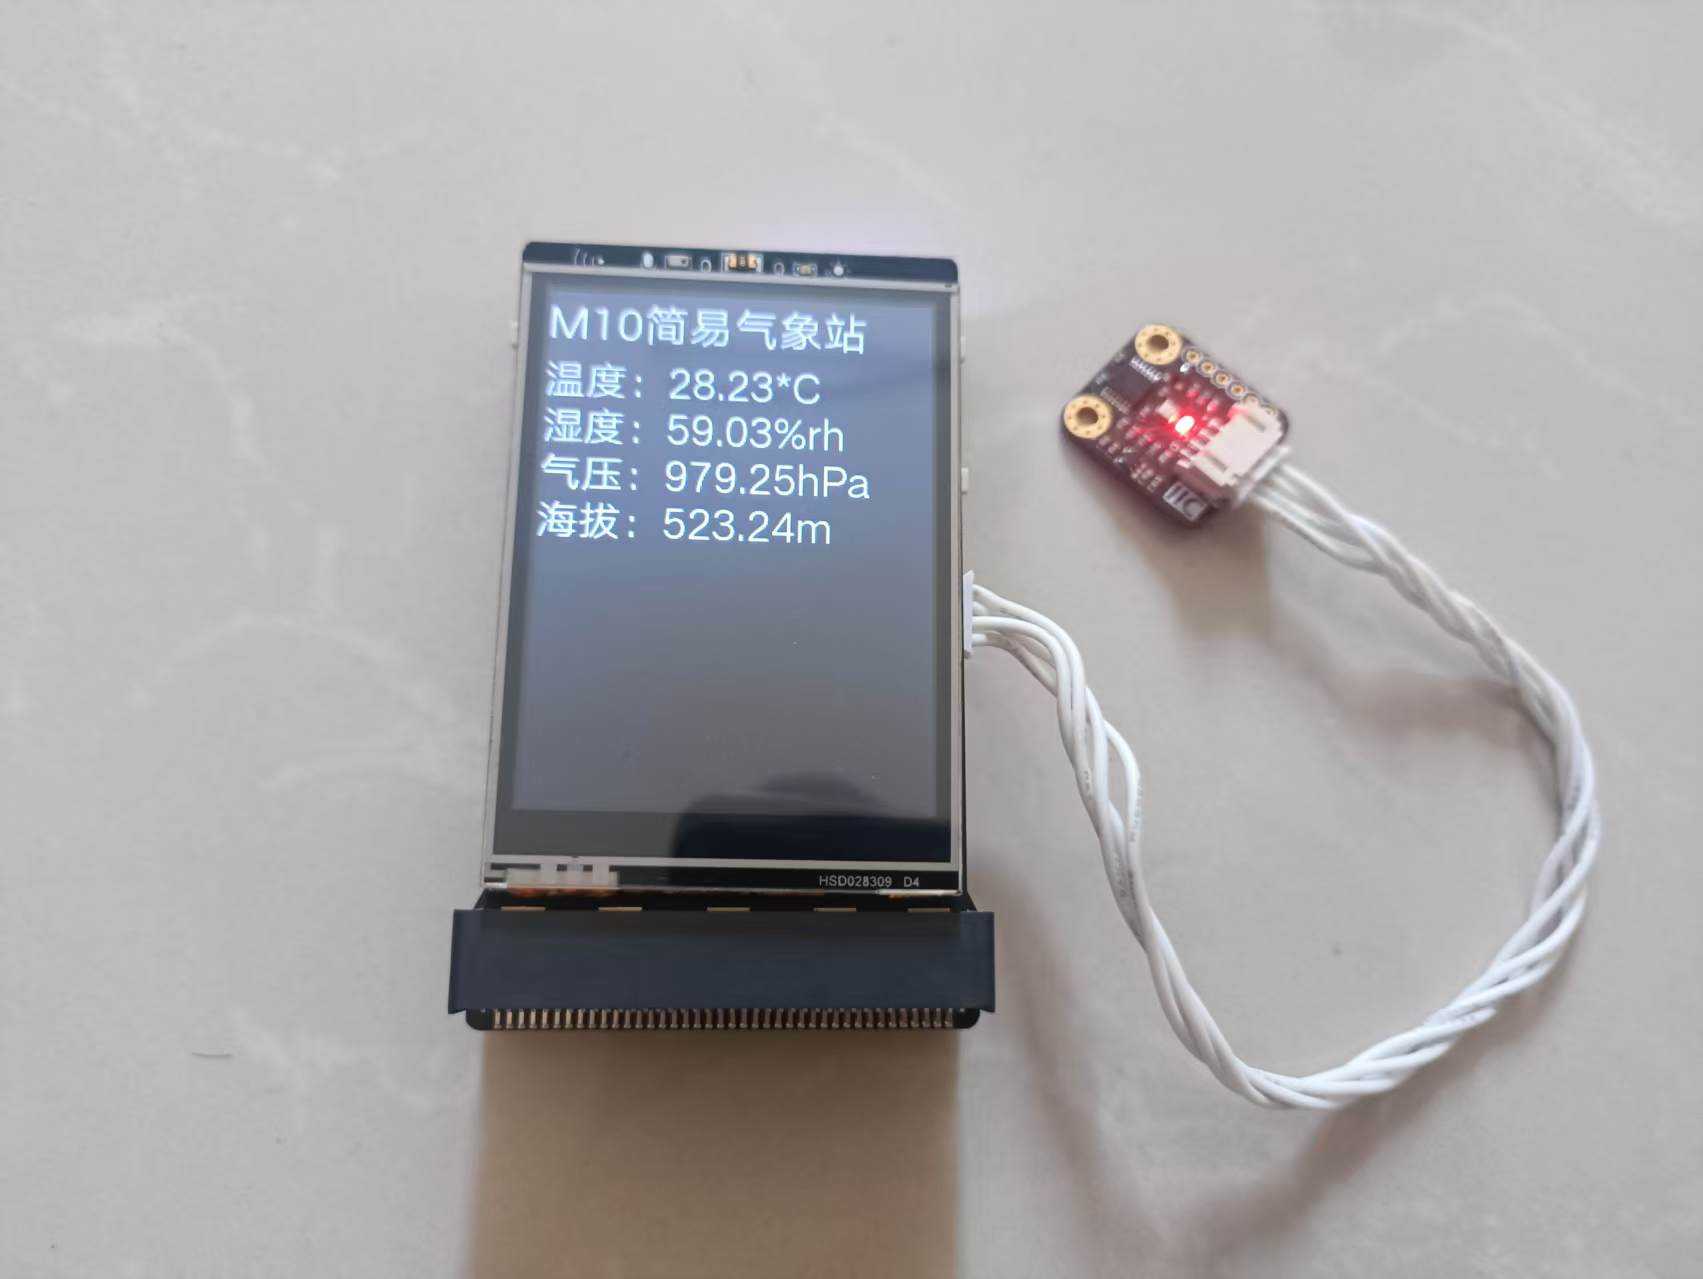
在下面图示中的M10做客户端向服务器发送BME280采集到的气象数据。
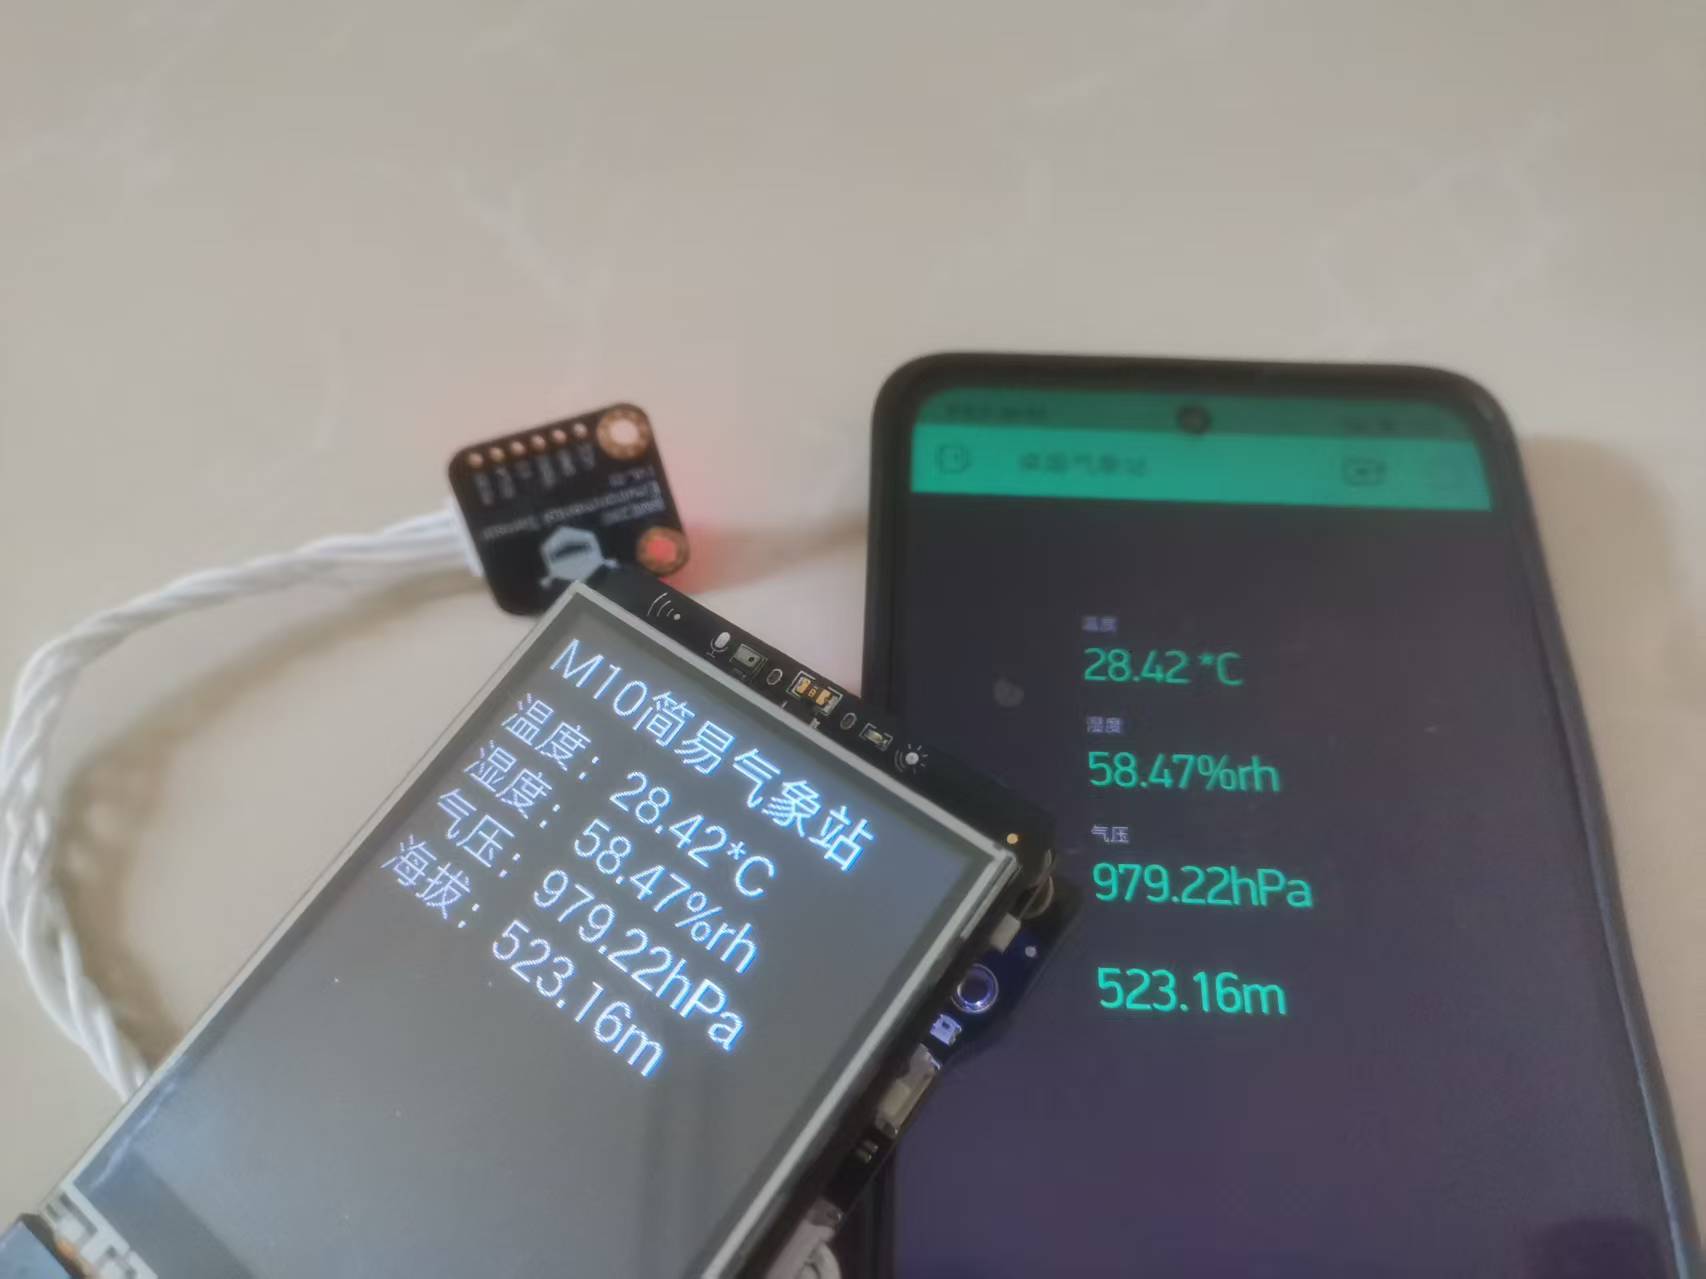
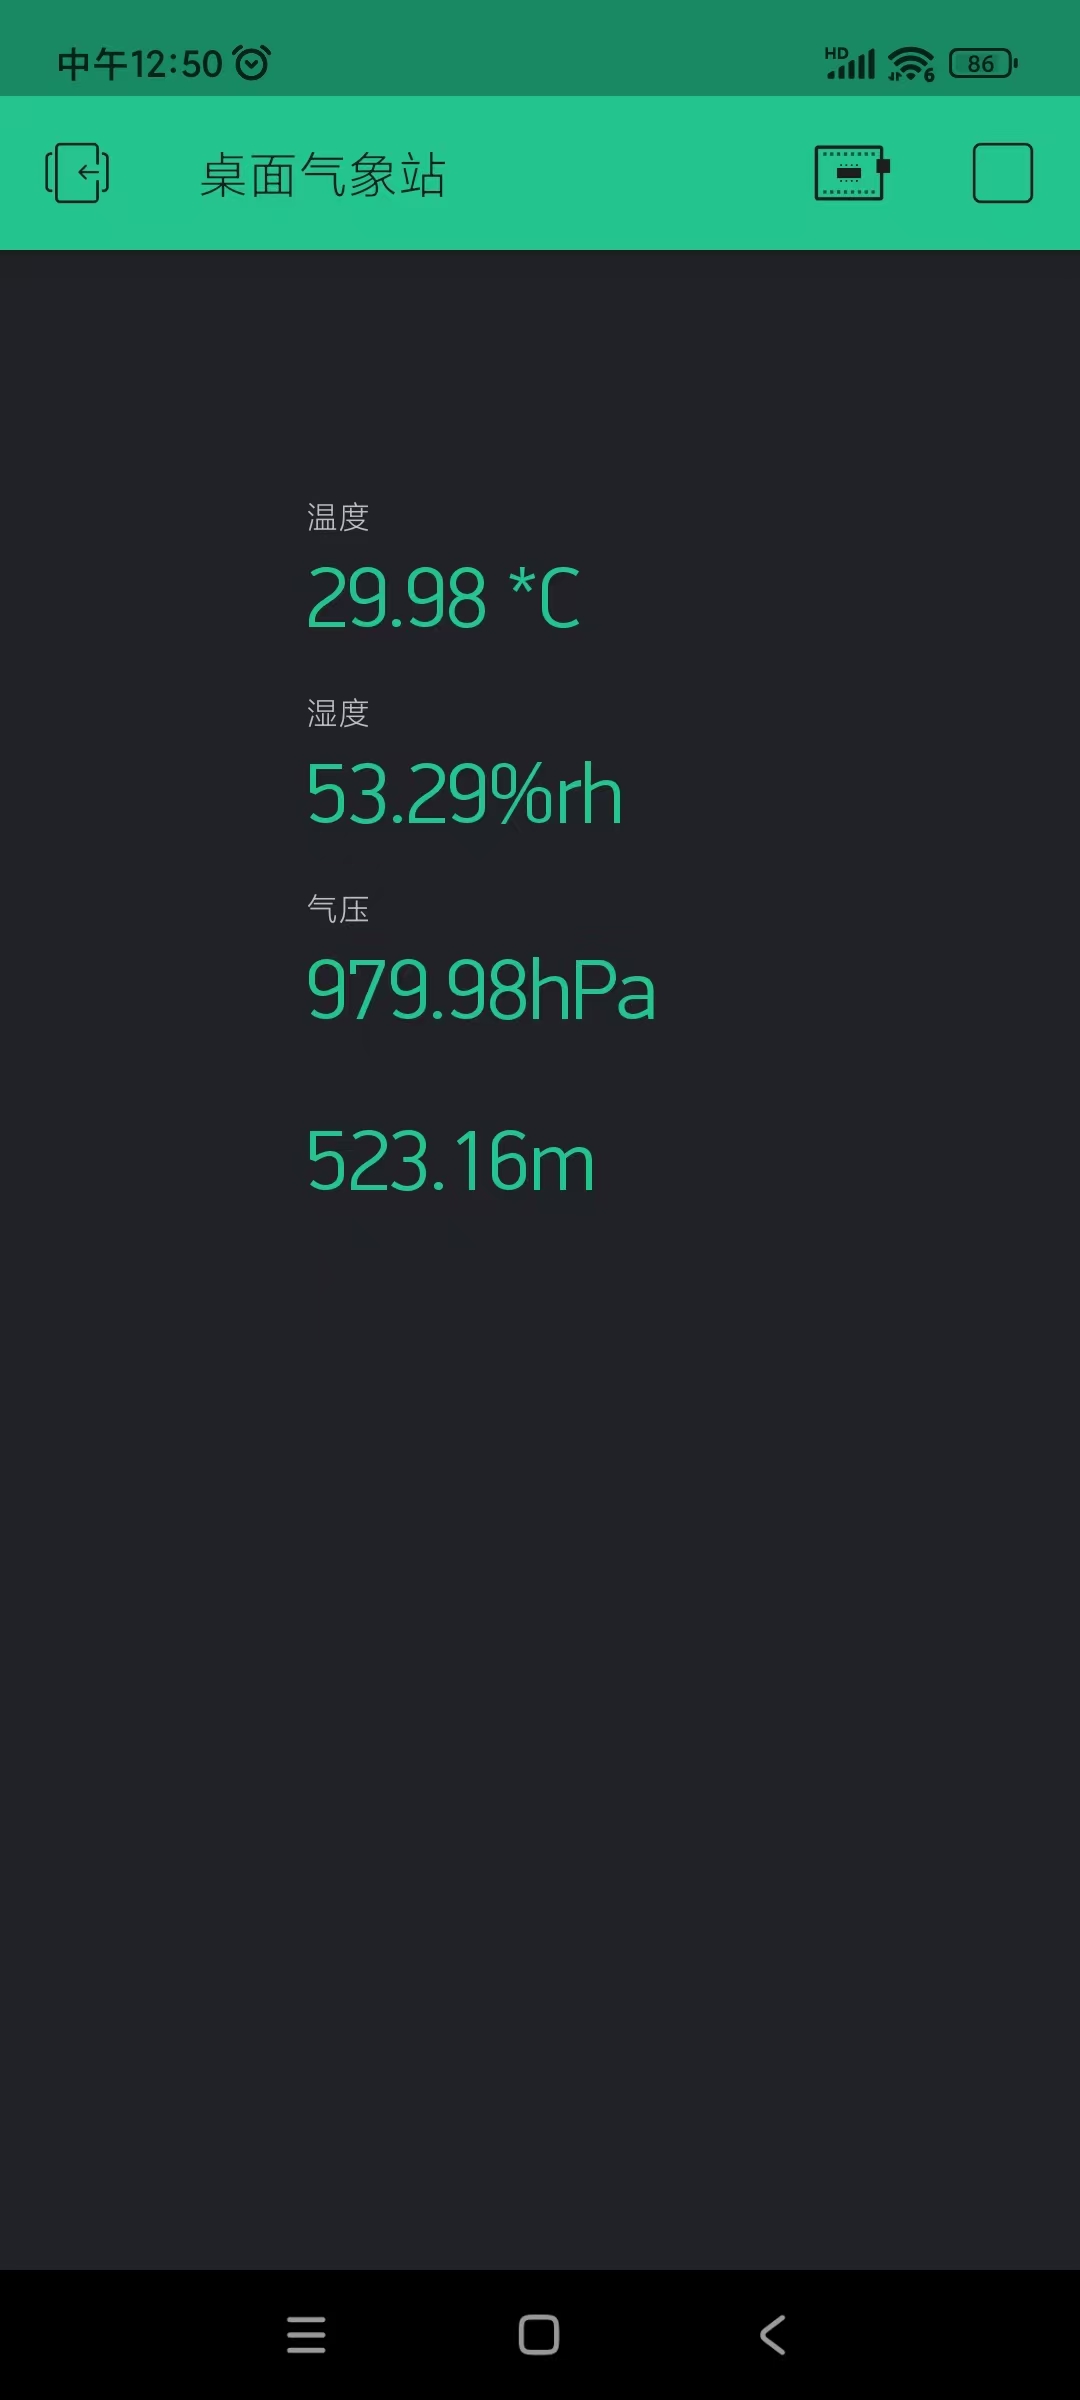
 同时手机端也可以显示气象数据。(项目的创建和授权码获取需要在手机端完成)
材料清单
- M10行空板 X2
- M10扩展板组合 X2
- 手机+Blynk app X1
- BME280气象传感器 X1
步骤1 在M10(B)上部署Blynk本地自启动服务器
这个任务已完成,详细内容记录在造物记。
步骤2 M10(A)客户端+BME280数据釆集及发送
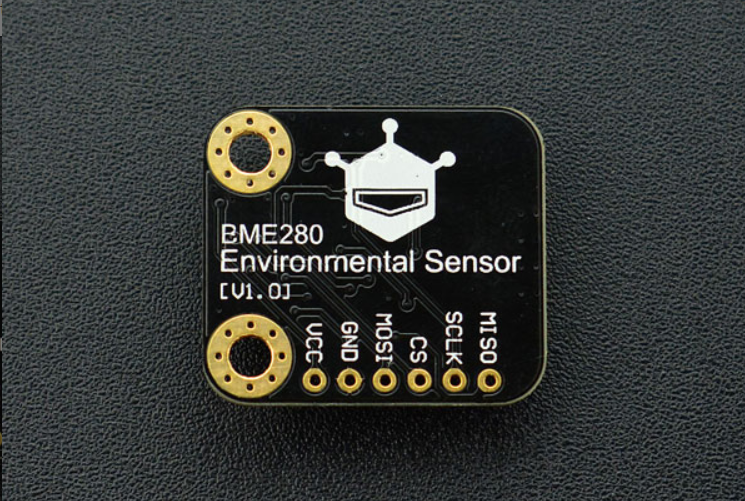
1、BME280,BME280是一款集成温度、湿度、气压,三位一体的环境传感器。具有高精度,多功能,小尺寸等特点。DFRobot Gravity I2C BME280环境传感器采用Gravity-I2C接口设计,同时预留SPI接口,可以方便快捷的搭建产品原型,应用于环境监测,楼层高度检测,物联网控制等各种应用场景。
2、BME280传感器连接行空板M10发送温度、湿度、气压数据到Blynk服务端,数据存储到Blynk服务端。(因为在服务器设置时端口为8080,这里就还用8080。)
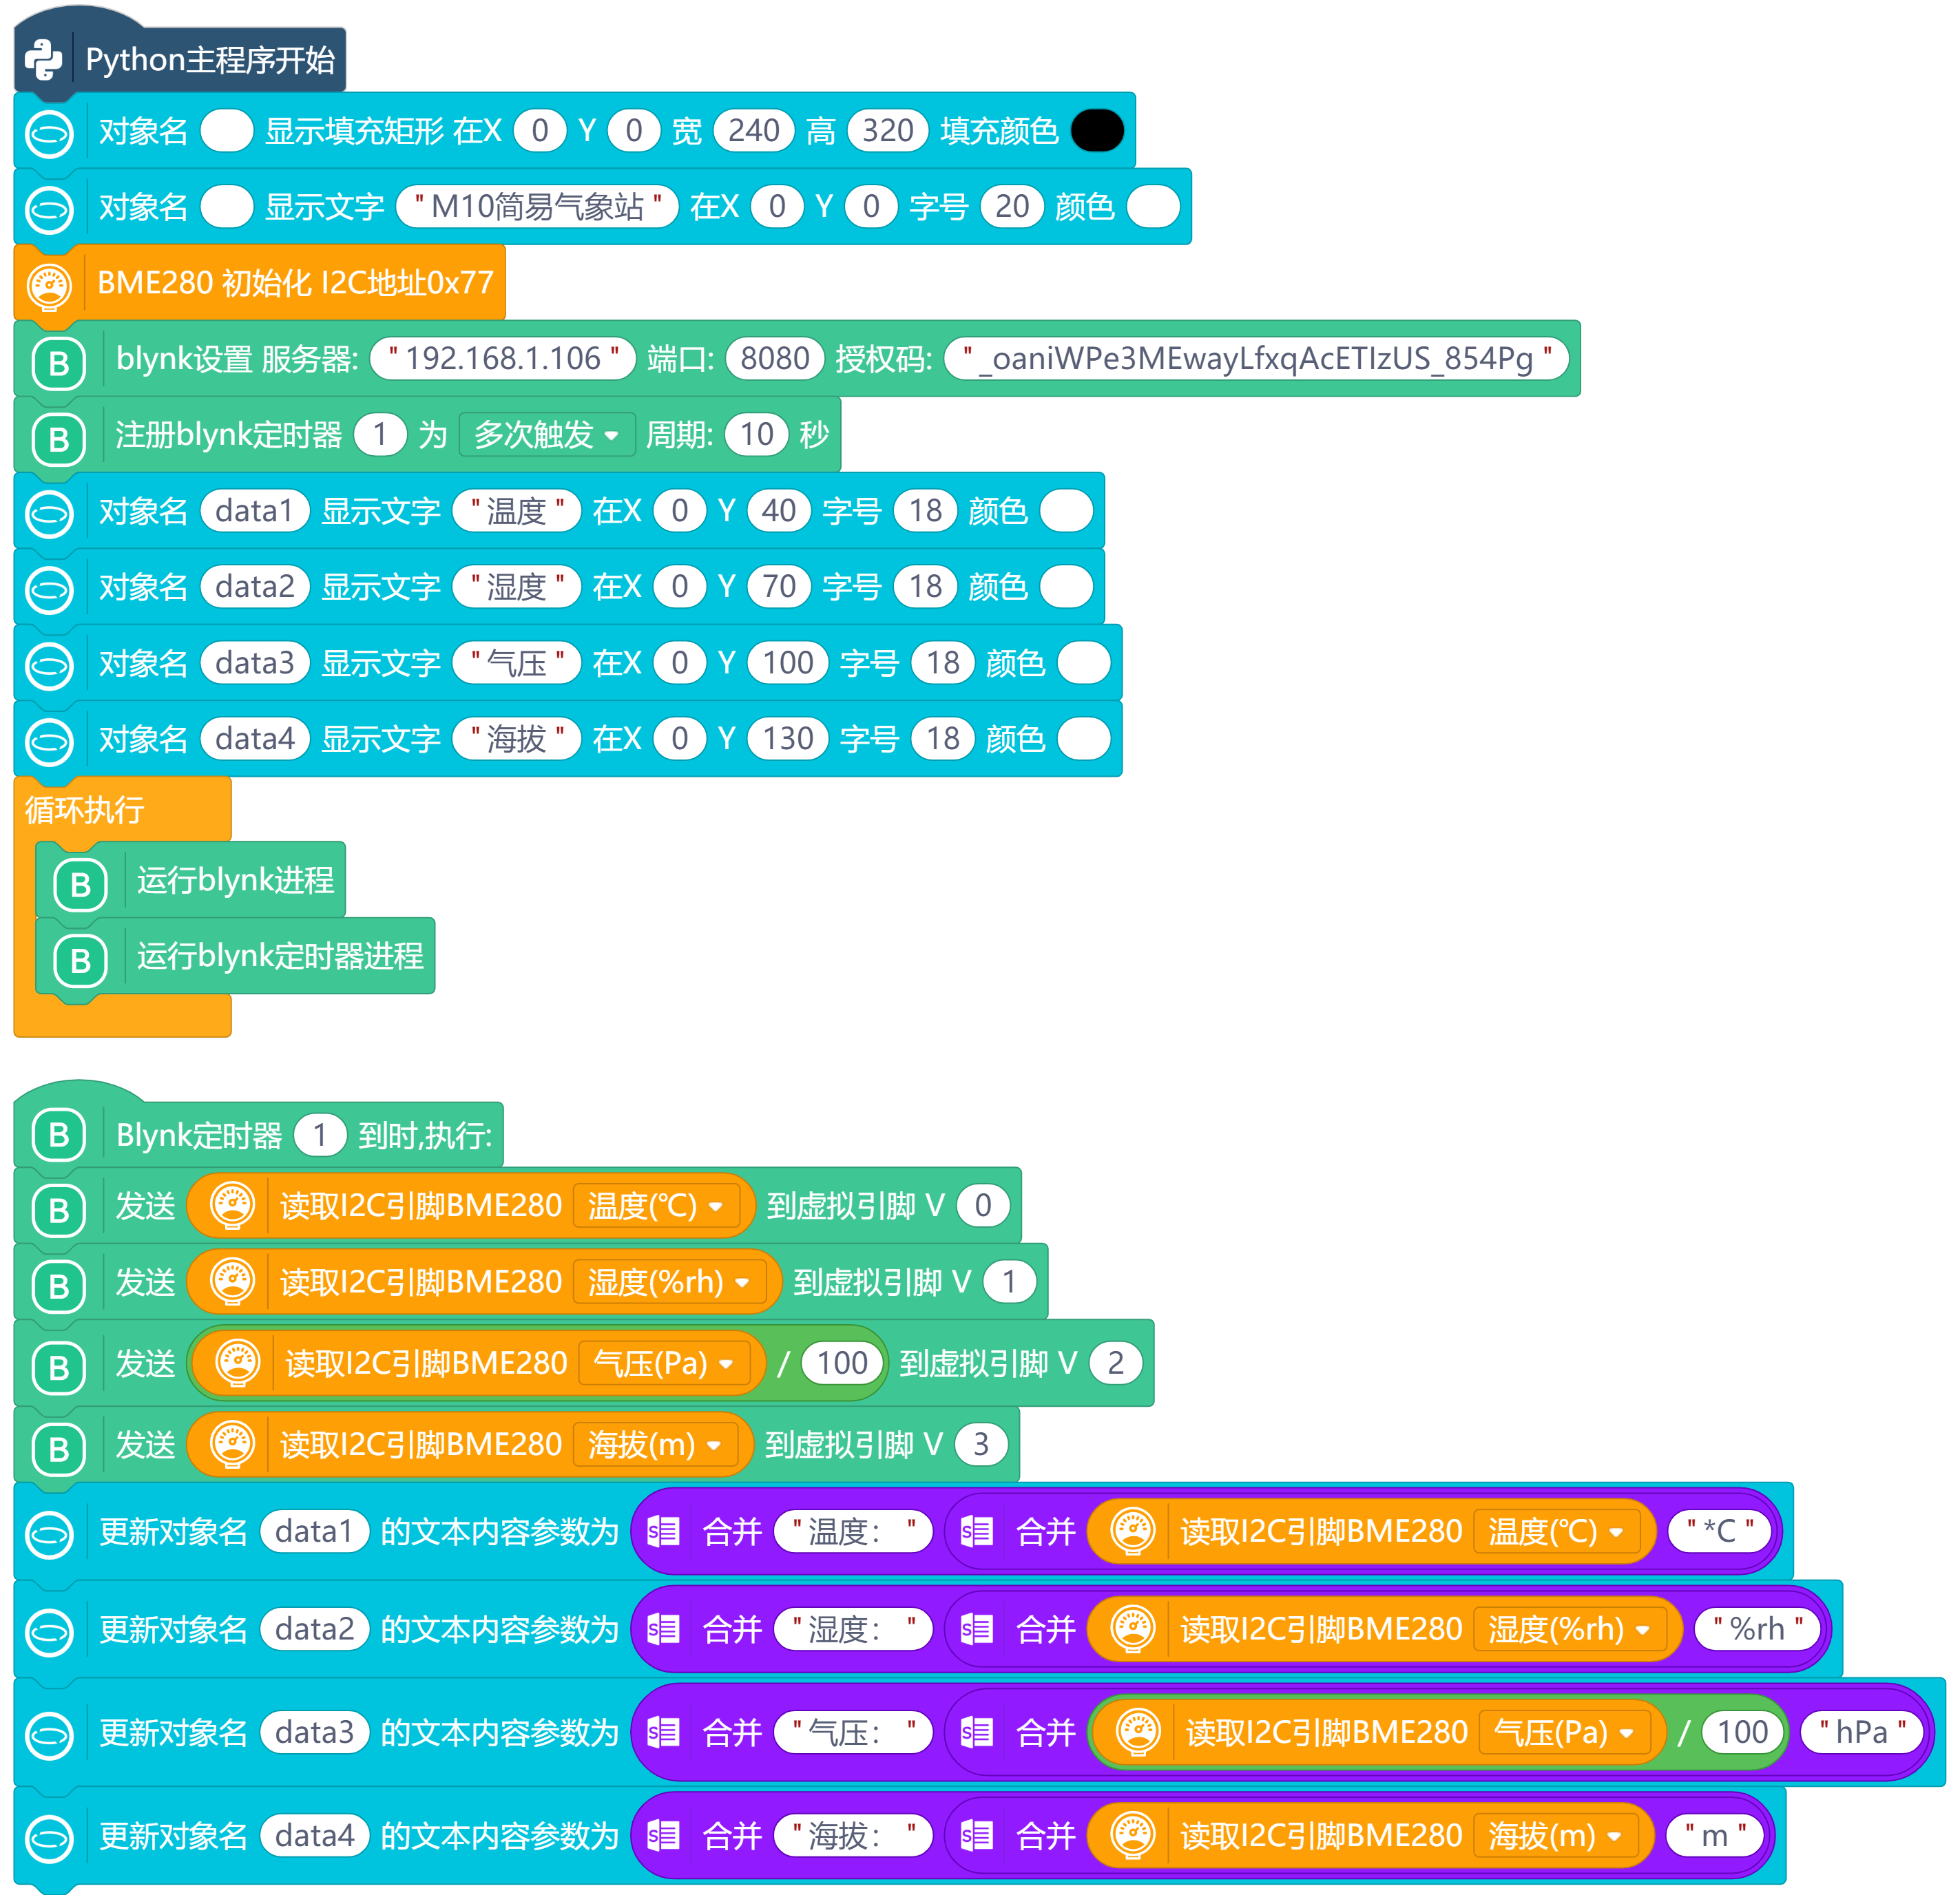
其中核心内容是:

3、在手机端Blynk创建项目并获取授权码。
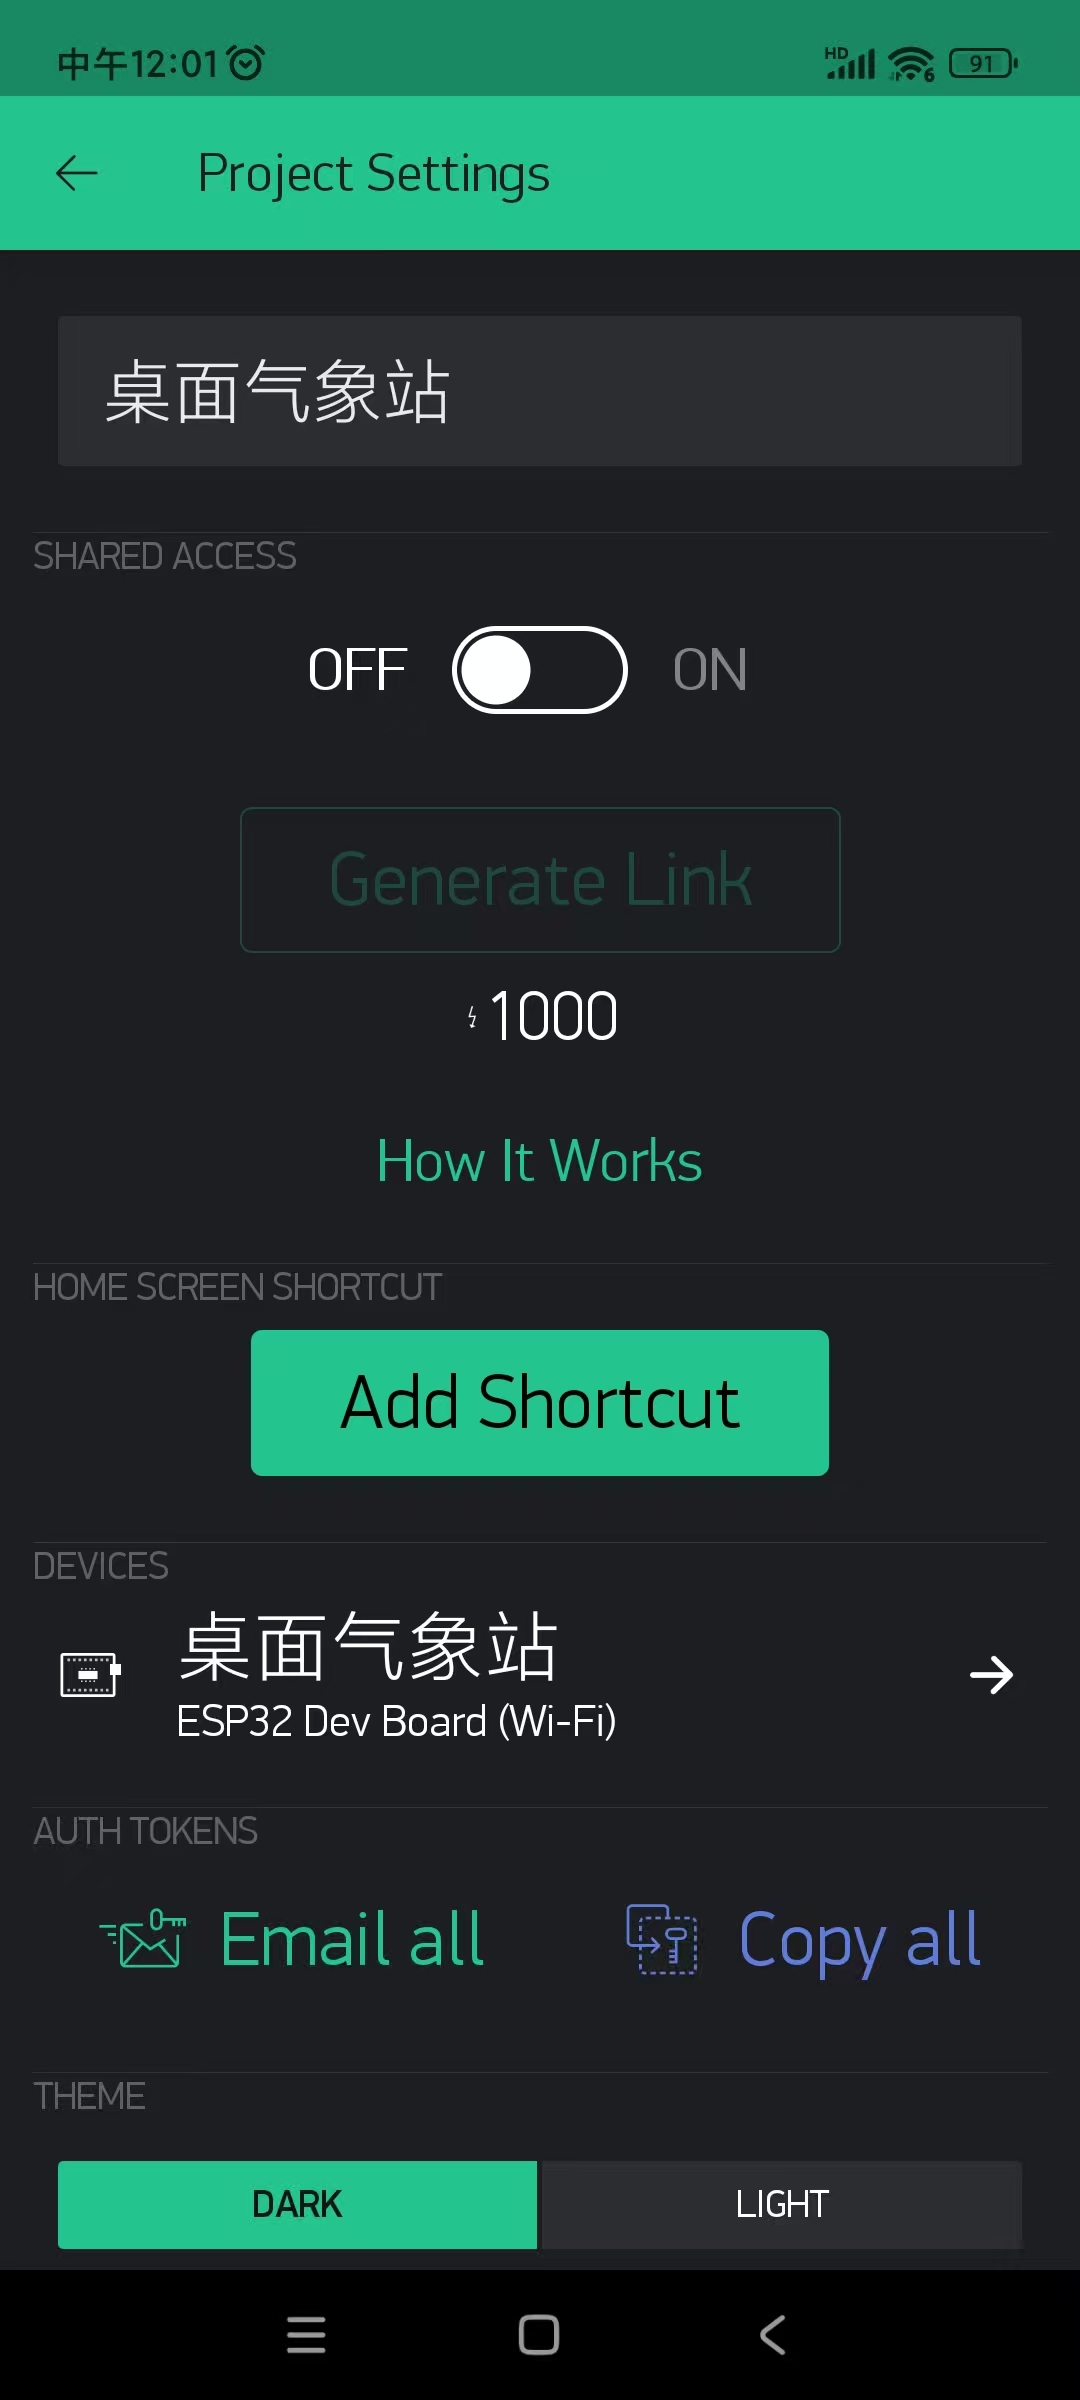
附件
步骤3 python读取Blynk服务的数据库温度、湿度、气压数据--准备工作
附件
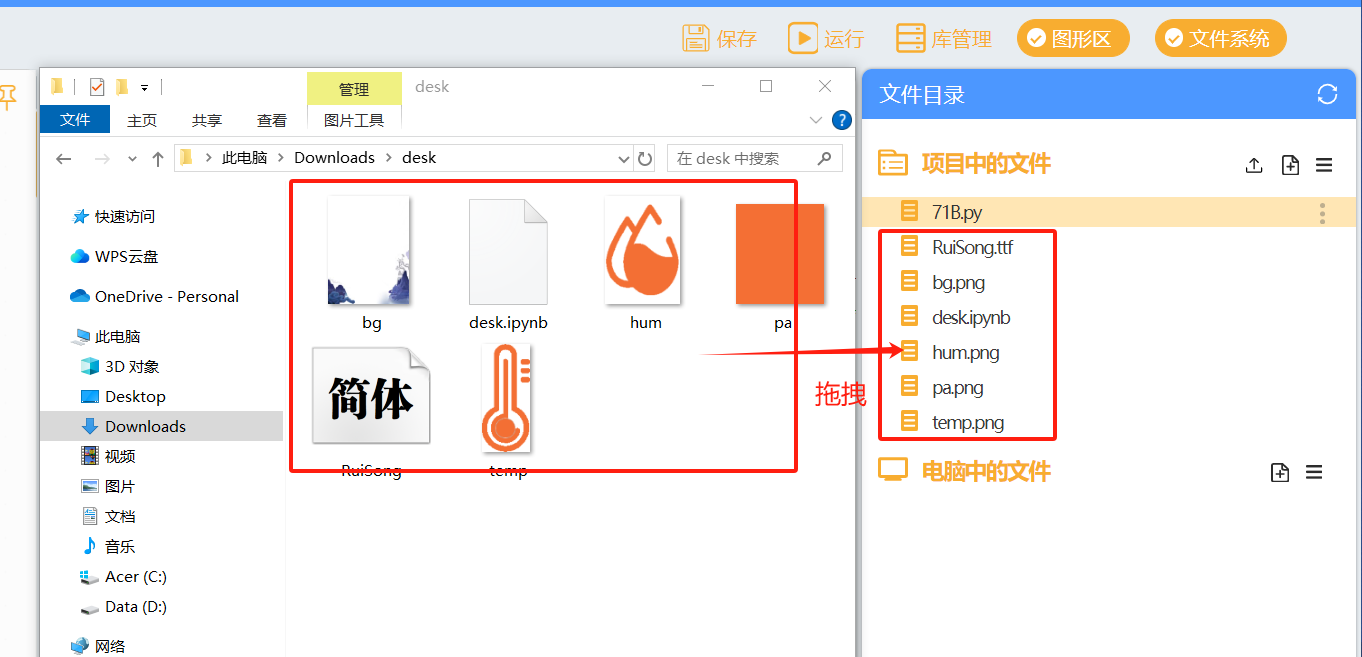
1、Mind+--Python模式--添加行空板M10。

2、下载上面的压缩文件,解压后拖拽到Mind+项目中的文件。
步骤4 行空板屏幕显示读取的数据、利用datetime和time库显示当前时间日期
下面的代码由@freedomzjsx老师编写。
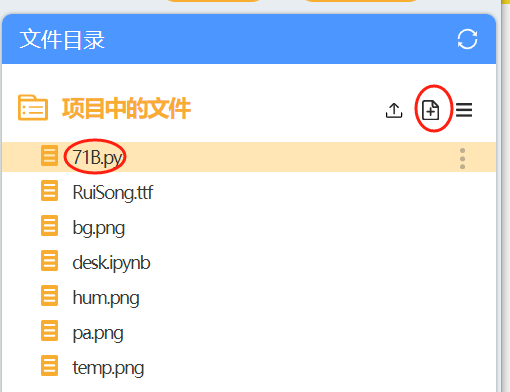
1、在项目中的文件中点击+号,新建一个py文件。我的命名为71B。
2、双击打开它,复制下面代码粘贴。
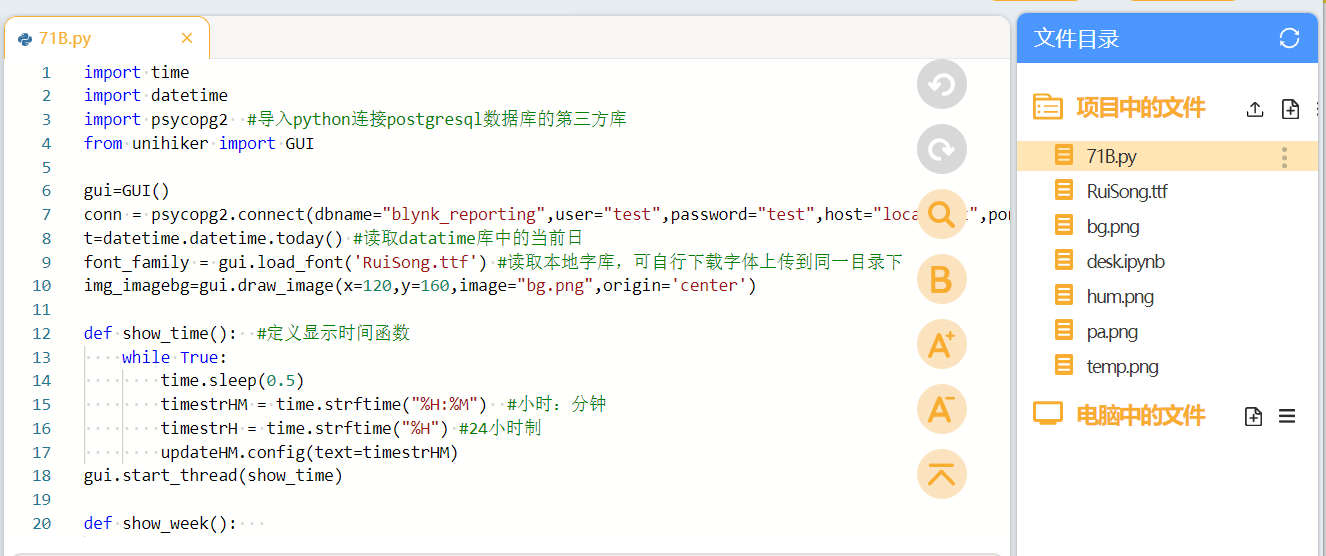
import time
import datetime
import psycopg2  #导入python连接postgresql数据库的第三方库
from unihiker import GUI

gui=GUI()
conn = psycopg2.connect(dbname="blynk_reporting",user="test",password="test",host="localhost",port="5432") #连接数据库blynk_reporting
t=datetime.datetime.today() #读取datatime库中的当前日
font_family = gui.load_font('RuiSong.ttf') #读取本地字库,可自行下载字体上传到同一目录下
img_imagebg=gui.draw_image(x=120,y=160,image="bg.png",origin='center')

def show_time():  #定义显示时间函数
    while True:
        time.sleep(0.5)
        timestrHM = time.strftime("%H:%M")  #小时:分钟
        timestrH = time.strftime("%H") #24小时制
        updateHM.config(text=timestrHM)
gui.start_thread(show_time)

def show_week():
    week_list=["星期一","星期二","星期三","星期四","星期五","星期六","星期日"] #创建星期的中文显示列表
    week=week_list[t.weekday()]  #获取星期,0-6分别对应周一到周日,根据列表的索引显示值为中文
    updateweek.config(text=week) #更新文本为索引对应的值

def show_md():
    month=t.month  #获取当前月
    day=t.day      #获取当前日
    updatem.config(text=str(month)+"月") #更新文本为月的值
    updateD.config(text=day)   #更新文本为日的值

def get_temp():  #获取温度数据

    temp = conn.cursor()  #创建指针
    temp_sql="select doublevalue from reporting_raw_data where pintype like 'v' and pin=0 order by ts desc limit 1"
    temp.execute(temp_sql)
        #执行SQL语句:获取reporting_raw_data表中端口类型为V(虚拟端口),端口为0的以时间排序的最新一条数据,输出doublevalue
    temp_row=temp.fetchall()
    conn.commit()  #提交事务
    updatetemp.config(text=temp_row)

def get_hum():    #获取湿度数据
    hum = conn.cursor()  #创建指针
    hum_sql="select doublevalue from reporting_raw_data where pintype like 'v' and pin=1 order by ts desc limit 1"
    hum.execute(hum_sql)
    #执行SQL语句:获取reporting_raw_data表中端口类型为V(虚拟端口),端口为1的以时间排序的最新一条数据,输出doublevalue
    hum_row=hum.fetchall()
    conn.commit()  #提交事务
    updatehum.config(text=hum_row)


def get_hpa():      #获取气压数据
    hpa = conn.cursor()  #创建指针
    hpa_sql="select doublevalue from reporting_raw_data where pintype like 'v' and pin=2 order by ts desc limit 1"
    hpa.execute(hpa_sql)
    #执行SQL语句:获取reporting_raw_data表中端口类型为V(虚拟端口),端口为2的以时间排序的最新一条数据,输出doublevalue
    hpa_row=hpa.fetchall()
    conn.commit()  #提交事务
    updatehpa.config(text=hpa_row)


updateHM = gui.draw_text(x=75, y=70, text='',color=(128,0,128),origin='bottom',font_family = font_family,font_size=36)
#显示小时:分钟

updatem  = gui.draw_text(x=168, y=35, text='',color=(128,0,128),origin='bottom' ,font_family = font_family,font_size=12) #显示月
updateD  = gui.draw_text(x=208, y=55, text='',color=(128,0,128),origin='bottom' ,font_family = font_family,font_size=28) #显示日
updateweek  = gui.draw_text(x=208, y=70, text='',color=(128,0,128),origin='bottom' ,font_family = font_family,font_size=10) #显示星期


img_imagetemp=gui.draw_image(x=18,y=93,w=40,h=25,image="temp.png",origin='center')#显示温度表示图
updatetemp  = gui.draw_text(x=58, y=110, text='',color="#f36f34",origin='bottom' ,font_family = font_family,font_size=18) #显示温度
updatetemp2  = gui.draw_text(x=95, y=108, text='℃',color="#f36f34",origin='bottom' ,font_family = font_family,font_size=12)


img_imagehum = gui.draw_image(x=140,y=95,w=40,h=25,image="hum.png",origin='center')#显示湿度表示图
updatehum  = gui.draw_text(x=185, y=110, text='',color="#f36f34",origin='bottom' ,font_family = font_family,font_size=18) #显示湿度
updatehum2  = gui.draw_text(x=219, y=107, text='%',color="#f36f34",origin='bottom' ,font_family = font_family,font_size=12)

img_imagehpa = gui.draw_image(x=20,y=140,w=40,h=25,image="pa.png",origin='center')#显示气压表示图
updatehpa  = gui.draw_text(x=85, y=157, text='',color='#f36f34',origin='bottom' ,font_family = font_family,font_size=18) #显示气压
updatehpa2  = gui.draw_text(x=150, y=155, text='hPa',color="#f36f34",origin='bottom' ,font_family = font_family,font_size=12)


#gui.fill_round_rect(x=5, y=237, w=112, h=75, r=5,width=3, color="#57b5ff")

#gui.fill_round_rect(x=122, y=237, w=113, h=75, r=5,width=3, color="#57b5ff")

while True:
    get_temp()
    get_hum()
    get_hpa()
    show_week()
    show_md()
    time.sleep(1)
3、保存文件。
4、连接远程终端。
5、运行程序。
在这一步,发现了新问题:
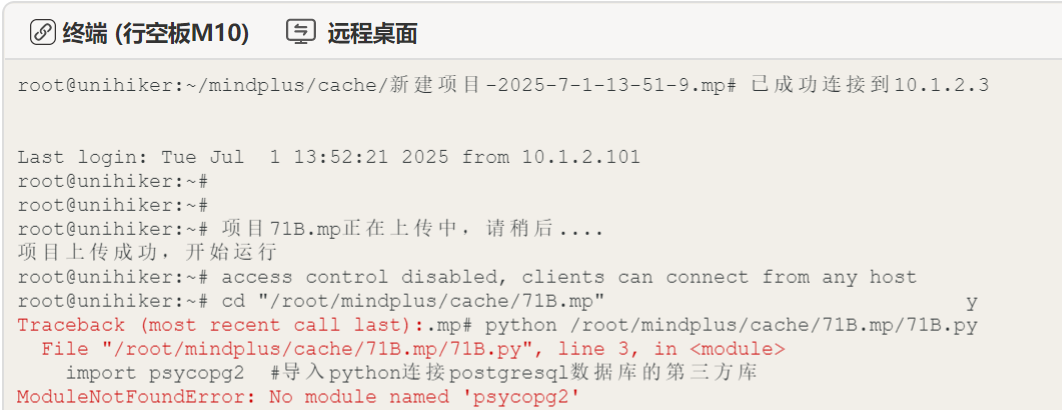
然后在网络中搜索,得到了如下结果:
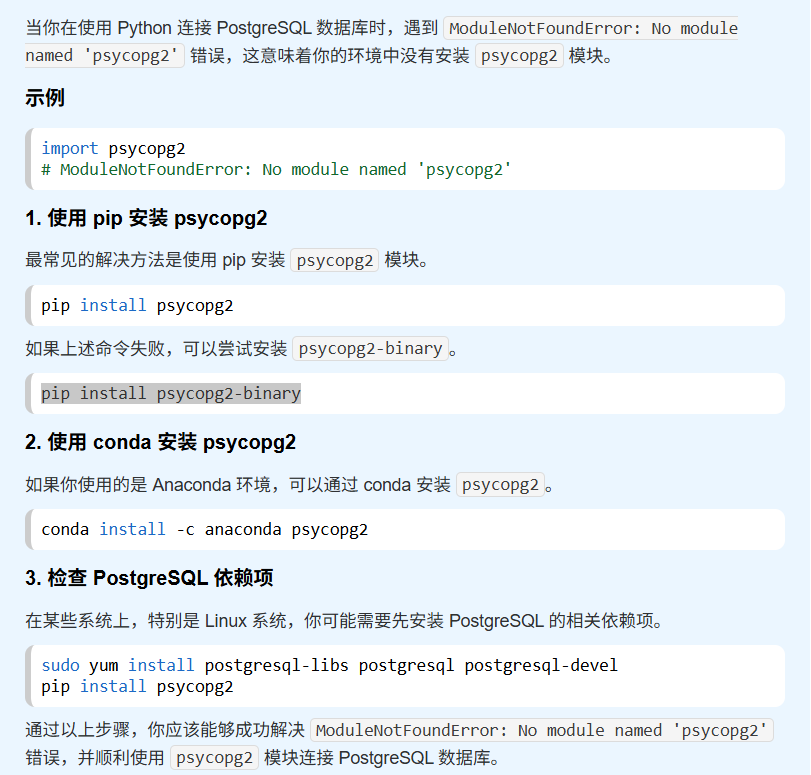
当你在使用 Python 连接 PostgreSQL 数据库时,遇到 ModuleNotFoundError: No module named 'psycopg2' 错误,这意味着你的环境中没有安装 psycopg2 模块。
示例
import psycopg2
# ModuleNotFoundError: No module named 'psycopg2'
1. 使用 pip 安装 psycopg2
最常见的解决方法是使用 pip 安装 psycopg2 模块。
pip install psycopg2
如果上述命令失败,可以尝试安装 psycopg2-binary。
pip install psycopg2-binary
2. 使用 conda 安装 psycopg2
如果你使用的是 Anaconda 环境,可以通过 conda 安装 psycopg2。
conda install -c anaconda psycopg2
3. 检查 PostgreSQL 依赖项
在某些系统上,特别是 Linux 系统,你可能需要先安装 PostgreSQL 的相关依赖项。
sudo yum install postgresql-libs postgresql postgresql-devel
pip install psycopg2
通过以上步骤,你应该能够成功解决 ModuleNotFoundError: No module named 'psycopg2' 错误,并顺利使用 psycopg2 模块连接 PostgreSQL 数据库。
我用尝试用pip install psycopg2安装,但是报错了。
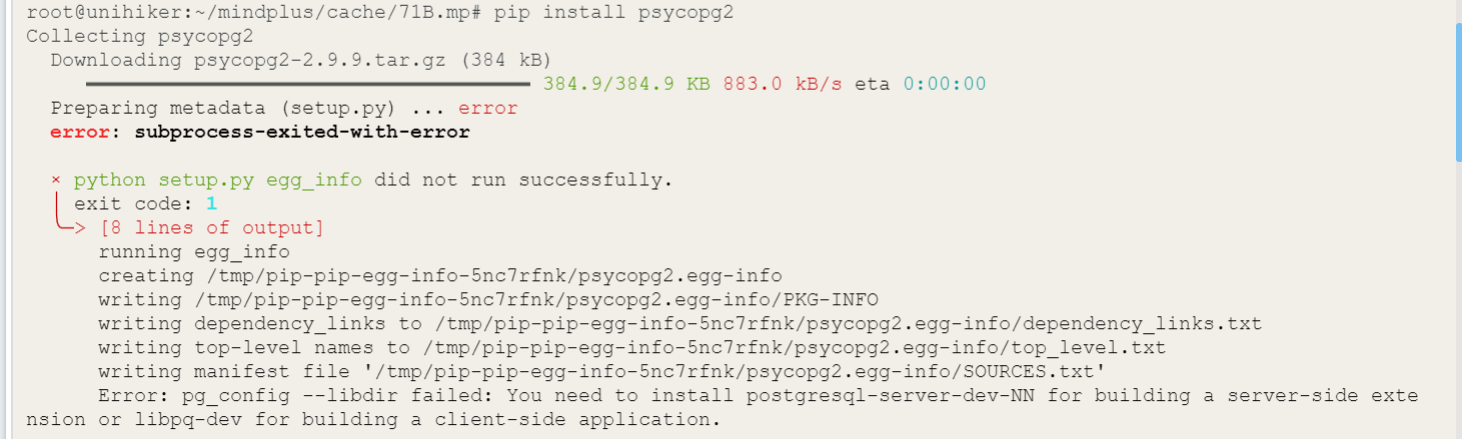

命令失败,可以尝试安装 psycopg2-binary。
pip install psycopg2-binary
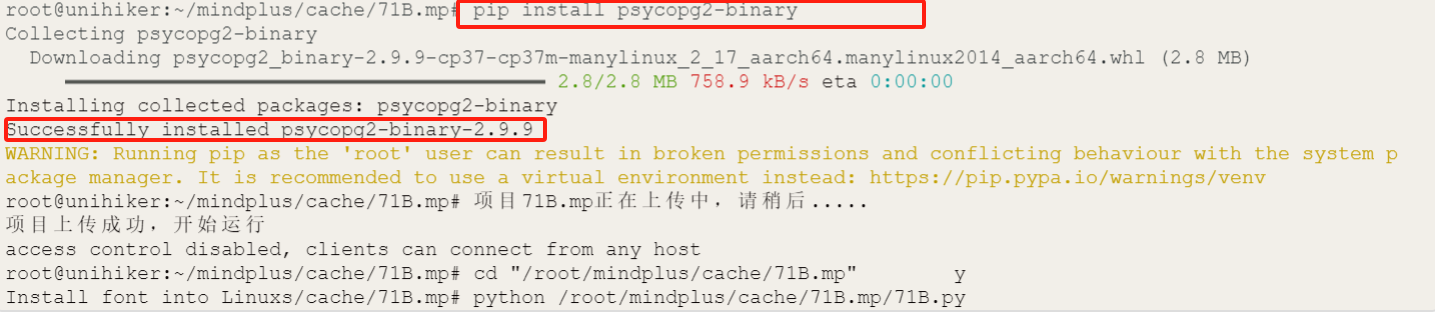
成功安装。
运行程序,M10屏幕显示出来了,漂亮的字体,时间,日期,星期+气象信息显示,又被装到了。
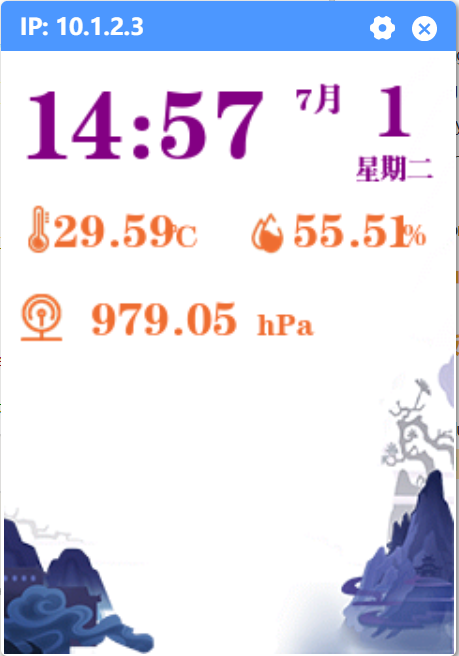
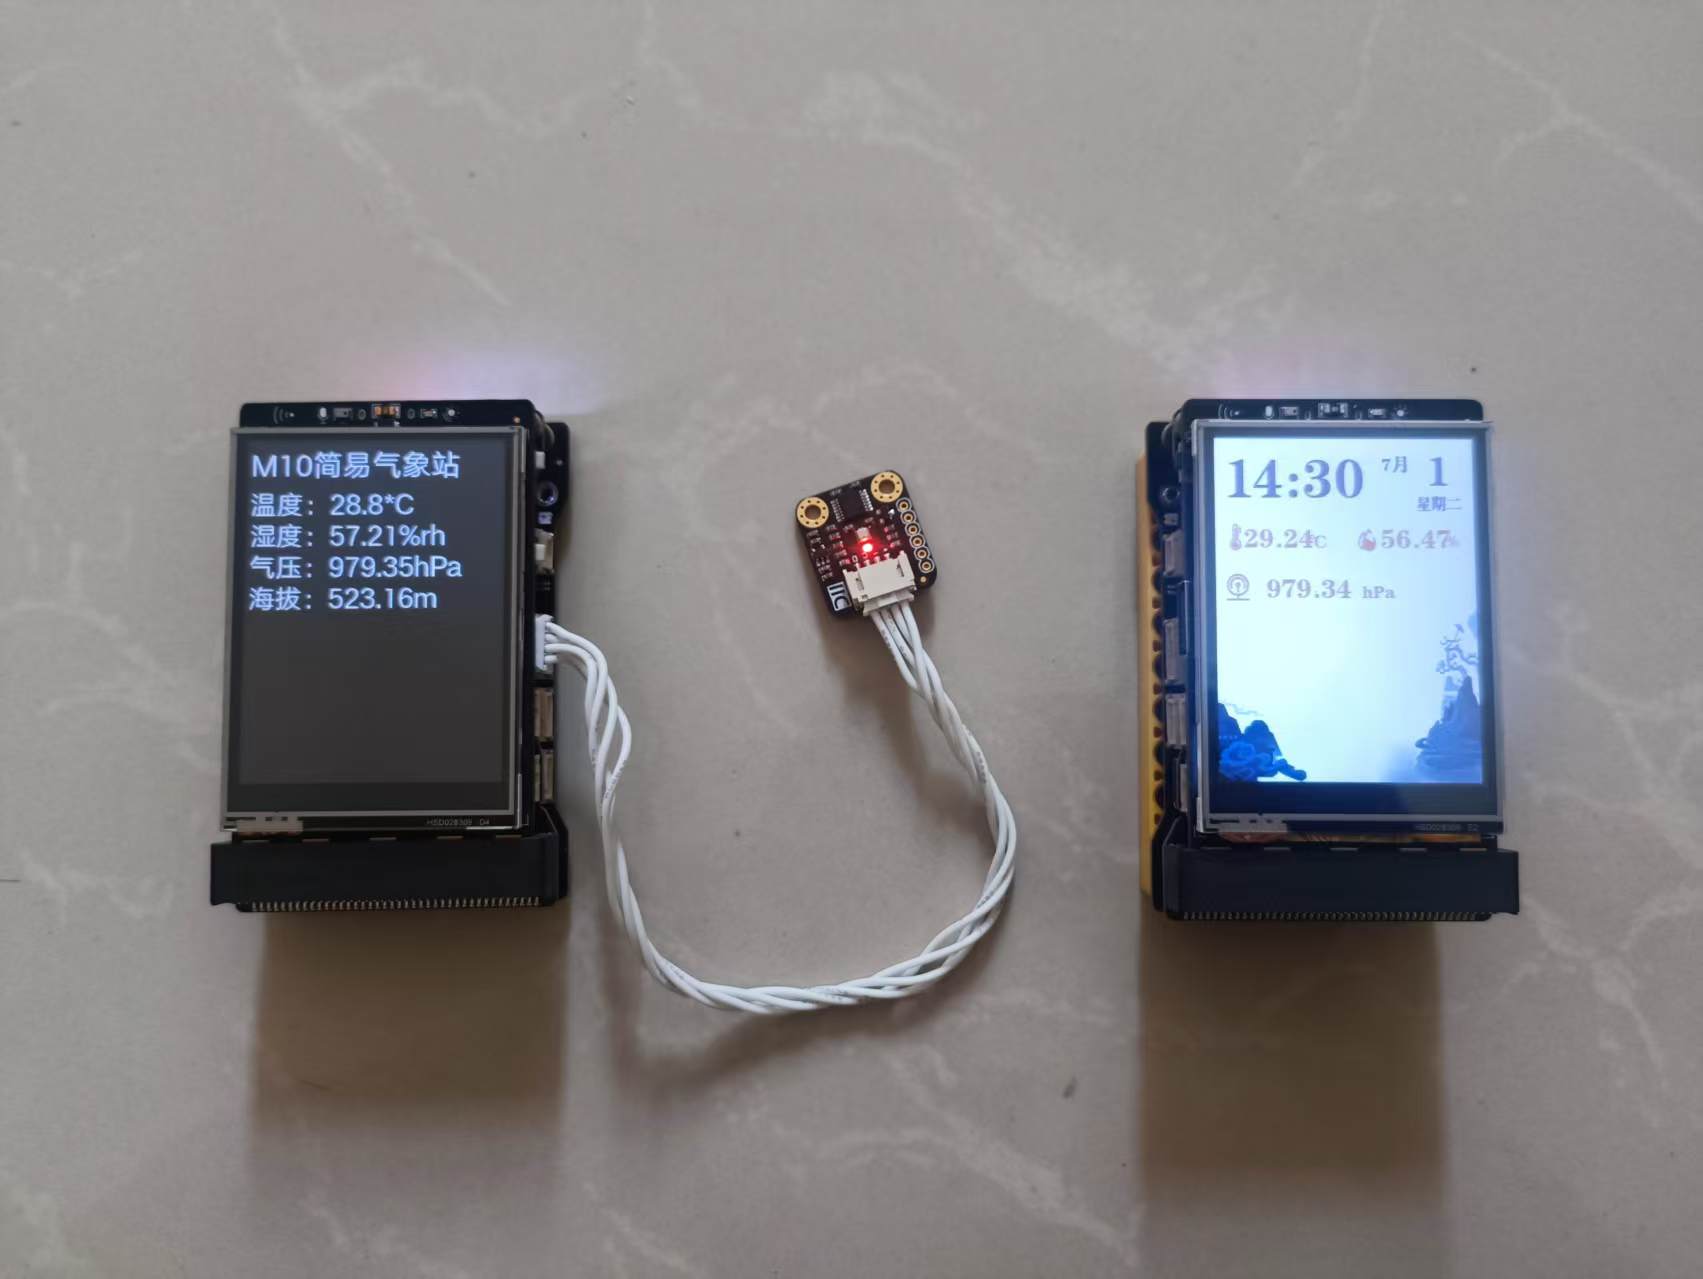
好帅啊。(右边服务器刷新较慢,显示数据会滞后一些,但不影响装帅,手机数据基本同步。)
帅是一辈子的事,不是吗?
再次感谢@freedomzjsx老师的教程。
附件


 他的勋章
他的勋章

评论