 返回首页
返回首页
 回到顶部
回到顶部
前言
随着当今社会的发展,水产品市场作为一个重要的食品供应领域,其规模庞大且竞争激烈。然而,在售卖水产品时,例如螃蟹,虾等,通常需要按照数量来计算和售卖,这个传统的方式不仅耗费了大量的人力和时间资源,还容易引发计算错误,导致盈利能力下降。
传统的水产品销售方式主要依赖于人工计算,这需要雇佣大量的工作人员来记录、计算和核对订单。这不仅增加了人力成本,还容易出现计算错误,导致产品的过多或过少售出,从而损害了盈利能力和客户满意度。此外,传统方式也会导致资源浪费。
所以传统的水产品销售方式在当今社会已经不再适用,因为它浪费了资源,容易出现错误,降低了盈利能力。本文便设计了一种基于单片机的设备,旨在在封闭环境下计算水下物体的数量,从而提高售卖过程的效率和精度。通过采用现代技术和数字化销售方式,水产品市场可以提高效率,减少成本,更好地满足客户和商户的需求,从而在竞争激烈的市场中保持竞争力。
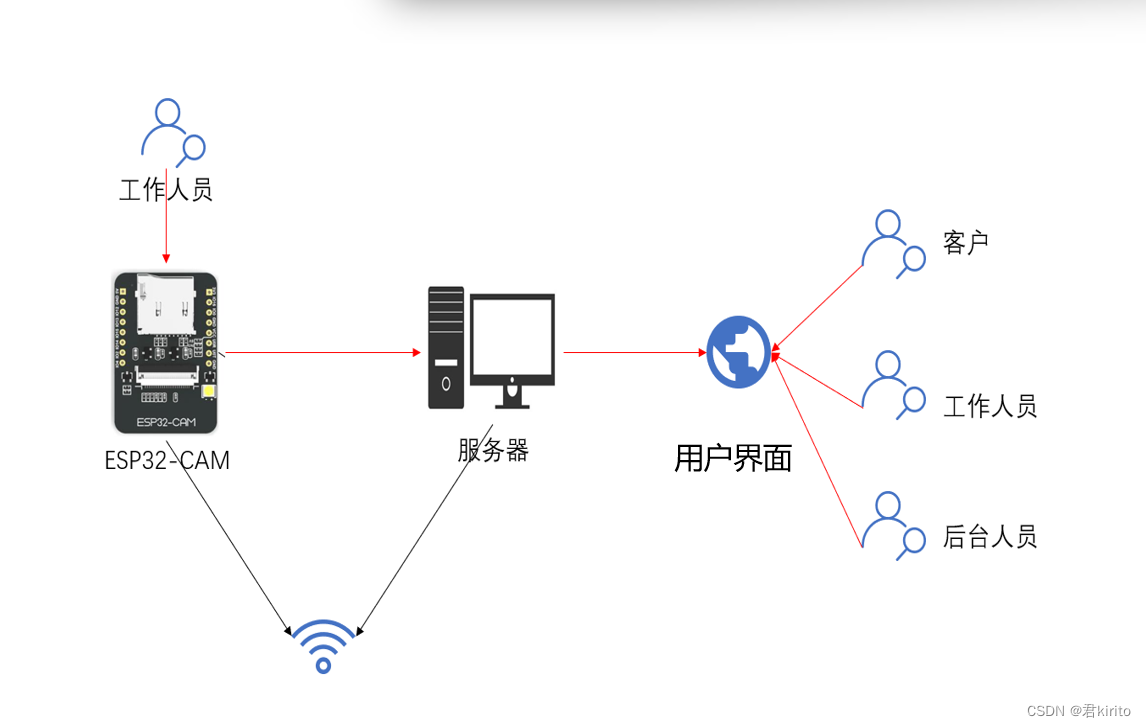
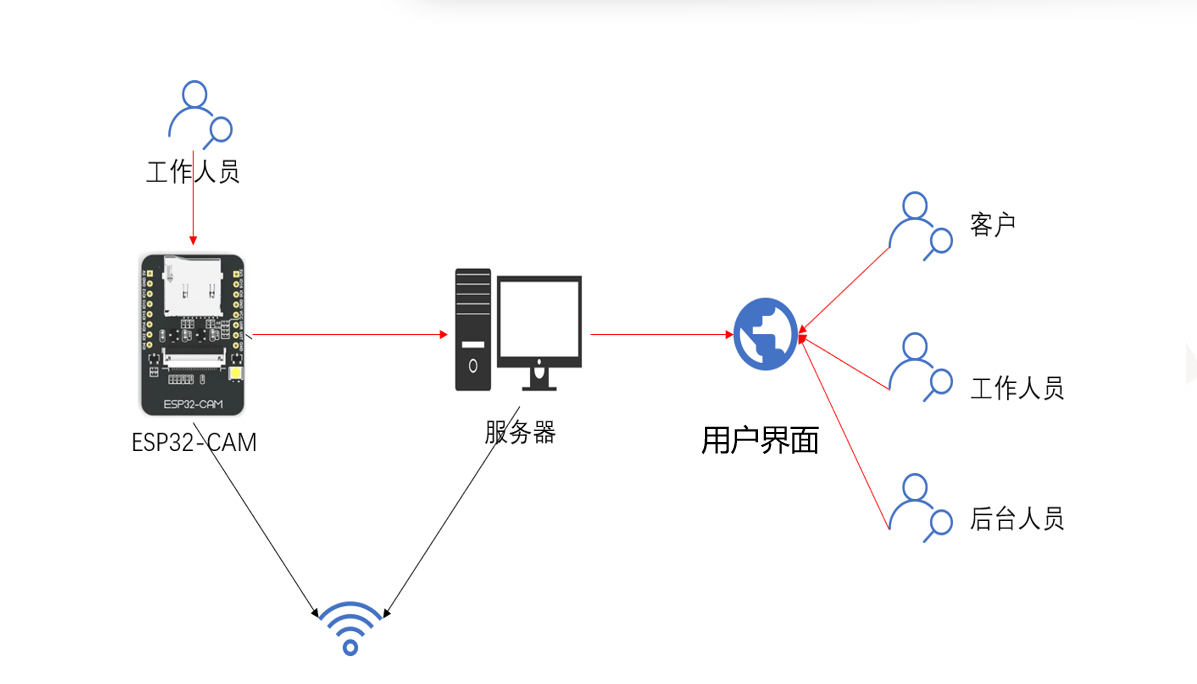
一、架构图及流程图
架构图

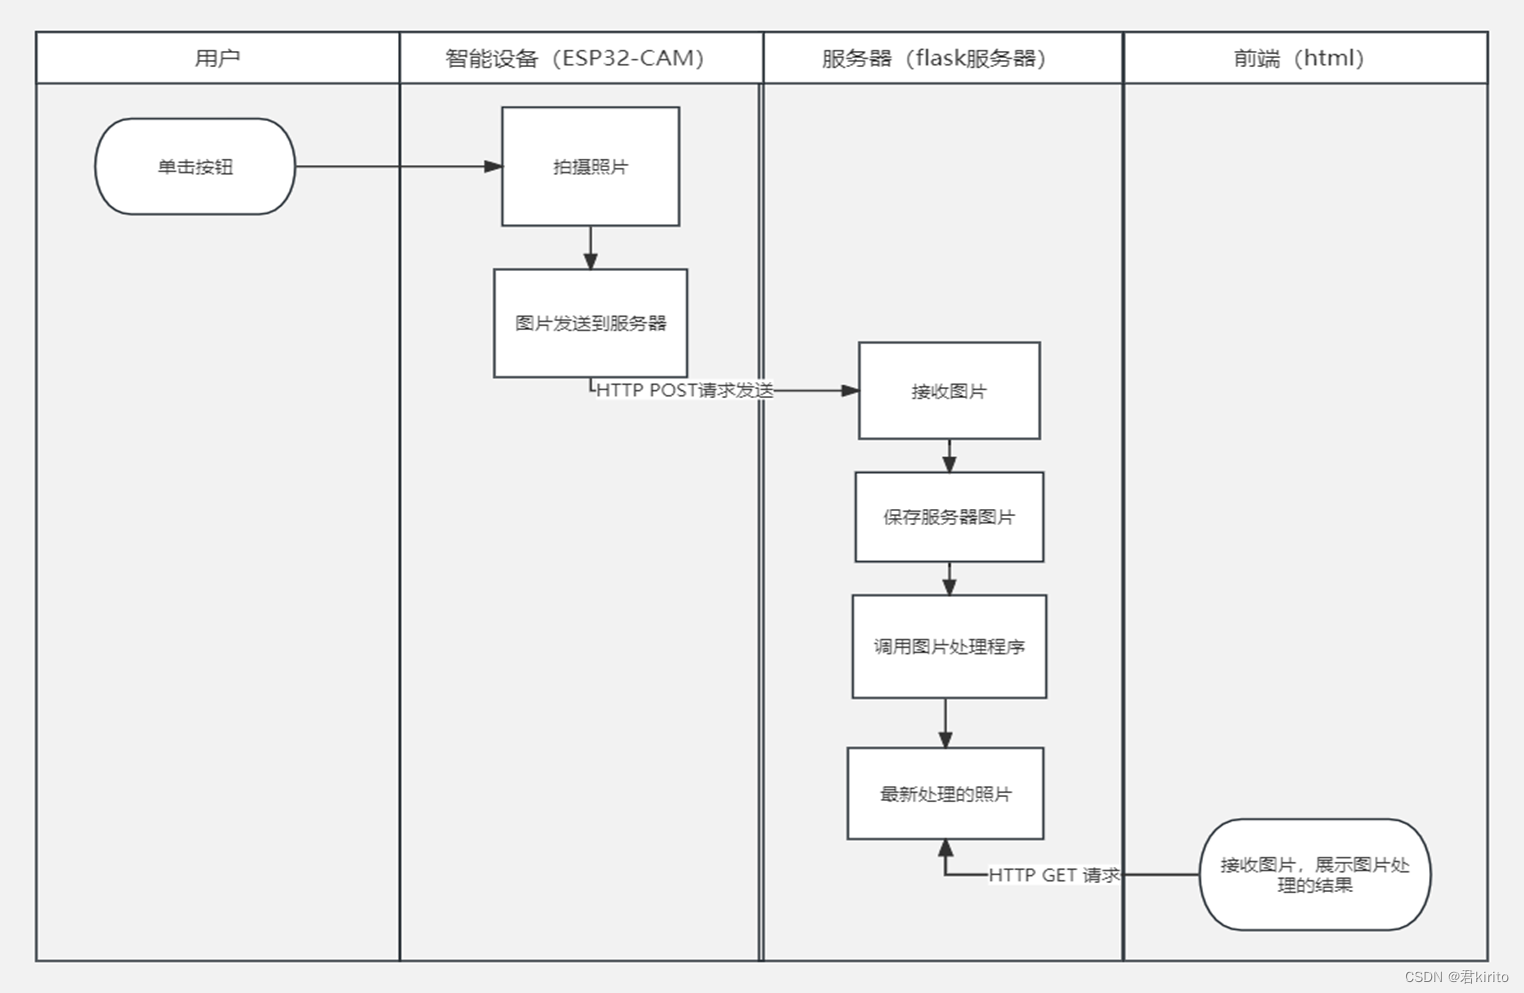
流程图


二、ESP32-CAM代码

注释:照明LED是ESP32-CAM自带的灯,引脚为4,按钮接的引脚为12。状态灯red,接的引脚为13。
三、Web服务器

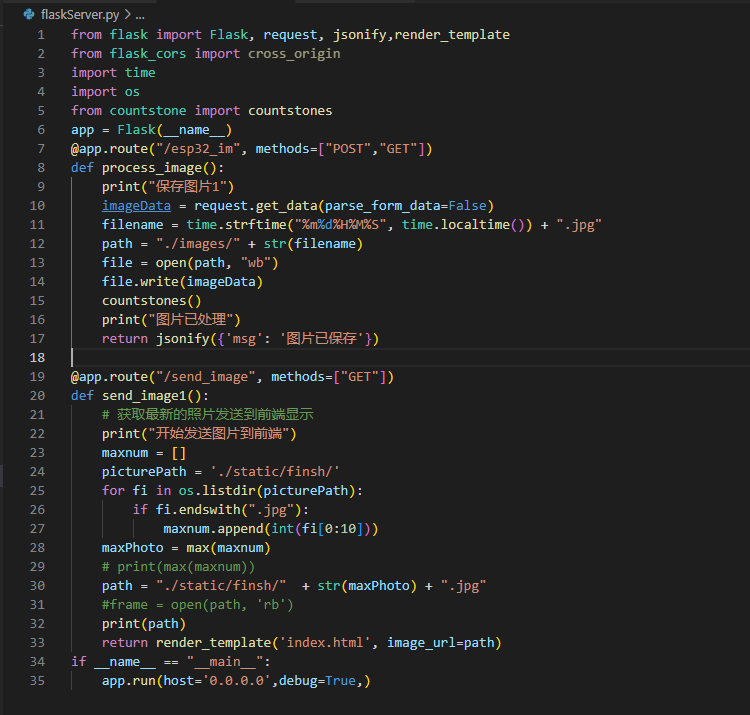
四、图像处理程序代码
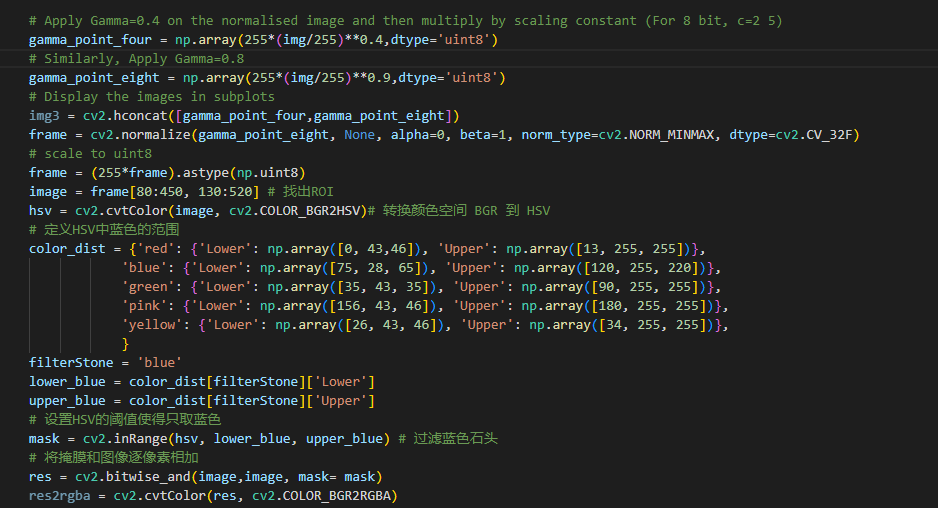
注释:水下物体是用蓝色石头代替的。
五、前端代码


六、使用流程
第一步:WiFi配置
将ESP32-CAM的WiFi网络名称(SSID)设置为"ESP32",密码设置为"123456789"。
第二步:连接WiFi并启动Web服务器
启动Web服务器,确保它连接到WiFi网络"ESP32"。
打开ESP32-CAM的电源,确保它连接到WiFi网络"ESP32"。
第三步:设备准备就绪指示
启动ESP32-CAM,当ESP32-CAM上的LED慢闪时,表示设备已准备就绪。
第四步:调整LED亮度
双击:快速按两次按钮以调整LED亮度。
调整完成:调整亮度完成后,LED将短暂闪烁一次。
第五步:拍摄图片
单击:按下ESP32-CAM上的按钮,以拍摄一张照片。
成功拍摄:成功拍摄后,LED将短暂闪烁一次。
第六步:查看拍摄的图片
在浏览器中访问以下网址:http://172.20.10.2:5000/send_image 以查看拍摄的图片的处理结果。
总结
本项目实现了在封闭水下环境中计算物体数量的任务,通过深入了解计算机视觉、人工智能和单片机开发领域的核心知识,实现了这一复杂任务。巧妙地将计算机视觉和人工智能的理论应用于实际,通过图像识别、分类和分析等算法,精确计算出水下物体的数量。
在项目的执行过程中,不仅深入研究了相关技术,还通过图像数据的预处理,包括降噪、增强和边缘检测等步骤,优化了数据的特征提取。通过分类算法,能够精确地识别和分类水下物体,最终得出准确的数量计算结果。
此外,对于单片机开发能力也得到了充分提升。能够选择并配置适当的硬件设备,满足项目需求,同时编写高效而可靠的代码,实现了所需功能。掌握了与传感器和其他外部设备的有效通信,确保了图像数据的采集和处理。
总的来说,本项目成功在封闭水下环境中实现了计算水下物体数量的目标。这一项目不仅为我提供了宝贵的经验和技能,深化了对计算机视觉和人工智能领域的理解,还增强了在单片机开发和项目管理方面的能力。这些积累将在未来的研究和工作中增加自信和有能力地面对各种挑战。
#ESP32-CAM
import machine
import time
import network
import ntptime
import urequests as requests
from machine import Timer, Pin
# 声明引脚 13 作为LED的引脚
red_pin = Pin(13, Pin.OUT)
timer = Timer(1) # 创建定时器对象
(ST_INIT, ST_READY, ST_BUSY) = (300, 0, 100)
def toggle_led(red_pin):
red_pin.value(not red_pin.value())
#指示灯
def led_blink_timed(timer, red_pin, state):
#就绪
if state == 'READY':
timer.deinit()
red_pin.value(ST_READY)
#初始
elif state == 'INIT':
timer.init(period=ST_INIT, mode=Timer.PERIODIC, callback=lambda t: toggle_led(red_pin))
#忙碌
elif state == 'BUSY':
timer.init(period=ST_BUSY, mode=Timer.PERIODIC, callback=lambda t: toggle_led(red_pin))
else:
print('not define yet')
# 定时器触发
led_blink_timed(timer, red_pin, state='INIT')
# 连接到 Wi-Fi 网络
def connectWiFi():
wlan = network.WLAN(network.STA_IF)
wlan.active(True)
if not wlan.isconnected():
print("连接到Wi-Fi网络...")
wlan.connect('whj','1234567899')
while not wlan.isconnected():
pass
print('网络配置: ', wlan.ifconfig())
led_blink_timed(timer, red_pin, state='INIT')
connectWiFi()
# freq设置PWM频率,duty设置初始占空比为1023
led_pin = machine.PWM(machine.Pin(4), freq=1000, duty=1023)
def led_control(current_brightness, led_pwm):
if current_brightness == 1023:
current_brightness = 100
elif current_brightness == 100:
current_brightness = 50
elif current_brightness == 50:
current_brightness = 1023
else:
current_brightness = 1023 # 如果当前亮度无效,将其设置为默认值1023
led_pwm.duty(current_brightness) # 更新LED亮度
return current_brightness
# 在主循环中初始化 LED 亮度
led_brightness = 1023
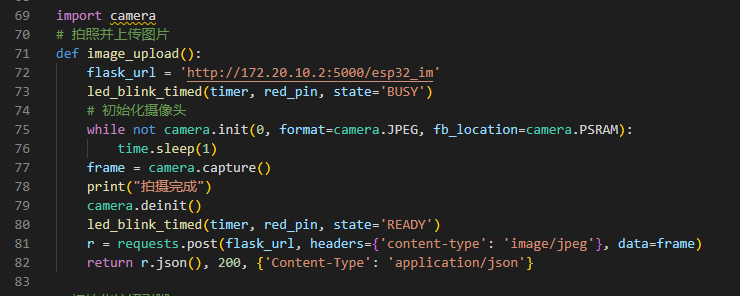
import camera
# 拍照并上传图片
def image_upload():
flask_url = 'http://172.20.10.2:5000/esp32_im'
led_blink_timed(timer, red_pin, state='BUSY')
# 初始化摄像头
while not camera.init(0, format=camera.JPEG, fb_location=camera.PSRAM):
time.sleep(1)
frame = camera.capture()
print("拍摄完成")
camera.deinit()
led_blink_timed(timer, red_pin, state='READY')
r = requests.post(flask_url, headers={'content-type': 'image/jpeg'}, data=frame)
return r.json(), 200, {'Content-Type': 'application/json'}
# 初始化按钮引脚
button_pin = machine.Pin(12, machine.Pin.IN, machine.Pin.PULL_UP)
if __name__ == '__main__':
button_state = button_pin.value() # 初始化按钮状态
last_trigger_time = 0 # 上次触发操作的时间
last_button_state = 1 # 初始状态为按键未按下
last_click_time = 0
double_click_timeout = 3 # 双击的最大时间间隔
min_double_click_interval = 1 # 最小双击间隔,单位为秒
debounce_delay = 50 # 消抖延迟,毫秒
while True:
current_time = time.ticks_ms() # 获取当前时间,以便检查是否达到了消抖延迟。
# 检查消抖延迟是否满足
if current_time - last_trigger_time >= debounce_delay:
new_button_state = button_pin.value() # 读取按钮引脚的当前状态
if new_button_state != button_state:
# 按钮状态改变
button_state = new_button_state
if button_state == 0:
# 根据单击或双击执行不同的操作
time_since_last_click = current_time - last_click_time
print(time_since_last_click)
if (
time_since_last_click > min_double_click_interval * 1000
and time_since_last_click < double_click_timeout * 1000
):
led_brightness = led_control(led_brightness, led_pin)
print("亮度:",led_brightness)
else:
print("单击操作")
print("发送照片")
image_upload()
print("发送成功")
last_click_time = current_time
last_trigger_time = current_time
#Web服务器
from flask import Flask, request, jsonify,render_template
from flask_cors import cross_origin
import time
import os
from countstone import countstones
app = Flask(__name__)
@app.route("/esp32_im", methods=["POST","GET"])
def process_image():
    print("保存图片1")
    imageData = request.get_data(parse_form_data=False)
    filename = time.strftime("%m%d%H%M%S", time.localtime()) + ".jpg"
    path = "./images/" + str(filename)
    file = open(path, "wb")
    file.write(imageData)
    countstones()
    print("图片已处理")
    return jsonify({'msg': '图片已保存'})

@app.route("/send_image", methods=["GET"])
def send_image1():
    # 获取最新的照片发送到前端显示
    print("开始发送图片到前端")
    maxnum = []
    picturePath = './static/finsh/'
    for fi in os.listdir(picturePath):
        if fi.endswith(".jpg"):
            maxnum.append(int(fi[0:10]))
    maxPhoto = max(maxnum)
    # print(max(maxnum))
    path = "./static/finsh/"  + str(maxPhoto) + ".jpg"
    #frame = open(path, 'rb')
    print(path)
    return render_template('index.html', image_url=path)
if __name__ == "__main__":
app.run(host='0.0.0.0',debug=True) #图像处理程序
import cv2
import os
import numpy as np
from matplotlib.pyplot import figure, imshow, axis,show
def countstones():
maxnum = []
picturePath = './images'
for fi in os.listdir(picturePath):
if fi.endswith(".jpg"):
maxnum.append(int(fi[0:10]))
maxPhoto = max(maxnum)
path = "./images/" + str(maxPhoto) + ".jpg"
img = cv2.imread(path)
# Apply Gamma=0.4 on the normalised image and then multiply by scaling constant (For 8 bit, c=2 5)
gamma_point_four = np.array(255*(img/255)**0.4,dtype='uint8')
# Similarly, Apply Gamma=0.8
gamma_point_eight = np.array(255*(img/255)**0.9,dtype='uint8')
# Display the images in subplots
img3 = cv2.hconcat([gamma_point_four,gamma_point_eight])
frame = cv2.normalize(gamma_point_eight, None, alpha=0, beta=1, norm_type=cv2.NORM_MINMAX, dtype=cv2.CV_32F)
# scale to uint8
frame = (255*frame).astype(np.uint8)
image = frame[80:450, 130:520] # 找出ROI
hsv = cv2.cvtColor(image, cv2.COLOR_BGR2HSV)# 转换颜色空间 BGR 到 HSV
# 定义HSV中蓝色的范围
color_dist = {'red': {'Lower': np.array([0, 43,46]), 'Upper': np.array([13, 255, 255])},
'blue': {'Lower': np.array([75, 28, 65]), 'Upper': np.array([120, 255, 220])},
'green': {'Lower': np.array([35, 43, 35]), 'Upper': np.array([90, 255, 255])},
'pink': {'Lower': np.array([156, 43, 46]), 'Upper': np.array([180, 255, 255])},
'yellow': {'Lower': np.array([26, 43, 46]), 'Upper': np.array([34, 255, 255])},
}
filterStone = 'blue'
lower_blue = color_dist[filterStone]['Lower']
upper_blue = color_dist[filterStone]['Upper']
# 设置HSV的阈值使得只取蓝色
mask = cv2.inRange(hsv, lower_blue, upper_blue) # 过滤蓝色石头
# 将掩膜和图像逐像素相加
res = cv2.bitwise_and(image,image, mask= mask)
res2rgba = cv2.cvtColor(res, cv2.COLOR_BGR2RGBA)
# 透过开运算取得蓝色石头所在位置
erode_hsv = cv2.erode(mask, None, iterations=1)
dilated_hsv = cv2.dilate(erode_hsv, None, iterations=1)
# 去除小的轮廓(噪点)
min_contour_area = 2 # 轮廓的最小面积,根据需要调整
lunkuo_img=image.copy()
#获取轮廓
_,binary=cv2.threshold(erode_hsv,0,255,cv2.THRESH_BINARY+cv2.THRESH_OTSU)
contours, hierarchy = cv2.findContours(binary, cv2.RETR_EXTERNAL, cv2.CHAIN_APPROX_SIMPLE)
filtered_contours = [contour for contour in contours if cv2.contourArea(contour) >= min_contour_area]
num_filtered_contours = len(filtered_contours)
print("过滤后的轮廓数量:", num_filtered_contours)
# 画出轮廓
image = cv2.drawContours(lunkuo_img, filtered_contours, -1, (0, 255, 0), 1)
cv2.putText(image, str(num_filtered_contours), (10, 30),cv2.FONT_HERSHEY_SIMPLEX, 1, (0, 255, 0), 2)
BGRimage = image[:, :, ::-1]
finshPath = "./static/finsh/" + str(maxPhoto) + ".jpg"
cv2.imwrite(finshPath, image)
return num_filtered_contours#前端
<!DOCTYPE html>
<html>
<head>
<title>用户界面</title>
<style>
body {
display: flex;
flex-direction: column;
justify-content: center;
align-items: center;
height: 100vh;
margin: 0;
}
</style>
<meta http-equiv="refresh" content="5">
</head>
<body>
<h1>用户界面</h1>
<img src="{{ image_url }}" alt="Latest Image" width="700" height="700">
</body>
</html>

 他的勋章
他的勋章

DeadWalking2023.11.30
优秀!!
许培享2023.11.28
喔,图片识别