 返回首页
返回首页
 回到顶部
回到顶部
37款传感器与执行器的提法,在网络上广泛流传,其实Arduino能够兼容的传感器模块肯定是不止这37种的。鉴于本人手头积累了一些传感器和执行器模块,依照实践出真知(一定要动手做)的理念,以学习和交流为目的,这里准备逐一动手尝试系列实验,不管成功(程序走通)与否,都会记录下来—小小的进步或是搞不掂的问题,希望能够抛砖引玉。
【Arduino】168种传感器模块系列实验(资料代码+仿真编程+图形编程)
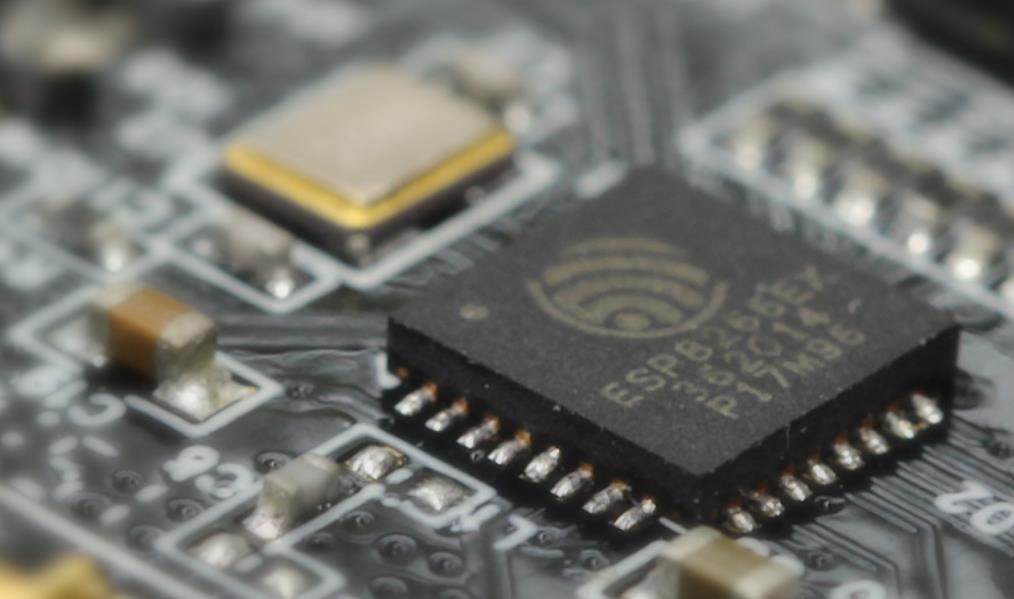
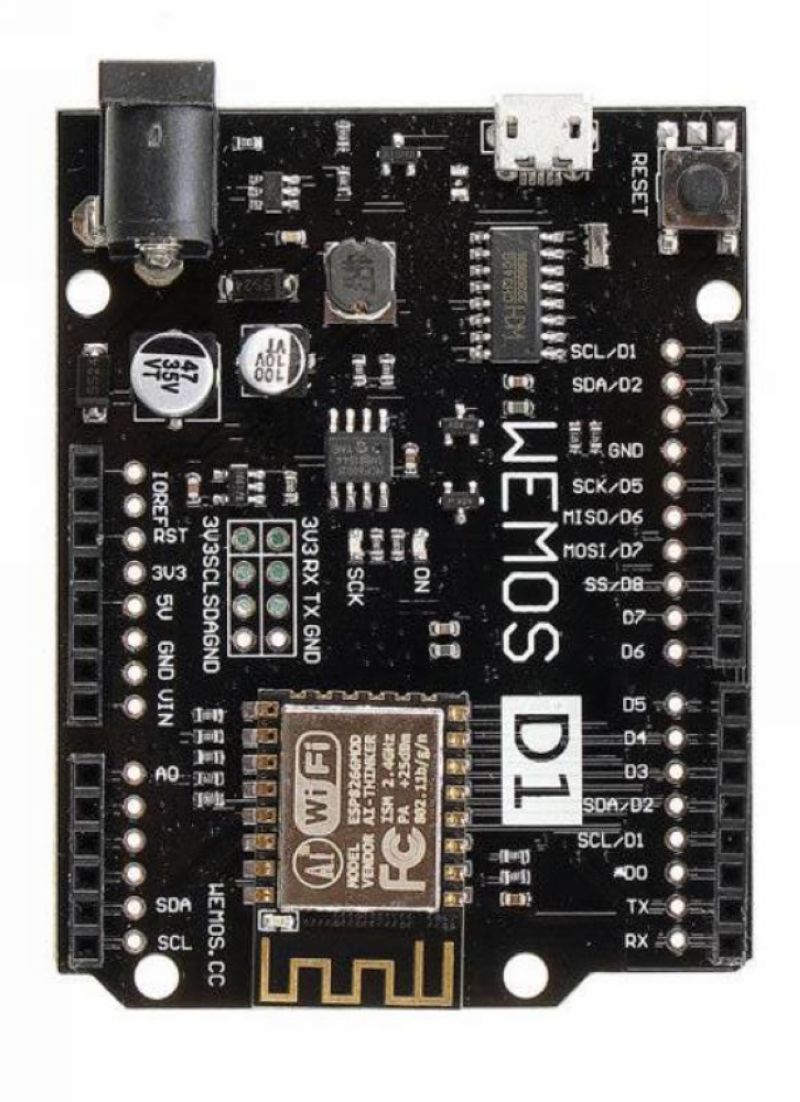
实验一百七十二:升级版 WeMos D1 R2 WiFi UNO 开发板 基于ESP8266

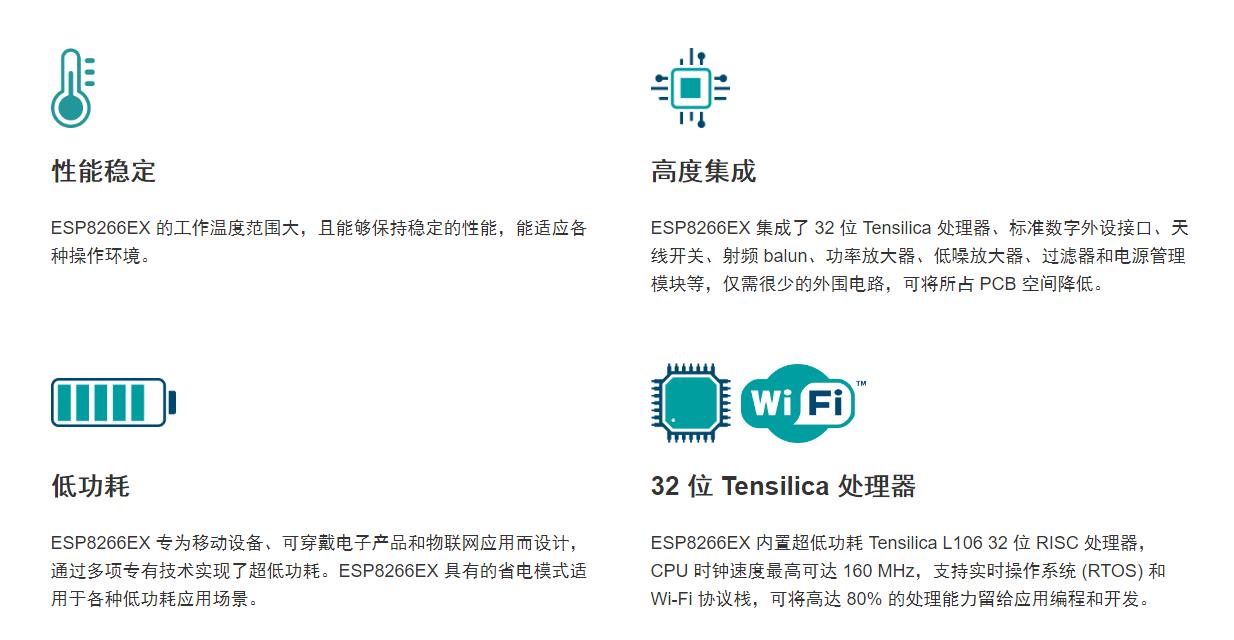
知识点:ESP8266
低功耗、高集成度的 Wi-Fi 芯片
仅需 7 个外围元器件
超宽工作温度范围:-40°C 至 +125°C
ESP8285 - ESP8266 内封 8 Mbit Flash
尽管Arduino UNO和WeMos-D1R2类似,但它们的引脚分配还是有一些区别。上图提供了引脚的映射。在某些情况下,为UNO编写的程序将需要稍作修改,以调整为WeMos-D1R2的正确引脚分配。
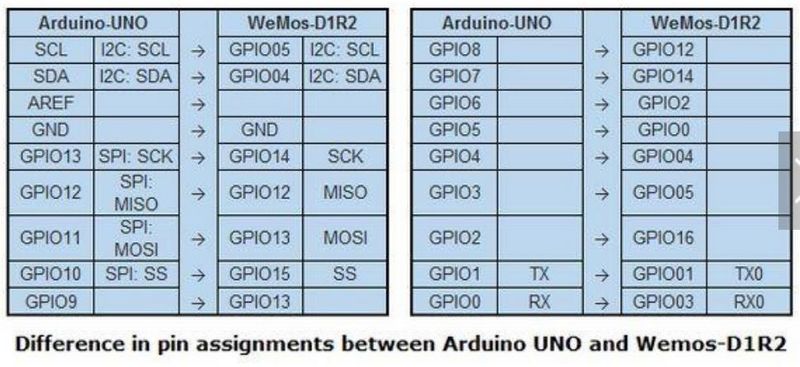
ESP8266 WeMos-D1R2 接脚图
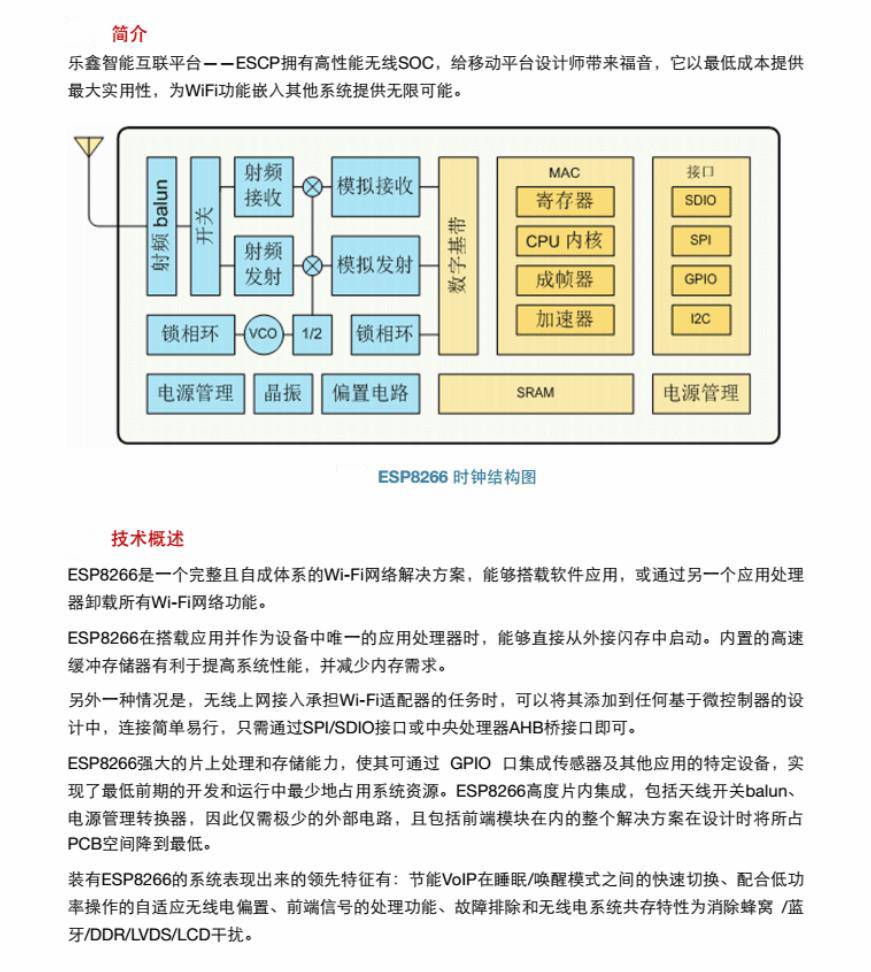
参考电原理图

【Arduino】168种传感器模块系列实验(资料代码+仿真编程+图形编程)
实验一百七十二:升级版 WeMos D1 R2 WiFi UNO 开发板 基于ESP8266
项目:测试串口
Arduino实验开源代码
/*
【Arduino】108种传感器模块系列实验(资料+代码+图形+仿真)
实验一百二十五: 升级版 WeMos D1 R2 WiFi UNO 开发板 基于ESP8266
项目:测试串口
*/
void setup() {
// put your setup code here, to run once:
Serial.begin(9600);
}
void loop() {
// put your main code here, to run repeatedly:
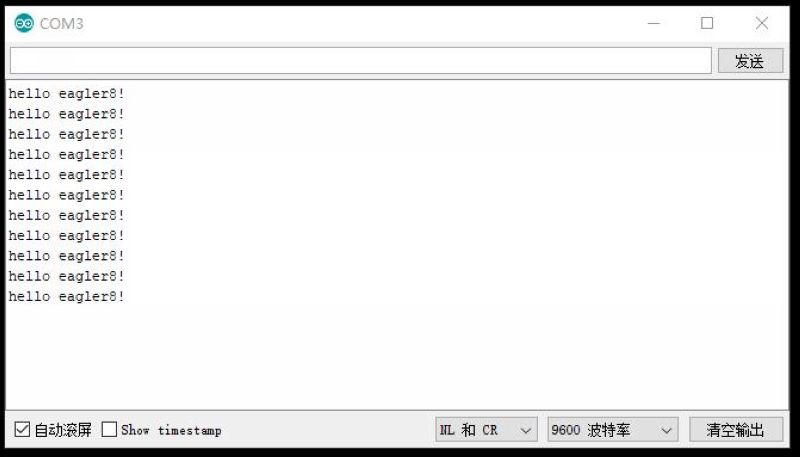
Serial.println("hello eagler8!");
delay(2000);
}实验串口返回情况
【Arduino】168种传感器模块系列实验(资料代码+仿真编程+图形编程)
实验一百七十二:升级版 WeMos D1 R2 WiFi UNO 开发板 基于ESP8266
项目:无延迟闪烁LED
Arduino实验开源代码
/*
【Arduino】108种传感器模块系列实验(资料+代码+图形+仿真)
实验一百二十五: 升级版 WeMos D1 R2 WiFi UNO 开发板 基于ESP8266
项目:无延迟闪烁LED
*/

int ledState = LOW;

unsigned long previousMillis = 0;
const long interval = 1000;

void setup() {
  pinMode(LED_BUILTIN, OUTPUT);
}

void loop() {
  unsigned long currentMillis = millis();
  if (currentMillis - previousMillis >= interval) {
    previousMillis = currentMillis;
    if (ledState == LOW) {
      ledState = HIGH;  // Note that this switches the LED *off*
    } else {
      ledState = LOW;  // Note that this switches the LED *on*
    }
    digitalWrite(LED_BUILTIN, ledState);
  }
}
【Arduino】168种传感器模块系列实验(资料代码+仿真编程+图形编程)
实验一百七十二:升级版 WeMos D1 R2 WiFi UNO 开发板 基于ESP8266
项目:ESP8266闪烁,由Daniel Salazar轮询超时
Arduino实验开源代码
/*
【Arduino】108种传感器模块系列实验(资料+代码+图形+仿真)
实验一百二十五: 升级版 WeMos D1 R2 WiFi UNO 开发板 基于ESP8266
项目:ESP8266闪烁,由Daniel Salazar轮询超时
*/

#include <olledTimeout.h>

void ledOn() {
  digitalWrite(LED_BUILTIN, LOW);   // Turn the LED on (Note that LOW is the voltage level
}

void ledOff() {
  digitalWrite(LED_BUILTIN, HIGH);  // Turn the LED off by making the voltage HIGH
}

void ledToggle() {
  digitalWrite(LED_BUILTIN, !digitalRead(LED_BUILTIN));  // Change the state of the LED
}


esp8266::polledTimeout::periodicFastUs halfPeriod(500000); //use fully qualified type and avoid importing all ::esp8266 namespace to the global namespace

// the setup function runs only once at start
void setup() {
  Serial.begin(115200);

  Serial.println();
  Serial.printf("periodic/oneShotMs::timeMax()     = %u ms\n", (uint32_t)esp8266::polledTimeout::periodicMs::timeMax());
  Serial.printf("periodic/oneShotFastMs::timeMax() = %u ms\n", (uint32_t)esp8266::polledTimeout::periodicFastMs::timeMax());
  Serial.printf("periodic/oneShotFastUs::timeMax() = %u us\n", (uint32_t)esp8266::polledTimeout::periodicFastUs::timeMax());
  Serial.printf("periodic/oneShotFastNs::timeMax() = %u ns\n", (uint32_t)esp8266::polledTimeout::periodicFastNs::timeMax());

#if 0 // 1 or debugging polledTimeoutf
  Serial.printf("periodic/oneShotMs::rangeCompensate     = %u\n", (uint32_t)esp8266::polledTimeout::periodicMs::rangeCompensate);
  Serial.printf("periodic/oneShotFastMs::rangeCompensate = %u\n", (uint32_t)esp8266::polledTimeout::periodicFastMs::rangeCompensate);
  Serial.printf("periodic/oneShotFastUs::rangeCompensate = %u\n", (uint32_t)esp8266::polledTimeout::periodicFastUs::rangeCompensate);
  Serial.printf("periodic/oneShotFastNs::rangeCompensate = %u\n", (uint32_t)esp8266::polledTimeout::periodicFastNs::rangeCompensate);
#endif

  pinMode(LED_BUILTIN, OUTPUT);     // Initialize the LED_BUILTIN pin as an output

  using esp8266::polledTimeout:neShotMs; //import the type to the local namespace

  //STEP1; turn the led ON
  ledOn();

  //STEP2: wait for ON timeout
  oneShotMs timeoutOn(2000);
  while (!timeoutOn) {
    yield();
  }

  //STEP3: turn the led OFF
  ledOff();

  //STEP4: wait for OFF timeout to assure the led is kept off for this time before exiting setup
  oneShotMs timeoutOff(2000);
  while (!timeoutOff) {
    yield();
  }

  //Done with STEPs, do other stuff
  halfPeriod.reset(); //halfPeriod is global, so it gets inited on sketch start. Clear it here to make it ready for loop, where it's actually used.
}


// the loop function runs over and over again forever
void loop() {
  if (halfPeriod) {
    ledToggle();
  }
}
【Arduino】168种传感器模块系列实验(资料代码+仿真编程+图形编程)
实验一百七十二:升级版 WeMos D1 R2 WiFi UNO 开发板 基于ESP8266
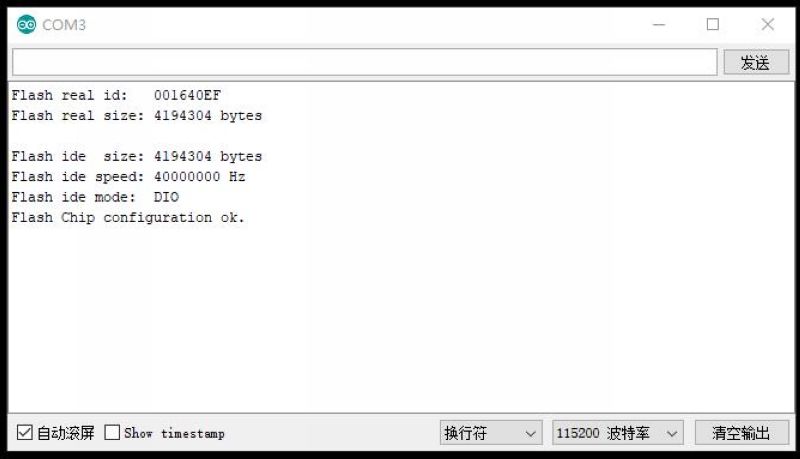
项目:测试ide的eeprom设置是否与硬件匹配
Arduino实验开源代码
/*
【Arduino】108种传感器模块系列实验(资料+代码+图形+仿真)
实验一百二十五: 升级版 WeMos D1 R2 WiFi UNO 开发板 基于ESP8266
项目:测试ide的eeprom设置是否与硬件匹配
*/

void setup(void) {
  Serial.begin(115200);
}

void loop() {

  uint32_t realSize = ESP.getFlashChipRealSize();
  uint32_t ideSize = ESP.getFlashChipSize();
  FlashMode_t ideMode = ESP.getFlashChipMode();

  Serial.printf("Flash real id:   %08X\n", ESP.getFlashChipId());
  Serial.printf("Flash real size: %u bytes\n\n", realSize);

  Serial.printf("Flash ide  size: %u bytes\n", ideSize);
  Serial.printf("Flash ide speed: %u Hz\n", ESP.getFlashChipSpeed());
  Serial.printf("Flash ide mode:  %s\n", (ideMode == FM_QIO ? "QIO" : ideMode == FM_QOUT ? "QOUT" : ideMode == FM_DIO ? "DIO" : ideMode == FM_DOUT ? "DOUT" : "UNKNOWN"));

  if (ideSize != realSize) {
    Serial.println("Flash Chip configuration wrong!\n");
  } else {
    Serial.println("Flash Chip configuration ok.\n");
  }

  delay(5000);
}
实验串口返回情况
Arduino实验场景图


 他的勋章
他的勋章

伦**2024.03.31
666