 返回首页
返回首页
 回到顶部
回到顶部

步骤1 项目介绍
Mind+ 1.8版本的可视化面板特别适合做一个在线管理平台。而智能家居是我们常见的一个项目。通过MQTT协议平台的关联,使物联网的应用场景真正落到实处。
本项目旨在通过面板提供的开关组件、柱形图、条形图、水滴图、动态图片等功能模拟真实环境的数据。

步骤2 制作过程
让我们一起以初学者的角度进入今天的项目:
一、版本文件的获取:
Mind+的可视化面板搭配,SIOT2.0使用,我们可以在这里找到下载地址:
https://mindplus.dfrobot.com.cn/dashboard
同步更新的还有行空板的最新固件。
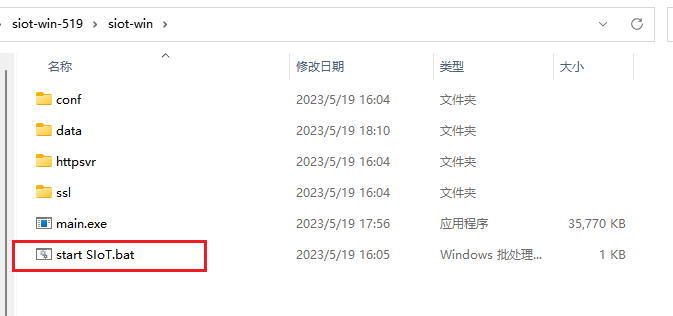
二、程序启动:
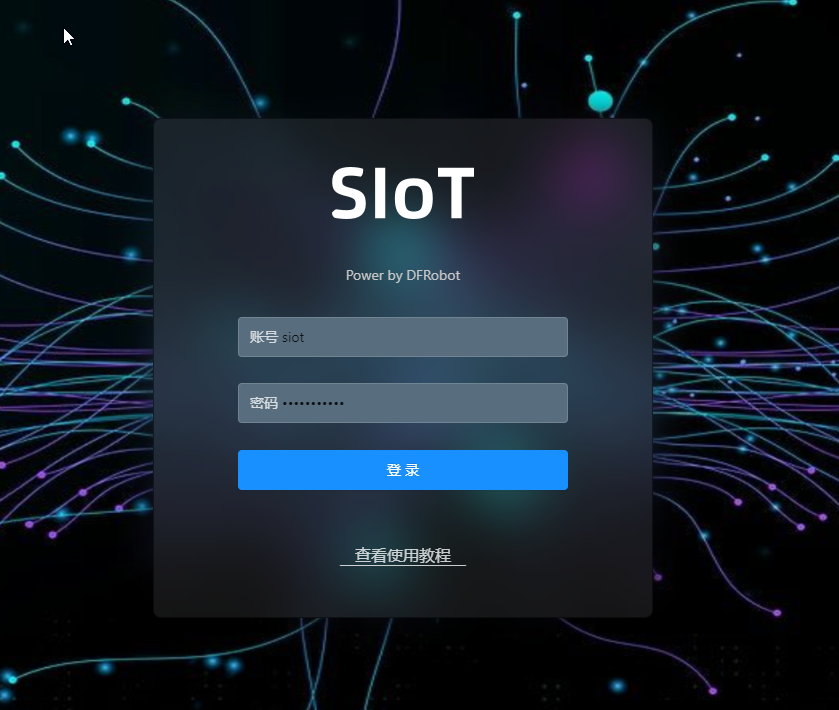
1 . 首先运行 SIOT服务端:
如果是本机运行,直接浏览器访问:http://127.0.0.1:8080,或者 localhost:8080即可,如果是在局域网访问,可获取相应IP地址进行连接。
2. 启动 Mind+ 1.8的可视化面板:

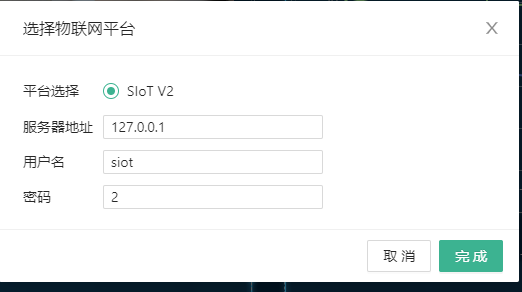
连接 SIoT服务,然后,选择一个组件进行 Topic绑定即可。
步骤3 可视化界面制作
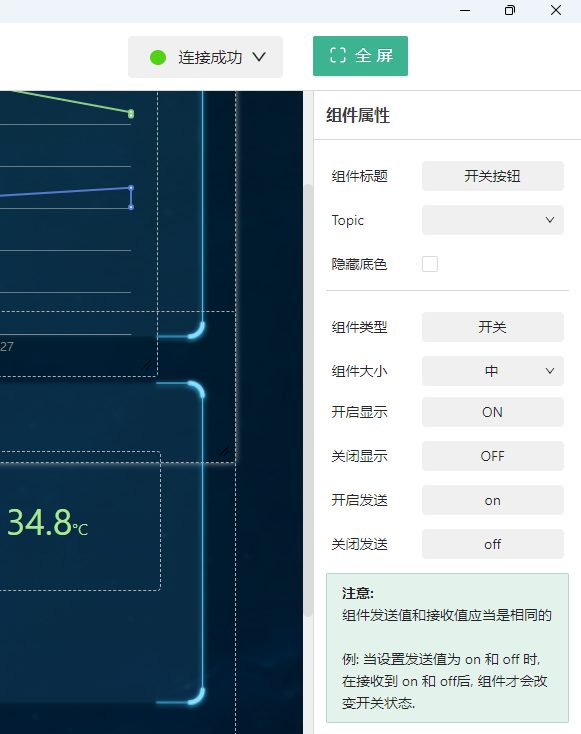
连接成功后,可以进行相应的可视化界面制作。有些组件的要求可以看具体的说明,或者自己尝试。
比如两个柱形图的数据发送格式是: 1|2,5|7,8|9,这样
还有 自定义开关的设置等。
具体操作朋友们自行研究下即可,这里不多做说明。
当然,具体使用过程中,碰到的一些功能性问题,只能冷暖自知了。(手动狗头)
步骤4 代码编写
因为本次入围赛,没有特别要求使用硬件,所以本次采用数据模拟的方式进行演示。
另外,python的图形化模式找不到多线程的积木,所以这里采用代码方式编写。
不过这里做个说明,因为SIoT本质上是 MQTT服务端,所以我们这里首先要发起
MQTT连接。
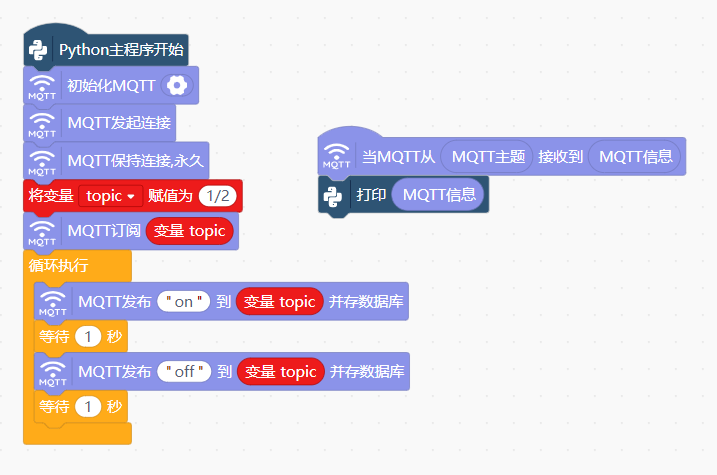
具体代码:
import datetime
import threading
import time
import random
# -*- coding: UTF-8 -*-
import locale
locale.setlocale(locale.LC_TIME, 'zh_CN') # 指定输出中文
# MindPlus
import siot
# 事件回调函数
def on_message_callback(client, userdata, msg):
print(msg.payload.decode())
siot.init(client_id="9124557967160474",server="127.0.0.1",port=1883,user="siot",password="2")
siot.connect()
siot.loop()
siot.set_callback(on_message_callback)
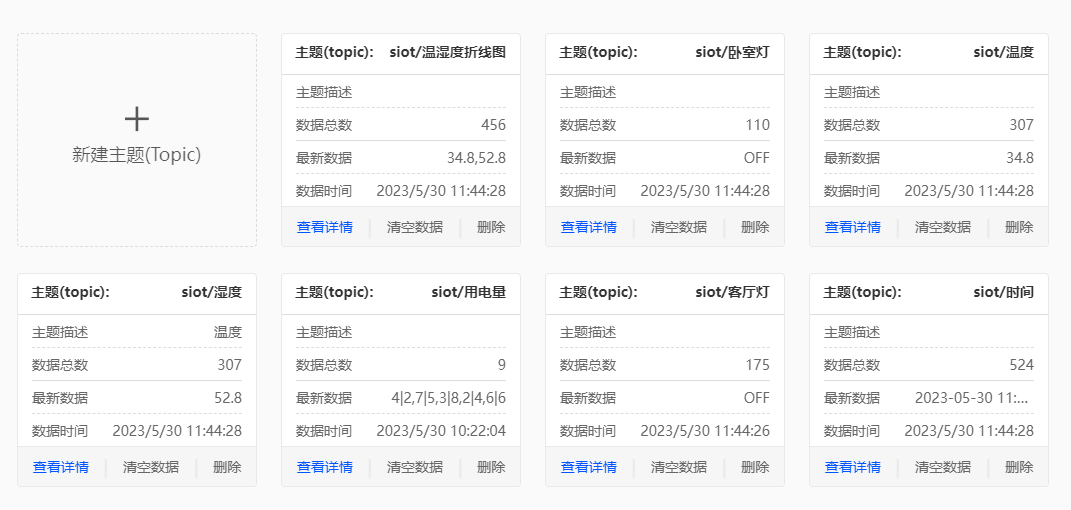
topic1 = "siot/时间"
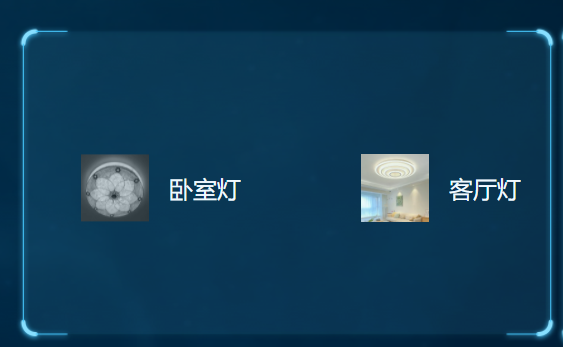
topic2 = "siot/卧室灯"
topic3 = "siot/客厅灯"
topic4 = "siot/温湿度折线图"
topic5 = "siot/温度"
topic6 = "siot/湿度"
siot.getsubscribe(topic=topic1)
siot.getsubscribe(topic=topic2)
siot.getsubscribe(topic=topic3)
siot.getsubscribe(topic=topic4)
siot.getsubscribe(topic=topic5)
siot.getsubscribe(topic=topic6)
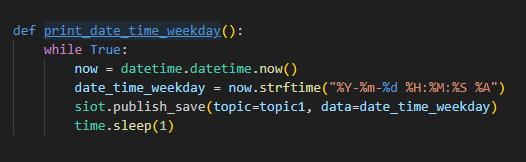
def print_date_time_weekday():
while True:
now = datetime.datetime.now()
date_time_weekday = now.strftime("%Y-%m-%d %H:%M:%S %A")
siot.publish_save(topic=topic1, data=date_time_weekday)
time.sleep(1)
def print_light2():
while True:
time.sleep(3)
siot.publish_save(topic=topic2, data='ON')
time.sleep(3)
siot.publish_save(topic=topic2, data='OFF')
def print_light3():
while True:
time.sleep(5)
siot.publish_save(topic=topic3, data='ON')
time.sleep(5)
siot.publish_save(topic=topic3, data='OFF')
def print_Temp_rh_line():
while True:
temp = round(random.uniform(29, 35), 1)
rh= round(random.uniform(49,60), 1)
siot.publish_save(topic=topic4, data=f'{temp},{rh}')
siot.publish_save(topic=topic5, data=temp)
siot.publish_save(topic=topic6, data=rh)
time.sleep(1)
threads = []
t1 = threading.Thread(target=print_date_time_weekday)
t2 = threading.Thread(target=print_light2)
t3 = threading.Thread(target=print_light3)
t4 = threading.Thread(target=print_Temp_rh_line)
t5 = threading.Thread(target=print_Temp_rh_line)
t6 = threading.Thread(target=print_Temp_rh_line)
threads.append(t1)
threads.append(t2)
threads.append(t3)
threads.append(t4)
threads.append(t5)
threads.append(t6)
for t in threads:
t.start()
for t in threads:
t.join()代码总共使用了 7 个Topic,功能如下:
步骤5 功能说明
代码总共开了6个线程,分别实现以下功能:
线程1,每 1 秒更新一次,主要是时间显示,使用的 单行文字 组件

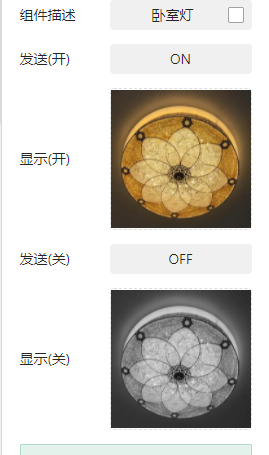
线程2,3 是模拟 客厅灯和卧室灯的开关,分别是 3,5秒一次,使用 自定义开关组件,使用开、关两张图片,进行交互。
线程4,5,6主要是温湿度数据的模拟,
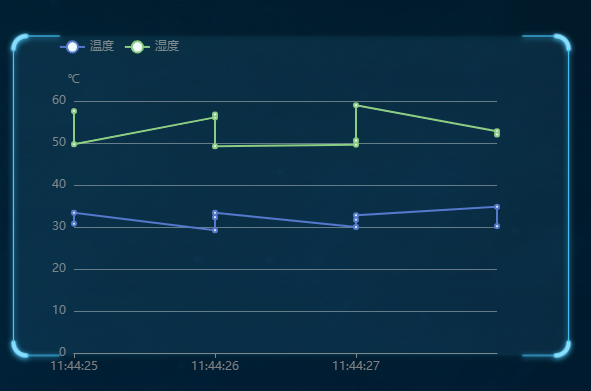
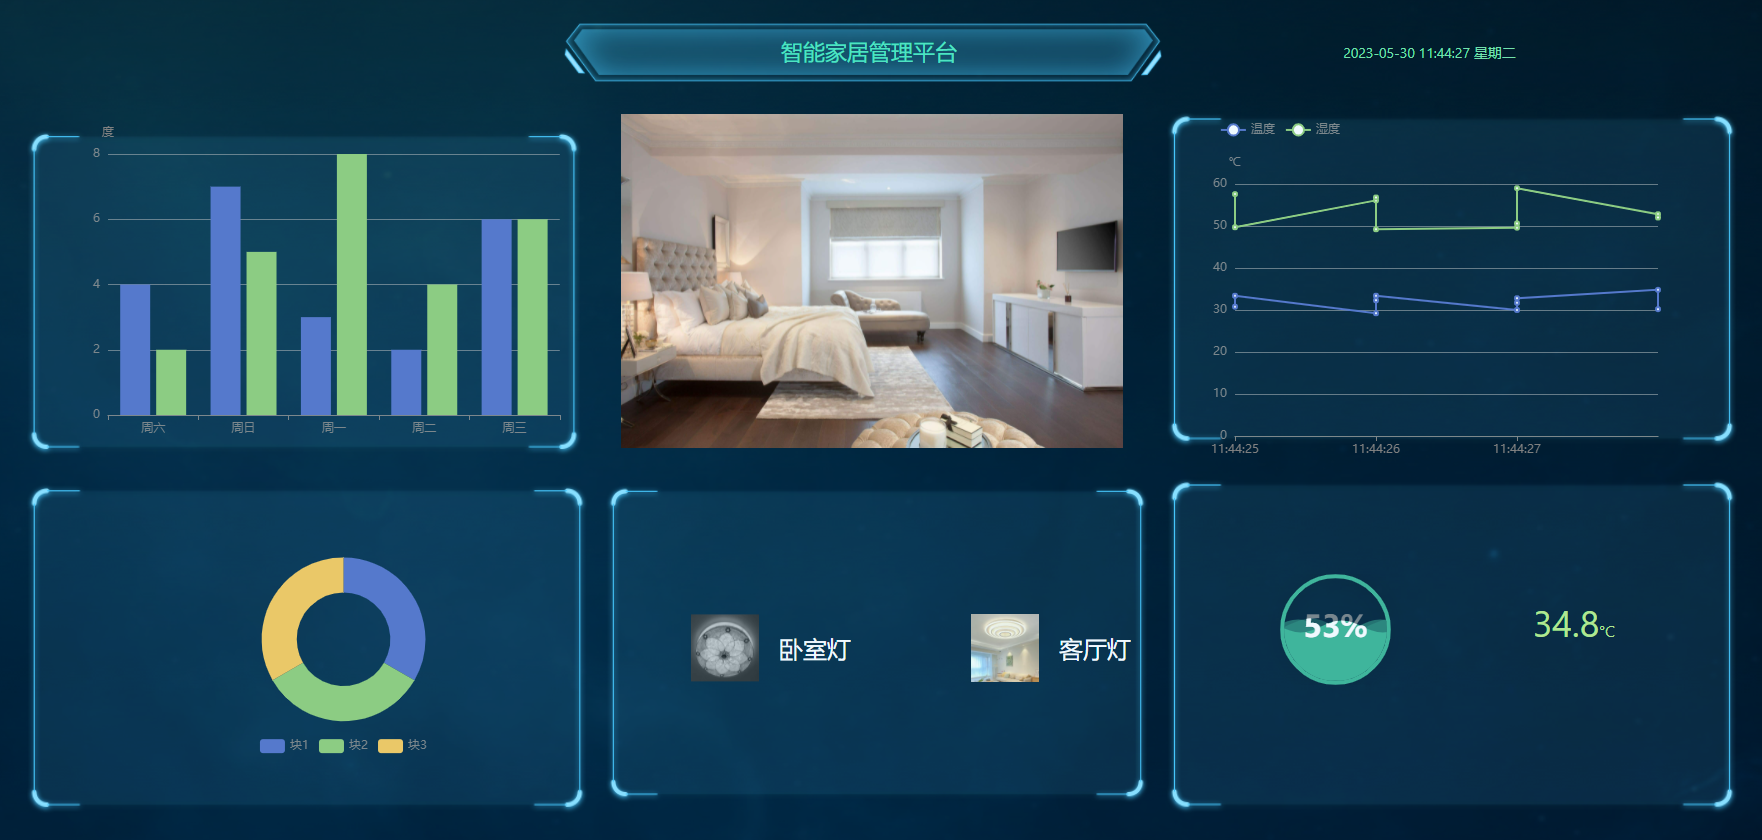
上图是,温湿度随时间变化折线图,下图是温湿度即时数据:

在最中间位置,应该使用摄像头的实时拍照图片,这里为了简便就没有模拟了,而是使用了静态图片组件,

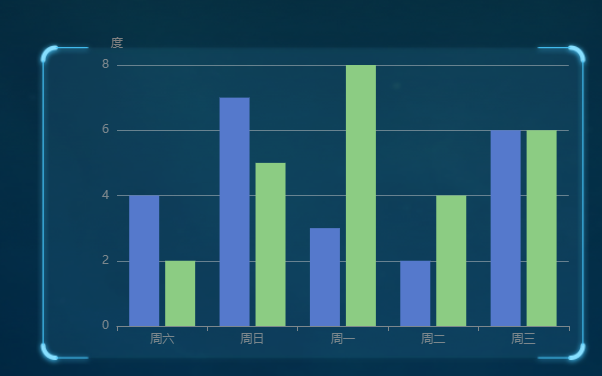
另外,柱形图的使用,设想是显示早晚的用电量,所以用了两组数据,横轴用星期来区分。
完整效果图:
步骤6 使用总结:
1. 可视化面板组件的操作问题,在群里已经吐槽过了。相关工程师也说明后续会跟进,这里暂且不表。
2. 总体上来讲,可视化面板能够实现快速模型布置,还是相当方便的。和其它低代码可视化平台相比,胜在简便。和Scratch、思维导图等初衷类似,将思维可视化。但成也萧何,败也萧何,太过简陋,也失去了一些乐趣。
3. 使用MQTT进行视频分帧图片的呈现,还是比较受欢迎了,希望看到更多在此基础上的变化。
4. 还有个问题,就是可视化面板一定要基于Mind+吗?是不是可以导出链接?这样就可以在一些低配设备上使用Web访问了。
以上。


 他的勋章
他的勋章

花生编程2023.07.31
赞赞赞赞赞
花生编程2023.07.31
厉害厉害
三春牛-创客2023.07.28
赞赞赞赞
三春牛-创客2023.07.28
厉害厉害