 返回首页
返回首页
 回到顶部
回到顶部
看到这个活动就想来试试,能申领到这个板子还是真开心。结果,马上打脸。因为平时只用mind+图形化编程,其它的只是知道而已。尴尬了
看着资料刷固件,一次一次的失败。
先用自己知道的Mixly试了试,上传失败;Arduino下载不同的版本,不停地试,失败了。 跟着米菲爸爸的文件试了试MicroPython,到端口部分只能看到COM1,失败了。不断地看群里同伴们的心得,提出问题时同伴都也是积极帮忙,但对小白来说总在某一个地方卡壳了。还剩四天的时候,固件还没有刷成功。我都怀疑这个板子是不是坏了。哈哈!
看着时间天天过去,感觉自己完不成了。跟粒子姐姐坦白时,粒子姐姐却暖心地安慰我。这时我反而平静下来。慢慢来吧。
我又看到了风隐的文章,于是又照着他的方法试了试。居然成功了。并成功点亮了一盏灯。
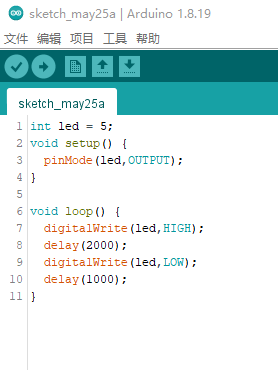

当点亮一颗灯的时候就有了无限的希望
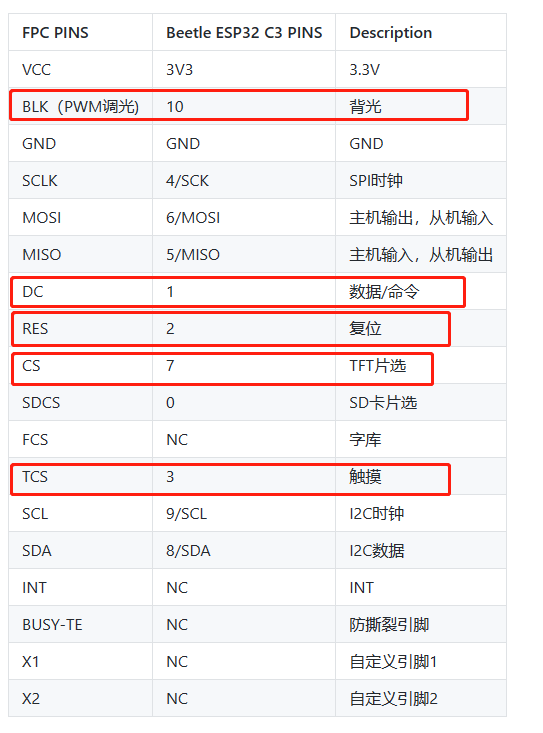
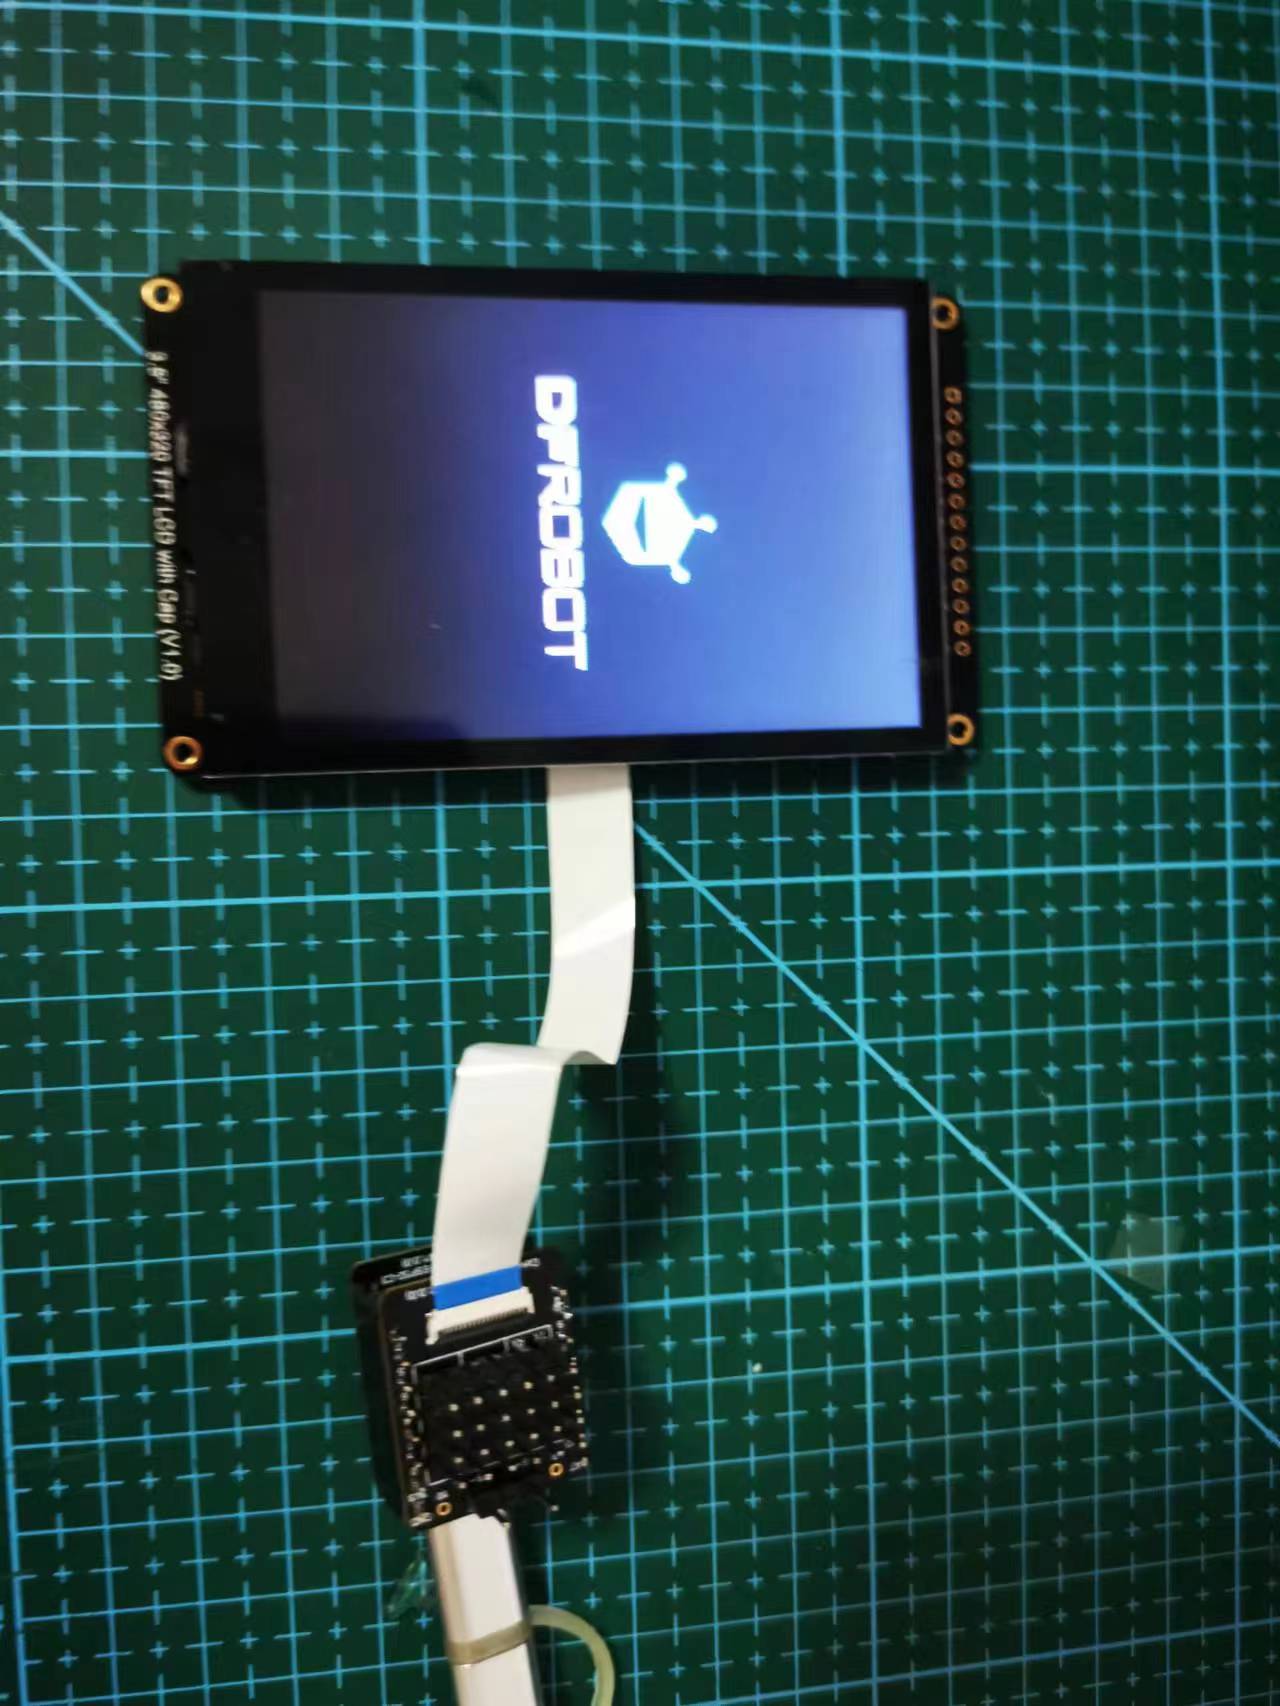
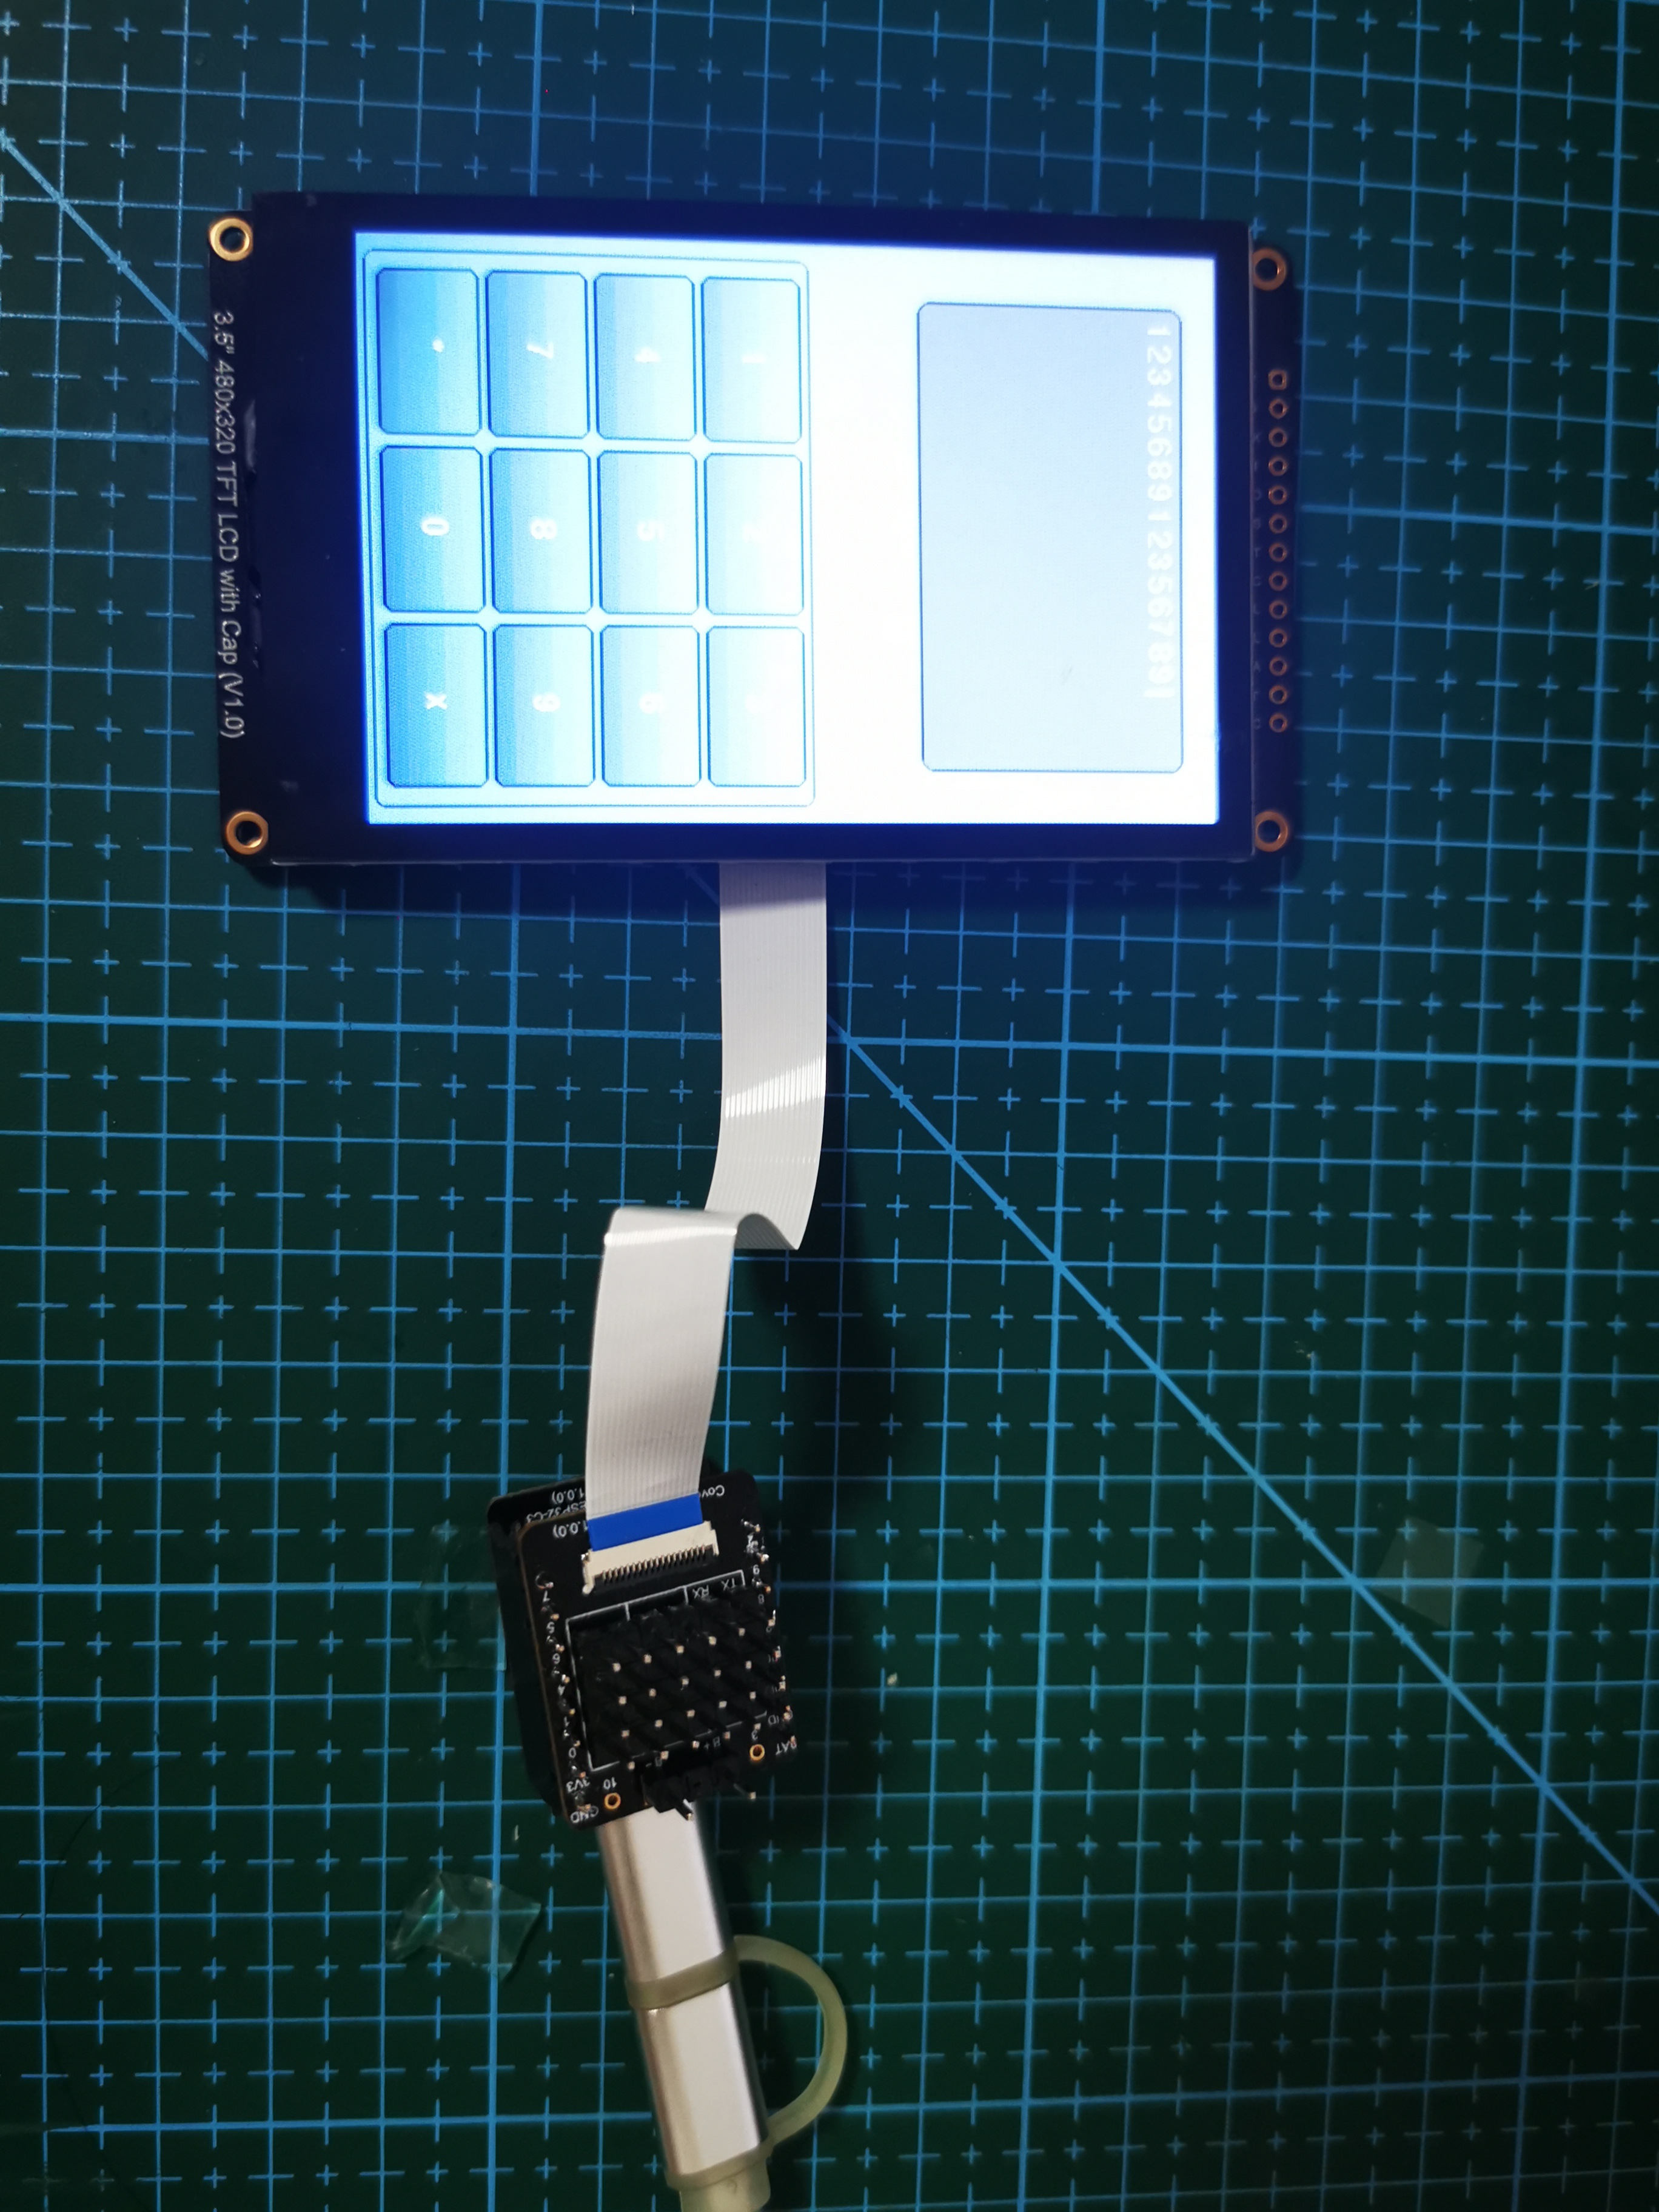
开始我的第二步计划:Beetle ESP32-C3体验3.5寸 IPS TFT电容显示屏。
查阅相关资料,安装相关库文件DFRobot_GDL库文件,连接主板
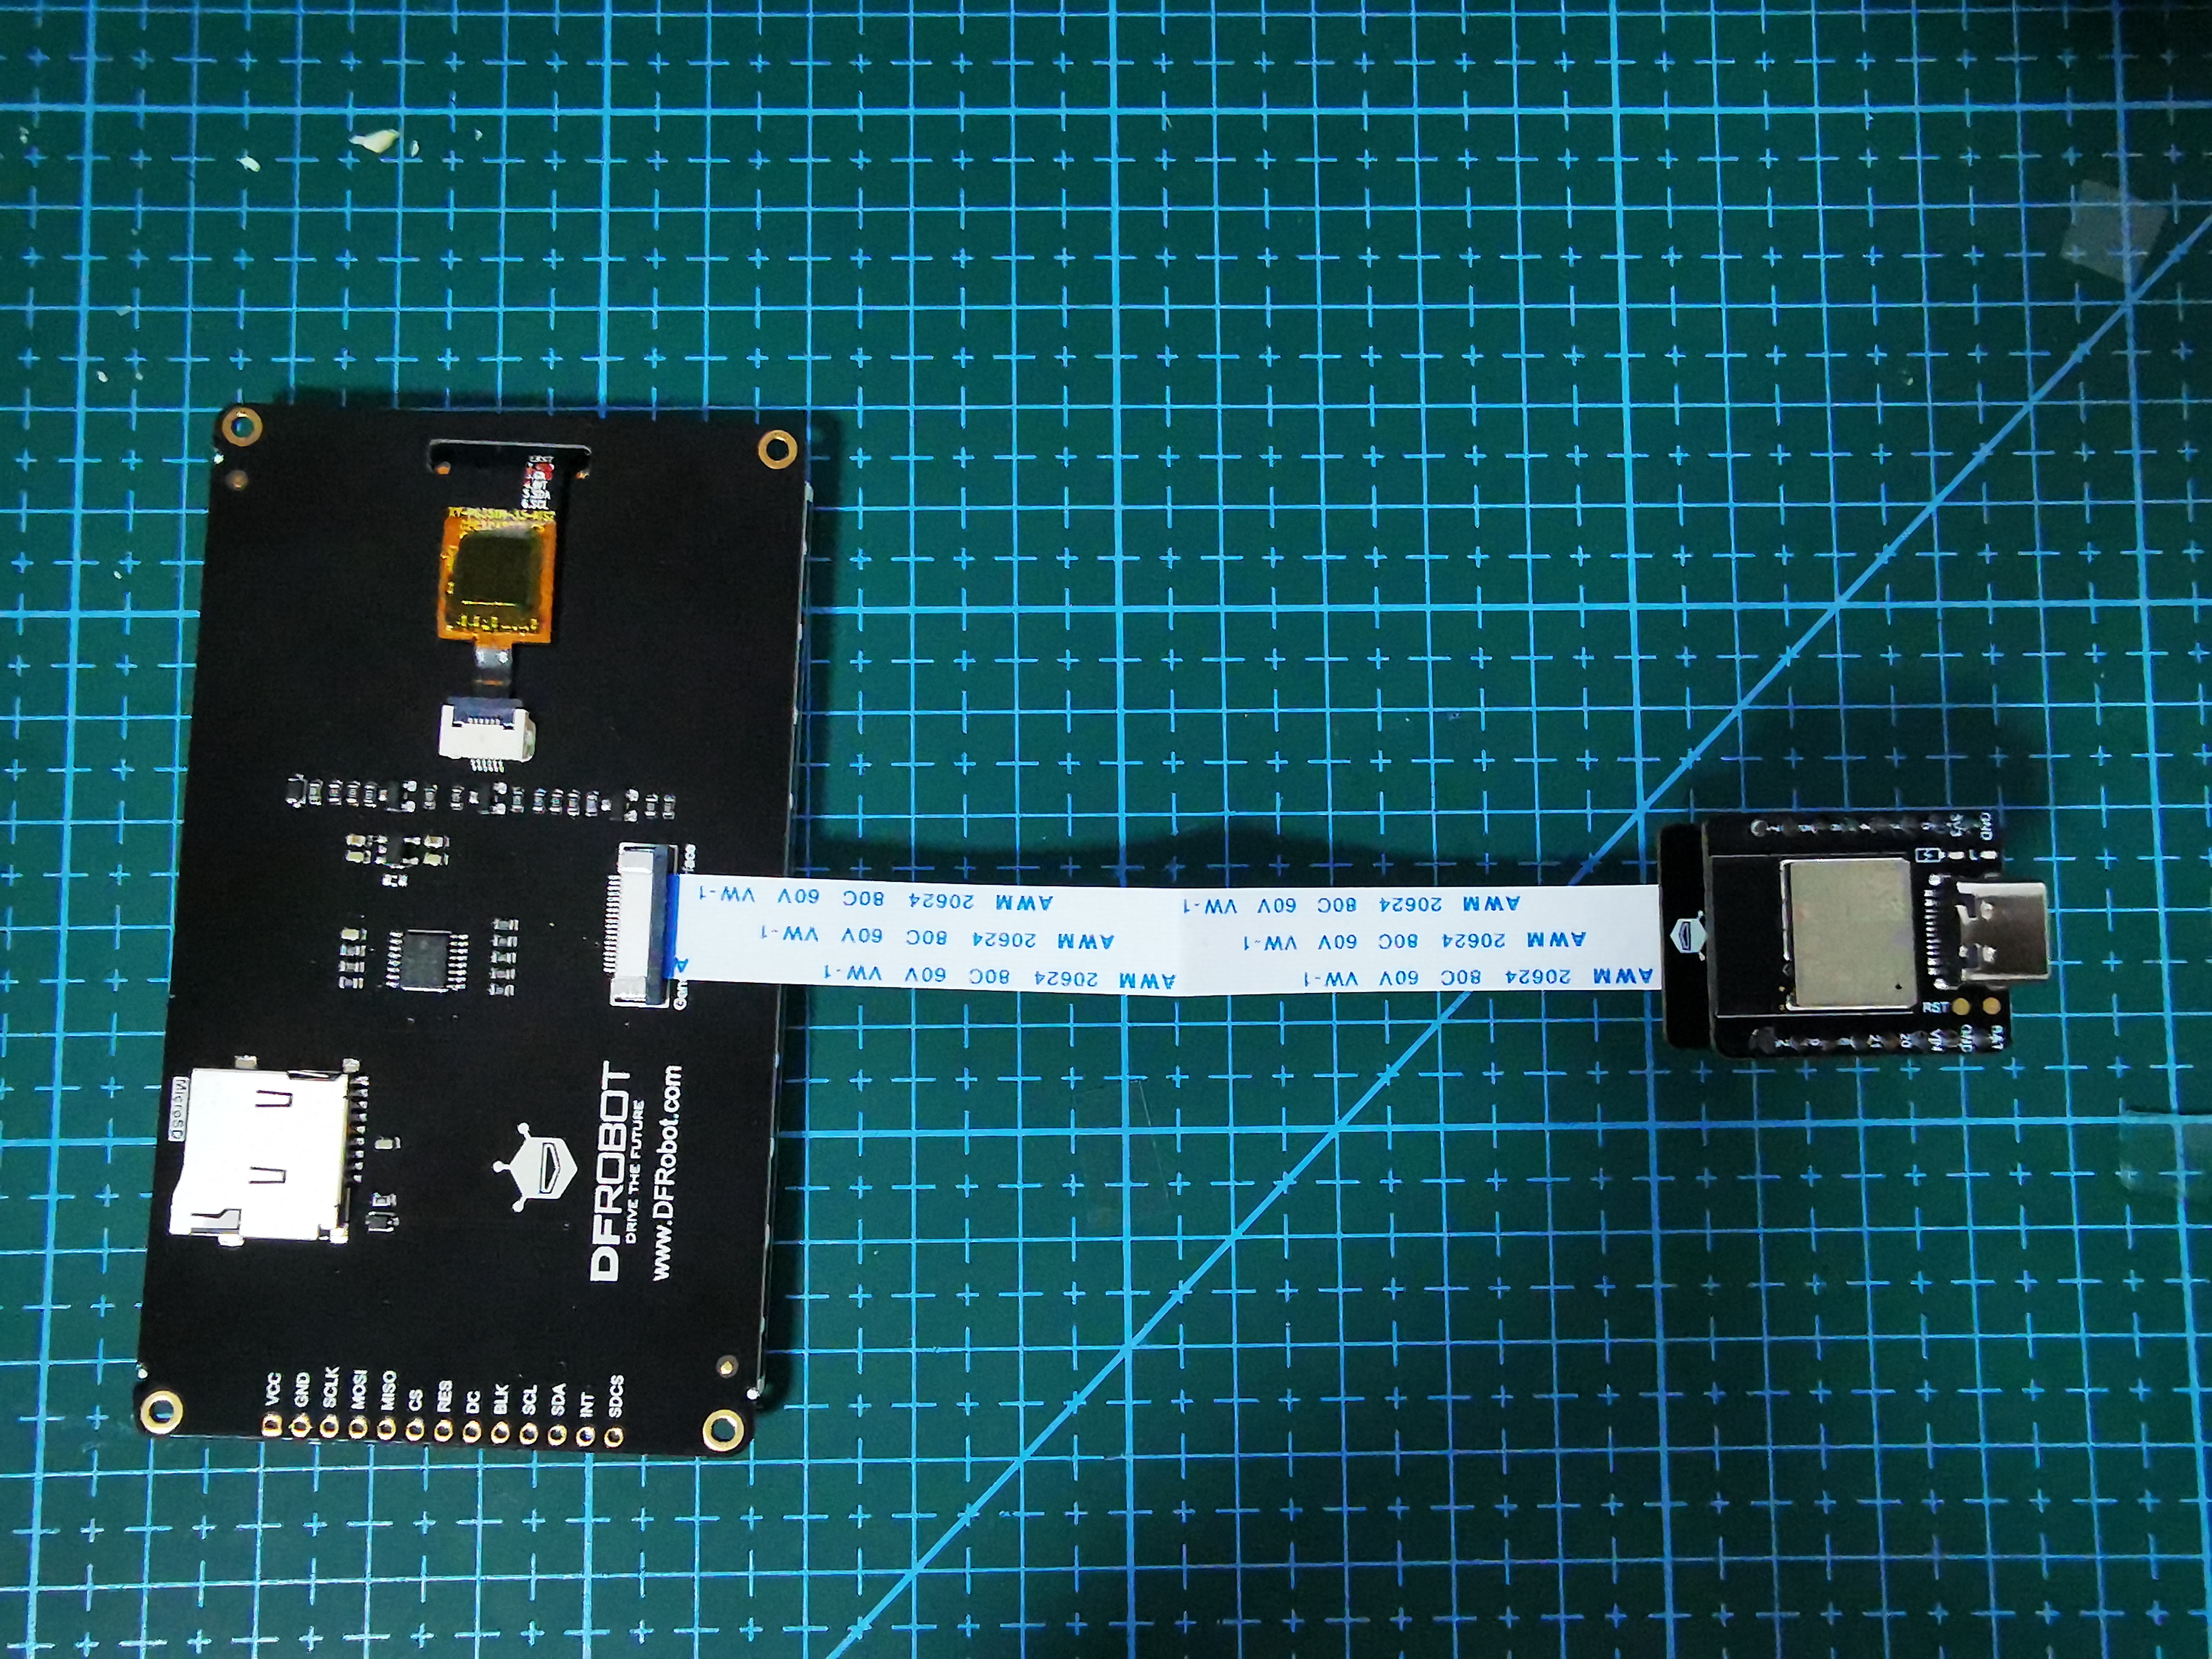
直接通过18Pin-FPC连接GDI接口,
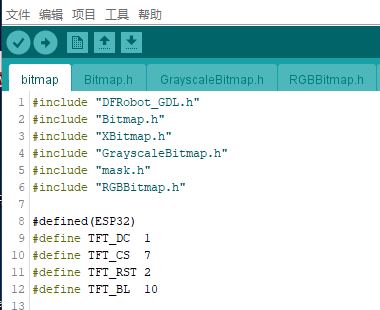
对照Beetle ESP32-C3接口表,对范例进行修改。
/*!
 * @file bitmap.ino
 * @brief Draw monochrome, colorful, and grayscale images based on the image array generated by the bitmap software.
 * @n The demo requires to be run on a main-controller with 40000 bytes of dynamic memory, like FireBeetle-ESP8266 and FireBeetle-ESP32 since there are 380,000 bytes in this project.
 * @n This demo supports mainboard FireBeetle-ESP32, FireBeetle-ESP8266, and FireBeetle-M0.
 * @copyright Copyright (c) 2010 DFRobot Co. Ltd (http://www.dfrobot.com)
 * @license The MIT License (MIT)
 * @author [YeHangYu] (hangyu.ye@dfrobot.com)
 * @version V0.1
 * @date 2020-01-07
 * @url https://github.com/DFRobot/DFRobot_GDL
 */
#include "DFRobot_GDL.h"
#include "Bitmap.h"
#include "XBitmap.h"
#include "GrayscaleBitmap.h"
#include "mask.h"
#include "RGBBitmap.h"
//Custom communication pins
/*M0*/
#if defined ARDUINO_SAM_ZERO
#define TFT_DC  7
#define TFT_CS  5
#define TFT_RST 6
#define TFT_BL  9
/*ESP32 and ESP8266*/
#elif defined(ESP32) || defined(ESP8266)
#define TFT_DC  1
#define TFT_CS  7
#define TFT_RST 2
#define TFT_BL  10
/* AVR series mainboard */
#else
#define TFT_DC  2
#define TFT_CS  3
#define TFT_RST 4
#define TFT_BL  5
#endif

/**
 * @brief Constructor Constructor of hardware SPI communication
 * @param dc Command/data line pin for SPI communication
 * @param cs Chip select pin for SPI communication
 * @param rst reset pin of the screen
 */
//DFRobot_ST7789_240x204_HW_SPI screen(/*dc=*/TFT_DC,/*cs=*/TFT_CS,/*rst=*/TFT_RST,/*bl=*/TFT_BL);
//DFRobot_ST7789_240x240_HW_SPI screen(/*dc=*/TFT_DC,/*cs=*/TFT_CS,/*rst=*/TFT_RST);
//DFRobot_ST7789_240x320_HW_SPI screen(/*dc=*/TFT_DC,/*cs=*/TFT_CS,/*rst=*/TFT_RST);
//DFRobot_ILI9341_240x320_HW_SPI  screen(/*dc=*/TFT_DC,/*cs=*/TFT_CS,/*rst=*/TFT_RST);
DFRobot_ILI9488_320x480_HW_SPI screen(/*dc=*/TFT_DC,/*cs=*/TFT_CS,/*rst=*/TFT_RST);
/* M0 mainboard DMA transfer */
//DFRobot_ST7789_240x204_DMA_SPI screen(/*dc=*/TFT_DC,/*cs=*/TFT_CS,/*rst=*/TFT_RST,/*bl=*/TFT_BL);
//DFRobot_ST7789_240x240_DMA_SPI screen(/*dc=*/TFT_DC,/*cs=*/TFT_CS,/*rst=*/TFT_RST);
//DFRobot_ST7789_240x320_DMA_SPI screen(/*dc=*/TFT_DC,/*cs=*/TFT_CS,/*rst=*/TFT_RST);
//DFRobot_ILI9341_240x320_DMA_SPI screen(/*dc=*/TFT_DC,/*cs=*/TFT_CS,/*rst=*/TFT_RST);
//DFRobot_ILI9488_320x480_DMA_SPI screen(/*dc=*/TFT_DC,/*cs=*/TFT_CS,/*rst=*/TFT_RST);


void setup() {
  Serial.begin(115200);
  screen.begin();
}

void loop() {
  /**
   * @brief Paint the screen white
   * @param 0xFFFF white parameter
   */
  screen.fillScreen(COLOR_RGB565_WHITE );
  /**
   * @brief Draw monochrome pictures with different drawing orders
   * @param x 0 Set the starting point to be at the upper left of the screen, near the left side
   * @param y 0 Near the upper side
   * @param bitmap gImage_XBitmap The array in the header file XBitmap, the array elements are single bytes
   * @param w 240 Picture width
   * @param h 240 Picture height
   * @param color 0x0000 The black picture part is set to black
   */
  screen.drawXBitmap(/*x=*/(screen.width()-240)/2,/*y=*/(screen.height()-240)/2,/*bitmap gImage_Bitmap=*/gImage_XBitmap,/*w=*/240,/*h=*/240,/*color=*/0x0000);
  screen.fillScreen(COLOR_RGB565_WHITE);
  /**
   * @brief Draw colorful picture
   * @param x 0 Set the starting point to be at the upper left of the screen, near the left side
   * @param y 0 Near the upper side
   * @param bitmap gImage_RGBBitmap The array of RGBBitmap header files, the array elements are single bytes, here forced to convert to 2 bytes
   * @param w 240 picture width
   * @param h 240 Picture height
   */
  screen.drawRGBBitmap(/*x=*/(screen.width()-240)/2,/*y=*/(screen.height()-240)/2,/*bitmap gImage_Bitmap=*/(const unsigned uint16_t*)gImage_RGBBitmap,/*w=*/240,/*h=*/240);
  /**
   * @brief Use the mask as a monochrome picture to draw a monochrome picture
   * @param x 0 Set the starting point to be at the upper left of the screen, near the left side
   * @param y 0 Near the upper side
   * @param bitmap gImage_mask The array in the header mask, the array elements are single bytes
   * @param w 240 Picture width
   * @param h 240 Picture height
   * @param color 0x0000 The black picture part is set to black
   */
  screen.drawBitmap(/*x=*/(screen.width()-240)/2,/*y=*/(screen.height()-240)/2,/*bitmap gImage_Bitmap=*/gImage_mask,/*w=*/240,/*h=*/240,/*color=*/0x0000);
  /**
    * @brief Draw a colorful picture, the white part of the mask is not painted
    * @param x 0 Set the starting point to be at the upper left of the screen, near the left side
    * @param y 0 Near the upper side
    * @param bitmap gImage_RGBBitmap The array of RGBBitmap header files, the array elements are single bytes, here forced to convert to 2 bytes
    * @param mask gImage_mask The array in the header mask, the array elements are single bytes
    * @param w 240 Picture width
    * @param h 240 Picture height
    */
  screen.drawRGBBitmap(/*x=*/(screen.width()-240)/2,/*y=*/(screen.height()-240)/2,/*bitmap gImage_Bitmap=*/(const unsigned uint16_t*)gImage_RGBBitmap,/*mask=*/gImage_mask,/*w=*/240,/*h=*/240);
  screen.fillScreen(COLOR_RGB565_BLACK);
  /**
   * @brief Draw a monochrome picture without background circularly, and the color is changing constantly.
   * @param x 0 Set the starting point to be at the upper left of the screen, near the left side
   * @param y 0 Near the upper side
   * @param bitmap gImage_Bitmap The array in the header file Bitmap, the array elements are single bytes
   * @param w 240 Picture width
   * @param h 240 Picture height
   * @param color i Set the black image part to bluish color
   */
  for (int16_t i = 0x00ff; ; i+=0x3300) {
    screen.drawBitmap(/*x=*/(screen.width()-240)/2,/*y=*/(screen.height()-240)/2,/*bitmap gImage_Bitmap=*/gImage_Bitmap,/*w=*/240,/*h=*/240,/*color=*/i);
  }
  //screen.drawGrayscaleBitmap(0,0,gImage_GrayscaleBitmap,240,240);//Draw grayscale image, not supported by this screen
  //screen.drawGrayscaleBitmap(0,0,gImage_GrayscaleBitmap,gImage_mask,240,240);//Draw grayscale image with mask, not supported by this screen
}
由于对arduino并不是很精通,里面一些代码还不太会修改,只能借花献佛了。
最后结果是一个动态了图像。截了一个图展示一下。
如法炮制,DFRobot_GDL-master里的示例都尝试了一遍。都成功啦!
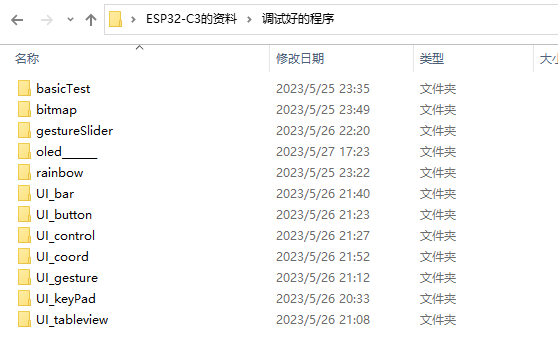
我会放到附件里供大家参考。
展示一下UI_keyPad的效果
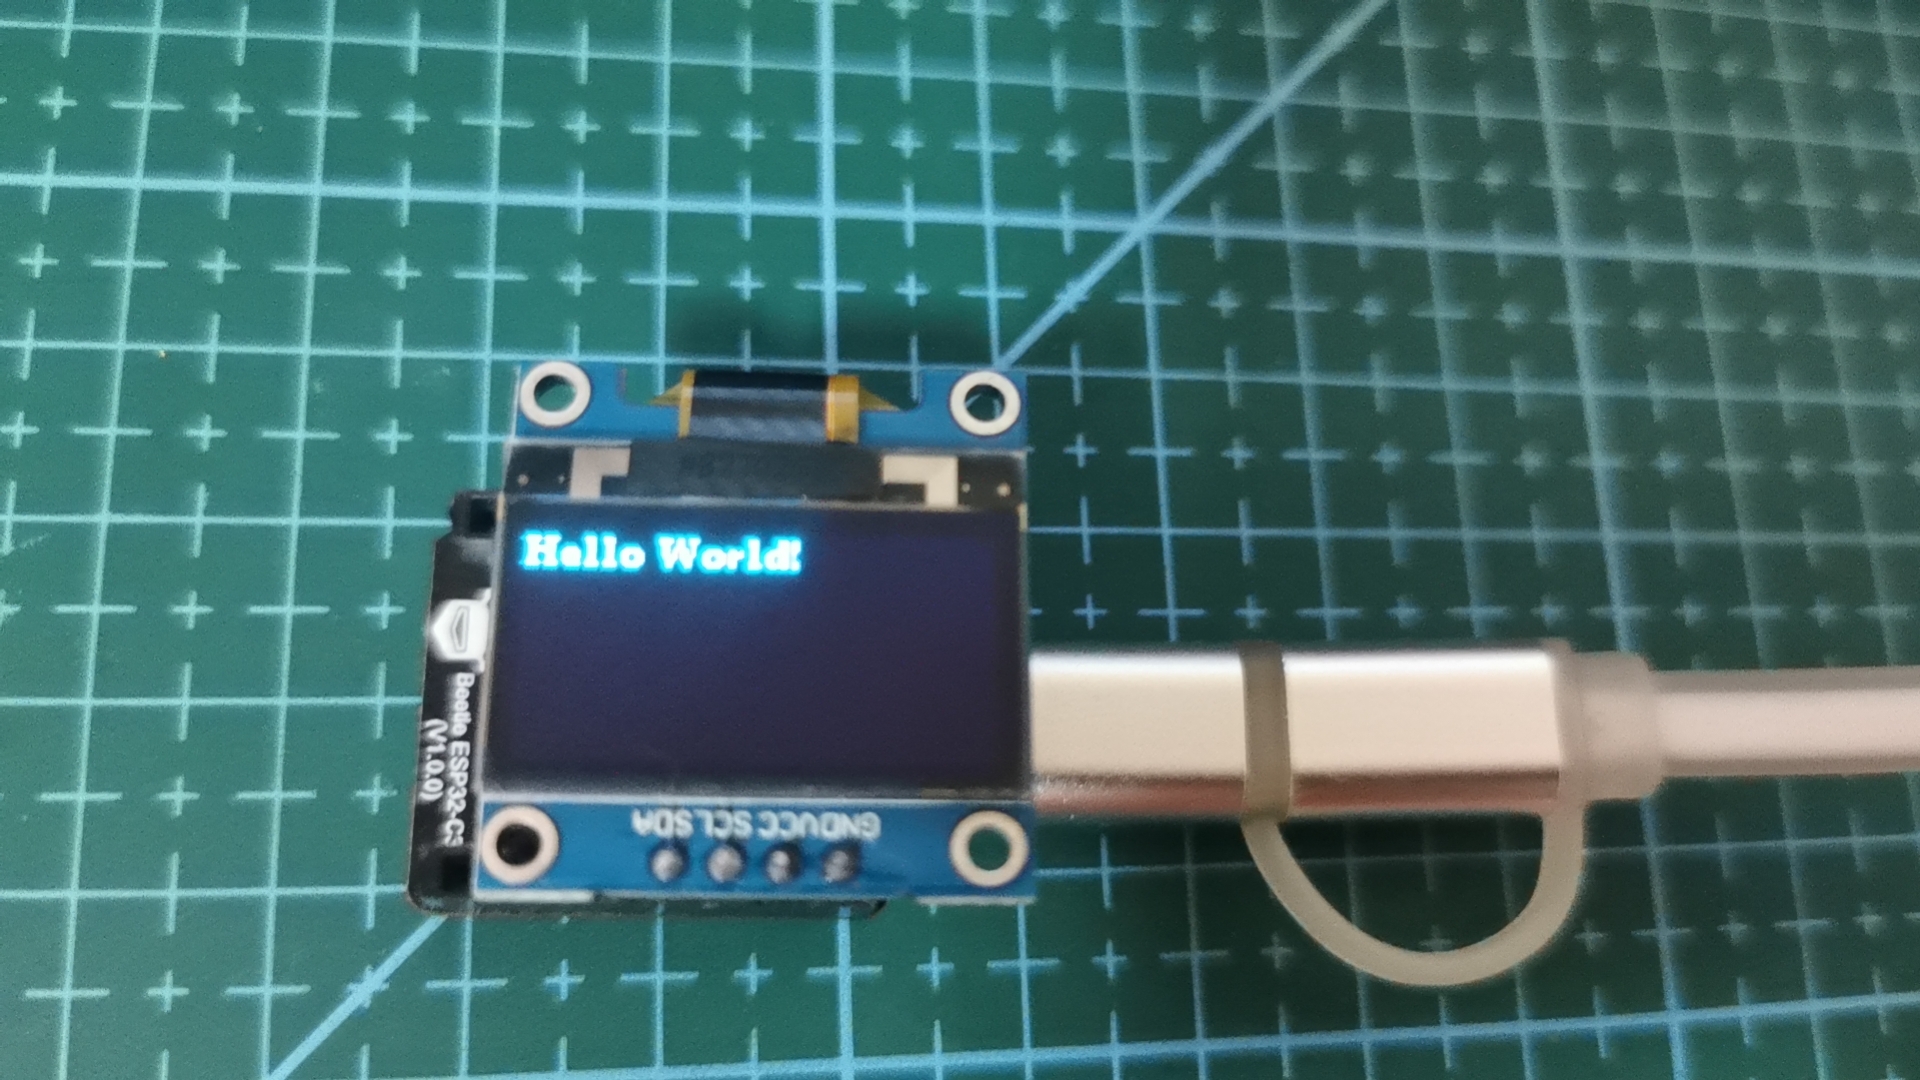
#include <U8g2lib.h>

#define OLED_SDA 1
#define OLED_SCL 0

U8G2_SSD1306_128X64_NONAME_F_SW_I2C u8g2(U8G2_R2,  OLED_SCL, OLED_SDA, U8X8_PIN_NONE);

void setup(void) {
  u8g2.begin();
}

void loop(void) {
  u8g2.clearBuffer();
  u8g2.setFont(u8g2_font_ncenB08_tr);
  u8g2.drawStr(0,10,"Hello World!");
  u8g2.sendBuffer();
  delay(1000);
}
代码中U8g2lib.h的库又一次难到我了。于是在群里求助。A瓦欧机器人——计老师,给我发来一个链接,并耐心指导。居然成功了。
学习一个新的编程,总是从Hello World!开始。在这个活动中,经历了无数次的失败,终于在截稿的前一天完成。随没有达到预期效果,总归是完成了作业。为什么一直用鳄鱼这个网名,也正是因为它有着锲而不舍的精神。
其实还有第四个项目就是物联网,看了很多相关的资料,还是没有弄好。欠缺的知识还很多,也是之后研究的方向了。
上面是oled的库,下面是3.5寸的库,最后一个附件是调试好的程序。希望能帮到大家
附件
最后特别鸣谢:
粒子姐姐、米菲爸爸、瓦欧机器人-计老师、Power Lin、风隐、哑、李隆、豆爸、sky、Mr.X
还有帮我焊接的田志超同学。


 他的勋章
他的勋章


花生编程2023.07.28
赞赞赞
花生编程2023.07.28
厉害
三春牛-创客2023.07.25
赞赞赞
三春牛-创客2023.07.25
不错