 返回首页
返回首页
 回到顶部
回到顶部

本文将详细介绍如何使用ESP32-C5微控制器结合行空板K10打造一个智能语音控制的LED灯光系统。通过小智AI的MCP服务,我们可以实现语音控制单个灯、所有灯的开关和颜色,以及五种炫酷的灯光效果。
【项目概述】
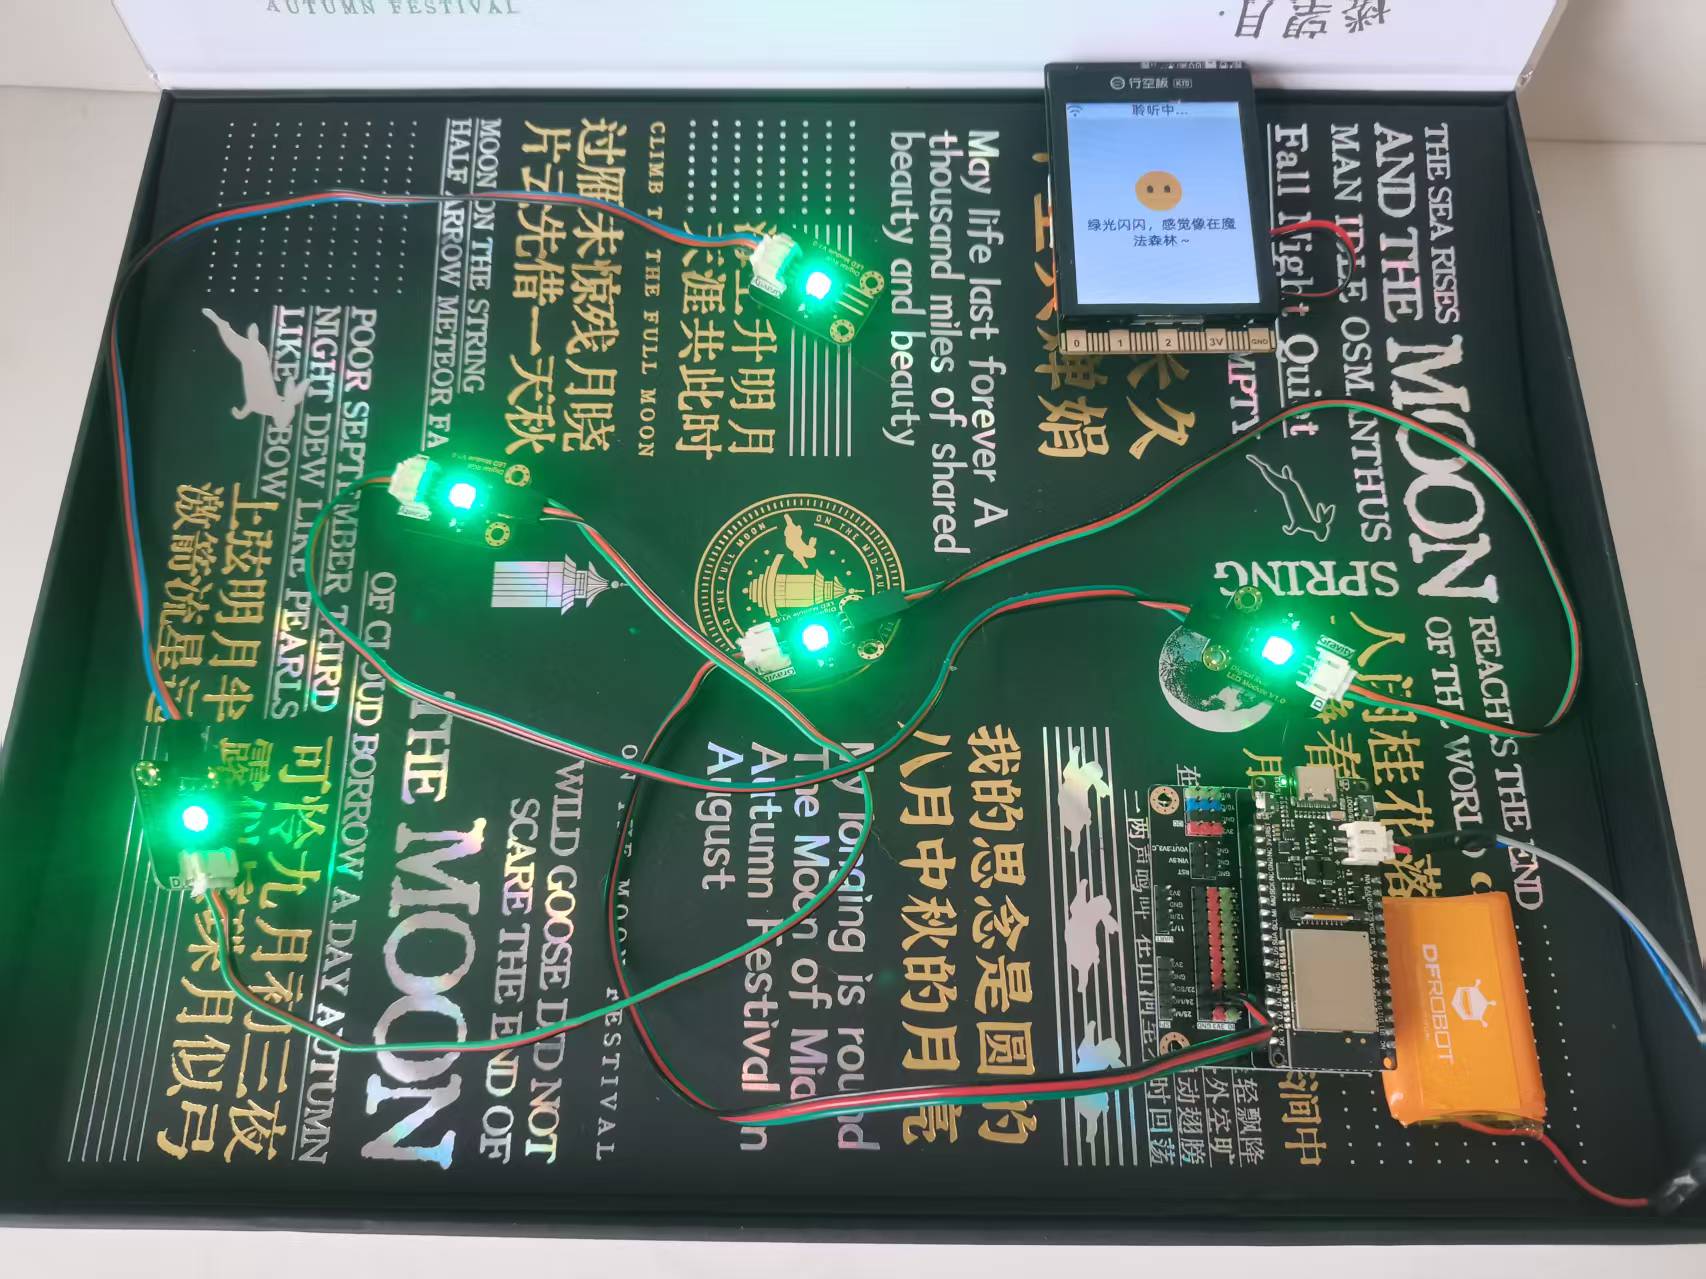
本项目基于ESP32-C5微控制器和行空板K10,结合小智AI的MCP(Model Context Protocol)服务,创建一个能够通过语音控制的智能LED灯光系统。ESP32-C5负责控制LED灯带,而行空板K10则作为小智AI的交互终端,接收语音指令并通过MCP协议传递给ESP32-C5。
【系统架构】
行空板K10:刷入小智AI固件,作为语音交互终端
ESP32-C5:通过Wi-Fi连接MCP服务,控制LED灯带
MCP服务:作为桥梁,连接小智AI和ESP32-C5设备
LED灯带:使用NeoPixel灯带,连接至ESP32-C5的引脚3
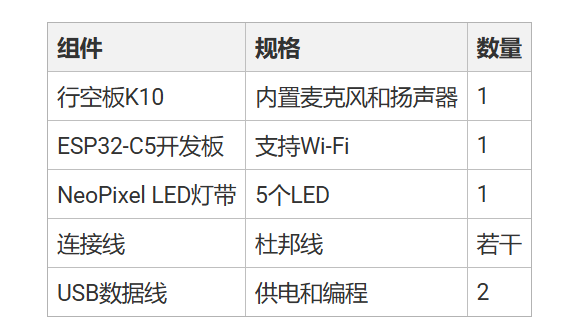
【硬件准备】
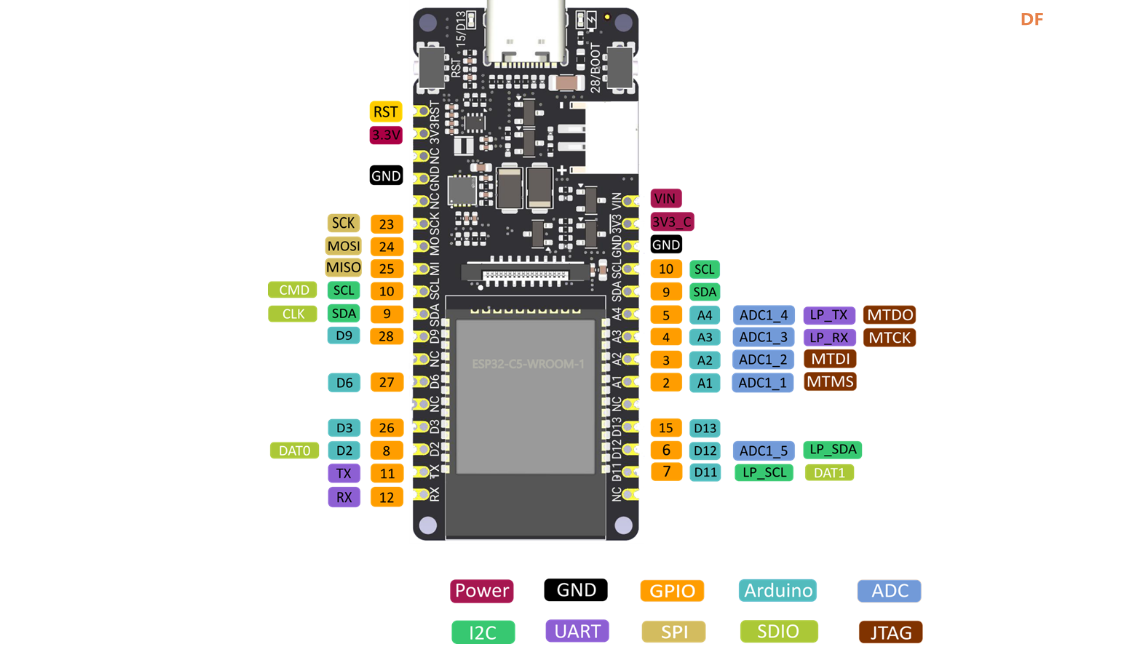
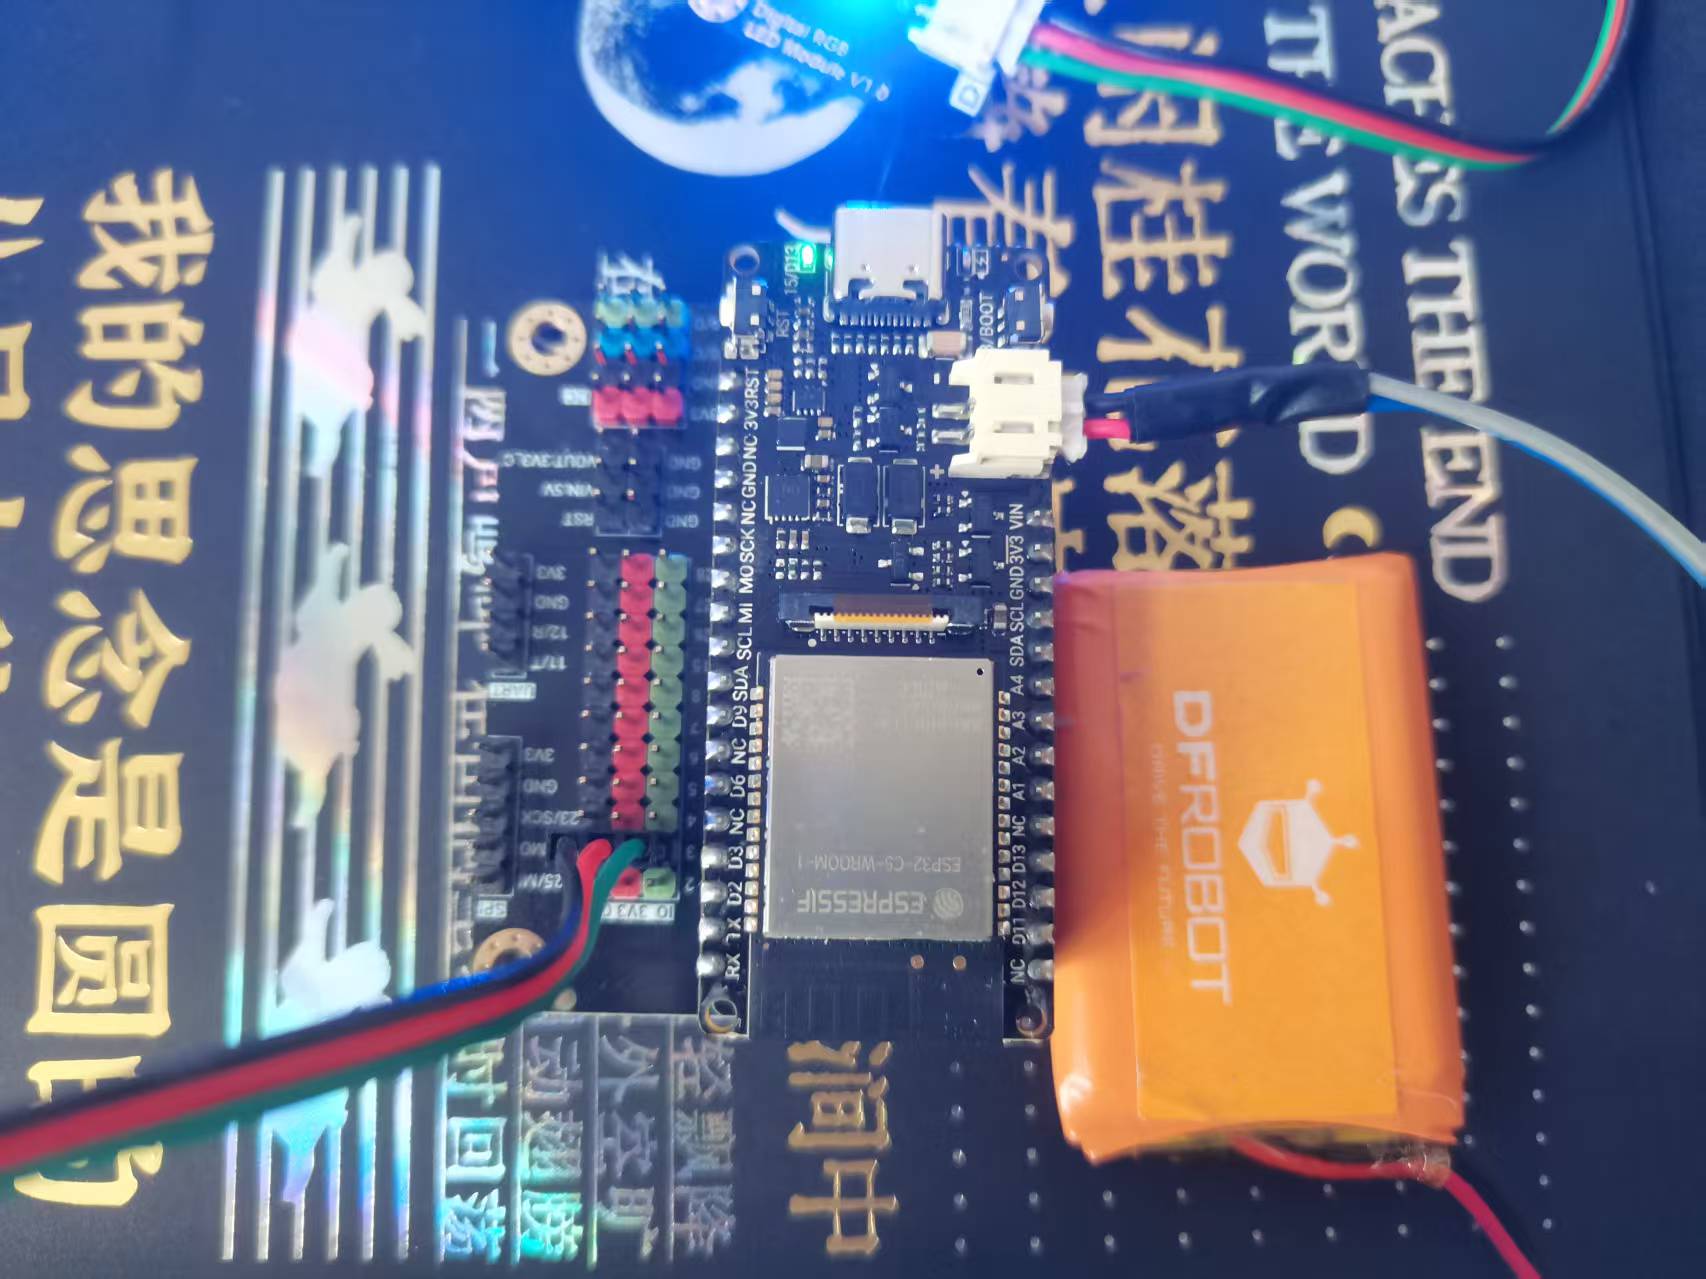
【硬件连接】
将NeoPixel LED灯带的数据输入引脚连接到ESP32-C5的GPIO 3,VCC连接至3.3V,GND连接至GND。行空板K10通过USB连接至电脑进行固件烧录。
【软件配置】
1. 行空板K10小智AI固件安装
下载固件:从小智AI的GitHub仓库下载最新的K10固件
烧录工具:使用Espressif的flash_download_tool工具
烧录步骤:
连接K10至电脑
打开烧录工具,选择对应的串口
加载固件文件,开始烧录
烧录完成后重启设备
配网设置:
手机连接K10热点(名称以"xiaozhi"开头)
浏览器打开192.168.4.1,配置Wi-Fi连接
只支持2.4GHz Wi-Fi网络
绑定设备:
唤醒小智AI(说"你好,小智")
获取设备码,在小智AI平台添加设备
配置角色和音色设置
2. Arduino IDE环境配置
安装Arduino IDE 2.3.6
添加ESP32-C5支持:
打开首选项,添加开发板管理器网址(http://172.104.52.16/package_esp32_dev_index_cn.json)
安装ESP32开发板支持包(搜索ESP32,点击安装3.3.0-alpha1)
选择ESP32-C5开发板
安装所需库:
Adafruit NeoPixel库
WebSocketMCP库(xiaozhi-mcp)
ArduinoJson库
【代码实现】
以下是完整的ESP32-C5代码实现,实现与MCP服务的连接和LED控制功能:
#include <WiFi.h>
#include <WebSocketMCP.h>
#include <ArduinoJson.h>
#include <Adafruit_NeoPixel.h>

#define PIN 3
#define NUMPIXELS 5
Adafruit_NeoPixel pixels(NUMPIXELS, PIN, NEO_GRB + NEO_KHZ800);

// WiFi配置
const char* ssid = "你的WiFi名称";
const char* password = "你的WiFi密码";

// MCP服务器配置
const char* mcpEndpoint = "wss://api.xiaozhi.me/mcp/?token=你的令牌";

// 创建MCP客户端实例
WebSocketMCP mcpClient;

// 效果控制变量
int currentEffect = 0;
unsigned long previousMillis = 0;
int effectPosition = 0;
String currentColor = "0,255,0"; // 默认绿色

// 连接状态回调函数
void onConnectionStatus(bool connected) {
  if (connected) {
    Serial.println("[MCP] 已连接到服务器");
    registerMcpTools(); // 连接成功后注册工具
  } else {
    Serial.println("[MCP] 与服务器断开连接");
  }
}

void setup() {
  Serial.begin(115200);
  pixels.begin();
  pixels.show(); // 初始化时关闭所有灯

  // 连接WiFi
  WiFi.begin(ssid, password);
  while (WiFi.status() != WL_CONNECTED) {
    delay(500);
    Serial.print(".");
  }
  Serial.println("WiFi已连接");

  // 初始化MCP客户端
  mcpClient.begin(mcpEndpoint, onConnectionStatus);
}

void loop() {
  mcpClient.loop(); // 处理MCP客户端事件

  // 根据当前效果执行动画
  switch(currentEffect) {
    case 0: // 无效果 - 静态显示
      break;
    case 1: // 流水灯效果
      runningLights();
      break;
    case 2: // 呼吸灯效果
      breathingEffect();
      break;
    case 3: // 彩虹效果
      rainbowCycle();
      break;
    case 4: // 警车灯效果
      policeLights();
      break;
    case 5: // 颜色渐变效果
      colorFade();
      break;
  }

  delay(10);
}
MCP工具注册
// 注册MCP工具
void registerMcpTools() {
  // 工具1: 控制单个灯
  mcpClient.registerTool(
    "neopixel_single",
    "控制单个LED灯,参数:灯号(0-4),红色(0-255),绿色(0-255),蓝色(0-255),例如:设置第2个灯为红色",
    "{\"type\":\"object\",\"properties\":{\"pixel\":{\"type\":\"number\",\"minimum\":0,\"maximum\":4},\"red\":{\"type\":\"number\",\"minimum\":0,\"maximum\":255},\"green\":{\"type\":\"number\",\"minimum\":0,\"maximum\":255},\"blue\":{\"type\":\"number\",\"minimum\":0,\"maximum\":255}},\"required\":[\"pixel\",\"red\",\"green\",\"blue\"]}",
    [](const String& args) {
      DynamicJsonDocument doc(256);
      deserializeJson(doc, args);
      int pixel = doc["pixel"];
      int red = doc["red"];
      int green = doc["green"];
      int blue = doc["blue"];

      if (pixel >= 0 && pixel < NUMPIXELS) {
        pixels.setPixelColor(pixel, pixels.Color(red, green, blue));
        pixels.show();
        currentEffect = 0; // 切换到静态模式

        String response = "设置灯" + String(pixel) + "为颜色(R:" + String(red) + ",G:" + String(green) + ",B:" + String(blue) + ")";
        return WebSocketMCP::ToolResponse("{\"success\":true,\"message\":\"" + response + "\"}");
      } else {
        return WebSocketMCP::ToolResponse("{\"success\":false,\"message\":\"灯号无效,请输入0-4\"}");
      }
    }
  );

  // 工具2: 控制所有灯
  mcpClient.registerTool(
    "neopixel_all",
    "控制所有LED灯,参数:红色(0-255),绿色(0-255),蓝色(0-255),例如:设置所有灯为蓝色",
    "{\"type\":\"object\",\"properties\":{\"red\":{\"type\":\"number\",\"minimum\":0,\"maximum\":255},\"green\":{\"type\":\"number\",\"minimum\":0,\"maximum\":255},\"blue\":{\"type\":\"number\",\"minimum\":0,\"maximum\":255}},\"required\":[\"red\",\"green\",\"blue\"]}",
    [](const String& args) {
      DynamicJsonDocument doc(256);
      deserializeJson(doc, args);
      int red = doc["red"];
      int green = doc["green"];
      int blue = doc["blue"];

      for(int i = 0; i < NUMPIXELS; i++) {
        pixels.setPixelColor(i, pixels.Color(red, green, blue));
      }
      pixels.show();
      currentEffect = 0; // 切换到静态模式
      currentColor = String(red) + "," + String(green) + "," + String(blue);

      String response = "设置所有灯为颜色(R:" + String(red) + ",G:" + String(green) + ",B:" + String(blue) + ")";
      return WebSocketMCP::ToolResponse("{\"success\":true,\"message\":\"" + response + "\"}");
    }
  );

  // 工具3: 灯光效果
  mcpClient.registerTool(
    "neopixel_effect",
    "设置LED灯光效果,参数:效果类型(流水灯、呼吸灯、彩虹灯、警车灯、颜色渐变、关闭效果)",
    "{\"type\":\"object\",\"properties\":{\"effect\":{\"type\":\"string\",\"enum\":[\"流水灯\",\"呼吸灯\",\"彩虹灯\",\"警车灯\",\"颜色渐变\",\"关闭效果\"]}},\"required\":[\"effect\"]}",
    [](const String& args) {
      DynamicJsonDocument doc(256);
      deserializeJson(doc, args);
      String effect = doc["effect"];

      if (effect == "流水灯") {
        currentEffect = 1;
        effectPosition = 0;
      } else if (effect == "呼吸灯") {
        currentEffect = 2;
      } else if (effect == "彩虹灯") {
        currentEffect = 3;
        effectPosition = 0;
      } else if (effect == "警车灯") {
        currentEffect = 4;
        effectPosition = 0;
      } else if (effect == "颜色渐变") {
        currentEffect = 5;
        effectPosition = 0;
      } else if (effect == "关闭效果") {
        currentEffect = 0;
      }

      return WebSocketMCP::ToolResponse("{\"success\":true,\"message\":\"已切换到效果:" + effect + "\"}");
    }
  );

  Serial.println("[MCP] NeoPixel控制工具已注册");
}
灯光效果实现
以下是五种灯光效果的具体实现代码:
// 流水灯效果
void runningLights() {
  unsigned long currentMillis = millis();
  if (currentMillis - previousMillis >= 150) {
    previousMillis = currentMillis;

    // 清除所有灯
    for(int i = 0; i < NUMPIXELS; i++) {
      pixels.setPixelColor(i, pixels.Color(0, 0, 0));
    }

    // 设置当前灯和下一个灯
    int current = effectPosition % NUMPIXELS;
    int next = (effectPosition + 1) % NUMPIXELS;

    pixels.setPixelColor(current, pixels.Color(0, 150, 0));     // 主灯绿色
    pixels.setPixelColor(next, pixels.Color(0, 50, 0));         // 下一个灯暗绿色

    pixels.show();
    effectPosition = (effectPosition + 1) % NUMPIXELS;
  }
}

// 呼吸灯效果
void breathingEffect() {
  unsigned long currentMillis = millis();
  if (currentMillis - previousMillis >= 20) {
    previousMillis = currentMillis;

    // 使用正弦波计算亮度
    float breath = (exp(sin(millis()/2000.0*PI)) - 0.36787944)*108.0;
    uint32_t color = pixels.Color(0, breath, 0); // 绿色呼吸

    for(int i = 0; i < NUMPIXELS; i++) {
      pixels.setPixelColor(i, color);
    }
    pixels.show();
  }
}

// 彩虹效果
void rainbowCycle() {
  unsigned long currentMillis = millis();
  if (currentMillis - previousMillis >= 100) {
    previousMillis = currentMillis;

    for(int i = 0; i < NUMPIXELS; i++) {
      // 计算每个灯的颜色
      int hue = (effectPosition * 256 / NUMPIXELS) + (i * 256 / NUMPIXELS);
      uint32_t color = wheel(hue & 255);
      pixels.setPixelColor(i, color);
    }
    pixels.show();
    effectPosition = (effectPosition + 1) % 256;
  }
}

// 警车灯效果
void policeLights() {
  unsigned long currentMillis = millis();
  if (currentMillis - previousMillis >= 300) {
    previousMillis = currentMillis;

    if (effectPosition == 0) {
      // 红色闪烁
      for(int i = 0; i < NUMPIXELS; i++) {
        pixels.setPixelColor(i, pixels.Color(255, 0, 0));
      }
      effectPosition = 1;
    } else {
      // 蓝色闪烁
      for(int i = 0; i < NUMPIXELS; i++) {
        pixels.setPixelColor(i, pixels.Color(0, 0, 255));
      }
      effectPosition = 0;
    }
    pixels.show();
  }
}

// 颜色渐变效果
void colorFade() {
  unsigned long currentMillis = millis();
  if (currentMillis - previousMillis >= 100) {
    previousMillis = currentMillis;

    // 在多个颜色间渐变
    uint32_t colors[] = {
      pixels.Color(255, 0, 0),    // 红
      pixels.Color(255, 255, 0),  // 黄
      pixels.Color(0, 255, 0),    // 绿
      pixels.Color(0, 255, 255),  // 青
      pixels.Color(0, 0, 255),    // 蓝
      pixels.Color(255, 0, 255)   // 紫
    };
    int numColors = 6;

    int currentColor = (effectPosition / 50) % numColors;
    int nextColor = (currentColor + 1) % numColors;
    float blendRatio = (effectPosition % 50) / 50.0;

    uint32_t blended = colorBlend(colors[currentColor], colors[nextColor], blendRatio);

    for(int i = 0; i < NUMPIXELS; i++) {
      pixels.setPixelColor(i, blended);
    }
    pixels.show();

    effectPosition = (effectPosition + 1) % (50 * numColors);
  }
}

// 生成彩虹色轮
uint32_t wheel(byte WheelPos) {
  WheelPos = 255 - WheelPos;
  if(WheelPos < 85) {
    return pixels.Color(255 - WheelPos * 3, 0, WheelPos * 3);
  }
  if(WheelPos < 170) {
    WheelPos -= 85;
    return pixels.Color(0, WheelPos * 3, 255 - WheelPos * 3);
  }
  WheelPos -= 170;
  return pixels.Color(WheelPos * 3, 255 - WheelPos * 3, 0);
}

// 颜色混合函数
uint32_t colorBlend(uint32_t color1, uint32_t color2, float ratio) {
  int r1 = (color1 >> 16) & 0xFF;
  int g1 = (color1 >> 8) & 0xFF;
  int b1 = color1 & 0xFF;

  int r2 = (color2 >> 16) & 0xFF;
  int g2 = (color2 >> 8) & 0xFF;
  int b2 = color2 & 0xFF;

  int r = r1 + (r2 - r1) * ratio;
  int g = g1 + (g2 - g1) * ratio;
  int b = b1 + (b2 - b1) * ratio;

  return pixels.Color(r, g, b);
}
【功能说明】
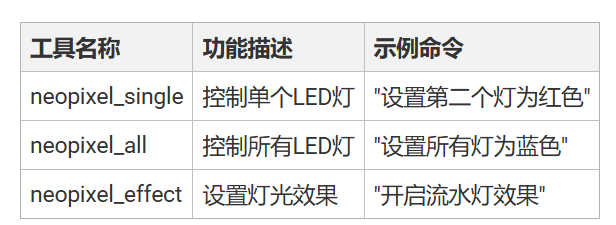
MCP工具功能
下表列出了通过小智AI可用的语音命令功能:

【灯光效果说明】
流水灯 - 绿色灯光在LED间流动,营造动态效果
呼吸灯 - LED亮度平滑变化,创造柔和氛围
彩虹灯 - 彩虹色彩循环变化,绚丽多彩
警车灯 - 红蓝交替闪烁,警示效果
颜色渐变 - 多种颜色平滑过渡,视觉享受
使用指南
语音控制示例
基本控制:
"设置第一个灯为红色"
"设置所有灯为蓝色"
"关闭所有灯"
效果控制:
"开启流水灯效果"
"切换到呼吸灯模式"
"关闭灯光效果"
调试技巧
检查连接状态:通过串口监视器查看MCP连接状态
错误处理:代码中包含错误响应机制,会返回具体错误信息-6
网络要求:确保ESP32-C5和行空板K10在同一网络下
项目优化与扩展
本项目可以进一步扩展和优化:
增加更多灯光效果:可以添加闪烁、追逐等更多效果
集成传感器:添加光敏传感器实现自动亮度调节-4
场景模式:根据时间或事件设置不同的灯光场景
多设备协同:控制多个ESP32设备,实现全屋灯光控制
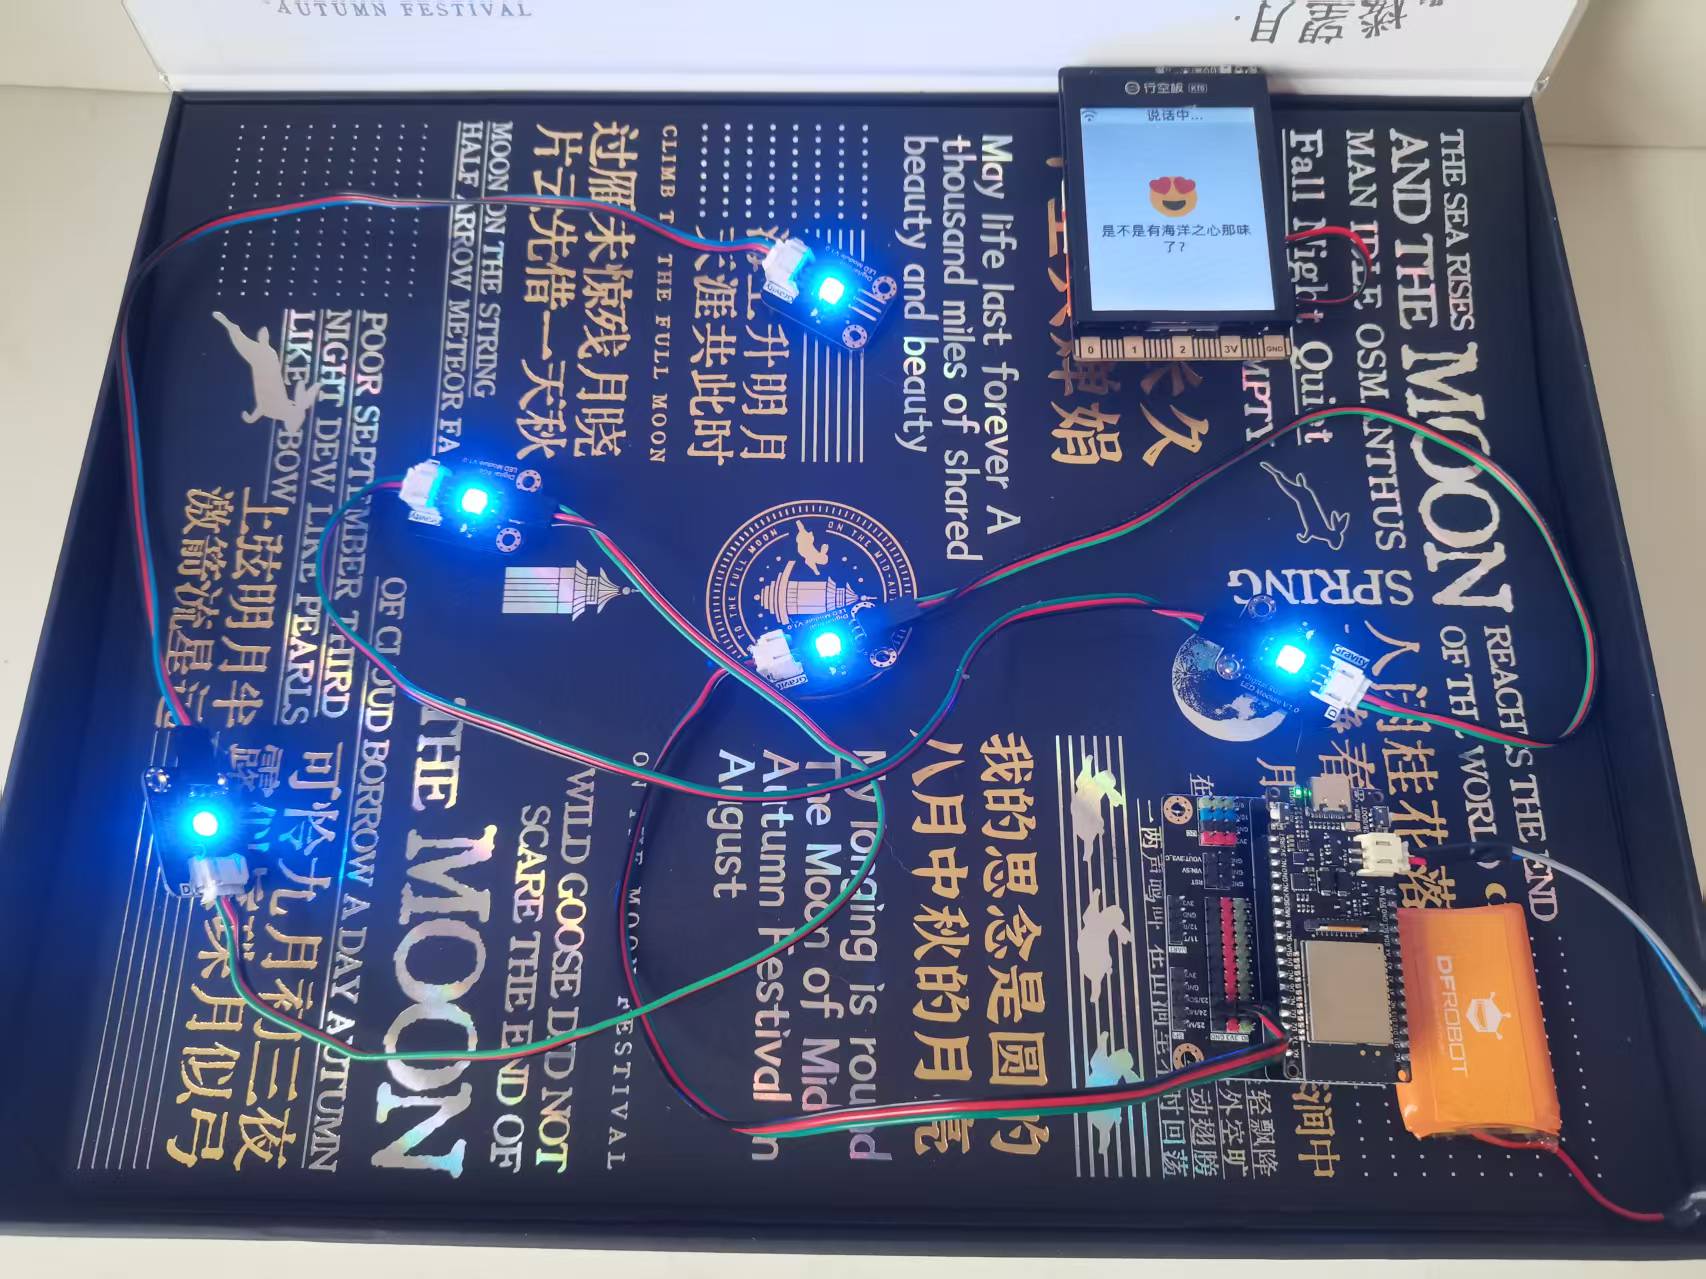
【结语】
本项目展示了如何将ESP32-C5与行空板K10结合,通过小智AI的MCP服务实现智能语音控制的LED灯光系统。这种硬件与AI的结合,体现了现代物联网技术的发展趋势,也为智能家居控制提供了实用的解决方案


 他的勋章
他的勋章
云天2025.10.10
#include <WiFi.h> #include <WebSocketMCP.h> #include <ArduinoJson.h> #include <Adafruit_NeoPixel.h> #define PIN 3 #define NUMPIXELS 5 Adafruit_NeoPixel pixels(NUMPIXELS, PIN, NEO_GRB + NEO_KHZ800); // WiFi配置 const char* ssid = "*****"; const char* password = "******"; // MCP服务器配置 const char* mcpEndpoint = "wss://api.xiaozhi.me/mcp/?token=******************"; // 创建MCP客户端实例 WebSocketMCP mcpClient; // 效果控制变量 int currentEffect = 0; unsigned long previousMillis = 0; int effectPosition = 0; String currentColor = "0,255,0"; // 默认绿色 // 连接状态回调函数 void onConnectionStatus(bool connected) { if (connected) { Serial.println("[MCP] 已连接到服务器"); registerMcpTools(); // 连接成功后注册工具 } else { Serial.println("[MCP] 与服务器断开连接"); } } void setup() { Serial.begin(115200); pixels.begin(); pixels.show(); // 初始化时关闭所有灯 // 连接WiFi WiFi.begin(ssid, password); while (WiFi.status() != WL_CONNECTED) { delay(500); Serial.print("."); } Serial.println("WiFi已连接"); // 初始化MCP客户端 mcpClient.begin(mcpEndpoint, onConnectionStatus); } void loop() { mcpClient.loop(); // 处理MCP客户端事件 // 根据当前效果执行动画 switch(currentEffect) { case 0: // 无效果 - 静态显示 break; case 1: // 流水灯效果 runningLights(); break; case 2: // 呼吸灯效果 breathingEffect(); break; case 3: // 彩虹效果 rainbowCycle(); break; case 4: // 警车灯效果 policeLights(); break; case 5: // 颜色渐变效果 colorFade(); break; } delay(10); } // 注册MCP工具 void registerMcpTools() { // 工具1: 控制单个灯 mcpClient.registerTool( "neopixel_single", "控制单个LED灯,参数:灯号(0-4),红色(0-255),绿色(0-255),蓝色(0-255),例如:设置第2个灯为红色", "{\"type\":\"object\",\"properties\":{\"pixel\":{\"type\":\"number\",\"minimum\":0,\"maximum\":4},\"red\":{\"type\":\"number\",\"minimum\":0,\"maximum\":255},\"green\":{\"type\":\"number\",\"minimum\":0,\"maximum\":255},\"blue\":{\"type\":\"number\",\"minimum\":0,\"maximum\":255}},\"required\":[\"pixel\",\"red\",\"green\",\"blue\"]}", [](const String& args) { DynamicJsonDocument doc(256); deserializeJson(doc, args); int pixel = doc["pixel"]; int red = doc["red"]; int green = doc["green"]; int blue = doc["blue"]; if (pixel >= 0 && pixel < NUMPIXELS) { pixels.setPixelColor(pixel, pixels.Color(red, green, blue)); pixels.show(); currentEffect = 0; // 切换到静态模式 String response = "设置灯" + String(pixel) + "为颜色(R:" + String(red) + ",G:" + String(green) + ",B:" + String(blue) + ")"; return WebSocketMCP::ToolResponse("{\"success\":true,\"message\":\"" + response + "\"}"); } else { return WebSocketMCP::ToolResponse("{\"success\":false,\"message\":\"灯号无效,请输入0-4\"}"); } } ); // 工具2: 控制所有灯 mcpClient.registerTool( "neopixel_all", "控制所有LED灯,参数:红色(0-255),绿色(0-255),蓝色(0-255),例如:设置所有灯为蓝色", "{\"type\":\"object\",\"properties\":{\"red\":{\"type\":\"number\",\"minimum\":0,\"maximum\":255},\"green\":{\"type\":\"number\",\"minimum\":0,\"maximum\":255},\"blue\":{\"type\":\"number\",\"minimum\":0,\"maximum\":255}},\"required\":[\"red\",\"green\",\"blue\"]}", [](const String& args) { DynamicJsonDocument doc(256); deserializeJson(doc, args); int red = doc["red"]; int green = doc["green"]; int blue = doc["blue"]; for(int i = 0; i < NUMPIXELS; i++) { pixels.setPixelColor(i, pixels.Color(red, green, blue)); } pixels.show(); currentEffect = 0; // 切换到静态模式 currentColor = String(red) + "," + String(green) + "," + String(blue); String response = "设置所有灯为颜色(R:" + String(red) + ",G:" + String(green) + ",B:" + String(blue) + ")"; return WebSocketMCP::ToolResponse("{\"success\":true,\"message\":\"" + response + "\"}"); } ); // 工具3: 开关控制 mcpClient.registerTool( "neopixel_switch", "开关所有LED灯,参数:状态(开灯、关灯)", "{\"type\":\"object\",\"properties\":{\"state\":{\"type\":\"string\",\"enum\":[\"开灯\",\"关灯\"]}},\"required\":[\"state\"]}", [](const String& args) { DynamicJsonDocument doc(256); deserializeJson(doc, args); String state = doc["state"]; if (state == "开灯") { // 使用当前颜色或默认绿色开灯 int red, green, blue; sscanf(currentColor.c_str(), "%d,%d,%d", &red, &green, &blue); for(int i = 0; i < NUMPIXELS; i++) { pixels.setPixelColor(i, pixels.Color(red, green, blue)); } pixels.show(); currentEffect = 0; return WebSocketMCP::ToolResponse("{\"success\":true,\"message\":\"已开灯\"}"); } else if (state == "关灯") { pixels.clear(); pixels.show(); currentEffect = 0; return WebSocketMCP::ToolResponse("{\"success\":true,\"message\":\"已关灯\"}"); } return WebSocketMCP::ToolResponse("{\"success\":false,\"message\":\"参数错误\"}"); } ); // 工具4: 灯光效果 mcpClient.registerTool( "neopixel_effect", "设置LED灯光效果,参数:效果类型(流水灯、呼吸灯、彩虹灯、警车灯、颜色渐变、关闭效果)", "{\"type\":\"object\",\"properties\":{\"effect\":{\"type\":\"string\",\"enum\":[\"流水灯\",\"呼吸灯\",\"彩虹灯\",\"警车灯\",\"颜色渐变\",\"关闭效果\"]}},\"required\":[\"effect\"]}", [](const String& args) { DynamicJsonDocument doc(256); deserializeJson(doc, args); String effect = doc["effect"]; if (effect == "流水灯") { currentEffect = 1; effectPosition = 0; } else if (effect == "呼吸灯") { currentEffect = 2; } else if (effect == "彩虹灯") { currentEffect = 3; effectPosition = 0; } else if (effect == "警车灯") { currentEffect = 4; effectPosition = 0; } else if (effect == "颜色渐变") { currentEffect = 5; effectPosition = 0; } else if (effect == "关闭效果") { currentEffect = 0; } return WebSocketMCP::ToolResponse("{\"success\":true,\"message\":\"已切换到效果:" + effect + "\"}"); } ); Serial.println("[MCP] NeoPixel控制工具已注册"); } // ========== 灯光效果函数 ========== // 流水灯效果 void runningLights() { unsigned long currentMillis = millis(); if (currentMillis - previousMillis >= 150) { previousMillis = currentMillis; // 清除所有灯 for(int i = 0; i < NUMPIXELS; i++) { pixels.setPixelColor(i, pixels.Color(0, 0, 0)); } // 设置当前灯和下一个灯 int current = effectPosition % NUMPIXELS; int next = (effectPosition + 1) % NUMPIXELS; pixels.setPixelColor(current, pixels.Color(0, 150, 0)); // 主灯绿色 pixels.setPixelColor(next, pixels.Color(0, 50, 0)); // 下一个灯暗绿色 pixels.show(); effectPosition = (effectPosition + 1) % NUMPIXELS; } } // 呼吸灯效果 void breathingEffect() { unsigned long currentMillis = millis(); if (currentMillis - previousMillis >= 20) { previousMillis = currentMillis; // 使用正弦波计算亮度 float breath = (exp(sin(millis()/2000.0*PI)) - 0.36787944)*108.0; uint32_t color = pixels.Color(0, breath, 0); // 绿色呼吸 for(int i = 0; i < NUMPIXELS; i++) { pixels.setPixelColor(i, color); } pixels.show(); } } // 彩虹效果 void rainbowCycle() { unsigned long currentMillis = millis(); if (currentMillis - previousMillis >= 100) { previousMillis = currentMillis; for(int i = 0; i < NUMPIXELS; i++) { // 计算每个灯的颜色 int hue = (effectPosition * 256 / NUMPIXELS) + (i * 256 / NUMPIXELS); uint32_t color = wheel(hue & 255); pixels.setPixelColor(i, color); } pixels.show(); effectPosition = (effectPosition + 1) % 256; } } // 警车灯效果 void policeLights() { unsigned long currentMillis = millis(); if (currentMillis - previousMillis >= 300) { previousMillis = currentMillis; if (effectPosition == 0) { // 红色闪烁 for(int i = 0; i < NUMPIXELS; i++) { pixels.setPixelColor(i, pixels.Color(255, 0, 0)); } effectPosition = 1; } else { // 蓝色闪烁 for(int i = 0; i < NUMPIXELS; i++) { pixels.setPixelColor(i, pixels.Color(0, 0, 255)); } effectPosition = 0; } pixels.show(); } } // 颜色渐变效果 void colorFade() { unsigned long currentMillis = millis(); if (currentMillis - previousMillis >= 100) { previousMillis = currentMillis; // 在多个颜色间渐变 uint32_t colors[] = { pixels.Color(255, 0, 0), // 红 pixels.Color(255, 255, 0), // 黄 pixels.Color(0, 255, 0), // 绿 pixels.Color(0, 255, 255), // 青 pixels.Color(0, 0, 255), // 蓝 pixels.Color(255, 0, 255) // 紫 }; int numColors = 6; int currentColor = (effectPosition / 50) % numColors; int nextColor = (currentColor + 1) % numColors; float blendRatio = (effectPosition % 50) / 50.0; uint32_t blended = colorBlend(colors[currentColor], colors[nextColor], blendRatio); for(int i = 0; i < NUMPIXELS; i++) { pixels.setPixelColor(i, blended); } pixels.show(); effectPosition = (effectPosition + 1) % (50 * numColors); } } // ========== 辅助函数 ========== // 生成彩虹色轮 uint32_t wheel(byte WheelPos) { WheelPos = 255 - WheelPos; if(WheelPos < 85) { return pixels.Color(255 - WheelPos * 3, 0, WheelPos * 3); } if(WheelPos < 170) { WheelPos -= 85; return pixels.Color(0, WheelPos * 3, 255 - WheelPos * 3); } WheelPos -= 170; return pixels.Color(WheelPos * 3, 255 - WheelPos * 3, 0); } // 颜色混合函数 uint32_t colorBlend(uint32_t color1, uint32_t color2, float ratio) { int r1 = (color1 >> 16) & 0xFF; int g1 = (color1 >> 8) & 0xFF; int b1 = color1 & 0xFF; int r2 = (color2 >> 16) & 0xFF; int g2 = (color2 >> 8) & 0xFF; int b2 = color2 & 0xFF; int r = r1 + (r2 - r1) * ratio; int g = g1 + (g2 - g1) * ratio; int b = b1 + (b2 - b1) * ratio; return pixels.Color(r, g, b); }