 返回首页
返回首页
 回到顶部
回到顶部

项目背景:
随着STEM(科学、技术、工程和数学)教育的兴起,越来越多的教育工作者开始寻找能够激发学生兴趣、培养创新能力和实践能力的项目。氛围灯作为一种结合灯光艺术与电子技术的产品,不仅能够提升学生的动手能力,还能帮助他们理解光学、电子学及编程等基础知识。本项目旨在利用行空版K10和树莓派开发一系列氛围灯控制系统案例。通过本文可以学习如何搭建自己的MQTT服务器并实现和行空板k10的通讯。
项目主要硬件:
行空板k10
树莓派3B+(或其他linux主机)
一、树莓派3B上的操作
1、 搭建MQTT broker
Mosquitto是一款开源的消息代理软件,支持MQTT协议,实现了可发布/可订阅的消息推送模式。它轻量级、跨平台,支持QoS等级、TLS/SSL加密及认证授权,适用于物联网设备通信,如智能家居、工业自动化等领域。
安装mosquitto指令
sudo apt-get install mosquitto
sudo apt-get install mosquitto-clients
sudo apt-get install mosquitto-dev
安装完成后的配置
cd /etc/mosquitto/
sudo cp pwfile.example passwd.conf
sudo vi mosquitto.conf
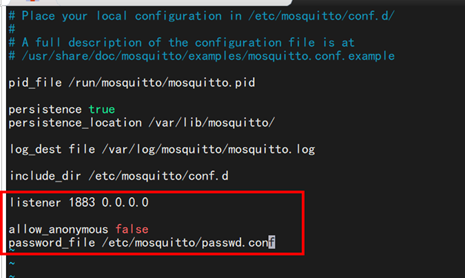
增加以下三行以支持局域网访问以及设置账号密码。
listener 1883 0.0.0.0
allow_anonymous false
password_file /etc/mosquitto/passwd.conf
如图:
接着使用以下指令明文创建账号
sudo mosquitto_passwd -b /etc/mosquitto/passwd.conf siot dfrobot
使用方法
配置修改完成后使用以下指令重启mosquitto 让配置生效
sudo service mosquitto restart
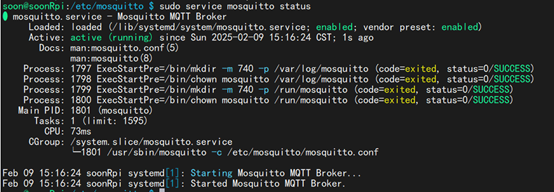
可以使用以下指令查看mosquitto 服务状态
sudo service mosquitto status
正常运行显示如下图
2、 安装Node-red
Node-RED是一个基于Node.js的开源可视化编程工具,由IBM开发,主要用于连接物联网设备、API和在线服务,以快速构建和部署事件驱动的应用程序,支持可视化编程、丰富的节点库和跨平台运行。
安装指令
sudo apt-get install nodejs
sudo apt-get install npm
sudo npm config set registry https://registry.npmmirror.com/
sudo npm install -g node-red
开机启动node-red的配置
cd /etc/systemd/system
sudo vim node-red.service
============================我是分割线=================================
[Unit]
Description=Node-RED
After=syslog.target network.target
[Service]
ExecStart=/usr/local/bin/node-red --max-old-space-size=128 -v
Restart=on-failure
KillSignal=SIGINT
# log output to syslog as node-red
SyslogIdentifier=node-red
StandardOutput=syslog
# non-root user to run as
WorkingDirectory=/home/xxx /
User=xxx
Group=xxx
[Install]
WantedBy=multi-user.target
==============================我是分割线=================================
将xxx换成你树莓派的账号
//刷新systemctl
sudo systemctl daemon-reload
//设置下次开机时自动启动。
sudo systemctl enable node-red.service
//开启node-red服务
sudo systemctl start node-red.service
如果遇到启动提示版本问题可尝试使用以下指令更新Node.js

sudo apt remove nodejs
curl -fsSL https://deb.nodesource.com/setup_18.x | sudo -E bash -
sudo apt install -y nodejs
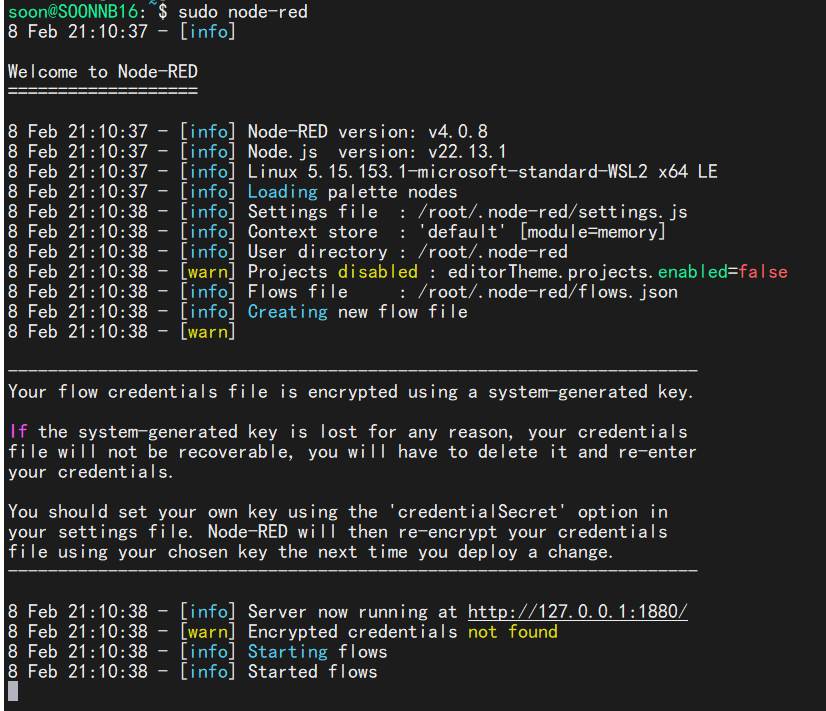
安装完成后通过树莓派IP:1880访问node-red配置页面
安装node-red-dashboard
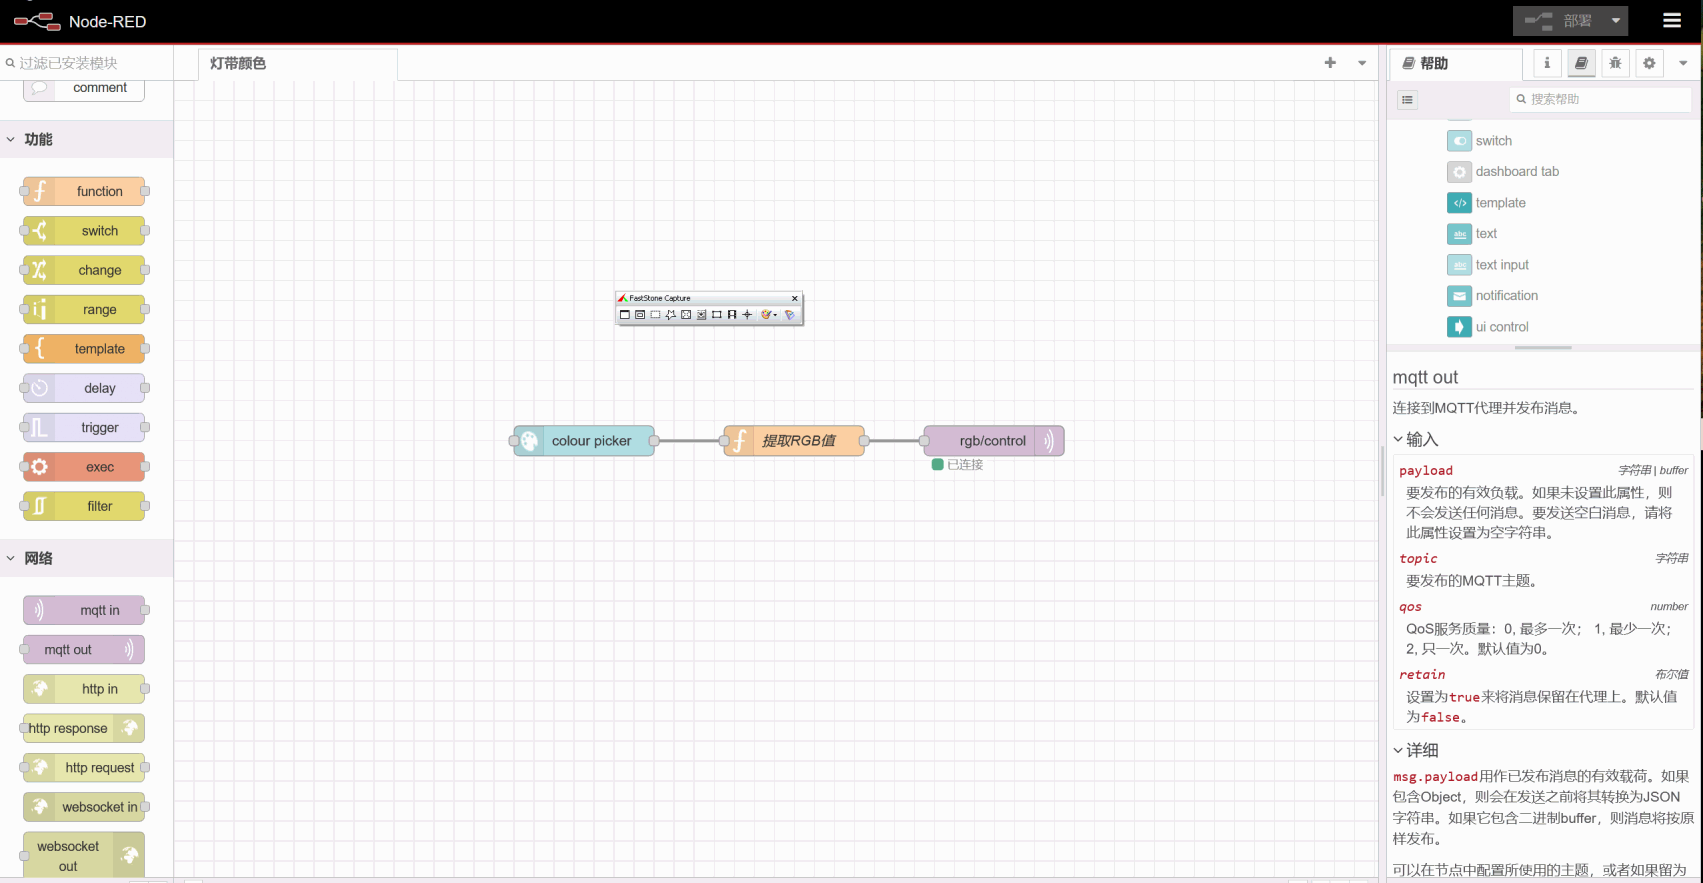
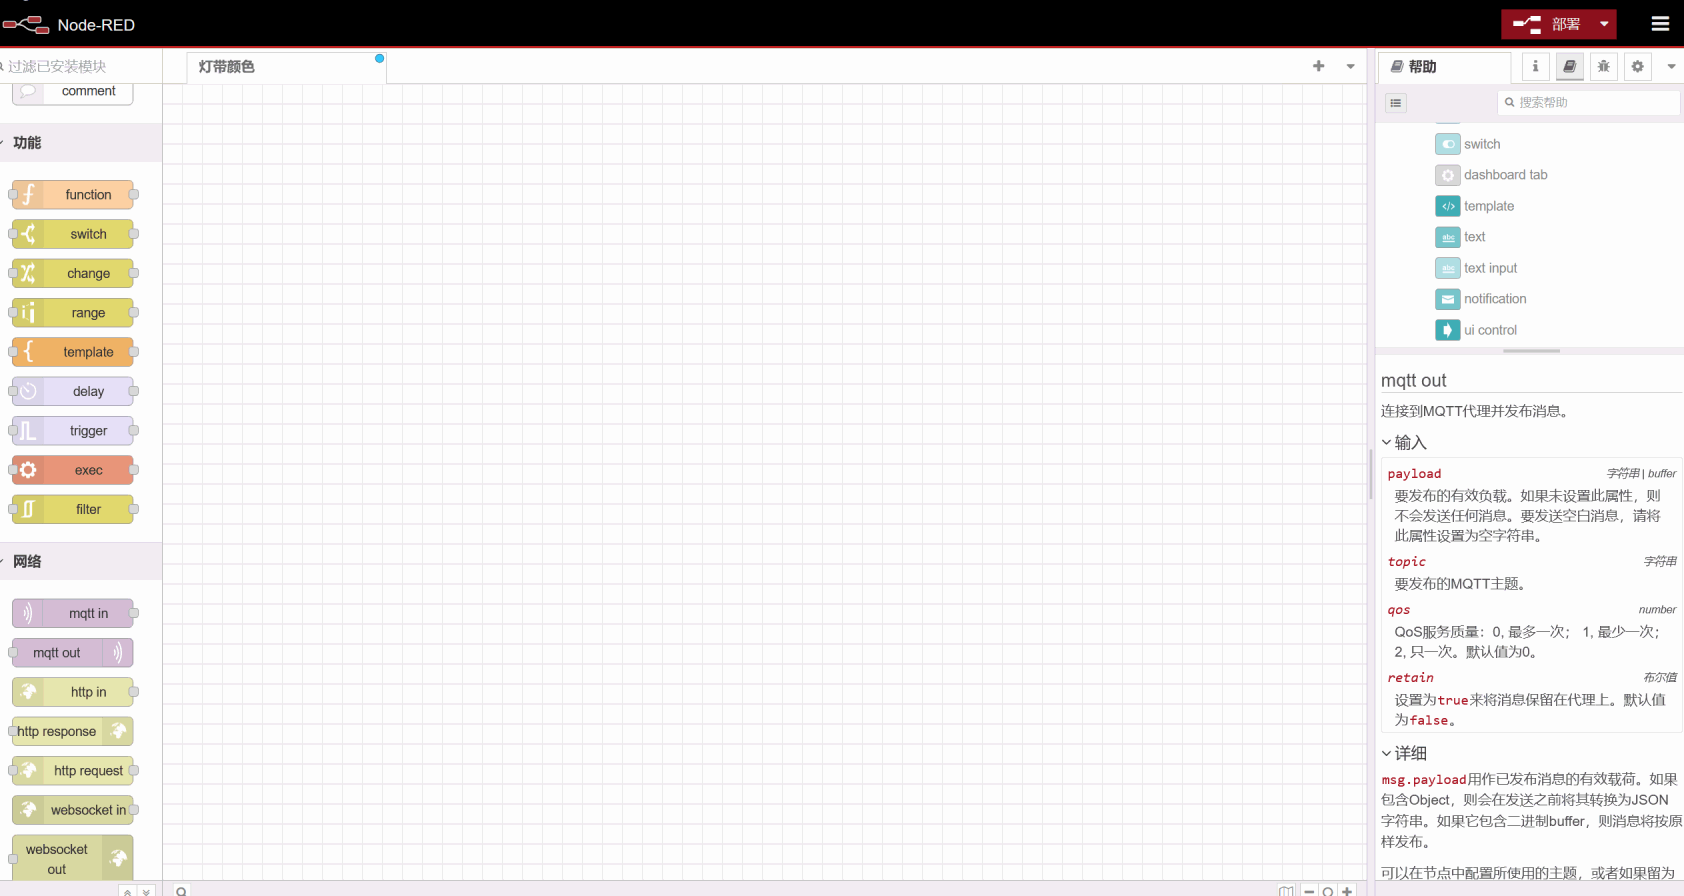
安装后可自行拖拽组件或者直接复制导入以下代码实现控制页面。
[
{
"id": "4eb1c5893747928b",
"type": "tab",
"label": "灯带颜色",
"disabled": false,
"info": "",
"env": []
},
{
"id": "fea4126dd2f5ef4e",
"type": "function",
"z": "4eb1c5893747928b",
"name": "提取RGB值",
"func": "let color = msg.payload;\n\nlet r = parseInt(color.substr(0, 2), 16);\nlet g = parseInt(color.substr(2, 2), 16);\nlet b = parseInt(color.substr(4, 2), 16);\n\nmsg.payload = {\n r: r,\n g: g,\n b: b\n};\n\nreturn msg;",
"outputs": 1,
"timeout": "",
"noerr": 0,
"initialize": "",
"finalize": "",
"libs": [],
"x": 620,
"y": 360,
"wires": [
[
"350c1a7e4f731460"
]
]
},
{
"id": "350c1a7e4f731460",
"type": "mqtt out",
"z": "4eb1c5893747928b",
"name": "",
"topic": "rgb/control",
"qos": "0",
"retain": "",
"respTopic": "",
"contentType": "",
"userProps": "",
"correl": "",
"expiry": "",
"broker": "b1b1c1a0.1b1c1",
"x": 820,
"y": 360,
"wires": []
},
{
"id": "e175399b16f87bee",
"type": "ui_colour_picker",
"z": "4eb1c5893747928b",
"name": "",
"label": "",
"group": "36c6f529d26bca6c",
"format": "hex",
"outformat": "string",
"showSwatch": true,
"showPicker": true,
"showValue": true,
"showHue": false,
"showAlpha": true,
"showLightness": false,
"square": "false",
"dynOutput": "false",
"order": 0,
"width": 0,
"height": 0,
"passthru": true,
"topic": "topic",
"topicType": "msg",
"className": "",
"x": 410,
"y": 360,
"wires": [
[
"fea4126dd2f5ef4e"
]
]
},
{
"id": "b1b1c1a0.1b1c1",
"type": "mqtt-broker",
"name": "",
"broker": "localhost",
"port": "1883",
"clientid": "",
"autoConnect": true,
"usetls": false,
"protocolVersion": 4,
"keepalive": "60",
"cleansession": true,
"autoUnsubscribe": true,
"birthTopic": "",
"birthQos": "0",
"birthPayload": "",
"birthMsg": {},
"closeTopic": "",
"closeQos": "0",
"closePayload": "",
"closeMsg": {},
"willTopic": "",
"willQos": "0",
"willPayload": "",
"willMsg": {},
"userProps": "",
"sessionExpiry": ""
},
{
"id": "36c6f529d26bca6c",
"type": "ui_group",
"name": "RGB控制",
"tab": "2629212c2b9c1802",
"order": 1,
"disp": true,
"width": "6",
"collapse": false,
"className": ""
},
{
"id": "2629212c2b9c1802",
"type": "ui_tab",
"name": "灯带控制",
"icon": "dashboard",
"order": 1,
"disabled": false,
"hidden": false
}
]
参考操作如下,导入后点击部署。
部署完成后即可通过http://树莓派IP:1880/ui/,如http://192.168.123.3:1880/ui/访问手机端访问效果如下
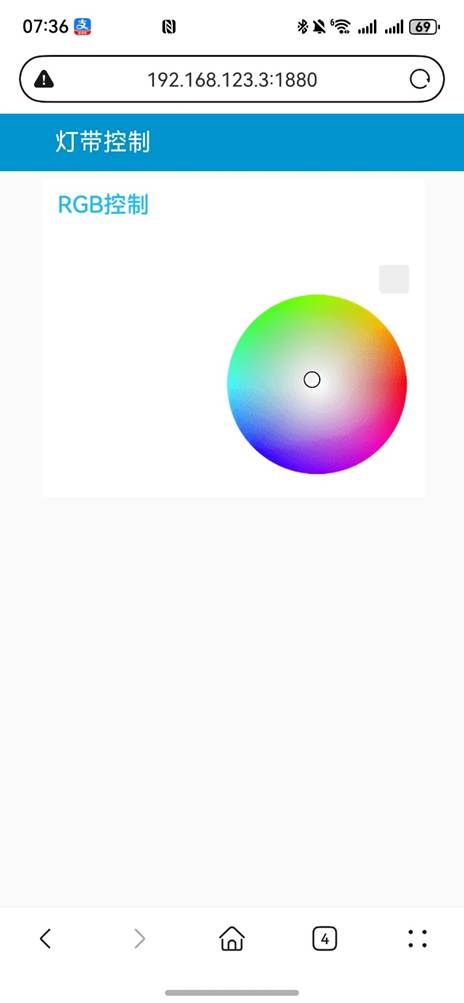
该代码实现了当UI页面RGB数值变化后会通过mqtt发布rgb/control主题消息,消息格式为{"r":231,"g":24,"b":134}
至此在树莓派上的部署完成。
二、行空板k10操作
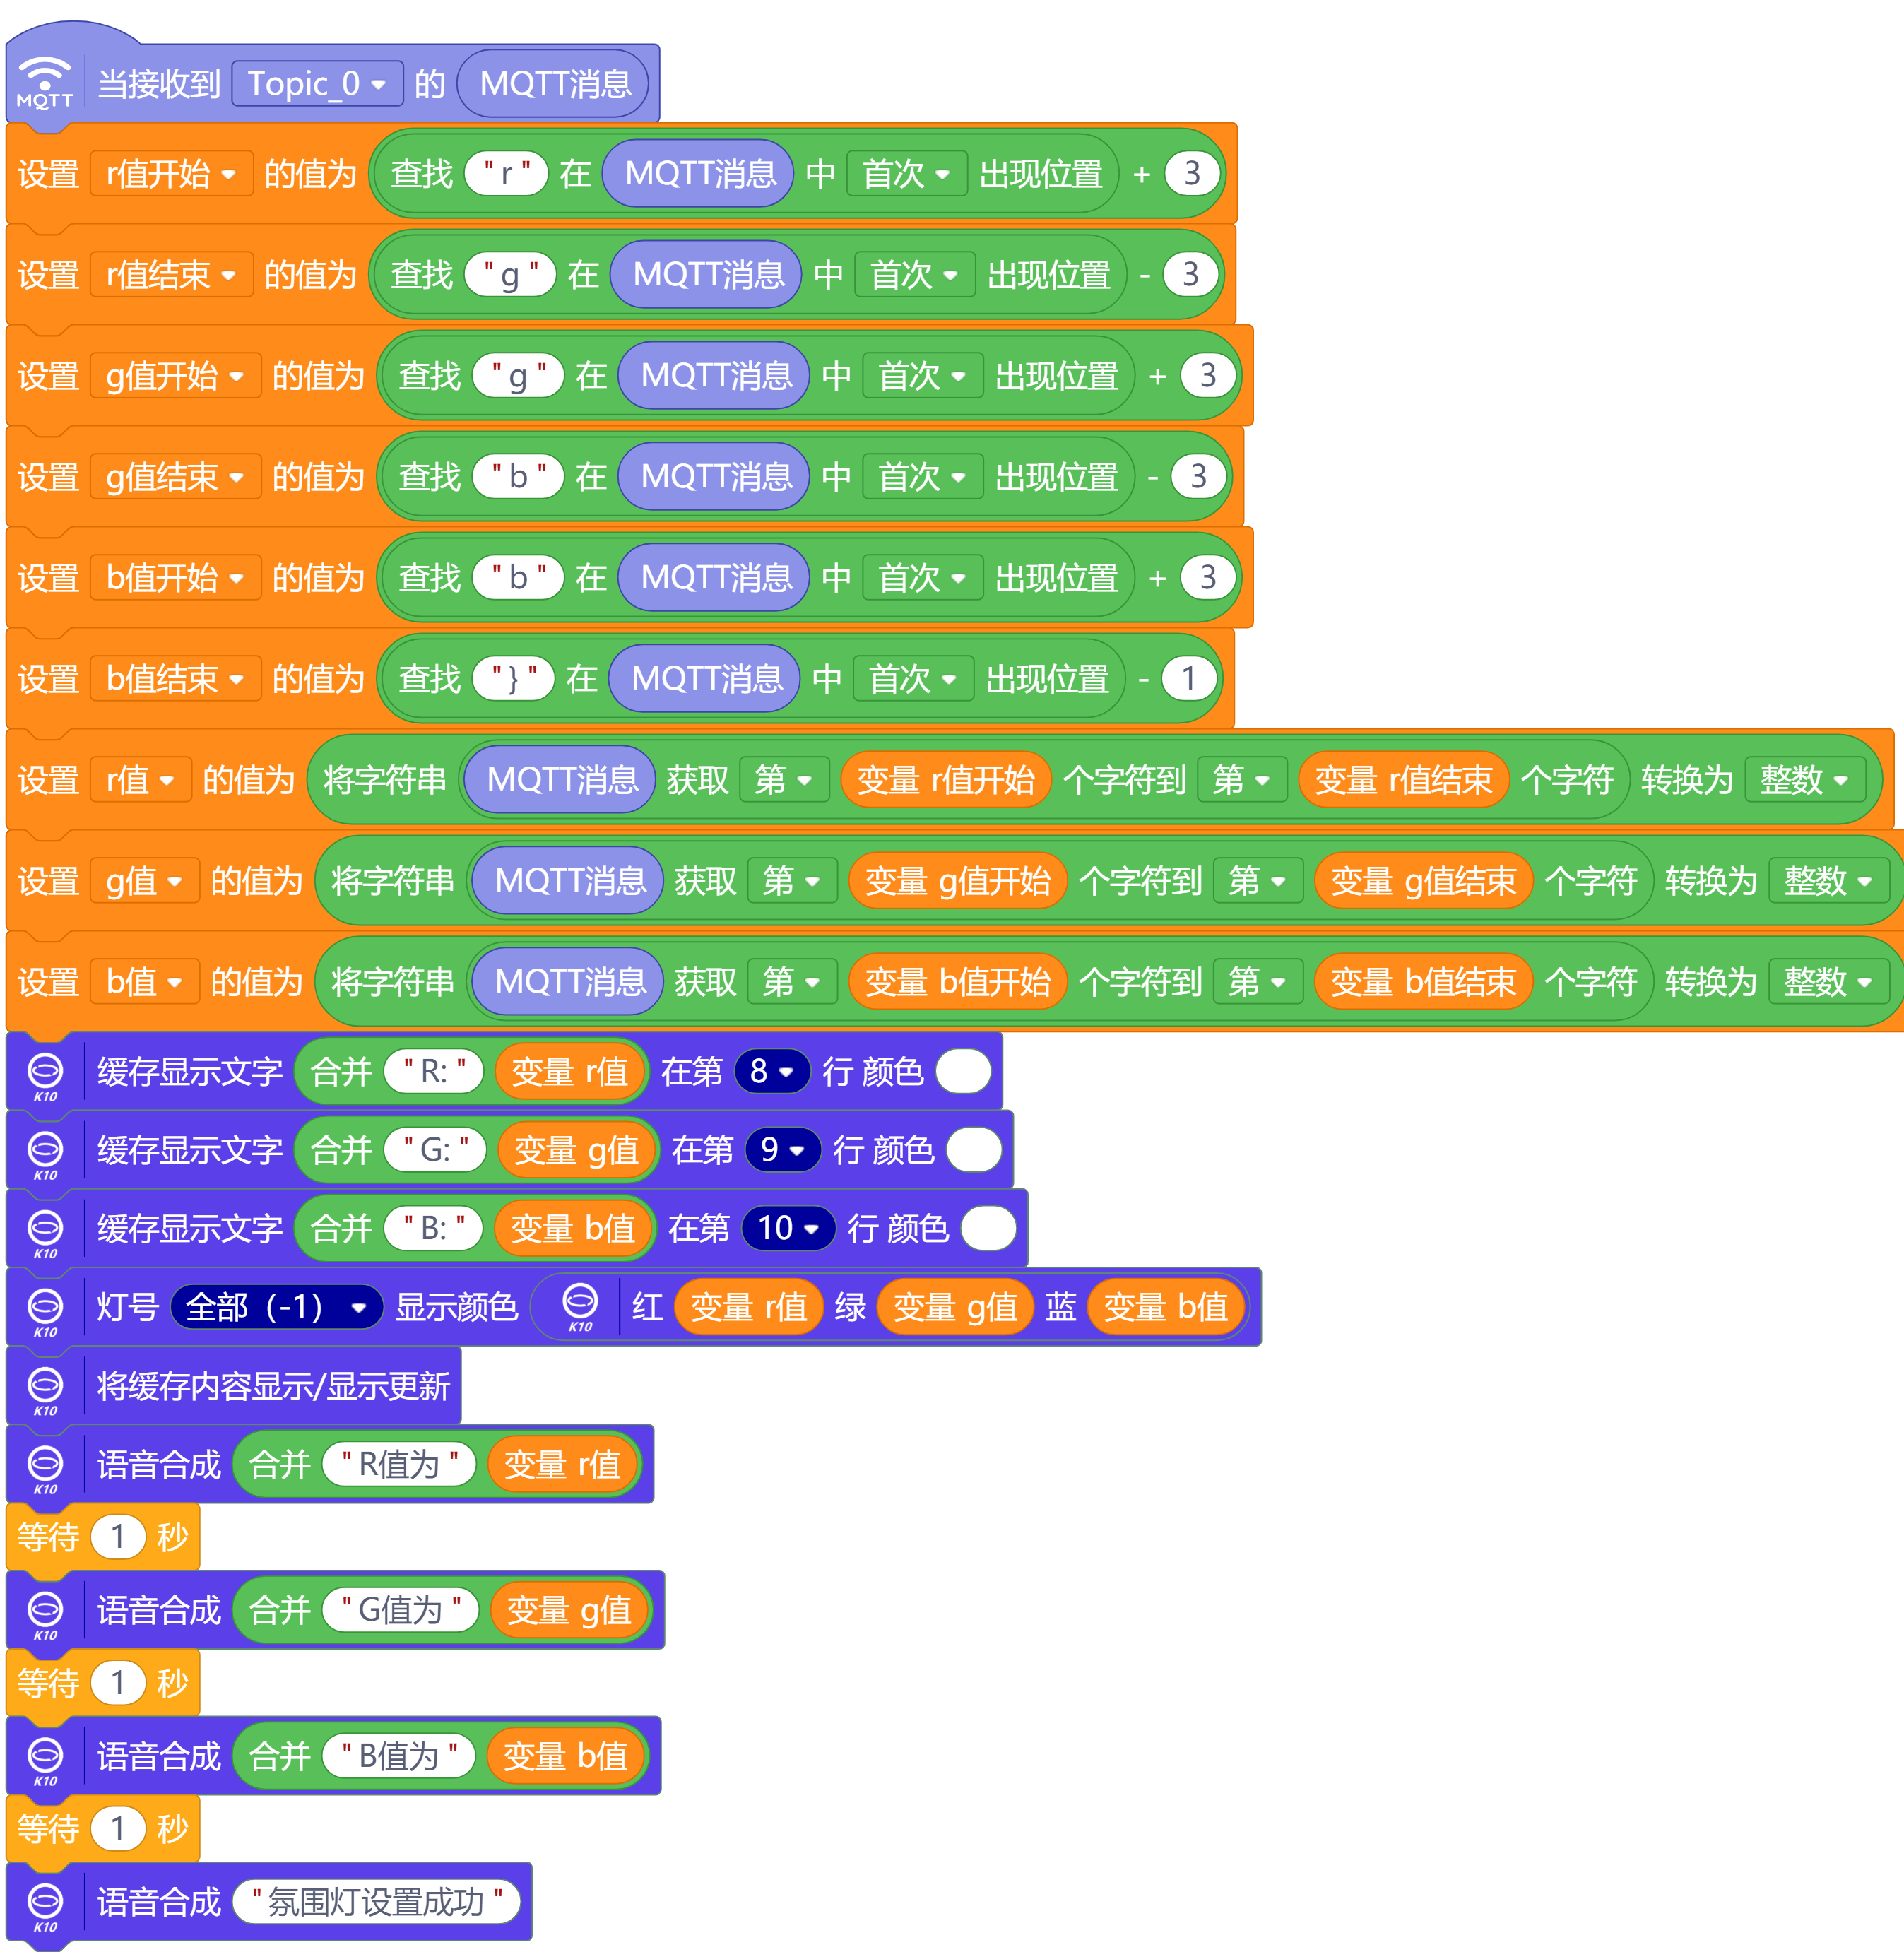
主代码如下,主要实现了网络连接,NTP对时,RGB灯颜色初始设置、MQTT连接,并用语音进行状态提醒。

MQTT消息处理
利用字符查找模块对收到的rgb数据进行了处理,并将数据显示在行空板k10上,并实现对板载RGB指示灯的控制
三、效果演示
以上基于行空板k10+树莓派3B搭建氛围灯控制系统分享,感谢查阅!


 他的勋章
他的勋章


评论