 返回首页
返回首页
 回到顶部
回到顶部

【项目背景】
随着人工智能技术的快速发展,AI在图像处理和生成领域取得了显著的进展。科大讯飞推出的HiDream功能,正是基于这种先进的人工智能技术,能够根据用户提供的提示词和参考图片生成新的图片。这种技术的应用前景广泛,包括但不限于艺术创作、设计辅助、教育娱乐等多个领域。
本项目能够帮助用户快速便捷地获得与自己想法相匹配的图像。 在教育领域,尤其是儿童教育,通过AI技术辅助绘画教学,可以激发孩子们的创造力和想象力。 结合行空板这样的交互设备,用户可以直接在设备上进行涂鸦,然后利用AI技术生成更加精美的图像,提升用户体验。
【项目设计】
本项目旨在利用科大讯飞的HiDream功能,开发一个基于行空板的涂鸦智画应用。用户可以通过行空板上的涂鸦来生成个性化的图像内容,同时,项目也将探索如何通过AI技术来理解用户的涂鸦内容,并据此生成更加准确的图像。
【图片生成】
本项目使用的是科大讯飞的HiDream功能,它是基于国际领先且自主可控的生成式人工智能多模态大模型,能够根据提示词和参考图片生成图片。
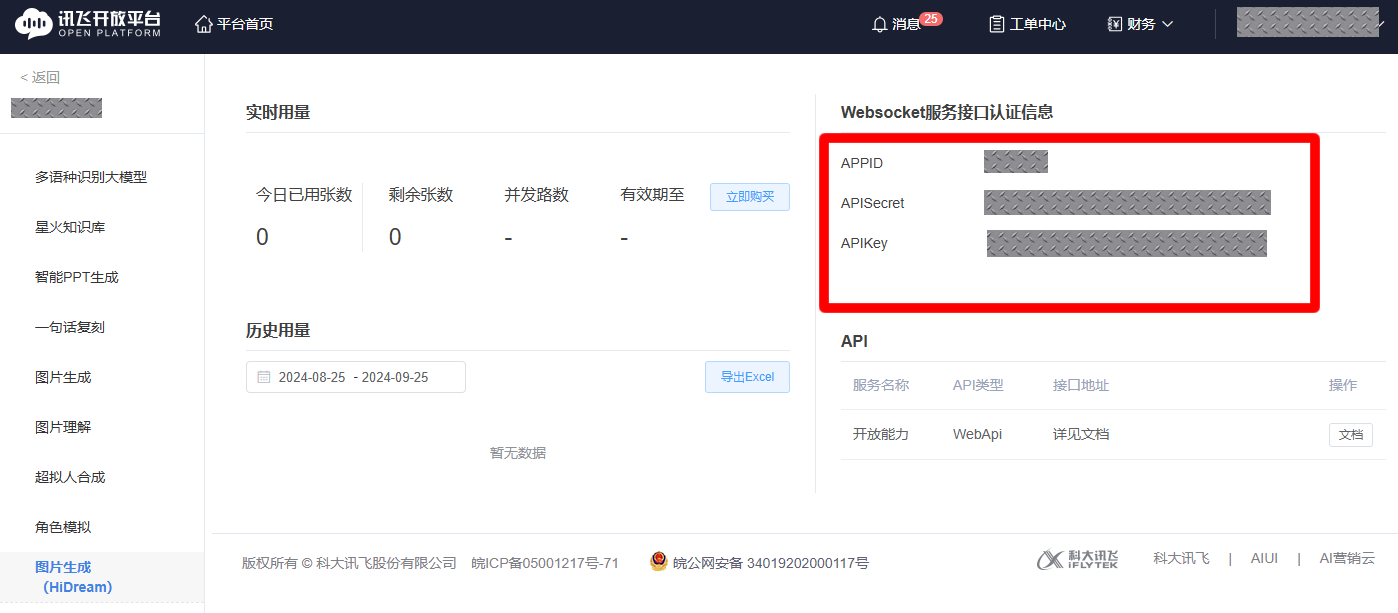
1.控制台中获取的 APPID 、APISecret、APIKey信息,https://console.xfyun.cn/services
2.代码如下:
# -*- encoding:utf-8 -*-
import base64
import hashlib
import hmac
import json
import time
from datetime import datetime
from time import mktime
from urllib.parse import urlencode, urlparse
from wsgiref.handlers import format_date_time
from urllib import parse
import requests
appid = "*********" #填写控制台中获取的 APPID 信息
apiSecret = "*************" #填写控制台中获取的 APISecret 信息
apiKey ="*****************" #填写控制台中获取的 APIKey 信息
imagedata = open("sc.png", 'rb').read()
image = str(base64.b64encode(imagedata), 'utf-8')
# 请求地址
create_host_url = "https://cn-huadong-1.xf-yun.com/v1/private/s3fd61810/create"
query_host_url = "https://cn-huadong-1.xf-yun.com/v1/private/s3fd61810/query"
def build_auth_request_url(request_url):
url_result = parse.urlparse(request_url)
date =format_date_time(mktime(datetime.now().timetuple()))
print(date)
method = "POST"
signature_origin = "host: {}\ndate: {}\n{} {} HTTP/1.1".format(url_result.hostname, date, method, url_result.path)
signature_sha = hmac.new(apiSecret.encode('utf-8'), signature_origin.encode('utf-8'),
digestmod=hashlib.sha256).digest()
signature_sha = base64.b64encode(signature_sha).decode(encoding='utf-8')
authorization_origin = "api_key=\"%s\", algorithm=\"%s\", headers=\"%s\", signature=\"%s\"" % (
apiKey, "hmac-sha256", "host date request-line", signature_sha)
authorization = base64.b64encode(authorization_origin.encode('utf-8')).decode(encoding='utf-8')
values = {
"host": url_result.hostname,
"date": date,
"authorization": authorization
}
return request_url + "?" + urlencode(values)
def create_url(url):
host = urlparse(url).netloc
path = urlparse(url).path
# 生成RFC1123格式的时间戳
now = datetime.now()
date = format_date_time(mktime(now.timetuple()))
# 拼接字符串
signature_origin = "host: " + host + "\n"
signature_origin += "date: " + date + "\n"
signature_origin += "POST " + path + " HTTP/1.1"
# 进行hmac-sha256进行加密
signature_sha = hmac.new(apiSecret.encode('utf-8'), signature_origin.encode('utf-8'),
digestmod=hashlib.sha256).digest()
signature_sha_base64 = base64.b64encode(signature_sha).decode(encoding='utf-8')
authorization_origin = f'api_key="{apiKey}", algorithm="hmac-sha256", headers="host date request-line", signature="{signature_sha_base64}"'
authorization = base64.b64encode(authorization_origin.encode('utf-8')).decode(encoding='utf-8')
# 将请求的鉴权参数组合为字典
v = {
"authorization": authorization,
"date": date,
"host": host
}
# 拼接鉴权参数,生成url
reUrl = url + '?' + urlencode(v)
# print(reUrl)
# 此处打印出建立连接时候的url,参考本demo的时候可取消上方打印的注释,比对相同参数时生成的url与自己代码生成的url是否一致
return reUrl
def get_headers(url):
headers = {
'content-type': "application/json",
'host': urlparse(url).netloc,
'app_id': appid
}
return headers
def gen_create_request_data(text):
data = {
"header": {
"app_id": appid,
"status": 3,
"channel": "default",
"callback_url": "default",
},
"parameter": {
"oig": {
"result": {
"encoding": "utf8",
"compress": "raw",
"format": "json"
},
}
},
"payload": {
"oig": {
"text": text
},
},
}
return data
def create_task():
text = {
"image": [image], #引擎上传的原图,如果仅用图片生成能力,该字段需为空
"prompt": "这是一个鹿的图画。请将此图片3D图片", # 该prompt 可以是要求引擎生成的描述,也可以结合上传的图片要求模型修改原图
"aspect_ratio": "1:1",
"negative_prompt": "",
"img_count": 1,
"resolution": "2k"
}
b_text = base64.b64encode(json.dumps(text).encode("utf-8")).decode()
request_url = create_url(create_host_url)
data = gen_create_request_data(b_text)
headers = get_headers(create_host_url)
response = requests.post(request_url, data=json.dumps(data), headers=headers)
# print(json.dumps(data))
# return
print('onMessage:\n' + response.text)
resp = json.loads(response.text)
taskid = resp['header']['task_id']
# print(taskid)
return taskid
def query_task(taskID):
data = {
"header": {
"app_id": appid,
"task_id": taskID # 填写创建任务时返回的task_id
}
}
request_url = create_url(query_host_url)
headers = get_headers(query_host_url)
response = requests.post(request_url, data=json.dumps(data), headers=headers)
res = json.loads(response.content)
return res
if __name__ == '__main__':
# 创建任务
task_id = create_task()
# 查询结果 task_status 1:待处理 2:处理中 3:处理完成 4:回调完成
while(True):
print(datetime.now())
res = query_task(task_id)
code = res["header"]["code"]
task_status = ''
if code == 0:
task_status = res["header"]["task_status"]
if ('' == task_status):
print("查询任务状态有误,请检查")
elif('3' == task_status):
print(datetime.now())
print("任务完成")
print(res)
f_text = res["payload"]["result"]["text"]
print("图片信息:\n" + str(base64.b64decode(f_text)))
break
else:
print("查询任务中:......" + json.dumps(res))
time.sleep(1)
continue
else:
print(res)

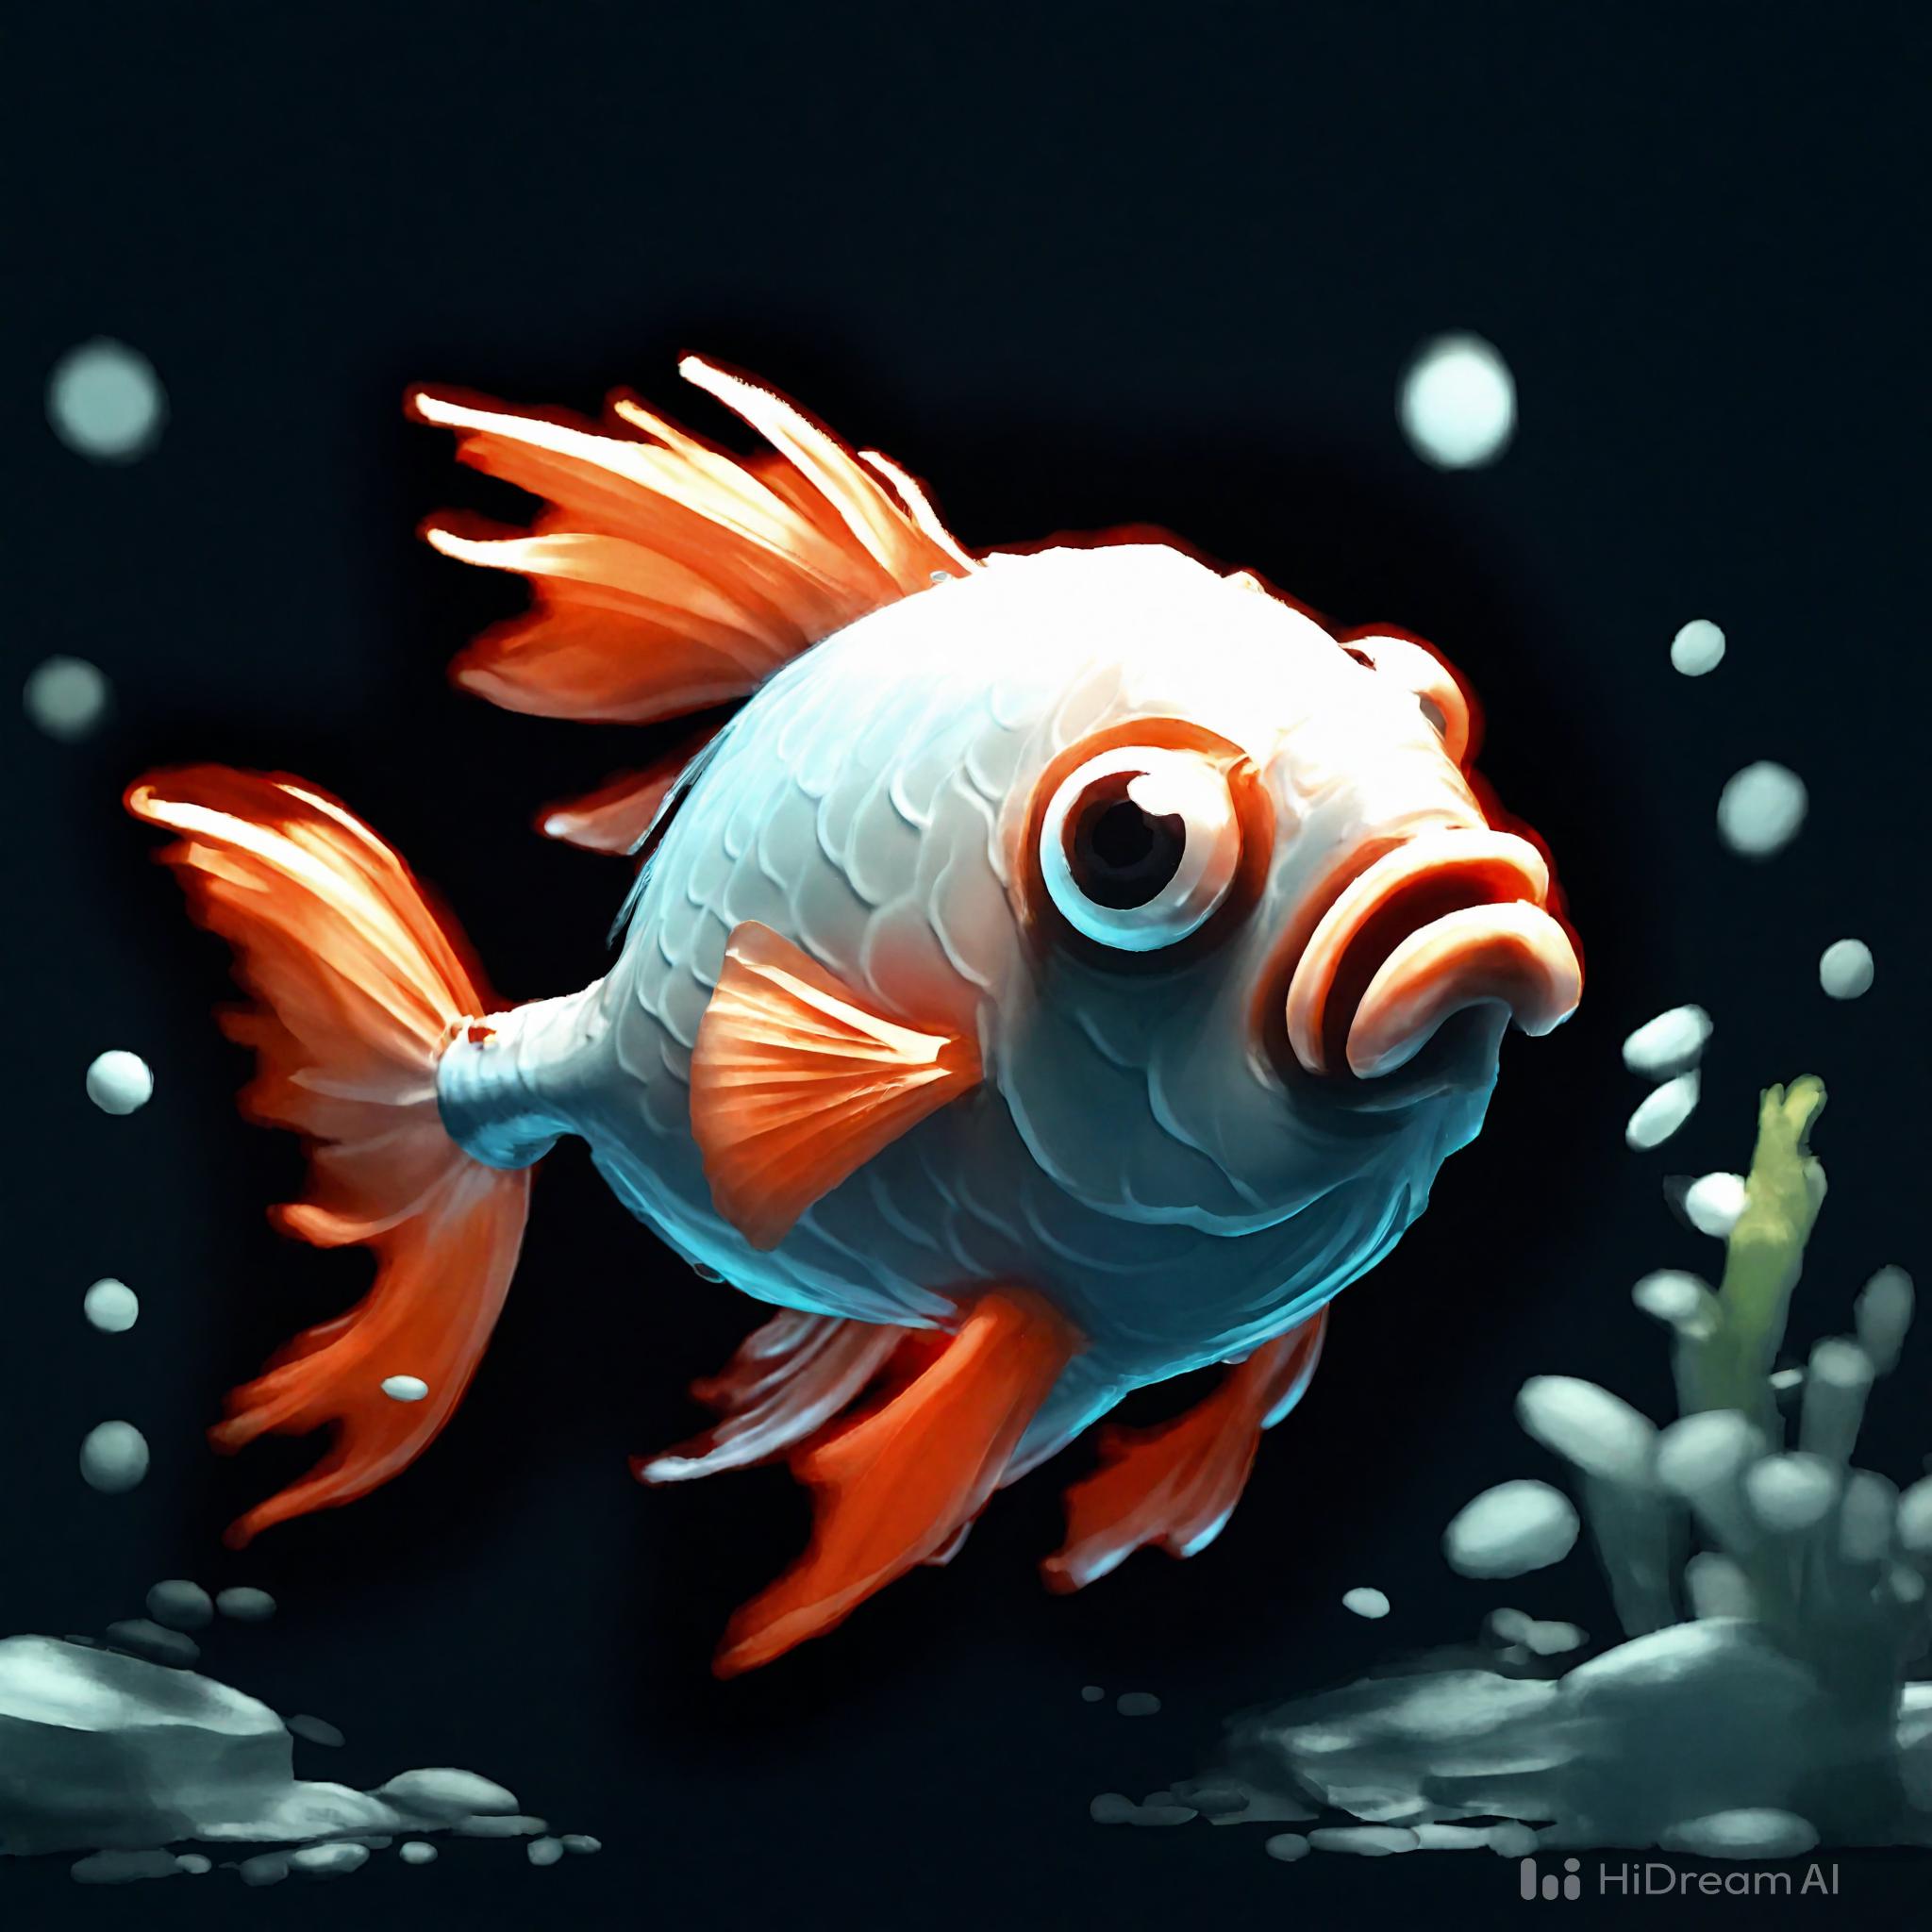
从网上下载一个简笔画图片,让HiDream生成相应图片。其中更改了提示词: "prompt": "这是一个鹿的图画。请将此图片3D图片"。

【行空板画图程序】
注:截屏功能scrot命令,需要进入行空板终端进行安装:sudo apt-get install scrot
from unihiker import GUI
import time
import os
import cv2
import numpy as np
pos_xy = []
# 图像旋转(以原点(0,0)为中心旋转)
def image_rotate(src, rotate=0):
h,w,c = src.shape
cos_val = np.cos(np.deg2rad(rotate))
sin_val = np.sin(np.deg2rad(rotate))
M = np.float32([[cos_val, -sin_val, 0], [sin_val, cos_val, 0]])
img = cv2.warpAffine(src, M, (w,h))
return img
# 事件回调函数,当按钮B被点击时,清除GUI上的内容。
def on_buttonb_click_callback():
u_gui.clear()
# 当按钮A被点击时,截取屏幕的一部分并保存为图片,然后清除GUI上的内容。
def on_buttona_click_callback():
os.system("scrot -a 0,0,240,240 sc.png")
u_gui.clear()
u_gui=GUI()
u_gui.on_a_click(on_buttona_click_callback)
u_gui.on_b_click(on_buttonb_click_callback)
#当鼠标移动时,记录鼠标的坐标并在GUI上绘制线条。
def mouse_move(x, y):
global temp_time
temp_time = time.time()
'''
首先判断pos_xy列表中是不是至少有两个点了
然后将pos_xy中第一个点赋值给point_start
利用中间变量pos_tmp遍历整个pos_xy列表
point_end = pos_tmp
画point_start到point_end之间的线
point_start = point_end
这样,不断地将相邻两个点之间画线,就能留下鼠标移动轨迹了
'''
pos_xy.append([x,y])
if len(pos_xy) > 1:
point_start = pos_xy[0]
for pos_tmp in pos_xy:
point_end = pos_tmp
line_text = u_gui.draw_line(x0=point_start[0],y0=point_start[1],x1=point_end[0],y1=point_end[1],width=5, color=(0,0,0))
point_start = point_end
# 当鼠标释放时,清除pos_xy列表,停止绘制线条。
def on_release(event):
pos_xy.clear()
u_gui.master.bind("
u_gui.on_mouse_move(mouse_move) #鼠标检测
while True:
#增加等待,防止程序退出和卡住
time.sleep(0.5)

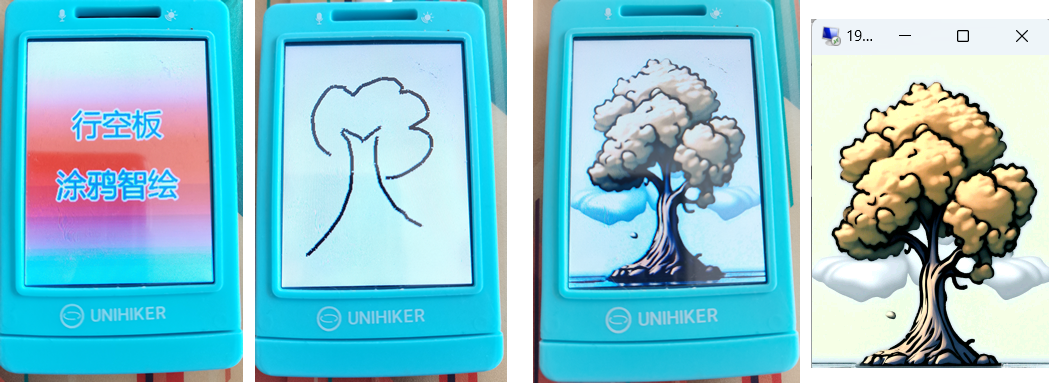
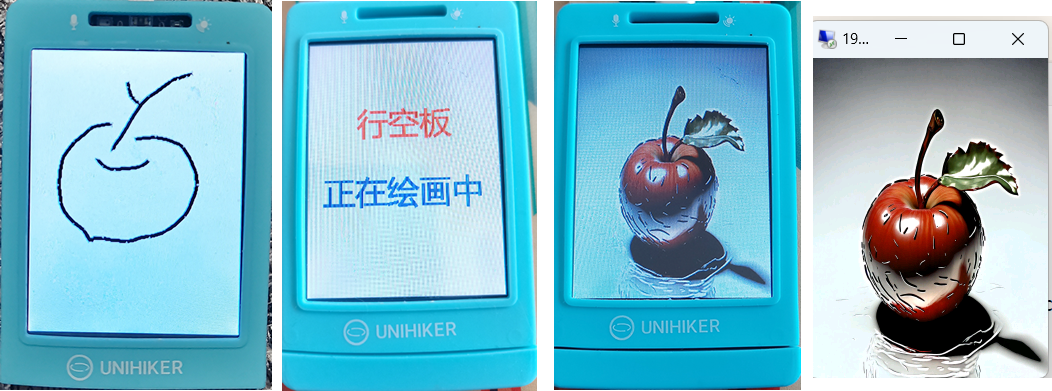
这是我用行空板画的(丑!哈哈)
再看看HiDreamAI,帮我画的。
【图像理解】
因 HiDreamAI生成图片时,就好有 "prompt": 提示词,所以本项目在行空板完成简笔画绘画后,将图片交给“讯飞”进行“图片理解”,生成提示词。
import _thread as thread
import base64
import datetime
import hashlib
import hmac
import json
from urllib.parse import urlparse
import ssl
from datetime import datetime
from time import mktime
from urllib.parse import urlencode
from wsgiref.handlers import format_date_time
import websocket # 使用websocket_client
appid = "************" #填写控制台中获取的 APPID 信息
api_secret = "*****************" #填写控制台中获取的 APISecret 信息
api_key ="********************" #填写控制台中获取的 APIKey 信息
imagedata = open("sc.png",'rb').read()
imageunderstanding_url = "wss://spark-api.cn-huabei-1.xf-yun.com/v2.1/image"#云端环境的服务地址
text =[{"role": "user", "content": str(base64.b64encode(imagedata), 'utf-8'), "content_type":"image"}]
class Ws_Param(object):
# 初始化
def __init__(self, APPID, APIKey, APISecret, imageunderstanding_url):
self.APPID = APPID
self.APIKey = APIKey
self.APISecret = APISecret
self.host = urlparse(imageunderstanding_url).netloc
self.path = urlparse(imageunderstanding_url).path
self.ImageUnderstanding_url = imageunderstanding_url
# 生成url
def create_url(self):
# 生成RFC1123格式的时间戳
now = datetime.now()
date = format_date_time(mktime(now.timetuple()))
# 拼接字符串
signature_origin = "host: " + self.host + "\n"
signature_origin += "date: " + date + "\n"
signature_origin += "GET " + self.path + " HTTP/1.1"
# 进行hmac-sha256进行加密
signature_sha = hmac.new(self.APISecret.encode('utf-8'), signature_origin.encode('utf-8'),
digestmod=hashlib.sha256).digest()
signature_sha_base64 = base64.b64encode(signature_sha).decode(encoding='utf-8')
authorization_origin = f'api_key="{self.APIKey}", algorithm="hmac-sha256", headers="host date request-line", signature="{signature_sha_base64}"'
authorization = base64.b64encode(authorization_origin.encode('utf-8')).decode(encoding='utf-8')
# 将请求的鉴权参数组合为字典
v = {
"authorization": authorization,
"date": date,
"host": self.host
}
# 拼接鉴权参数,生成url
url = self.ImageUnderstanding_url + '?' + urlencode(v)
#print(url)
# 此处打印出建立连接时候的url,参考本demo的时候可取消上方打印的注释,比对相同参数时生成的url与自己代码生成的url是否一致
return url
# 收到websocket错误的处理
def on_error(ws, error):
print("### error:", error)
# 收到websocket关闭的处理
def on_close(ws,one,two):
print(" ")
# 收到websocket连接建立的处理
def on_open(ws):
thread.start_new_thread(run, (ws,))
def run(ws, *args):
data = json.dumps(gen_params(appid=ws.appid, question= ws.question ))
ws.send(data)
# 收到websocket消息的处理
def on_message(ws, message):
#print(message)
data = json.loads(message)
code = data['header']['code']
if code != 0:
print(f'请求错误: {code}, {data}')
ws.close()
else:
choices = data["payload"]["choices"]
status = choices["status"]
content = choices["text"][0]["content"]
print(content,end ="")
global answer
answer += content
# print(1)
if status == 2:
ws.close()
def gen_params(appid, question):
"""
通过appid和用户的提问来生成请参数
"""
data = {
"header": {
"app_id": appid
},
"parameter": {
"chat": {
"domain": "image",
"temperature": 0.5,
"top_k": 4,
"max_tokens": 2028,
"auditing": "default"
}
},
"payload": {
"message": {
"text": question
}
}
}
return data
def main(appid, api_key, api_secret, imageunderstanding_url,question):
wsParam = Ws_Param(appid, api_key, api_secret, imageunderstanding_url)
websocket.enableTrace(False)
wsUrl = wsParam.create_url()
ws = websocket.WebSocketApp(wsUrl, on_message=on_message, on_error=on_error, on_close=on_close, on_open=on_open)
ws.appid = appid
#ws.imagedata = imagedata
ws.question = question
ws.run_forever(sslopt={"cert_reqs": ssl.CERT_NONE})
def getText(role, content):
jsoncon = {}
jsoncon["role"] = role
jsoncon["content"] = content
text.append(jsoncon)
return text
def getlength(text):
length = 0
for content in text:
temp = content["content"]
leng = len(temp)
length += leng
return length
def checklen(text):
#print("text-content-tokens:", getlength(text[1:]))
while (getlength(text[1:])> 8000):
del text[1]
return text
if __name__ == '__main__':
Input = "请帮我识别一下画的是什么,你回复的内容如:这是一棵树。"
question = checklen(getText("user",Input))
answer = ""
print("答:",end = "")
main(appid, api_key, api_secret, imageunderstanding_url, question)
getText("assistant", answer)
# print(str(text))
【完整程序】
1.查看返回信息
b'[{"sub_task_id":"6a0eb614-78d4-41ec-bbdd-6315f9b0d3a7","task_status":1,"task_completion":1,"image":"","image_wm":"https://storage.hidreamai.com/image/p_faac22c0-7a78-11ef-897c-00163e5cba89_wm.jpg"}]'
2.通过询问Kimi,得到如下代码:
# 解码Base64字符串 decoded_text = base64.b64decode(f_text).decode('utf-8')
# 将JSON字符串转换为Python对象
data = json.loads(decoded_text)
# 检查data是否是列表,如果是,则遍历列表
if isinstance(data, list):
for item in data: # 提取image_wm字段
image_wm = item.get('image_wm', '')
if image_wm: # 如果image_wm字段存在
print(image_wm)
3.通过cv2库获取网络图片,并在行空板屏幕上显示
import cv2
import requests
import numpy as np
# 图片的URL
image_url = "https://storage.hidreamai.com/image/p_ed973d22-7a7d-11ef-a6a8-00163e5cba89_wm.jpg"
# 使用requests下载图片
response = requests.get(image_url)
# 确保请求成功
print(response.status_code)
if response.status_code == 200:
# 将图片数据转换为numpy数组
image_array = np.asarray(bytearray(response.content), dtype="uint8")
# 使用cv2.imdecode读取图片数据
image = cv2.imdecode(image_array, cv2.IMREAD_COLOR)
# 调整图片大小到240x320
image_resized = cv2.resize(image, (240, 320), interpolation=cv2.INTER_AREA)
# 创建窗口
cv2.namedWindow('Resized Image', cv2.WINDOW_NORMAL)
# 设置窗口属性为全屏
cv2.setWindowProperty('Resized Image', cv2.WND_PROP_FULLSCREEN, cv2.WINDOW_FULLSCREEN)
while 1:
cv2.imshow("Resized Image",image_resized)
if cv2.waitKey(20) & 0xff== 27:
break
5.完整程序
from unihiker import GUI
import time
import os
import cv2
import numpy as np
import _thread as thread
import base64
import datetime
import hashlib
import hmac
import json
from urllib.parse import urlparse
import ssl
from datetime import datetime
from time import mktime
from urllib.parse import urlencode
from wsgiref.handlers import format_date_time
import websocket # 使用websocket_client
from urllib import parse
import requests
from PIL import Image
import io
appid = "**********" #填写控制台中获取的 APPID 信息
apiSecret = "******************" #填写控制台中获取的 APISecret 信息
apiKey ="*********************" #填写控制台中获取的 APIKey 信息
pos_xy = []
# 请求地址
create_host_url = "https://cn-huadong-1.xf-yun.com/v1/private/s3fd61810/create"
query_host_url = "https://cn-huadong-1.xf-yun.com/v1/private/s3fd61810/query"
class Ws_Param(object):
# 初始化
def __init__(self, APPID, APIKey, APISecret, imageunderstanding_url):
self.APPID = APPID
self.APIKey = APIKey
self.APISecret = APISecret
self.host = urlparse(imageunderstanding_url).netloc
self.path = urlparse(imageunderstanding_url).path
self.ImageUnderstanding_url = imageunderstanding_url
# 生成url
def create_url(self):
# 生成RFC1123格式的时间戳
now = datetime.now()
date = format_date_time(mktime(now.timetuple()))
# 拼接字符串
signature_origin = "host: " + self.host + "\n"
signature_origin += "date: " + date + "\n"
signature_origin += "GET " + self.path + " HTTP/1.1"
# 进行hmac-sha256进行加密
signature_sha = hmac.new(self.APISecret.encode('utf-8'), signature_origin.encode('utf-8'),
digestmod=hashlib.sha256).digest()
signature_sha_base64 = base64.b64encode(signature_sha).decode(encoding='utf-8')
authorization_origin = f'api_key="{self.APIKey}", algorithm="hmac-sha256", headers="host date request-line", signature="{signature_sha_base64}"'
authorization = base64.b64encode(authorization_origin.encode('utf-8')).decode(encoding='utf-8')
# 将请求的鉴权参数组合为字典
v = {
"authorization": authorization,
"date": date,
"host": self.host
}
# 拼接鉴权参数,生成url
url = self.ImageUnderstanding_url + '?' + urlencode(v)
#print(url)
# 此处打印出建立连接时候的url,参考本demo的时候可取消上方打印的注释,比对相同参数时生成的url与自己代码生成的url是否一致
return url
# 收到websocket错误的处理
def on_error(ws, error):
print("### error:", error)
# 收到websocket关闭的处理
def on_close(ws,one,two):
print(" ")
# 收到websocket连接建立的处理
def on_open(ws):
thread.start_new_thread(run, (ws,))
def run(ws, *args):
data = json.dumps(gen_params(appid=ws.appid, question= ws.question ))
ws.send(data)
# 收到websocket消息的处理
def on_message(ws, message):
#print(message)
data = json.loads(message)
code = data['header']['code']
if code != 0:
print(f'请求错误: {code}, {data}')
ws.close()
else:
choices = data["payload"]["choices"]
status = choices["status"]
content = choices["text"][0]["content"]
print(content,end ="")
global answer
answer += content
# print(1)
if status == 2:
ws.close()
def gen_params(appid, question):
"""
通过appid和用户的提问来生成请参数
"""
data = {
"header": {
"app_id": appid
},
"parameter": {
"chat": {
"domain": "image",
"temperature": 0.5,
"top_k": 4,
"max_tokens": 2028,
"auditing": "default"
}
},
"payload": {
"message": {
"text": question
}
}
}
return data
def main(appid, apiKey, apiSecret, imageunderstanding_url,question):
wsParam = Ws_Param(appid, apiKey, apiSecret, imageunderstanding_url)
websocket.enableTrace(False)
wsUrl = wsParam.create_url()
ws = websocket.WebSocketApp(wsUrl, on_message=on_message, on_error=on_error, on_close=on_close, on_open=on_open)
ws.appid = appid
#ws.imagedata = imagedata
ws.question = question
ws.run_forever(sslopt={"cert_reqs": ssl.CERT_NONE})
def getText(role, content):
jsoncon = {}
jsoncon["role"] = role
jsoncon["content"] = content
text.append(jsoncon)
return text
def getlength(text):
length = 0
for content in text:
temp = content["content"]
leng = len(temp)
length += leng
return length
def checklen(text):
#print("text-content-tokens:", getlength(text[1:]))
while (getlength(text[1:])> 8000):
del text[1]
return text
def build_auth_request_url(request_url):
url_result = parse.urlparse(request_url)
date =format_date_time(mktime(datetime.now().timetuple()))
print(date)
method = "POST"
signature_origin = "host: {}\ndate: {}\n{} {} HTTP/1.1".format(url_result.hostname, date, method, url_result.path)
signature_sha = hmac.new(apiSecret.encode('utf-8'), signature_origin.encode('utf-8'),
digestmod=hashlib.sha256).digest()
signature_sha = base64.b64encode(signature_sha).decode(encoding='utf-8')
authorization_origin = "api_key=\"%s\", algorithm=\"%s\", headers=\"%s\", signature=\"%s\"" % (
apiKey, "hmac-sha256", "host date request-line", signature_sha)
authorization = base64.b64encode(authorization_origin.encode('utf-8')).decode(encoding='utf-8')
values = {
"host": url_result.hostname,
"date": date,
"authorization": authorization
}
return request_url + "?" + urlencode(values)
def create_url(url):
host = urlparse(url).netloc
path = urlparse(url).path
# 生成RFC1123格式的时间戳
now = datetime.now()
date = format_date_time(mktime(now.timetuple()))
# 拼接字符串
signature_origin = "host: " + host + "\n"
signature_origin += "date: " + date + "\n"
signature_origin += "POST " + path + " HTTP/1.1"
# 进行hmac-sha256进行加密
signature_sha = hmac.new(apiSecret.encode('utf-8'), signature_origin.encode('utf-8'),
digestmod=hashlib.sha256).digest()
signature_sha_base64 = base64.b64encode(signature_sha).decode(encoding='utf-8')
authorization_origin = f'api_key="{apiKey}", algorithm="hmac-sha256", headers="host date request-line", signature="{signature_sha_base64}"'
authorization = base64.b64encode(authorization_origin.encode('utf-8')).decode(encoding='utf-8')
# 将请求的鉴权参数组合为字典
v = {
"authorization": authorization,
"date": date,
"host": host
}
# 拼接鉴权参数,生成url
reUrl = url + '?' + urlencode(v)
# print(reUrl)
# 此处打印出建立连接时候的url,参考本demo的时候可取消上方打印的注释,比对相同参数时生成的url与自己代码生成的url是否一致
return reUrl
def get_headers(url):
headers = {
'content-type': "application/json",
'host': urlparse(url).netloc,
'app_id': appid
}
return headers
def gen_create_request_data(text):
data = {
"header": {
"app_id": appid,
"status": 3,
"channel": "default",
"callback_url": "default",
},
"parameter": {
"oig": {
"result": {
"encoding": "utf8",
"compress": "raw",
"format": "json"
},
}
},
"payload": {
"oig": {
"text": text
},
},
}
return data
def create_task(prompt):
text = {
"image": [image], #引擎上传的原图,如果仅用图片生成能力,该字段需为空
"prompt": prompt+"请将此图片3D图片", # 该prompt 可以是要求引擎生成的描述,也可以结合上传的图片要求模型修改原图
"aspect_ratio": "1:1",
"negative_prompt": "",
"img_count": 1,
"resolution": "2k"
}
b_text = base64.b64encode(json.dumps(text).encode("utf-8")).decode()
request_url = create_url(create_host_url)
data = gen_create_request_data(b_text)
headers = get_headers(create_host_url)
response = requests.post(request_url, data=json.dumps(data), headers=headers)
# print(json.dumps(data))
# return
print('onMessage:\n' + response.text)
resp = json.loads(response.text)
taskid = resp['header']['task_id']
# print(taskid)
return taskid
def query_task(taskID):
data = {
"header": {
"app_id": appid,
"task_id": taskID # 填写创建任务时返回的task_id
}
}
request_url = create_url(query_host_url)
headers = get_headers(query_host_url)
response = requests.post(request_url, data=json.dumps(data), headers=headers)
res = json.loads(response.content)
return res
# 图像旋转(以原点(0,0)为中心旋转)
def image_rotate(src, rotate=0):
h,w,c = src.shape
cos_val = np.cos(np.deg2rad(rotate))
sin_val = np.sin(np.deg2rad(rotate))
M = np.float32([[cos_val, -sin_val, 0], [sin_val, cos_val, 0]])
img = cv2.warpAffine(src, M, (w,h))
return img
# 事件回调函数,当按钮B被点击时,清除GUI上的内容。
def on_buttonb_click_callback():
if(bs==2):
bs=0
cv2.destroyAllWindows()
u_gui.clear()
# 当按钮A被点击时,截取屏幕的一部分并保存为图片,然后清除GUI上的内容。
def on_buttona_click_callback():
global answer,text,bs,image,task_id
os.system("scrot -a 0,0,240,240 sc.png")
u_gui.clear()
imagedata = open("sc.png",'rb').read()
imageunderstanding_url = "wss://spark-api.cn-huabei-1.xf-yun.com/v2.1/image"#云端环境的服务地址
text =[{"role": "user", "content": str(base64.b64encode(imagedata), 'utf-8'), "content_type":"image"}]
Input = "请帮我识别一下画的是什么,你回复的内容如:这幅画描绘的是一棵树。"
question = checklen(getText("user",Input))
answer = ""
main(appid, apiKey, apiSecret, imageunderstanding_url, question)
getText("assistant", answer)
image = str(base64.b64encode(imagedata), 'utf-8')
task_id = create_task(answer)
bs=1
u_gui=GUI()
u_gui.on_a_click(on_buttona_click_callback)
u_gui.on_b_click(on_buttonb_click_callback)
#当鼠标移动时,记录鼠标的坐标并在GUI上绘制线条。
def mouse_move(x, y):
global temp_time
temp_time = time.time()
pos_xy.append([x,y])
if len(pos_xy) > 1:
point_start = pos_xy[0]
for pos_tmp in pos_xy:
point_end = pos_tmp
line_text = u_gui.draw_line(x0=point_start[0],y0=point_start[1],x1=point_end[0],y1=point_end[1],width=5, color=(0,0,0))
point_start = point_end
# 当鼠标释放时,清除pos_xy列表,停止绘制线条。
def on_release(event):
pos_xy.clear()
u_gui.master.bind("
u_gui.on_mouse_move(mouse_move) #鼠标检测
if __name__ == '__main__':
# 创建任务
bs=0
img = cv2.imread("now.png", cv2.IMREAD_UNCHANGED)
img1 = cv2.imread("now1.png", cv2.IMREAD_UNCHANGED)
while True:
#增加等待,防止程序退出和卡住
time.sleep(0.5)
if(bs==1):
# 创建窗口
cv2.namedWindow('Resized Image', cv2.WINDOW_NORMAL)
# 设置窗口属性为全屏
cv2.setWindowProperty('Resized Image', cv2.WND_PROP_FULLSCREEN, cv2.WINDOW_FULLSCREEN)
while(True):
print(datetime.now())
res = query_task(task_id)
code = res["header"]["code"]
task_status = ''
if code == 0:
task_status = res["header"]["task_status"]
if ('' == task_status):
print("查询任务状态有误,请检查")
elif('3' == task_status):
print(datetime.now())
print("任务完成")
print(res)
f_text = res["payload"]["result"]["text"]
# 解码Base64字符串
decoded_text = base64.b64decode(f_text).decode('utf-8')
# 将JSON字符串转换为Python对象
data = json.loads(decoded_text)
# 检查data是否是列表,如果是,则遍历列表
if isinstance(data, list):
for item in data:
# 提取image_wm字段
image_wm = item.get('image_wm', '')
if image_wm: # 如果image_wm字段存在
print(image_wm)
response = requests.get(image_wm)
# 确保请求成功
if response.status_code == 200:
# 将图片数据转换为numpy数组
image_array = np.asarray(bytearray(response.content), dtype="uint8")
# 使用cv2.imdecode读取图片数据
image = cv2.imdecode(image_array, cv2.IMREAD_COLOR)
# 调整图片大小到240x320
image_resized = cv2.resize(image, (240, 320), interpolation=cv2.INTER_AREA)
bs=2
break
else:
print("查询任务中:......" + json.dumps(res))
cv2.imshow("Resized Image", img)
cv2.waitKey(1000)
cv2.imshow("Resized Image", img1)
cv2.waitKey(1000)
continue
else:
print(res)
if(bs==2):
cv2.imshow("Resized Image",image_resized)
cv2.waitKey(20)
【效果演示】
【演示视频】
本项目不仅展示了AI技术在图像生成领域的应用,同时也提供了一个用户友好的交互平台,使得普通用户也能够轻松地利用AI技术进行创作。通过本项目,我们希望能够推动AI技术在艺术和教育等领域的普及和应用。


 他的勋章
他的勋章

竺可桢学校程老师2024.10.23
我改了HiDream接口,还有别的要改吗?运行有问题的
风悠扬05392024.09.26
这代码有点多看不过来