 返回首页
返回首页
 回到顶部
回到顶部

图像理解是AIGC技术的一个重要组成部分,它使得AIGC能够更好地理解与人类视觉感知相关的图像内容。AIGC是指利用人工智能技术自动创作生成的内容,这包括了文本、图像、音频和视频等各种形式的数字内容。讯飞星火大模型通过其图像理解功能,能够识别和理解图像内容,并根据用户的问题提供准确的描述和回答,这是AIGC技术在图像领域的具体应用之一。
【项目背景】
中国有1730万的盲人,为什么我们在大街上很少看到他们?因盲道的残缺、占用,各种公共设施对盲人不友好。因此,公共无障碍设施的建设不完善,让想要出门的视障人士畏而却步。导盲犬,应该是盲人出行的好方式,但犬类生活在人类社会的接受度很低,且导盲犬的数量很少。我们经常从新闻当中听到导盲犬的相关新闻,一些人不允许导盲犬上车,这相当于限制了盲人的出行。
基于以上背景,我们设计了一个为盲人定制的智能导盲杖。
【项目设计】
本智能导盲杖,实现以下功能:
1. 行空板通过USB摄像头采集环境图像,发送到讯飞大语言模型平台进行图像理解,并将理解结果反馈给行空板,再通过蓝牙音箱,语音提示周围环境,如是否前方有障碍物,是什么、是否是路口、周围的建筑物都是什么、厕所在那个方位等。
2. 利用行空板上的加速度传感器检测盲杖是否倾倒,实现(1)当盲人意外跌倒不起,盲杖可发出提示音,提醒路人前来帮忙。(2)当盲人意外将盲杖跌落,盲杖发出提示音,帮助盲人寻找。
3. 行空板连接LED灯带,通过行空板上自带按钮,可控制LED灯带的亮灭,在夜晚时,打开LED灯,以提醒周围人注意到盲人,防止发生碰撞。
4. 单独使用Microbit加两个超声波传感器,实现检测前方障碍物,防止盲杖在探路时,敲打到路人或其它易损坏物品。
【项目硬件】
行空板及扩展板,语音合成模块,USB摄像头、蓝牙音箱、按钮模块2 个,LED灯带,3.7V锂电池、充电宝、Micro:bit主板、超声波传感器2个。
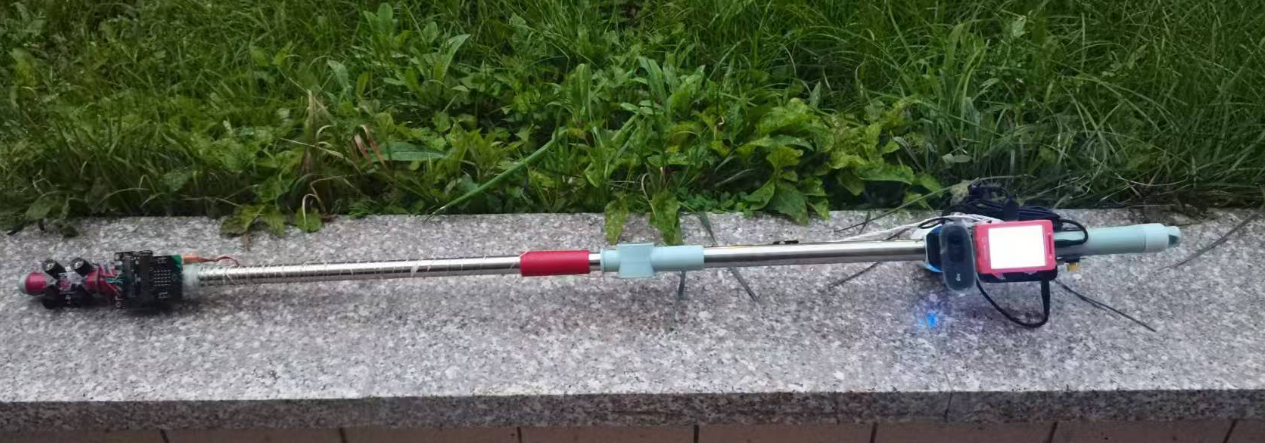

行空板及摄像头
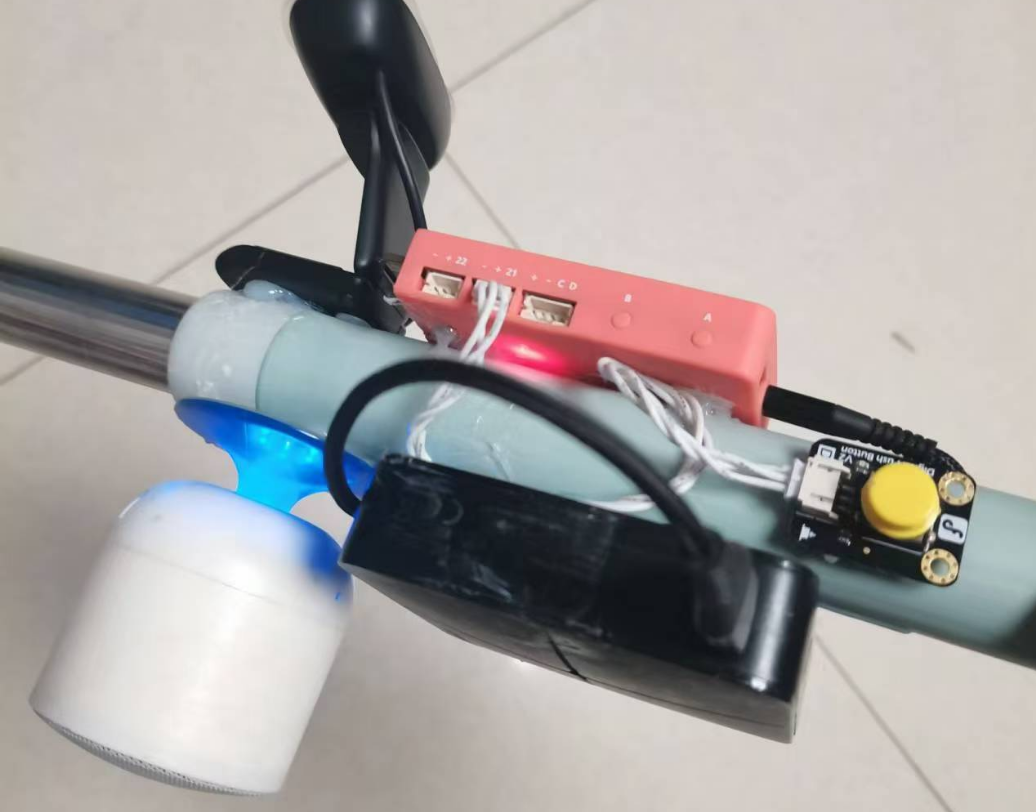
蓝牙音箱、充电宝(行空板供电)、按钮(行空板引脚21)

【程序编写】
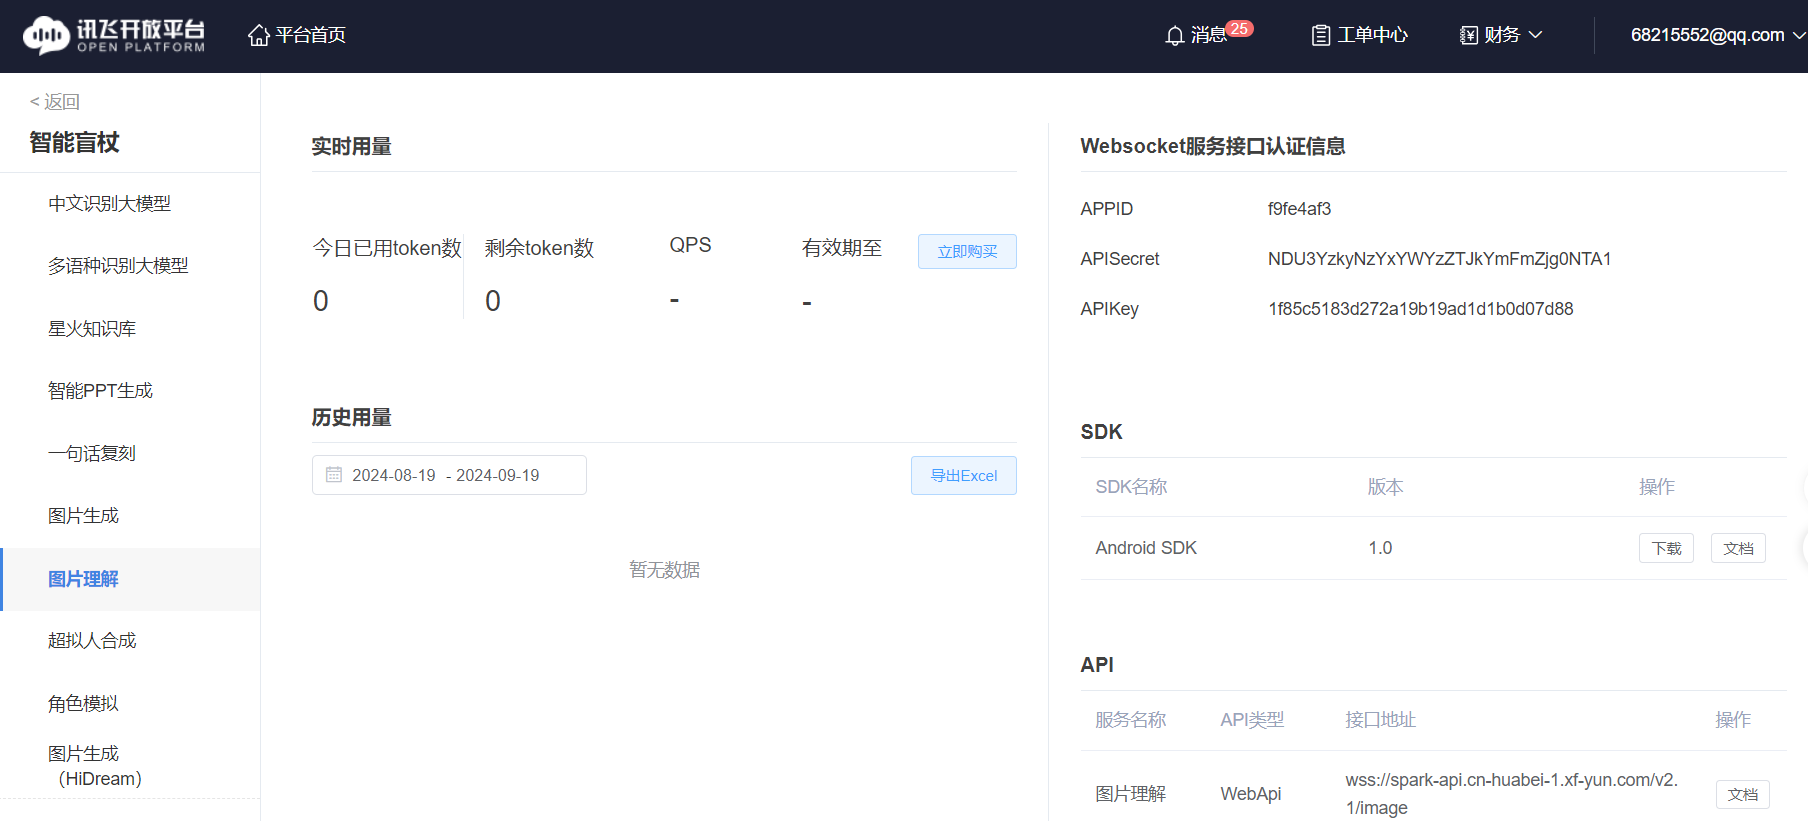
1.获取讯飞星火大模型API免费试用

2.测试“图像理解”代码
import _thread as thread
import base64
import datetime
import hashlib
import hmac
import json
from urllib.parse import urlparse
import ssl
from datetime import datetime
from time import mktime
from urllib.parse import urlencode
from wsgiref.handlers import format_date_time
import websocket  # 使用websocket_client

appid ="******"    #填写控制台中获取的 APPID 信息
api_secret ="*************************"   #填写控制台中获取的 APISecret 信息
api_key ="******************************"    #填写控制台中获取的 APIKey 信息

imageunderstanding_url = "wss://spark-api.cn-huabei-1.xf-yun.com/v2.1/image"#云端环境的服务地址

class Ws_Param(object):
    # 初始化
    def __init__(self, APPID, APIKey, APISecret, imageunderstanding_url):
        self.APPID = APPID
        self.APIKey = APIKey
        self.APISecret = APISecret
        self.host = urlparse(imageunderstanding_url).netloc
        self.path = urlparse(imageunderstanding_url).path
        self.ImageUnderstanding_url = imageunderstanding_url

    # 生成url
    def create_url(self):
        # 生成RFC1123格式的时间戳
        now = datetime.now()
        date = format_date_time(mktime(now.timetuple()))

        # 拼接字符串
        signature_origin = "host: " + self.host + "\n"
        signature_origin += "date: " + date + "\n"
        signature_origin += "GET " + self.path + " HTTP/1.1"

        # 进行hmac-sha256进行加密
        signature_sha = hmac.new(self.APISecret.encode('utf-8'), signature_origin.encode('utf-8'),
                                 digestmod=hashlib.sha256).digest()

        signature_sha_base64 = base64.b64encode(signature_sha).decode(encoding='utf-8')

        authorization_origin = f'api_key="{self.APIKey}", algorithm="hmac-sha256", headers="host date request-line", signature="{signature_sha_base64}"'

        authorization = base64.b64encode(authorization_origin.encode('utf-8')).decode(encoding='utf-8')

        # 将请求的鉴权参数组合为字典
        v = {
            "authorization": authorization,
            "date": date,
            "host": self.host
        }
        # 拼接鉴权参数,生成url
        url = self.ImageUnderstanding_url + '?' + urlencode(v)
        #print(url)
        # 此处打印出建立连接时候的url,参考本demo的时候可取消上方打印的注释,比对相同参数时生成的url与自己代码生成的url是否一致
        return url


# 收到websocket错误的处理
def on_error(ws, error):
    print("### error:", error)


# 收到websocket关闭的处理
def on_close(ws,one,two):
    print(" ")


# 收到websocket连接建立的处理
def on_open(ws):
    thread.start_new_thread(run, (ws,))


def run(ws, *args):
    data = json.dumps(gen_params(appid=ws.appid, question= ws.question ))
    ws.send(data)


# 收到websocket消息的处理
def on_message(ws, message):
    #print(message)
    data = json.loads(message)
    code = data['header']['code']
    if code != 0:
        print(f'请求错误: {code}, {data}')
        ws.close()
    else:
        choices = data["payload"]["choices"]
        status = choices["status"]
        content = choices["text"][0]["content"]
        print(content,end ="")
        global answer
        answer += content
        # print(1)
        if status == 2:
            ws.close()


def gen_params(appid, question):
    """
    通过appid和用户的提问来生成请参数
    """

    data = {
        "header": {
            "app_id": appid
        },
        "parameter": {
            "chat": {
                "domain": "image",
                "temperature": 0.5,
                "top_k": 4,
                "max_tokens": 2028,
                "auditing": "default"
            }
        },
        "payload": {
            "message": {
                "text": question
            }
        }
}

    return data


def main(appid, api_key, api_secret, imageunderstanding_url,question):

    wsParam = Ws_Param(appid, api_key, api_secret, imageunderstanding_url)
    websocket.enableTrace(False)
    wsUrl = wsParam.create_url()
    ws = websocket.WebSocketApp(wsUrl, on_message=on_message, on_error=on_error, on_close=on_close, on_open=on_open)
    ws.appid = appid
    #ws.imagedata = imagedata
    ws.question = question
    ws.run_forever(sslopt={"cert_reqs": ssl.CERT_NONE})


def getText(role, content):
    jsoncon = {}
    jsoncon["role"] = role
    jsoncon["content"] = content
    text.append(jsoncon)
    return text


def getlength(text):
    length = 0
    for content in text:
        temp = content["content"]
        leng = len(temp)
        length += leng
    return length


def checklen(text):
    #print("text-content-tokens:", getlength(text[1:]))
    while (getlength(text[1:])> 8000):
        del text[1]
    return text

if __name__ == '__main__':

    #text.clear
    if(1):
        imagedata = open("Mind+.png",'rb').read()
        text =[{"role": "user", "content": str(base64.b64encode(imagedata), 'utf-8'), "content_type":"image"}]
        Input = input("\n" +"问:")
        question = checklen(getText("user",Input))
        answer = ""
        print("答:",end = "")
        main(appid, api_key, api_secret, imageunderstanding_url, question)
        getText("assistant", answer)
        # print(str(text))
3.行空板拍摄照片代码
#  -*- coding: UTF-8 -*-

# MindPlus
# Python
import cv2
import time
from unihiker import GUI

# 事件回调函数
def on_buttona_click_callback():
    global BiaoShi
    global 摄像头
    摄像头 = cv2.VideoCapture()
    摄像头.open(0)
    摄像头.set(cv2.CAP_PROP_FRAME_WIDTH,240)
    摄像头.set(cv2.CAP_PROP_FRAME_HEIGHT,320)
    while not (摄像头.isOpened()):
        pass
    BiaoShi = 1
    print("1")
    time.sleep(1)


u_gui=GUI()
u_gui.on_a_click(on_buttona_click_callback)
BiaoShi = 0
显示=u_gui.draw_image(image="",x=0,y=0)

while True:
    if (BiaoShi == 1):
        print("2")
        BiaoShi = 0
        ZhuangTai, TuXiang = 摄像头.read()
        TuXiang = cv2.rotate(TuXiang,cv2.ROTATE_90_CLOCKWISE)
        if bool(ZhuangTai):
            print("3")
            cv2.imwrite("Mind+.png", TuXiang)
            显示.config(image="Mind+.png")
            摄像头.release()
4.讯飞“语音合成”代码
#  -*- coding: UTF-8 -*-

# MindPlus
# Python
from unihiker import GUI
from unihiker import Audio
from df_xfyun_speech import XfTts

# 事件回调函数
def on_buttona_click_callback():
    pass


u_gui=GUI()
appid ="**************"    #填写控制台中获取的 APPID 信息
api_secret ="*******************"   #填写控制台中获取的 APISecret 信息
api_key ="***********************"    #填写控制台中获取的 APIKey 信息
options = {}
u_audio = Audio()
u_gui.on_a_click(on_buttona_click_callback)
tts = XfTts(appid, api_key, api_secret, options)
tts.synthesis("你好, Mind+", "speech.wav")
u_audio.play("speech.wav")
5.图像理解——问题列表
#  -*- coding: UTF-8 -*-

# MindPlus
# Python
from unihiker import GUI
from pinpong.board import Board,Pin
from pinpong.extension.unihiker import *


u_gui=GUI()
Board().begin()
u_gui.on_a_click(on_buttona_click_callback)
p_p21_in=Pin(Pin.P21, Pin.IN)
WenTi = ["这张图片展示的内容是什么?"]
WenTi.append("照片中的盲道上是畅通的吗?")
WenTi.append("照片的路口红绿灯是红灯还是绿灯?")
WenTi.append("照片中有公共卫生间吗?")
input = (WenTi[0])
XuHao = 0
if (p_p21_in.read_digital()==True):
    XuHao = (XuHao + 1)
    input = (WenTi[XuHao])
6.完整代码
import _thread as thread
import base64
import datetime
import hashlib
import hmac
import json
from urllib.parse import urlparse
import ssl
from datetime import datetime
from time import mktime
from urllib.parse import urlencode
from wsgiref.handlers import format_date_time
import websocket  # 使用websocket_client
import cv2
import time
from unihiker import GUI
from unihiker import Audio
from df_xfyun_speech import XfTts
from pinpong.board import Board,Pin
from pinpong.extension.unihiker import *


appid ="***********"    #填写控制台中获取的 APPID 信息
api_secret ="********************"   #填写控制台中获取的 APISecret 信息
api_key ="**************************"    #填写控制台中获取的 APIKey 信息

imageunderstanding_url = "wss://spark-api.cn-huabei-1.xf-yun.com/v2.1/image"#云端环境的服务地址

class Ws_Param(object):
    # 初始化
    def __init__(self, APPID, APIKey, APISecret, imageunderstanding_url):
        self.APPID = APPID
        self.APIKey = APIKey
        self.APISecret = APISecret
        self.host = urlparse(imageunderstanding_url).netloc
        self.path = urlparse(imageunderstanding_url).path
        self.ImageUnderstanding_url = imageunderstanding_url

    # 生成url
    def create_url(self):
        # 生成RFC1123格式的时间戳
        now = datetime.now()
        date = format_date_time(mktime(now.timetuple()))

        # 拼接字符串
        signature_origin = "host: " + self.host + "\n"
        signature_origin += "date: " + date + "\n"
        signature_origin += "GET " + self.path + " HTTP/1.1"

        # 进行hmac-sha256进行加密
        signature_sha = hmac.new(self.APISecret.encode('utf-8'), signature_origin.encode('utf-8'),
                                 digestmod=hashlib.sha256).digest()

        signature_sha_base64 = base64.b64encode(signature_sha).decode(encoding='utf-8')

        authorization_origin = f'api_key="{self.APIKey}", algorithm="hmac-sha256", headers="host date request-line", signature="{signature_sha_base64}"'

        authorization = base64.b64encode(authorization_origin.encode('utf-8')).decode(encoding='utf-8')

        # 将请求的鉴权参数组合为字典
        v = {
            "authorization": authorization,
            "date": date,
            "host": self.host
        }
        # 拼接鉴权参数,生成url
        url = self.ImageUnderstanding_url + '?' + urlencode(v)
        #print(url)
        # 此处打印出建立连接时候的url,参考本demo的时候可取消上方打印的注释,比对相同参数时生成的url与自己代码生成的url是否一致
        return url


# 收到websocket错误的处理
def on_error(ws, error):
    print("### error:", error)


# 收到websocket关闭的处理
def on_close(ws,one,two):
    print(" ")


# 收到websocket连接建立的处理
def on_open(ws):
    thread.start_new_thread(run, (ws,))


def run(ws, *args):
    data = json.dumps(gen_params(appid=ws.appid, question= ws.question ))
    ws.send(data)


# 收到websocket消息的处理
def on_message(ws, message):
    #print(message)
    data = json.loads(message)
    code = data['header']['code']
    if code != 0:
        print(f'请求错误: {code}, {data}')
        ws.close()
    else:
        choices = data["payload"]["choices"]
        status = choices["status"]
        content = choices["text"][0]["content"]
        #print(content,end="")
        global answer
        answer += content

        if status == 2:
            ws.close()


def gen_params(appid, question):
    """
    通过appid和用户的提问来生成请参数
    """

    data = {
        "header": {
            "app_id": appid
        },
        "parameter": {
            "chat": {
                "domain": "image",
                "temperature": 0.5,
                "top_k": 4,
                "max_tokens": 2028,
                "auditing": "default"
            }
        },
        "payload": {
            "message": {
                "text": question
            }
        }
}

    return data


def main(appid, api_key, api_secret, imageunderstanding_url,question):

    wsParam = Ws_Param(appid, api_key, api_secret, imageunderstanding_url)
    websocket.enableTrace(False)
    wsUrl = wsParam.create_url()
    ws = websocket.WebSocketApp(wsUrl, on_message=on_message, on_error=on_error, on_close=on_close, on_open=on_open)
    ws.appid = appid
    #ws.imagedata = imagedata
    ws.question = question
    ws.run_forever(sslopt={"cert_reqs": ssl.CERT_NONE})


def getText(role, content):
    jsoncon = {}
    jsoncon["role"] = role
    jsoncon["content"] = content
    text.append(jsoncon)
    return text


def getlength(text):
    length = 0
    for content in text:
        temp = content["content"]
        leng = len(temp)
        length += leng
    return length


def checklen(text):
    #print("text-content-tokens:", getlength(text[1:]))
    while (getlength(text[1:])> 8000):
        del text[1]
    return text

#  -*- coding: UTF-8 -*-

# MindPlus
# Python

# 事件回调函数
def on_buttona_click_callback():
    p_p24_out.write_digital(1)
    buzzer.play(buzzer.POWER_UP,buzzer.Once)
def on_buttonb_click_callback():
    p_p24_out.write_digital(0)
    buzzer.play(buzzer.POWER_DOWN,buzzer.Once)

u_gui=GUI()
Board().begin()
options = {}
u_audio = Audio()
tts = XfTts(appid, api_key, api_secret, options)
BiaoShi = 0
显示=u_gui.draw_image(image="logo.png",x=0,y=0)
p_p21_in=Pin(Pin.P21, Pin.IN)
p_p23_in=Pin(Pin.P23, Pin.IN)
u_gui.on_a_click(on_buttona_click_callback)
p_p24_out=Pin(Pin.P24, Pin.OUT)
u_gui.on_b_click(on_buttonb_click_callback)
if __name__ == '__main__':
  WenTi = ["这张图片展示的内容是什么?"]
  WenTi.append("照片中的盲道上是畅通的吗?")
  WenTi.append("照片的路口红绿灯是红灯还是绿灯?")
  WenTi.append("照片中有公共卫生间吗?")
  Input = (WenTi[0])
  XuHao = 0
  while True:
    if (p_p21_in.read_digital()==True):
        tts.synthesis("正在识别中,请稍等等", "speech.wav")
        u_audio.play("speech.wav")
        摄像头 = cv2.VideoCapture()
        摄像头.open(0)
        摄像头.set(cv2.CAP_PROP_FRAME_WIDTH,240)
        摄像头.set(cv2.CAP_PROP_FRAME_HEIGHT,320)
        ZhuangTai, TuXiang = 摄像头.read()
        TuXiang = cv2.rotate(TuXiang,cv2.ROTATE_90_CLOCKWISE)
        print("2")
        if bool(ZhuangTai):
            print("3")
            cv2.imwrite("Mind+.png", TuXiang)
            显示.config(image="Mind+.png")
            摄像头.release()
            imagedata = open("Mind+.png",'rb').read()
            text =[{"role": "user", "content": str(base64.b64encode(imagedata), 'utf-8'), "content_type":"image"}]

            question = checklen(getText("user",Input))
            #print(question)
            answer = ""
            #print("答:",end="")
            main(appid, api_key, api_secret, imageunderstanding_url, question)
            getText("assistant", answer)
            print(answer)
            tts.synthesis(answer+"   ", "speech.wav")
            u_audio.play("speech.wav")
    if (p_p23_in.read_digital()==True):
        XuHao = (XuHao + 1)

        if (XuHao == len(WenTi)):
            XuHao = 0
        Input = (WenTi[XuHao])
        tts.synthesis(Input+"   ", "speech.wav")
        u_audio.play("speech.wav")
【连接蓝牙音箱】
1.操作命令
要将行空板连接蓝牙音箱,可以按照以下步骤操作:
确保蓝牙音箱处于可被发现的状态。通常这意味着需要将其置于配对模式。
在行空板上,您可能需要使用命令行工具来搜索并连接蓝牙设备。可以用 bluetoothctl 命令来管理蓝牙设备。
打开行空板的终端,输入以下命令来启动蓝牙服务:
bluetoothctl
在蓝牙控制界面中,输入 power on 来开启蓝牙。
输入 agent on 来启动蓝牙代理。
输入 default-agent 来设置默认代理。
输入 scan on 开始搜索附近的蓝牙设备。
一旦您的蓝牙音箱出现在搜索结果中,使用 pair [设备MAC地址] 命令来配对设备。
配对成功后,使用 connect [设备MAC地址] 命令来连接音箱。
2.使用程序
import subprocess
# 启动蓝牙服务(如果尚未启动)
subprocess.call(['systemctl', 'start', 'bluetooth'])
# 执行bluetoothctl命令
def run_bluetooth_command(command):
    try:
        process = subprocess.Popen(
            ['bluetoothctl'] + command,
            stdout=subprocess.PIPE,
            stderr=subprocess.PIPE
        )
        stdout, stderr = process.communicate()
        if process.returncode == 0:
            print('Success:', stdout.decode())
        else:
            print('Error:', stderr.decode())
    except OSError as e:
        print('Execution failed:', e)
# 连接蓝牙音箱
def connect_bluetooth_speaker(address):
    run_bluetooth_command(['power', 'on'])  # 启动蓝牙适配器
    run_bluetooth_command(['agent', 'on'])  # 启动代理
    run_bluetooth_command(['default-agent'])  # 设置默认代理
    run_bluetooth_command(['scan', 'on'])  # 开始扫描设备
    # 这里可能需要等待一段时间,以确保音箱被发现
    run_bluetooth_command(['scan', 'off'])  # 停止扫描
    run_bluetooth_command(['pair', address])  # 配对音箱
    run_bluetooth_command(['connect', address])  # 连接音箱
# 使用音箱的蓝牙地址
bluetooth_address = '5A:5A:5A:A7:01:CA'  # 替换为你的蓝牙音箱地址
connect_bluetooth_speaker(bluetooth_address)
【演示视频】


 他的勋章
他的勋章

_深蓝_2024.11.29
需要行空板连接网络哦,否则程序运行不了
罗罗罗2024.10.13
太牛了
孙洪尧19852024.09.19
云天老师,是否可以做一些浦育平台+行空板的图形化案例?
云天2024.09.19
Mind+扩展里讯飞语音合成,播放时会吞掉最后一个字。
风悠扬05392024.09.19
那你多输入一个,就解决了吧
云天2024.09.19
其中有一句话,我就是这样做的,可以的。但这确实是个问题!