 返回首页
返回首页
 回到顶部
回到顶部
37款传感器与执行器的提法,在网络上广泛流传,其实Arduino能够兼容的传感器模块肯定是不止这37种的。鉴于本人手头积累了一些传感器和执行器模块,依照实践出真知(一定要动手做)的理念,以学习和交流为目的,这里准备逐一动手尝试系列实验,不管成功(程序走通)与否,都会记录下来—小小的进步或是搞不掂的问题,希望能够抛砖引玉。
【Arduino】168种传感器模块系列实验(资料代码+仿真编程+图形编程)
实验六十: 直条8位 WS2812B 5050 RGB LED内置全彩驱动彩灯模块
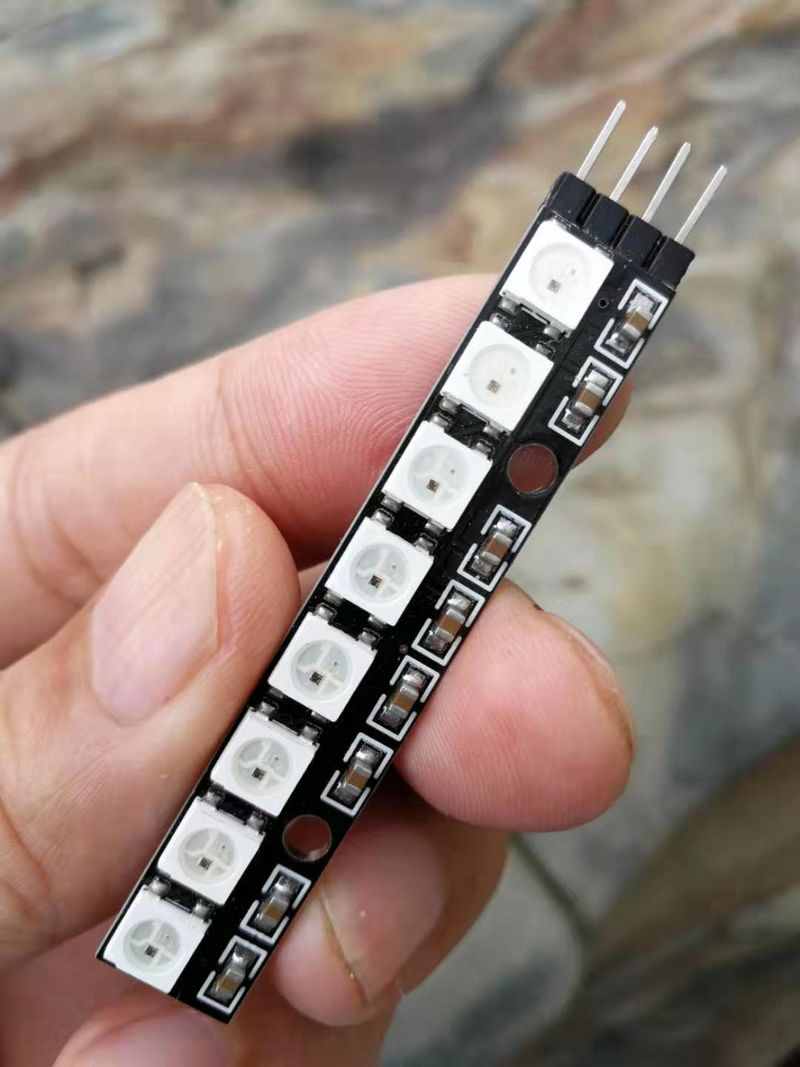
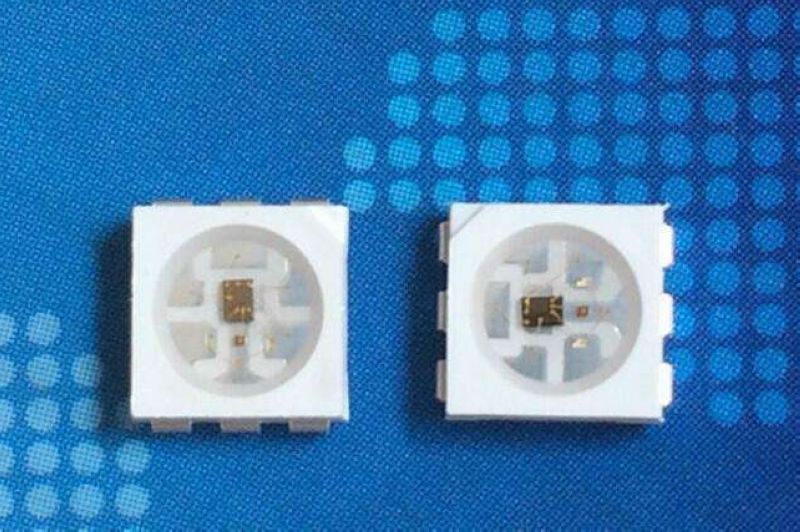
知识点:WS2812B芯片
是一个集控制电路与发光电路于一体的智能外控LED光源。其外型与一个5050LED灯珠相同,每个元件即为一个像素点。像素点内部包含了智能数字接口数据锁存信号整形放大驱动电路,还包含有高精度的内部振荡器和12V高压可编程定电流控制部分,有效保证了像素点光的颜色高度一致。数据协议采用单线归零码的通讯方式,像素点在上电复位以后,DIN端接受从控制器传输过来的数据,首先送过来的24bit数据被第一个像素点提取后,送到像素点内部的数据锁存器,剩余的数据经过内部整形处理电路整形放大后通过DO端口开始转发输出给下一个级联的像素点,每经过一个像素点的传输,信号减少24bit。像素点采用自动整形转发技术,使得该像素点的级联个数不受信号传送的限制,仅仅受限信号传输速度要求。
WS2812主要特点
1、智能反接保护,电源反接不会损坏IC。
2、IC控制电路与LED点光源公用一个电源。
3、控制电路与RGB芯片集成在一个5050封装的元器件中,构成一个完整的外控像素点。
4、内置信号整形电路,任何一个像素点收到信号后经过波形整形再输出,保证线路波形畸变不会累加。
5、内置上电复位和掉电复位电路。
6、每个像素点的三基色颜色可实现256级亮度显示,完成16777216种颜色的全真色彩显示,扫描频率不低于400Hz/s。
7、串行级联接口,能通过一根信号线完成数据的接收与解码。
8、任意两点传传输距离在不超过5米时无需增加任何电路。
9、当刷新速率30帧/秒时,级联数不小于1024点。
10、数据发送速度可达800Kbps。
11、光的颜色高度一致,性价比高。
【Arduino】168种传感器模块系列实验(资料代码+图形编程+仿真编程)
实验六十:直条8位 WS2812B 5050 RGB LED内置全彩驱动彩灯模块
项目三十三:NeoEase 动画缓动方法的使用;提供模拟加速动画
实验开源代码
/*
  【Arduino】168种传感器模块系列实验(资料代码+图形编程+仿真编程)
  实验六十一:直条8位 WS2812B 5050 RGB LED内置全彩驱动彩灯模块
  项目三十三:NeoEase 动画缓动方法的使用;提供模拟加速动画
*/

// NeoPixelCylon
// This example will move a Cylon Red Eye back and forth across the
// the full collection of pixels on the strip.
//
// This will demonstrate the use of the NeoEase animation ease methods; that provide
// simulated acceleration to the animations.
//
//

#include <NeoPixelBus.h>
#include <NeoPixelAnimator.h>

const uint16_t PixelCount = 8; // make sure to set this to the number of pixels in your strip
const uint8_t PixelPin = 6;  // make sure to set this to the correct pin, ignored for Esp8266
const RgbColor CylonEyeColor(HtmlColor(0x7f0000));

NeoPixelBus<NeoGrbFeature, Neo800KbpsMethod> strip(PixelCount, PixelPin);
// for esp8266 omit the pin
//NeoPixelBus<NeoGrbFeature, Neo800KbpsMethod> strip(PixelCount);

NeoPixelAnimator animations(2); // only ever need 2 animations

uint16_t lastPixel = 0; // track the eye position
int8_t moveDir = 1; // track the direction of movement

// uncomment one of the lines below to see the effects of
// changing the ease function on the movement animation
AnimEaseFunction moveEase =
//      NeoEase::Linear;
//      NeoEase::QuadraticInOut;
//      NeoEase::CubicInOut;
        NeoEase::QuarticInOut;
//      NeoEase::QuinticInOut;
//      NeoEase::SinusoidalInOut;
//      NeoEase::ExponentialInOut;
//      NeoEase::CircularInOut;

void FadeAll(uint8_t darkenBy)
{
    RgbColor color;
    for (uint16_t indexPixel = 0; indexPixel < strip.PixelCount(); indexPixel++)
    {
        color = strip.GetPixelColor(indexPixel);
        color.Darken(darkenBy);
        strip.SetPixelColor(indexPixel, color);
    }
}

void FadeAnimUpdate(const AnimationParam& param)
{
    if (param.state == AnimationState_Completed)
    {
        FadeAll(10);
        animations.RestartAnimation(param.index);
    }
}

void MoveAnimUpdate(const AnimationParam& param)
{
    // apply the movement animation curve
    float progress = moveEase(param.progress);

    // use the curved progress to calculate the pixel to effect
    uint16_t nextPixel;
    if (moveDir > 0)
    {
        nextPixel = progress * PixelCount;
    }
    else
    {
        nextPixel = (1.0f - progress) * PixelCount;
    }

    // if progress moves fast enough, we may move more than
    // one pixel, so we update all between the calculated and
    // the last
    if (lastPixel != nextPixel)
    {
        for (uint16_t i = lastPixel + moveDir; i != nextPixel; i += moveDir)
        {
            strip.SetPixelColor(i, CylonEyeColor);
        }
    }
    strip.SetPixelColor(nextPixel, CylonEyeColor);

    lastPixel = nextPixel;

    if (param.state == AnimationState_Completed)
    {
        // reverse direction of movement
        moveDir *= -1;

        // done, time to restart this position tracking animation/timer
        animations.RestartAnimation(param.index);
    }
}

void SetupAnimations()
{
    // fade all pixels providing a tail that is longer the faster
    // the pixel moves.
    animations.StartAnimation(0, 5, FadeAnimUpdate);

    // take several seconds to move eye fron one side to the other
    animations.StartAnimation(1, 2000, MoveAnimUpdate);
}

void setup()
{
    strip.Begin();
    strip.Show();

    SetupAnimations();
}

void loop()
{
    // this is all that is needed to keep it running
    // and avoiding using delay() is always a good thing for
    // any timing related routines
    animations.UpdateAnimations();
    strip.Show();
}
【Arduino】168种传感器模块系列实验(资料代码+图形编程+仿真编程)
实验六十:直条8位 WS2812B 5050 RGB LED内置全彩驱动彩灯模块
项目三十四:将随机选择一种颜色并将所有像素淡化为该颜色,然后
它会将它们淡化为黑色并重新开始
实验开源代码
/*
  【Arduino】168种传感器模块系列实验(资料代码+图形编程+仿真编程)
  实验六十一:直条8位 WS2812B 5050 RGB LED内置全彩驱动彩灯模块
  项目三十四:将随机选择一种颜色并将所有像素淡化为该颜色,然后
  它会将它们淡化为黑色并重新开始
*/

#include <NeoPixelBus.h>
#include <NeoPixelAnimator.h>

const uint16_t PixelCount = 8; // make sure to set this to the number of pixels in your strip
const uint8_t PixelPin = 6;  // make sure to set this to the correct pin, ignored for Esp8266
const uint8_t AnimationChannels = 1; // we only need one as all the pixels are animated at once

NeoPixelBus<NeoGrbFeature, Neo800KbpsMethod> strip(PixelCount, PixelPin);
// For Esp8266, the Pin is omitted and it uses GPIO3 due to DMA hardware use.
// There are other Esp8266 alternative methods that provide more pin options, but also have
// other side effects.
// for details see wiki linked here https://github.com/Makuna/NeoPixelBus/wiki/ESP8266-NeoMethods

NeoPixelAnimator animations(AnimationChannels); // NeoPixel animation management object

boolean fadeToColor = true;  // general purpose variable used to store effect state


// what is stored for state is specific to the need, in this case, the colors.
// basically what ever you need inside the animation update function
struct MyAnimationState
{
  RgbColor StartingColor;
  RgbColor EndingColor;
};

// one entry per pixel to match the animation timing manager
MyAnimationState animationState[AnimationChannels];

void SetRandomSeed()
{
  uint32_t seed;

  // random works best with a seed that can use 31 bits
  // analogRead on a unconnected pin tends toward less than four bits
  seed = analogRead(0);
  delay(1);

  for (int shifts = 3; shifts < 31; shifts += 3)
  {
    seed ^= analogRead(0) << shifts;
    delay(1);
  }

  randomSeed(seed);
}

// simple blend function
void BlendAnimUpdate(const AnimationParam& param)
{
  // this gets called for each animation on every time step
  // progress will start at 0.0 and end at 1.0
  // we use the blend function on the RgbColor to mix
  // color based on the progress given to us in the animation
  RgbColor updatedColor = RgbColor::LinearBlend(
                            animationState[param.index].StartingColor,
                            animationState[param.index].EndingColor,
                            param.progress);

  // apply the color to the strip
  for (uint16_t pixel = 0; pixel < PixelCount; pixel++)
  {
    strip.SetPixelColor(pixel, updatedColor);
  }
}

void FadeInFadeOutRinseRepeat(float luminance)
{
  if (fadeToColor)
  {
    // Fade upto a random color
    // we use HslColor object as it allows us to easily pick a hue
    // with the same saturation and luminance so the colors picked
    // will have similiar overall brightness
    RgbColor target = HslColor(random(360) / 360.0f, 1.0f, luminance);
    uint16_t time = random(800, 2000);

    animationState[0].StartingColor = strip.GetPixelColor(0);
    animationState[0].EndingColor = target;

    animations.StartAnimation(0, time, BlendAnimUpdate);
  }
  else
  {
    // fade to black
    uint16_t time = random(600, 700);

    animationState[0].StartingColor = strip.GetPixelColor(0);
    animationState[0].EndingColor = RgbColor(0);

    animations.StartAnimation(0, time, BlendAnimUpdate);
  }

  // toggle to the next effect state
  fadeToColor = !fadeToColor;
}

void setup()
{
  strip.Begin();
  strip.Show();

  SetRandomSeed();
}

void loop()
{
  if (animations.IsAnimating())
  {
    // the normal loop just needs these two to run the active animations
    animations.UpdateAnimations();
    strip.Show();
  }
  else
  {
    // no animation runnning, start some
    //
    FadeInFadeOutRinseRepeat(0.2f); // 0.0 = black, 0.25 is normal, 0.5 is bright
  }
}
【Arduino】168种传感器模块系列实验(资料代码+图形编程+仿真编程)
实验六十:直条8位 WS2812B 5050 RGB LED内置全彩驱动彩灯模块
项目三十五:将围绕一系列像素移动光迹,轨迹将有一个缓慢衰减的尾部
实验开源代码
/*
  【Arduino】168种传感器模块系列实验(资料代码+图形编程+仿真编程)
  实验六十一:直条8位 WS2812B 5050 RGB LED内置全彩驱动彩灯模块
  项目三十五:将围绕一系列像素移动光迹,轨迹将有一个缓慢衰减的尾部
*/

// NeoPixelFunLoop
// This example will move a trail of light around a series of pixels.
// A ring formation of pixels looks best.
// The trail will have a slowly fading tail.
//
// This will demonstrate the use of the NeoPixelAnimator.
// It shows the advanced use an animation to control the modification and
// starting of other animations.
// It also shows the normal use of animating colors.
// It also demonstrates the ability to share an animation channel rather than
// hard code them to pixels.
//

#include <NeoPixelBus.h>
#include <NeoPixelAnimator.h>


const uint16_t PixelCount = 8; // make sure to set this to the number of pixels in your strip
const uint16_t PixelPin = 6;  // make sure to set this to the correct pin, ignored for Esp8266
const uint16_t AnimCount = PixelCount / 5 * 2 + 1; // we only need enough animations for the tail and one extra

const uint16_t PixelFadeDuration = 300; // third of a second
// one second divide by the number of pixels = loop once a second
const uint16_t NextPixelMoveDuration = 1000 / PixelCount; // how fast we move through the pixels

NeoGamma<NeoGammaTableMethod> colorGamma; // for any fade animations, best to correct gamma

NeoPixelBus<NeoGrbFeature, Neo800KbpsMethod> strip(PixelCount, PixelPin);
// For Esp8266, the Pin is omitted and it uses GPIO3 due to DMA hardware use.
// There are other Esp8266 alternative methods that provide more pin options, but also have
// other side effects.
// for details see wiki linked here https://github.com/Makuna/NeoPixelBus/wiki/ESP8266-NeoMethods

// what is stored for state is specific to the need, in this case, the colors and
// the pixel to animate;
// basically what ever you need inside the animation update function
struct MyAnimationState
{
    RgbColor StartingColor;
    RgbColor EndingColor;
    uint16_t IndexPixel; // which pixel this animation is effecting
};

NeoPixelAnimator animations(AnimCount); // NeoPixel animation management object
MyAnimationState animationState[AnimCount];
uint16_t frontPixel = 0;  // the front of the loop
RgbColor frontColor;  // the color at the front of the loop

void SetRandomSeed()
{
    uint32_t seed;

    // random works best with a seed that can use 31 bits
    // analogRead on a unconnected pin tends toward less than four bits
    seed = analogRead(0);
    delay(1);

    for (int shifts = 3; shifts < 31; shifts += 3)
    {
        seed ^= analogRead(0) << shifts;
        delay(1);
    }

    // Serial.println(seed);
    randomSeed(seed);
}

void FadeOutAnimUpdate(const AnimationParam& param)
{
    // this gets called for each animation on every time step
    // progress will start at 0.0 and end at 1.0
    // we use the blend function on the RgbColor to mix
    // color based on the progress given to us in the animation
    RgbColor updatedColor = RgbColor::LinearBlend(
        animationState[param.index].StartingColor,
        animationState[param.index].EndingColor,
        param.progress);
    // apply the color to the strip
    strip.SetPixelColor(animationState[param.index].IndexPixel,
        colorGamma.Correct(updatedColor));
}

void LoopAnimUpdate(const AnimationParam& param)
{
    // wait for this animation to complete,
    // we are using it as a timer of sorts
    if (param.state == AnimationState_Completed)
    {
        // done, time to restart this position tracking animation/timer
        animations.RestartAnimation(param.index);

        // pick the next pixel inline to start animating
        //
        frontPixel = (frontPixel + 1) % PixelCount; // increment and wrap
        if (frontPixel == 0)
        {
            // we looped, lets pick a new front color
            frontColor = HslColor(random(360) / 360.0f, 1.0f, 0.25f);
        }

        uint16_t indexAnim;
        // do we have an animation available to use to animate the next front pixel?
        // if you see skipping, then either you are going to fast or need to increase
        // the number of animation channels
        if (animations.NextAvailableAnimation(&indexAnim, 1))
        {
            animationState[indexAnim].StartingColor = frontColor;
            animationState[indexAnim].EndingColor = RgbColor(0, 0, 0);
            animationState[indexAnim].IndexPixel = frontPixel;

            animations.StartAnimation(indexAnim, PixelFadeDuration, FadeOutAnimUpdate);
        }
    }
}

void setup()
{
    strip.Begin();
    strip.Show();

    SetRandomSeed();

    // we use the index 0 animation to time how often we move to the next
    // pixel in the strip
    animations.StartAnimation(0, NextPixelMoveDuration, LoopAnimUpdate);
}


void loop()
{
    // this is all that is needed to keep it running
    // and avoiding using delay() is always a good thing for
    // any timing related routines
    animations.UpdateAnimations();
    strip.Show();
}
【Arduino】168种传感器模块系列实验(资料代码+图形编程+仿真编程)
实验六十:直条8位 WS2812B 5050 RGB LED内置全彩驱动彩灯模块
项目三十六:随机选择一个像素,然后启动动画将它们从当前颜色混合到
实验开源代码
/*
  【Arduino】168种传感器模块系列实验(资料代码+图形编程+仿真编程)
  实验六十一:直条8位 WS2812B 5050 RGB LED内置全彩驱动彩灯模块
  项目三十六:随机选择一个像素,然后启动动画将它们从当前颜色混合到
*/

#include <NeoPixelBus.h>
#include <NeoPixelAnimator.h>

const uint16_t PixelCount = 8; // make sure to set this to the number of pixels in your strip
const uint8_t PixelPin = 6;  // make sure to set this to the correct pin, ignored for Esp8266

NeoPixelBus<NeoGrbFeature, Neo800KbpsMethod> strip(PixelCount, PixelPin);
// For Esp8266, the Pin is omitted and it uses GPIO3 due to DMA hardware use.
// There are other Esp8266 alternative methods that provide more pin options, but also have
// other side effects.
// for details see wiki linked here https://github.com/Makuna/NeoPixelBus/wiki/ESP8266-NeoMethods

NeoPixelAnimator animations(PixelCount); // NeoPixel animation management object

// what is stored for state is specific to the need, in this case, the colors.
// Basically what ever you need inside the animation update function
struct MyAnimationState
{
    RgbColor StartingColor;
    RgbColor EndingColor;
};

// one entry per pixel to match the animation timing manager
MyAnimationState animationState[PixelCount];

void SetRandomSeed()
{
    uint32_t seed;

    // random works best with a seed that can use 31 bits
    // analogRead on a unconnected pin tends toward less than four bits
    seed = analogRead(0);
    delay(1);

    for (int shifts = 3; shifts < 31; shifts += 3)
    {
        seed ^= analogRead(0) << shifts;
        delay(1);
    }

    // Serial.println(seed);
    randomSeed(seed);
}

// simple blend function
void BlendAnimUpdate(const AnimationParam& param)
{
    // this gets called for each animation on every time step
    // progress will start at 0.0 and end at 1.0
    // we use the blend function on the RgbColor to mix
    // color based on the progress given to us in the animation
    RgbColor updatedColor = RgbColor::LinearBlend(
        animationState[param.index].StartingColor,
        animationState[param.index].EndingColor,
        param.progress);
    // apply the color to the strip
    strip.SetPixelColor(param.index, updatedColor);
}

void PickRandom(float luminance)
{
    // pick random count of pixels to animate
    uint16_t count = random(PixelCount);
    while (count > 0)
    {
        // pick a random pixel
        uint16_t pixel = random(PixelCount);

        // pick random time and random color
        // we use HslColor object as it allows us to easily pick a color
        // with the same saturation and luminance
        uint16_t time = random(100, 400);
        animationState[pixel].StartingColor = strip.GetPixelColor(pixel);
        animationState[pixel].EndingColor = HslColor(random(360) / 360.0f, 1.0f, luminance);

        animations.StartAnimation(pixel, time, BlendAnimUpdate);

        count--;
    }
}

void setup()
{
    strip.Begin();
    strip.Show();

    SetRandomSeed();
}


void loop()
{
    if (animations.IsAnimating())
    {
        // the normal loop just needs these two to run the active animations
        animations.UpdateAnimations();
        strip.Show();
    }
    else
    {
        // no animations runnning, start some
        //
        PickRandom(0.2f); // 0.0 = black, 0.25 is normal, 0.5 is bright
    }
}
【Arduino】168种传感器模块系列实验(资料代码+图形编程+仿真编程)
实验六十:直条8位 WS2812B 5050 RGB LED内置全彩驱动彩灯模块
项目三十七:随机使用 31 位的种子效果淡入淡出动画
实验开源代码
/*
【Arduino】168种传感器模块系列实验(资料代码+图形编程+仿真编程)
实验六十一:直条8位 WS2812B 5050 RGB LED内置全彩驱动彩灯模块
项目三十七:随机使用 31 位的种子效果淡入淡出动画
*/
#include <NeoPixelBus.h>
#include <NeoPixelAnimator.h>
const uint16_t PixelCount = 8; // make sure to set this to the number of pixels in your strip
const uint16_t PixelPin = 6; // make sure to set this to the correct pin, ignored for Esp8266
const uint16_t AnimCount = 1; // we only need one
const uint16_t TailLength = 6; // length of the tail, must be shorter than PixelCount
const float MaxLightness = 0.4f; // max lightness at the head of the tail (0.5f is full bright)
NeoGamma<NeoGammaTableMethod> colorGamma; // for any fade animations, best to correct gamma
NeoPixelBus<NeoGrbFeature, Neo800KbpsMethod> strip(PixelCount, PixelPin);
// for esp8266 omit the pin
//NeoPixelBus<NeoGrbFeature, Neo800KbpsMethod> strip(PixelCount);
NeoPixelAnimator animations(AnimCount); // NeoPixel animation management object
void SetRandomSeed()
{
uint32_t seed;
// random works best with a seed that can use 31 bits
// analogRead on a unconnected pin tends toward less than four bits
seed = analogRead(0);
delay(1);
for (int shifts = 3; shifts < 31; shifts += 3)
{
seed ^= analogRead(0) << shifts;
delay(1);
}
// Serial.println(seed);
randomSeed(seed);
}
void LoopAnimUpdate(const AnimationParam& param)
{
// wait for this animation to complete,
// we are using it as a timer of sorts
if (param.state == AnimationState_Completed)
{
// done, time to restart this position tracking animation/timer
animations.RestartAnimation(param.index);
// rotate the complete strip one pixel to the right on every update
strip.RotateRight(1);
}
}
void DrawTailPixels()
{
// using Hsl as it makes it easy to pick from similiar saturated colors
float hue = random(360) / 360.0f;
for (uint16_t index = 0; index < strip.PixelCount() && index <= TailLength; index++)
{
float lightness = index * MaxLightness / TailLength;
RgbColor color = HslColor(hue, 1.0f, lightness);
strip.SetPixelColor(index, colorGamma.Correct(color));
}
}
void setup()
{
strip.Begin();
strip.Show();
SetRandomSeed();
// Draw the tail that will be rotated through all the rest of the pixels
DrawTailPixels();
// we use the index 0 animation to time how often we rotate all the pixels
animations.StartAnimation(0, 66, LoopAnimUpdate);
}
void loop()
{
// this is all that is needed to keep it running
// and avoiding using delay() is always a good thing for
// any timing related routines
animations.UpdateAnimations();
strip.Show();
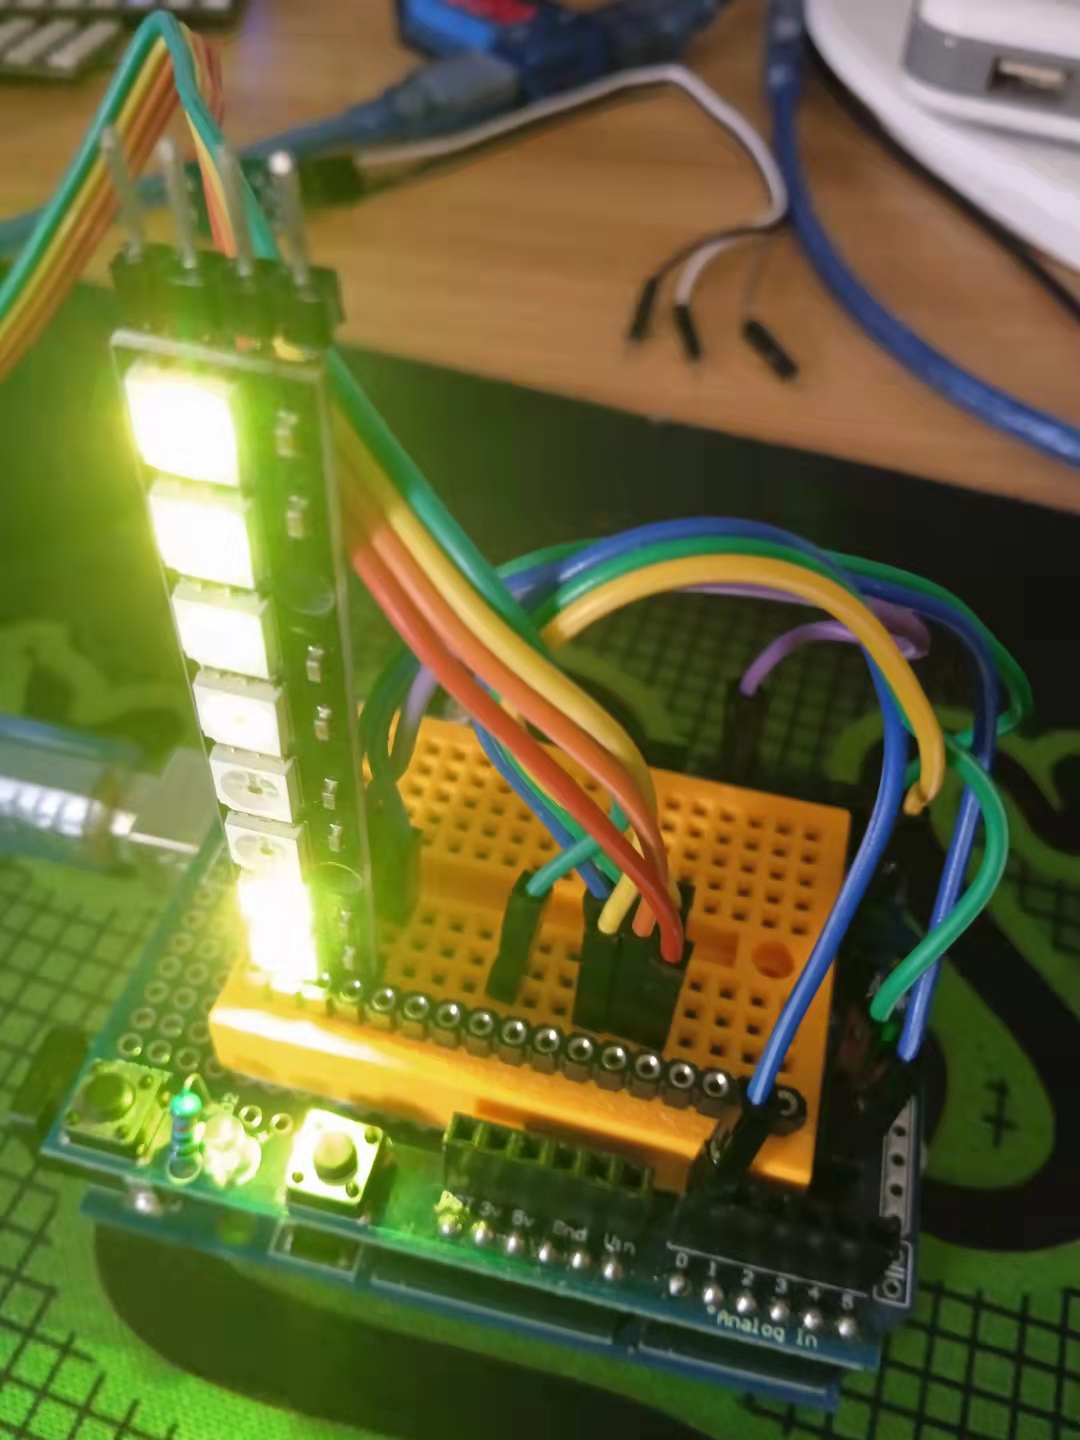
}Arduino实验场景图


 他的勋章
他的勋章

hacker_2023.07.25
666